In addition, this material has good heat and sound insulating properties. This allows it to be used as additional insulation on various objects. That is why it is classified as a group of so-called “warm” plasters.
Perlite plaster for facade work can be used to solve various problems. It is used to line the walls. Other structures are additionally insulated. They even use it to do the finishing touches.
It can be used for plastering bases made of different types of materials. Concrete, brick, wood “feel” well under a layer of such plaster if the application rules are followed. For walls made of foam concrete, this material is considered perhaps the most optimal choice.
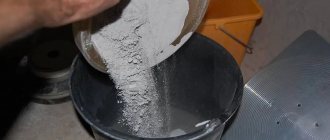
Components.
Perlite plaster contains three main groups of ingredients:
filler – porous material: perlite sand; it serves as a heat and sound insulator for the coating;
binder base - it usually consists of gypsum, cement, lime or a combination of them;
polymer additives to improve plasticity, increase water-repellent properties, improve air saturation of the solution.
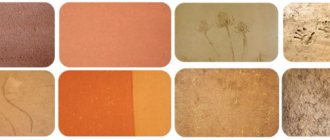
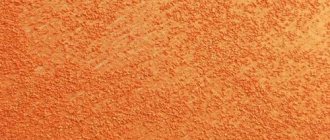
This is interesting: Perlite is a type of acidic volcanic glass, obsidian. Its structure resembles pearls. Outwardly, it looks like fairly coarse gray-white sand or small-diameter crushed stone.
In the manufacture of perlite plaster, the property of perlite, when heated to 1100 degrees Celsius, is used to increase its volume many times - to swell. The volume can increase 5–20 times.
As a result, the material is filled with a huge number of air bubbles. This gives a very low thermal conductivity, which explains the “warm” qualities of the plaster coating. Perlite is also added to mixtures for producing lightweight concrete, gypsum products and others. Large volumes of it are used for the production of plaster compositions.
The best brands
Perlite plasters are produced by almost all companies involved in the production of building mixtures. For example, the Teplon gypsum composition from Unis is of excellent quality, acquires a snow-white color after drying and is suitable for wallpapering and other types of finishing.
Extra Gips “Izo” plaster is also intended for indoor use, as it contains gypsum. It can be applied in a layer of up to 7 cm, and it sets in just 30 minutes. There are also perlite compositions on sale from Knauf, Perlitex, In-Tek, Gaia, Kwik-Mix, etc. All perlite-based mixtures have heat-insulating and noise-proof properties and are an excellent choice for houses and apartments.
Properties of thermal insulation plaster.
This plaster is distinguished by a number of features that make it a widely popular material for heat and sound insulation of buildings, mainly on the outside. The advantages of this mixture include:
- low density of the components of the solution - the finished coating is light, that is, the load on the supporting structures is reduced; you can make them lighter by laying out a less solid, cheaper foundation;
- non-flammability: material with perlite has a fire hazard class of NG;
- environmental Safety; Compared to some traditional insulators, the use of perlite plaster does not produce substances harmful to human health;
- ability to perform many functions: such material can be not only a heat-insulating, but also a decorative coating; it can be used as a finishing coating and as a means to level the surface of the wall;
- high thermal insulation qualities: according to experts, one layer of perlite plaster five centimeters thick protects against heat loss in the same way as a two-brick wall or four centimeters of insulation for plaster;
- ease of application: due to its good ductility, special skills are not required to make a coating from such a material;
- vapor permeability: this finish “breathes”, which has a beneficial effect on the health of people in a building insulated with perlite plaster; this ability prevents fungus and mold from multiplying;
- resistance to rapid temperature changes and precipitation; it can be used in damp areas;
- creates a smooth surface, without cracks;
An important point: this type of coating does not shrink at all, even if the plaster was applied more than eight centimeters thick and no plaster mesh was used.
Key Pros and Cons
Plaster for insulation is used quite often.
This is due to a number of advantages of this material:
- A 5-centimeter layer ensures heat retention like a one-brick wall;
- provides the required level of sound insulation for any room;
- does not burn upon contact with open fire;
- has low weight;
- shows a high degree of adhesion to the wall surface;
- made from completely environmentally friendly material;
- ease of installation.
Scope of application.
Perlite coating is used in buildings for a wide variety of purposes. It is used in industrial premises - for exterior and interior finishing. Apply in residential buildings. It is used to decorate basements and various fences. This plaster is in demand in agricultural buildings, as well as in the arrangement of individual houses. It can be applied to bases made of concrete, brick, metal mesh, or wood. The disadvantages of this coating include its high hygroscopicity. This dictates the need to use additional materials to protect it from moisture.
Filling the technological gap with a warm solution based on perlite.
Let us consider in detail why to fill the technological gap between the cladding and the Porotherm block with a solution based on perlite. And so, according to the Porotherm block laying technology, after the block is installed, the outer vertical seam must be carefully covered with mortar. Briefly, why this needs to be done, since masonry with a ceramic porous block is carried out with a groove-ridge, and the block may not have the correct geometric shape or the worker will not place the block close to each other, then at the place where the groove-ridge will be there is a gap, in other words gap. If you do not seal the vertical seam from the outside, but only plaster it from the inside, then closed convection will not work and the block will lose its thermal efficiency. In order to comply with the rules for laying a block, it was necessary to first raise the wall with a block, and then, when the seams were sealed, begin to lift the cladding. I do it the other way round, raise the lining by 2 - 3 rows of porotherm, then put the block down. This is convenient because you don’t have to install additional scaffolding for laying facing bricks, because both the scaffolding and the work on their construction cost money.
If you choose the most correct way to first lay the block then the cladding, then here are some tips for you:
- Place connections in the mortar joint of the block in advance so that you don’t have to drill anything later.
- Put the house under the roof and then finish it with cladding.
- Do not buy facing bricks in advance (it may begin to mold, there may be ants and they will drag soil there and the brick will be dirty, it will get wet in the rain and efflorescence will begin to appear on it).
- Leave the vent. the gap between the cladding and block 1 is 1.5 cm.
You may be wondering why I fill the gap with perlite mortar rather than regular mortar or leave it empty altogether? I decided to do this because the manufacturer recommends placing the ceramic porous POROTHERM block on a warm solution, and it is on perlite. I put POROTHERM 44 on a regular solution, but pouring those. I fill the gap with perlite mortar and close the vertical seams, additionally insulate the wall and remove cold bridges.
The composition of the mixture is perlite.
I made the pouring mixture as follows:
I took 2 buckets of M75 perlite for one batch, my bucket is 12 liters, a 130 liter concrete mixer, 1 bucket of sand, half a bucket of M500 cement, half a bucket of water, maybe more or less, and soap.
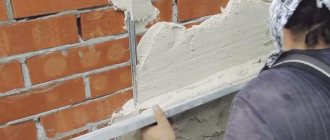
Now about the kneading process itself:
Pour water then, turn off the concrete mixer, set it with the hole at the top, carefully (perlite is very volatile), pour out two buckets of perlite, turn on the mixer and put it in the working position, turn for 7-9 minutes (perlite has this property, it first takes up water and begins to clump, then turns into mush) add water if necessary. After the slurry is obtained, fill a bucket of sand (do not mix with sand for a long time), the perlite is mixed with the sand, add cement and mix for no more than 2 minutes, it is no longer recommended that the perlite granules will be broken by the sand and the thermal efficiency will be lost.
xn--b1adqkjc0a.xn--p1ai
With my own hands.
You can make perlite plaster yourself. To do this you will need cement, perlite, water and a plasticizer. One part of cement is taken. Filler – four parts. Water is added until the desired consistency is obtained. Plasticizing additives, such as PVA glue, make up about one percent of the mixture. You can buy perlite and cement in the store. And as a plasticizer it is allowed to use ordinary water-soluble PVA glue.
- First, the glue must be diluted in a small amount of water.
- Then mix cement and perlite.
- Then add water to them, gradually pouring it in until you get a mass - thick, but at the same time plastic.
- The mixture should be allowed to brew for about fifteen minutes.
- Mix the composition again.
For example, for one cubic meter of perlite you will need about 375 kilograms of cement, about three hundred liters of water and 4 - 5 liters of PVA glue.
Expert advice: for large volumes of finishing, homemade perlite plaster will cost less than a ready-made factory mixture. A ton of M500 cement costs three to four thousand rubles. A bag of slaked lime weighing twenty kilograms - 170 rubles. A cubic meter of perlite - from one and a half to two thousand rubles.
Do it yourself
Warm plaster, which provides a fabric effect on the surface, may contain not only:
- lime;
- cement;
- gypsum;
- combination of materials.
In order to achieve improved quality characteristics, polymer ingredients are also used.
Attention! It is better to prepare a solution from one package, using the entire volume of material at once, otherwise you may encounter a violation of the proportions.
Stirring should be carried out until lumps can be eliminated. The mass should be homogeneous. The composition should be developed within 3 hours, after which it will begin to polymerize.
Four parts of filler will require part of cement and water. Liquid is added in the volume to achieve the desired consistency. PVA glue can act as a plasticizer. It is added in a volume of 1% of the total mass. First you need to combine the glue with water, and then mix the cement and sand. The dry mixture is then combined with the liquid and left for 15 minutes, but then mixed well again.
Factory products.
It is easier to purchase a factory solution, although somewhat more expensive. Its advantage lies in the precisely adjusted ratio of ingredients. In addition, special substances with water-repellent properties are added there. Such mixtures must be diluted with water, strictly following the manufacturer's instructions. This will allow you to achieve the desired result. Be sure to immediately prepare the entire composition from one package. This way the quality of the finished coating will be higher. The composition should be homogeneous, without dense inclusions. It must be used within two to three hours until the solution begins to harden.
Varieties
“Warm” plaster with perlite filler is distinguished by the type of binder used.
Cement based:
The use of a cement binder increases the durability and water resistance of the coating. This allows the use of cement-perlite plaster for the exterior finishing of walls of structures that are operated in areas of high humidity. The prepared solution is applied manually or mechanized (finishing occurs 5-6 times faster than by hand). Gaining the required strength lasts about a month, and the thermal insulation properties will be revealed within two months, when the perlite coating is completely dry.
It is advisable to make reinforcement using polypropylene fiber, since fiberglass in this composition will be destroyed by an alkaline environment.
Gypsum based
Gypsum plaster with perlite can be used both in dry heated rooms and in rooms with a small amount of moisture, which cannot be said about ordinary gypsum Start, and the expanded porous sand in the mixture will protect the wall structure from the appearance of unwanted microorganisms.
When making gypsum perlite plaster yourself at home, you will have to face the following difficulties:
- increasing the density of the solution due to the destruction of perlite grains during mixing;
- insufficient specific gravity required to ensure the specified thermal insulation properties;
- poor workability.
It is preferable to use a ready-made mixture, the composition of which has been developed and tested by specialists. Usually it contains additional modifying additives that increase the workability and service life of the solution.
Lime based
Lime plaster with perlite provides strong adhesion to porous mineral surfaces and is easy to rub off, so this composition is usually used when finishing walls made of aerated concrete blocks or various types of ceramics. This solution is a bactericidal and environmentally friendly product with a high antibacterial effect. To increase the strength of the coating, Portland cement is usually added to its composition.
To increase the plasticity of the solution, it is recommended to use the additive plasticizer C-3.
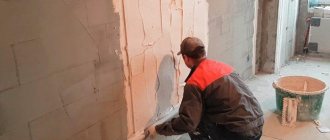
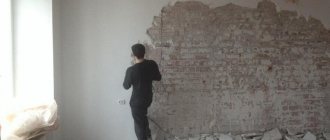
Finishing work.
Before applying perlite plaster to the wall, the surface for finishing is prepared. This happens according to the usual algorithm; there are no special recommendations here, except for cases where wooden surfaces are supposed to be finished.
An important point: if you plan to use the solution for plastering wood, you must first fill it with shingles. This will provide the plaster with good adhesion to the base, otherwise it will simply crumble very quickly.
When façade plastering is done on concrete and brick walls, they are first moistened with water. Before this, they are cleaned of dust, dirt, and all finishing materials that were on them before.
To achieve good adhesion, the surface is treated with a special primer. They lubricate the wall in several layers if the base for finishing is a wall with high absorbency. If there are cracks and potholes on the surface, they must be covered with a special plaster mixture.
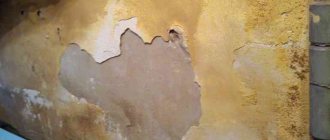
Preparing walls before application
You need to start working with plaster three days after completing the preparatory work. Contaminants, including dust, grease and flaking areas of old finishing, are removed from the walls. Contamination can be removed from concrete using hydrochloric acid, then the walls are washed with plain water. Sludges of solution are removed with a brush with metal bristles.
Attention! Preparing gas silicate before applying plaster involves wetting the surface.
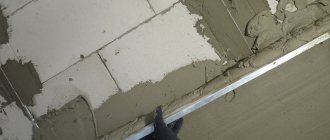
In the process of application.
You can work with it at temperatures from plus five degrees Celsius. Lower values may result in poor-quality coverage.
- Application is done using a spatula. Then the solution is leveled with pressure. For this, a grater or rule is used.
- It is recommended to make each layer of the mixture from 5 to 50 mm thick.
- If a thicker coating is needed, apply several layers.
- After the solution has set, it is trimmed using the rule.
- After two hours, you can polish the surface: take a sponge, moisten it in water and rub the coating with it.
- Painting the finished wall can be done after two to three days.
- The highest strength indicators are observed for this type of finishing composition after 28 days.
- The maximum thermal insulation characteristics of this plaster are formed after two months from the time it dries.
Common mistakes when working with perlite plaster for facades
Let's look at the main mistakes and ways to avoid them.
- Error: high speed of mixing the required mixture
Solution: when mixing the solution, you should monitor the rotation speed of the mixer or mortar mixer; its speed should not be higher than 600 rpm.
- Error: insufficient preparation of the base
Solution: the degree of adhesion of the coating, its further appearance and the final quality and durability depend on the preparation of the base for applying the plaster composition.
- Error: solution too thin
Solution: do not immediately pour out the entire recommended volume of liquid; add it little by little after the perlite begins to release it, while controlling the consistency.
Valuable question.
The cost of perlite plaster per sq.m varies depending on the brand and weight of the packaged mixture. The price ranges from approximately 215 to 230 rubles per 15 kg bag. Gypsum perlite plaster is usually sold packaged in 30 kilograms for about 300 rubles.
If a layer of perlite is laid out five centimeters thick, the consumption per “square” is about 8.5 kilograms.
That is, you need to pay about 100 - 150 rubles per m². Prices per square meter vary for different types and brands of perlite. Costs are also determined by the thickness of the final coating that is planned to be made. You can buy perlite plaster in regular finishing materials stores, and you can also order it online on the website. data-matched-content-ui-type=”image_stacked” data-matched-content-rows-num=”2″ data-matched-content-columns-num=”3″ data-ad-format=”autorelaxed”>
Material consumption
In preparation for plastering work, the need for basic materials is calculated. If the walls are smooth, the calculation is carried out only on their total area, the consumption rate per layer 10 mm high for an area of 1 sq.m, as well as the coating thickness accepted for insulation. The consumption varies for different ready-made SS (dry mixes). On average, approximately 9 kg/m2. When calculating the total volume of prepared mixtures, the resulting total is increased by the amount of unaccounted expenses (in reserve).
If the walls are uneven and require adjustment, then the volume of coating is calculated for each wall by determining the average layer thickness. To do this, 2–3 beacons are placed in one vertical plane (the surface of the future coating). The layer thickness (minimum and maximum) is measured at two to three points along each beacon. The measured values are summed up and divided by the number of measurements. By multiplying the resulting thickness by the area of the wall, the volume of the coating is obtained.
For building mixtures we choose perlite sand + Video
If you want warm floors, add perlite sand
In the domestic construction market, materials with the addition of perlite are found quite often, but, for the most part, in molded form. Meanwhile, abroad, perlite sand is added to various finishing compositions, including plasters . Such a filler gives building mixtures new properties, enhancing existing characteristics. Thus, with the help of perlite it is possible to obtain thermal insulation, acoustic compounds, fire-resistant coatings, and lightweight mortars.
Underfloor heating based on perlite is considered very effective. For its installation, hydrophobized perlite is used, the fractions of which do not exceed 6 millimeters. After laying the pipelines on the prepared surface, the sand is poured out of the bags and leveled with long slats, and the layer thickness should be 20% greater than the desired coating height.
If necessary, drainage pipes with a layer of kraft paper above them are also hidden under the sand (if the floor above the basement is not used as a base). Slabs, for example, made of aerated concrete, are laid on top of the backfill, then the floor is poured. For wooden flooring, compaction with slabs is not used; all voids between the joists are simply filled with perlite.
Expanded perlite sand, practical in all respects
Perhaps even earlier we should have mentioned such a property of perlite as non-flammability. And this is not surprising if you consider how expanded perlite sand is produced. It is made from volcanic glass by high-temperature (over 1000 degrees) firing, similar to basalt tiles, which have a similar origin.
Perlite-based refractory bricks are used for lining work, that is, for lining blast furnaces in the metallurgical industry. It is the remarkable fire-resistant properties of perlite that make it possible to obtain excellent heat-resistant building mixtures with its help.
The perlite filler in the plaster mortar can reduce its thermal conductivity by 50%, while 3 centimeters of the resulting finishing material will correspond to 15 centimeters of brick in terms of thermal insulation properties.
Perlite can be used as insulation not only in thermal insulation products, but also in its natural, bulk form. The best option is to fill the cavity between the load-bearing wall and the facing masonry, laid out with an indentation of 3-4 centimeters. The cavity is filled every 4 layers of brick, and perlite is poured in layers, followed by light tamping, which should lead to shrinkage by 10%. You can pour perlite directly from bags or using a sandblasting machine.
Mortars with perlite base
The reliability of building masonry is the key to the strength of a future building, no matter whether it is a good-quality country house or a residential apartment complex within a metropolis. And it is perlite that is able to provide this reliability. The composition is light, which has a positive effect on the overall massiveness of the building. It is best to use perlite-based mortars when laying foam concrete blocks or other types of lightweight bricks, since these building materials are closest in their characteristics to mortar.
With this combination of brick and mortar, the possibility of cold bridges will be completely eliminated. A properly made mortar after hardening has the following characteristics: density - about 650 kg/m3, tensile strength - over 1.7 N/m2, compressive strength - over 5 N/m2, thermal insulation properties - on average 0.2 W/ (m*K).
By the way, here is one of the options for such a solution: 1 part cement, 3 parts perlite, 2.2 parts sand, 1.5 parts water, 3 parts plasticizer (if necessary). As for the dry insulating backfill, its thermal conductivity corresponds to 0.04-0.05 W/(m*K). Expanded perlite, like other products of volcanic activity (such as tuff), both in solution and in a granular state, does not age at all and does not lose its properties, and is not damaged by rodents, insects or fungi.
ogodom.ru