Features and Benefits
Plaster serves to protect the wood from rotting, getting wet and drying out, and damage from wood-boring beetles. A wooden surface requires a competent and responsible approach to work. It is necessary to properly treat the base before applying the protective layer, to clean out any unevenness and roughness. It is also important that the material is dry, otherwise the coating will crack when it shrinks.
Among the advantages, we note that plaster is a plastic material, easy to apply, and dries quickly. Finishing materials adhere well to it, and it promotes good adhesion to the base. Good plaster mixtures have a fine consistency and form a thin layer.
It is recommended to plaster the wooden beams used to construct the floor of a house no earlier than a year after its construction. This is necessary to prevent cracking of the plaster when the walls shrink.
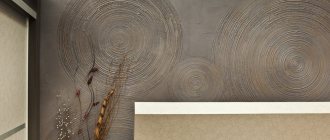
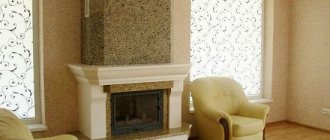
Combination of plaster and wood in the interior
This is a common technique for exterior decoration of houses. Often there is a combination of facades by floor: the bottom is plastered, the top is covered with a block house or clapboard. This option is appropriate if the property is built from different materials. And decorating rooms with plaster and natural wood is common if the owner seeks to emphasize his love for environmentally friendly, safe materials. Designers believe that wood fills rooms with comfort and tranquility.
More information on the topic is presented in the video:
Types and methods of application
Types of plaster are determined by several indicators. If we consider from the point of view of location, then it will be façade and interior. The first is used for finishing the outside of a wooden house, the interior - indoors. The facade forms a durable coating that is resistant to atmospheric influences. Plaster for interior work is more decorative and forms a thin, neat layer.
The following types of plaster should be distinguished:
- Ordinary.
- Decorative.
- Thermal insulation.
- Waterproofing.
- Sound-absorbing.
- Special compounds.
Each of them is designed for specific purposes. They decorate wooden structures, protect against cold, moisture and noise, and serve as fire protection.
Plaster does not adhere well to wood, so it is applied in three stages:
- Spray. The liquid mixture is sprayed onto the surface and leveled. This layer improves the adhesion of the base. It is made 10 mm thick.
- Priming. This is the main layer, with the help of which a smooth surface is achieved, bumps and depressions are smoothed out, making it completely flat. The thickness of the layer depends on the quality of the wooden surface and varies from 5 to 10 mm.
- Covering. A thin finishing layer that completes the preparation of the surface for decorative finishing or wallpapering. Thickness no more than 2 mm.
When plastering wooden surfaces, nets are laid under the plaster or a lattice of wooden slats is filled.
How to apply plaster
If you have not prepared the necessary set of tools and have not carried out preliminary work, then repairs will not be possible.
For the necessary work you should prepare:
- plaster mesh or shingles;
- mixing container;
- concrete mixer;
- shovel;
- rule;
- graters;
- lighthouses;
- brush;
- twine;
- level.
Types of plaster solutions
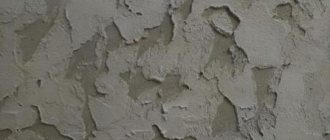
The main components of plaster mortars for wood are cement, gypsum, clay, sand and special additives. Mineral chips of various diameters are added to decorative plasters of the “Bark Beetle” type to obtain convolutions on the surface that imitate the passages of the bark beetle.
Let's look at the composition of ordinary plaster.
Cement-sand mortar
This plaster mixture contains cement and sand. For one part of cement, take 3-5 parts of sand. The ratio depends on the brand of cement. Here is the most commonly used ratio of cement and sand in cement-sand plaster:
| Cement brand | Amount of cement in shares | Amount of sand in fractions |
| M600 | 1 | 6 |
| M500 | 1 | 5 |
| M400 | 1 | 4 |
| M300 | 1 | 3 |
| M200 | 1 | 2,5 |
All components are thoroughly and gently mixed until the grains of sand turn gray. Subsequently, the mixture is sifted, removing particles larger than 2.5 mm. Then add water. This is done in small portions until the consistency of thick sour cream is obtained.
You can make the plaster mortar yourself, or you can buy it ready-made.
Important! By purchasing a ready-made mixture, we will receive a composition with the addition of plasticizers. This improves the quality of the solution and facilitates the work of applying plaster.
Cement-lime mortar
The best composition for the first layer directly on a wooden surface. Adheres reliably to the base and has good adhesion to wood. The result is a frost-resistant and water-resistant coating. Used for interior and exterior finishing works. Has the following composition:
- cement grade M300 – 1 share.;
- sand – 4 shares;
- slaked lime – 1 share.
It is better to use slaked lime, which can be purchased ready-made. Here it is important to choose the right quality one, otherwise cracks will appear on the plastered surface.
Lime-gypsum mortar
Consists of a mixture of gypsum powder and dry lime. First, lime dough is prepared. To its 4 parts add 1 part of gypsum. Gypsum dries in about 30 minutes, so it is prepared in small portions and used quickly. It is useless to dilute dried gypsum plaster with water; it will not give a good result.
Plastering wooden walls inside a house is the main use of lime-gypsum mortar; you just need to exclude rooms with high humidity.
Clay-based plaster mortar
Clay has been used for plastering wooden surfaces for a long time. Currently, the composition has been slightly changed; modern components are added to it for strength, for example, non-woven glue.
The following composition is used:
- clay – 3 parts;
- straw or sawdust - about a liter by volume;
- sand - 7 parts.
It’s good to add a liquid glue solution (the preparation method is indicated on its packaging). When decorating the outside of the house, add 1 part of cement. This plaster can be used in damp areas.
The plasticity of clay plaster is determined as follows: roll a 4 cm ball, squeeze it between two planes and observe its condition. The appearance of 3-4 shallow cracks indicates its readiness. If the ball crumbles, you need to add clay. If the ball wrinkles like plasticine, increase the amount of sand.
It is convenient to use ready-made plaster mixtures for work. They have an optimal composition, which is difficult to obtain on your own. The additives used in them make it possible to obtain breathable walls, while at the same time maintaining their moisture resistance and vapor permeability.
Advice! When choosing a plaster mixture, you need to consider what kind of substrate they can be applied to in order to provide a durable coating that will not peel off.
Is it possible and why to plaster wooden walls?
Modern building materials - cement, gypsum, lime, as well as various primers - have changed the idea of the technology of applying plaster mortar to the wall. But only for concrete, brick, aerated concrete and other artificial materials.
With regard to wooden houses, everything remains as it was many centuries ago - shingles are filled, and plaster is applied to it. Plastering wooden walls inside a house solves several problems at once:
- Wall surfaces are leveled for finishing (decorative plaster, wallpaper, paint);
- The house is insulated;
- The level of protection against penetration of various noises into the home increases;
- The fire resistance of the building increases;
- Wood is protected from:
- Rotting. Wood absorbs moisture well from the air and slowly releases it, which leads to natural decay processes, the results of which begin to be felt after 25-30 years of operation of the building. Plaster blocks the flow of air, and with it oxygen, to the walls and slows down or even stops this process;
- Fungal growth and mold growth;
- Damage from mice and rats;
- The appearance of colonies of termites and house ants.
Applying plaster to the facade of the building protects the logs from cracking as a result of drying out.
Tools and equipment for plastering work
Before starting the plastering process, it is necessary to equip the workplace. For ease of work, scaffolding, scaffolding or stepladders are used. Select equipment for preparing the plaster mixture: mixing tank, measuring containers - buckets or tanks of a certain volume. It is convenient to use an electric mixer; you can limit yourself to a drill with a special attachment.
Select a tool for applying plaster to the surface. They use spatulas of different sizes, graters and graters, a trowel, usually smoothers, mallets, a plumb line and level, and a tape measure.
Plastering walls with your own hands
In order for the process of plastering wooden walls with your own hands to be as correct and efficient as possible, you should study all the intricacies of the procedure and acquire all the necessary tools and carry out preparatory work.
To do the work yourself, you will need:
- special plaster mesh;
- any container for mixing the solution;
- trowel for application and distribution;
- rule for accuracy and evenness of application;
- as well as special beacons and a level.
Also, don’t forget about the twine and fly brush, which will also be useful to you during the work.
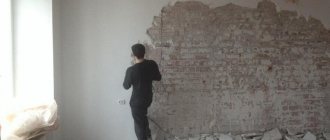
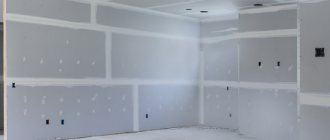
Surface preparation before plastering
Plastering wooden walls begins with preparing the base to ensure adhesion of the plaster layer to the wood. The easiest way is to make notches on wooden walls. They are applied at an angle of 450 with an ax to a depth of 1 cm.
Let's decide how to plaster a log wall. First you need to seal the depressions between the logs. To do this, use moss, tow or polyurethane foam. The surface is treated with an antiseptic to prevent the formation of fungus and mold. In wet rooms, foamed polyethylene film or a layer of roofing material is attached to wooden walls.
Significantly increases the strength of the plaster coating by applying wooden strips (shingles) to the wall. Modern technologies use reinforcing mesh, this is especially true if the walls are not level enough, and a thick layer of plaster is applied to achieve their horizontality.
To plaster the base of the house and its external walls, a metal mesh is used. It is attached to the wall with dowels; it must be well tensioned and not sag.
Instructions
To obtain high-quality coating, it is important to apply the right technology, adhere to the deadlines and sequence of the process. Here is an algorithm for how to plaster wooden surfaces:
- We fill in depressions, cracks and irregularities. This is important in order to prevent the possibility of moisture penetrating into the wooden structure. To do this, we use mineral wool, tow, moss or polyurethane foam.
- We fill shingles - wooden slats, make two layers, each at an angle of 450, resulting in a rhombic mesh. Instead of shingles, a reinforcing nylon mesh is used if the interior of a wooden house is being plastered, but for exterior work the mesh must be metal.
- We install beacons. This is necessary to visually assess the evenness of the coating. They are installed so as to obtain a layer 2 cm thick. We calculate the size from the top layer of shingles. We check the correct installation with a level.
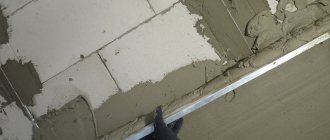
- We make the first layer - spray. We spray the wall with a liquid plaster solution containing PVA glue (0.2 l/10 l). Cover all defects of the wooden surface, level with the rule, leaving a layer thickness of 1 cm.
- We prime the surface without waiting for the previous layer to dry. The surface is made smooth, leveling out all irregularities. Layer thickness – 0.7 cm.
- Next, we apply the final plaster layer, which can be a finishing layer. Modern decorative plasters can imitate various surfaces in the form of stone, wood and others.
Tips and tricks
To avoid the appearance of defects in the finished finishing and to do all the work efficiently, you should follow a number of tips from professionals:
- use only reliable solutions and tools, do not skimp on their purchase;
- work in compliance with the temperature regime in the house and only in good weather outside;
- before application, check the color, texture, thickness of the plaster in an inconspicuous area, and only then proceed to processing the main area;
- apply subsequent layers of mortar after the previous ones have dried;
- carefully follow the procedure for preparing the base, do not ignore cleaning and degreasing the walls;
- To improve the quality of plaster, use quartz sand rather than river sand.
After the plaster has completely dried, it can be painted or treated with a shiny/matte varnish. It is recommended to use skirting boards or baguettes to cover joints. High-quality finishing of a wooden house will last a long time, will not deteriorate and will allow you to insulate the home, while not causing unnecessary financial costs, because it will be done with your own hands.
Drying plastered surfaces
Natural drying gives the best effect. This is especially important in the first three days after plastering is completed. Accelerating the process leads to uneven drying of the layers - the top layer dries out, but the bottom is still wet. This leads to cracks in the plaster.
The process of accelerating drying can begin on day 4-5. To do this, use additional heating of the room and provide ventilation. They increase the temperature inside the rooms by installing a heat gun and heating devices.
External plastered surfaces require special attention. They are affected by precipitation, solar heating and wind. To protect against these factors, a protective film is used to cover the facades with it.
Why does wood need plaster?
In order not to plaster the house after its construction, you can use special timber during construction, which is impregnated with chemicals at the production stage, which does not make it environmentally friendly. Such houses turn out to be more attractive in appearance. However, if timber that was not pre-treated was used for construction, then it will have to be plastered after completion of the work. This will protect the material from mold and rot, as well as damage from rodents and termites.
Features of plastering wood outside the house
Before determining how to plaster external walls, you need to take into account some features of this process. Basic operations are performed as for interior work, but some features should be clarified:
- external walls must be plastered after interior finishing work is completed;
- when multi-layer plastering of external walls, gypsum is added to the solution for the first layer to speed up drying;
- slaked lime in the plaster serves as an antiseptic against fungi and insects;
- plaster solutions for exterior use should not contain clay;
- If you add varnish to the finishing layer, you get a glossy surface.
For finishing plastering of facades, a more elastic composition is used. It serves for noise, hydro and thermal insulation of wooden surfaces. To give the outer surface of the house a beautiful, presentable appearance, types of plaster such as acrylic, silicate and silicone are used.
Technology: 5 steps
Regardless of whether you have to deal with a timber or frame house, finishing is carried out according to the same principles. Plaster does not stick to wood very well, and to prevent the layer from falling off under its own weight, it is necessary to create additional support. It is a mesh made of wood or metal. It also compensates for the slightest movements of the wall. For example, a building made of timber can take a long time to settle. Thanks to the lattice, the layer of plaster will maintain its integrity, even though it may move away from the base.
Requirements for work conditions
Wood constantly changes its size depending on the temperature and humidity conditions in which it is located. Those. applying hard coating is risky business. Our task is to minimize the risk of cracks in the plaster layer. Therefore, only ready-made frame buildings can be finished immediately - the walls in them do not bear the load, and therefore do not deform over time. Another situation is with new or reconstructed houses made of timber: before plastering work, the walls must shrink, during which the thickness of the crown joints will be reduced and the wall material will be compacted under load. This usually takes from a year to two, provided that the building box is not directly exposed to precipitation.
It is better to postpone work until the warm season. Heat, as well as cold, will negatively affect the adhesion of the plaster mortar to the wooden base and the quality of the finished coating. Optimal conditions: normal air humidity and temperature around 10-20 °C.
If we are talking about indoor work, then such finishing should be carried out in front of the façade, and the heating system should function in the cold season. It is impossible to purposefully use heaters for local drying of plastered walls - they must dry under normal conditions.
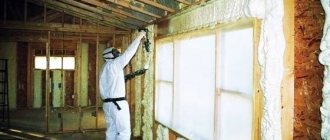
Preparing the base
Any foreign coatings reduce adhesion, so the wall must first be cleaned with a brush to remove dust, then, if necessary, with a solvent to remove stains of paint or varnish. If the base material has a glossy surface, then it is first sanded with coarse sandpaper. The cheapest way to improve adhesion involves applying notches to wooden walls. They are horizontal or at an angle of 45° cuts the width of the ax blade and a depth of up to 1 cm. However, a more reliable way is to use reinforcing metal or wooden mesh.
The video below shows an example of preparing a wooden surface for plastering work. Foamed polyethylene film is used as a damping material (since the work is carried out in a wet room), and a metal mesh is used to fix the plaster on the base.
There are situations when the geometry of a wooden structure does not allow full use of the capabilities of the factory metal mesh. In such situations, it is knitted directly on the base: nails are driven in at the required pitch and connected with wire.
If everything is more or less clear with steel mesh for plaster, then what about wooden mesh? In this case we are talking about the so-called shingles. It is a set of wooden slats up to 5 mm thick and up to 20 mm wide - nailed crosswise to the base, they form a spatial grid that perfectly holds the plaster mortar and protects the coating from cracking.
If you have a machine, then shingles can be produced “at home” from any coniferous wood without being affected by mold or rot.
How to use shingles:
- If work is carried out in a wet room, the base is additionally covered with a layer of waterproofing. This can be a roll or coating material. In other cases, the wooden surface is left untouched; To avoid cracking of the slats along the fibers, they are pre-moistened with water;
- First, the first layer of shingles is nailed onto the working surface. The slats are placed at an angle of 45° to the floor and nailed down in increments of 50-60 mm. For these purposes, you can use ordinary nails with a length exceeding the thickness of the shingles by 2 times. Our main task is to somehow grab the slats - because the fastening will be strengthened when installing the next layer of slats. Usually, each plank is fixed at two points along the edges, in a position - each element must be tensioned;
- The first layer is followed by the second, fixed at an angle of 90° to the one already nailed, in increments of 60-70 mm. It is recorded in more detail, because the nails will hold the entire lath system and the plaster on it. Usually one nail is enough for every 150 mm of board;
- It is better to install nails not in the middle of the width of the boards, but in a checkerboard pattern 1/3 from the edge. This minimizes the risk of cracks forming along the fibers;
- When building slats, they are not fastened end-to-end, but with a small gap, which, if something happens, compensates for changes in the geometry of the board. In fact, this is reinsurance, because... When humidity changes, the board changes in thickness, not length
After installing the mesh (grid), if necessary, install a beacon profile. That's it, now the base is immediately ready for plastering.
Application of the solution
To achieve the best effect, plastering is carried out in three stages, applying three layers:
- spray The layer thickness is up to 10 mm. This liquid plaster is applied in order to achieve maximum adhesion of subsequent layers. After it has set, the base is primed;
- priming. It is nothing but a basic plaster solution used to level a wooden wall. The layer thickness is 5-10 mm depending on the condition of the surface. After it has set, the coating is leveled with a layer of covering;
- cover. It is a layer of mortar for the final leveling of the plastered base. The thickness of the layer should not exceed 2 mm and when grouting or smoothing the surface, its required condition is achieved (for painting or wallpapering)
Finishing work
If the walls of a frame house were finished, then at the final stage you can use any solutions to give the coating a finished look. This can be decorative plaster, water- or organic-based paintwork, wallpapering, etc. In other cases, when an integral requirement is to maintain the vapor permeability of the walls, appropriate materials are used. As a rule, everything is limited to paper wallpaper. In addition to their decorative function, they easily hide the web of cracks that will inevitably appear on the plastered surface.
Leveling and insulation with plaster
In villages, log houses are often dealt with as follows:
- A lattice with a cell of 100×100 mm is knitted from wire with a diameter of 6-10 mm, which is nailed to the wall. For these purposes, you can also use a factory mesh with approximately the same dimensions;
- The next step is mixing homemade warm plaster. To do this, take clay, sawdust and straw, which are mixed in a ratio of 1 to 1 to 1. It is best to use a concrete mixer, because manually the process may take longer. Add water by eye, achieving a thick consistency of the solution. The plaster is applied in a layer up to 50 mm thick. The main thing is that the thickness of the layer above the reinforcing mesh does not exceed 30 mm, which can be fraught with the appearance of large cracks after the coating dries - minor ones are quite acceptable;
- Only after the plaster has dried, and this may take more than one day, is the surface further leveled with cement mortar. After the coating has dried, you can begin the final stages of finishing with vapor-permeable materials