Let's look at how to properly paint decorative stone yourself
Tools and materials:
- grinding tool and a set of special discs (for old stone);
- compressor or vacuum cleaner;
- special impregnation;
- brushes, roller or spray;
- primer;
- containers;
- sponges, rags;
- safety glasses, mask/respirator, gloves;
- varnish or paint;
- pigments;
- water;
- stirring stick.
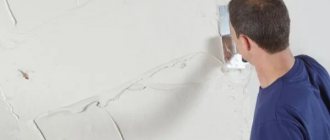
Preparing the stone surface
For new stone that has just been laid, the preparatory stage for painting goes much faster. It is enough just to wash the surface of the cladding, apply two or three layers of special impregnation and, after it dries, immediately proceed to painting.
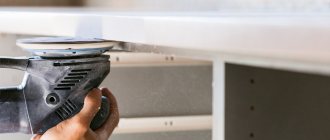
But if the cladding on the wall is old and there are noticeable defects, then you will have to work hard - grind and polish the stone. You cannot apply paint directly to an old, unpolished stone; it will simply crumble.
For home stone processing, special orbital grinders with micro-abrasive film-based sandpapers are usually used. An ordinary grinder with a suitable grinding wheel is also suitable for these purposes.
The essence of such work is that by gradually reducing the grain size, you can achieve a beautiful, smooth, even or sparkling base of stone tiles.
To begin, carefully remove the top operational layer of the stone (up to 2.0 mm) that has faded, become covered with stains, scratches, microcracks or other defects.
For primary stone processing, a coarser abrasive (P60-100) or an appropriate film disc, for example 3M 266L Hookit™, is used. Also good for working with stone are special diamond flexible discs - “Cheburashkas”. They are marked from No. 50, No. 100 - for starting work and further, to No. 3000 (the finest grind) and BUFF (for final polishing).
At the same time, in each cycle of work, try to move the grinder along the surface with the same forceful pressure, parallel to the surface, and you need to grind crosswise, and then also smooth the edges of each pass with circular movements. During the repair process, do not forget to clean or change the disks.
After removing the top layer, blow off the wall - carefully remove the dust using a vacuum cleaner or other compressor device, then rinse the stone. To remove sanding products, you can use special dust removal wipes.
Now polish the surface of the stone with fine-grained sandpaper - from P180 to P400 and above. This is necessary in order to remove possible irregularities that could spoil the painting. Depending on the type of stone, you may need several similar intermediate stages - from coarse to fine processing, with a gradual reduction in the grain size of the polishing.
Instead of polishing wheels for “jewelry” processing of stone, you can use special polishing pastes GOI or 3M Finesse-it™. In addition, they also remove sanding marks and minor defects.
Finally, remove the dust again and rinse the stone.
Painting stages
Painting artificial stone is not difficult: you can do without special tools and technologies. The gypsum texture masks minor defects in the material. The main thing is to properly dilute the composition.
Pay attention to: Shoe paint: products for leather, suede and nubuck
Preparing the stone
Careful preparation of the material is required before painting. Before painting, the part is inspected to ensure there are no defects. New stone is easier to process than old stone. Only wash, soak twice, dry, and apply dye. From old tiles:
- clean off the cracked layer of pigment;
- carefully polish the surface;
- remove remaining dust with a stream of air or a rag;
- impregnate with primer 2-3 times;
- dry thoroughly.
Typically, impregnation is chosen with antiseptic or water-repellent properties.
Coating
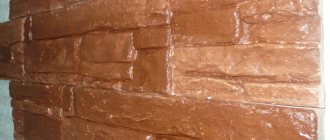
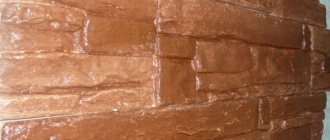
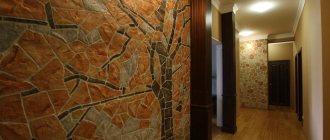
Decorative stone is painted in different ways - before and after facing. It depends on the experience of the performer and the amount of work. Painting the finished wall covering will immediately show the result. It is important to accurately calculate the ratio of light and shadow. You should not use more than two shades. Plaster often absorbs pigment differently and produces different tones in different areas. The most common processing method is adding dye to the gypsum mass. The stone turns out to be colored from the inside. The pigment on the wall stays stronger if the stone is impregnated with a primer before coating. After the background coating, darker shades are applied to individual areas to give an aging effect. After drying, the work is completed by applying a layer of varnish to the stone.
The result of coloring artificial stone
Recommendations for coloring
Proper painting of gypsum stone involves following simple rules:
- the parts are pre-dried for 1-2 days;
- the old material is sanded, otherwise the paint will fall off soon;
- impregnations are applied according to the instructions on the label - some solutions are applied before the painting procedure, certain types are not compatible with certain paints;
- To give the product shine, a varnish coating is added over the paint, but it is not always appropriate - due to this, the feeling of the naturalness of the stone is lost.
By following these tips, it becomes possible to protect the decorative stone from negative influences and corrosion, and the paint layer will last a long time.
Coloring option
It is considered the most practical and best way. In this case, coloring pigments in powder form, which are used for concrete, are added directly to the gypsum solution. Thus, you receive a product that is painted from the inside. When cutting or chipping, you will not see the white base.
Painting artificial gypsum stone with coloring pigments
A beige or yellow solution is best, and in polyurethane form, parts of the stones can be painted with liquid pigments using a brush.
- take ½ tsp. color (pigment);
- add 200 ml of water;
- add 200 ml of any acrylic primer.
When the stone has set, remove it from the mold and dry it, and after laying it on the surface, apply a matte water-based varnish to it.
This option for painting decorative gypsum stone is the most effective and almost all manufacturers use it. That’s why we can see these kinds of products in stores. The disadvantage of this method is the rough and unnatural painting, which can be observed at close range.
By making gypsum artificial stone yourself, you have the opportunity to work on naturalness by carefully painting parts of the stones in the mold. Of course, no one will do this on an industrial scale, otherwise the price will increase significantly.
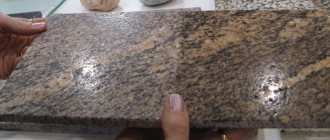
Below we will propose another painting technology that will help make a product from gypsum tiles that is more similar to natural stone. You will learn how to paint artificial stone so that it has the same natural veining and color scheme as natural stone.
Surface
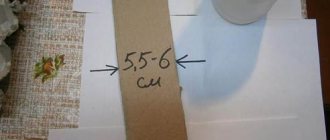
Tinting paint for artificial stone
The instructions are simple - you need:
- add a coloring pigment to the water, you can even add several at once;
- dip a brush into the solution;
- saturate gypsum tiles with it.
Artificial gypsum stone has unique properties of developing shades that are similar to natural ones due to the absorption of tinted water.
Tip: add 30-50% of the weight of any acrylic-based primer to water to give additional strength to the product after drying.
In order to give gypsum stone the desired shade and color, you do not need to have an artistic education. Dip the brush into the colored water and paint the stone as you see fit.
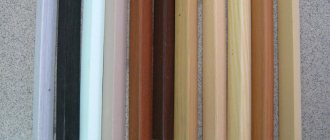
In the photo - paints for working with plaster
Then you can tint some with a dark solution consisting of color pigment and water. You shouldn’t think too much about the palette, since each gypsum tile, even with the same texture, will absorb the solution differently, which will allow you to create an individual pattern each time.
DIY decorative concrete painting
DIY painting of decorative printed stamped concrete
At the moment there are a lot of painting
DIY
decorative , including folk-handicraft ones, and there are many different types of paints for decorative stamped concrete, various types of dry powder dyes, ready-to-use water-based dyes, color concentrates diluted with water and acid paints to give concrete an effect antiquity.
We will look at several acceptable painting methods, both technological and folk, which were developed by the Slavic brains of the post-Soviet space and are constantly improving them. I want to say that some craftsmen paint concrete
with their own hands
no worse than advanced technologies and companies, and paints developed according to their recipes (one of which we will consider today) are ten times cheaper than popular brands.
Well, from the works of some other folk craftsmen, unfortunately, it is immediately clear that their work is a handicraft “homemade”! The reasons for the unpresentable appearance of this type of work on painting decorative stamped concrete will also be discussed below! Let's start with an elementary simple, cheap and cheerful folk method of painting printed concrete, which has shown itself well since 2008 and continues to please the eyes of customers! The methods presented below for painting
decorative
concrete with your own hands
are done the next day after drying. It is believed that for good quality
painting
(excluding acid dyes), it is desirable that the printed
concrete
be made on the basis of a mixture of white cement, adhering to the technology of decorative printed concrete, although most teams they use gray mixtures and the coloring result is no worse, so this is a controversial issue discussed on forums on decorative concrete. You decide.
Folk method Take a deep-penetrating water-based primer for mineral surfaces, preferably it also has an antifungal effect, tint it with coloring pigments for water-soluble paints and, if necessary, dilute with clean water, but without fanaticism, no more than 20-30% (unless, of course, the primer is not concentrate). For a more realistic resemblance to a natural stone, it is advisable to use coloring pigments of more natural shades or mix several colors, for example, a little brown + yellow + a little red or red, this is if you want to get a yellow stone and so that the color of our homemade coloring composition is not purely lemon , and with a slight admixture of another color, for example, it gave off a slight hint of red. If the primer is milky white, then the added pigments, when mixed with white color, already form a dirty shade, but only until the primer begins to dry, that is, the shade may change when drying, so you need to paint a small piece of decorative concrete, in in an inconspicuous place and look at the color after drying. It is better to measure the dyes with a syringe and add them to the primer, remembering the proportions so that, if necessary, you can select the desired color. Also, there should not be too much dye; the tinted primer should be translucent, otherwise its properties will deteriorate. After we have decided on the color, we move on to preparing the surface. We clean the surface of stamped concrete from dust, dirt, petroleum products, cement laitance, efflorescence and other materials that prevent the penetration of the active chemical components of our colored primer. Cleaning the surface of decorative concrete
done
with your own hands
using a hose with water, if necessary using a mechanical method (brush with metal bristles).
We apply a layer of our colored primer with a brush, roller or spray, depending on the porosity of the decorative printed concrete, and after drying, with a sponge moistened with a similar homemade coloring agent in other colors, individual fragments of stones that are printed on the printed concrete are impregnated. A good effect will be achieved if you spray our colored primer with a spray bottle and rub it with a sponge or rag. For this procedure, 2-3 different colors are enough. Thus, decorative concrete acquires the appearance identical to natural stone! Let me remind you again that you should first try painting the first layer on a small piece and wait until it dries completely, since some primers after drying can form a slippery dense film that will prevent the uniform natural spreading of primers of other colors over the first layer. If this happens, then you don’t need to wait for the first layer to dry completely, but only after drying it for a short time, paint the stone elements with a sponge using a similar primer, tinted with water-soluble pigments of other colors! After we have dealt with this stage, 2-3 layers of acrylic (water-based) varnish are applied to the entire painted surface of the decorative stamped concrete to acquire color saturation. You can use matte or glossy varnish if you want to achieve a wet effect on the stone. If the painting of
stamped
concrete
was carried out on external vertical surfaces, that is, a fence or the facade of a building, then it is necessary to cover the entire painted surface with UV-resistant façade acrylic varnish to protect the decorative stamped concrete from precipitation and premature fading of paints. As for unsuccessful
painting
using a homemade method (
do it yourself
), then the reasons may be different, from improper unnatural mixing of pigments, to violation of the technology of laying concrete on a vertical surface, especially when some sprinkle raw gray concrete with loose pigments before stamping, my personal opinion is that in addition to spraying expensive powder into the air Such painting is of little use, I advise you to choose a more acceptable option. Stone Essence works on a similar principle - a concentrated translucent water-based surface dye - an environmentally friendly alternative to acid dyes. The principle of operation of this dye is based on the introduction of pigments into the pores of concrete. Available in 20 standard colors, including 9 colors typical of acid dyes. All colors are ideal for both indoor and outdoor use. They can be mixed together to obtain a greater variety of shades. One 950ml bottle is diluted with water in a ratio of 1:3. When painting with a pump sprayer, it is enough for 15 m2. After application to the surface, the use of varnishes to protect the color is necessary. If you have the opportunity to purchase several different shades of such a concentrate, then you should not reinvent the wheel; Stone Essence dye has proven itself well in the USA and other countries, since it is environmentally friendly, unlike aggressive acid dyes.
Stain-Crete acid staining technology for concrete
A new direction in decorative concrete is painting concrete with an acid dye, which gives a wide range of options. Acid dye for concrete is an excellent means for treating the surface of concrete. It turns ordinary unpainted or painted concrete into a beautiful, unusual multi-colored surface. The dye reacts chemically with substances in the hardened concrete, resulting in the formation of uniquely colored, insoluble deposits within the pores of the concrete. It lightly etches the concrete surface, removing cement laitance. Increte Systems produces this kind of dyes in 8 different colors. Since the surface of concrete always has a heterogeneous chemical composition, the reaction accordingly occurs differently, which gives each concrete coating a unique ornament, and when several different colors are used simultaneously, a very unique marble effect is obtained. Surface preparation is standard, as described above. The color of the acid dye does not match the final color; being transparent when applied, it darkens when it reacts. Apply the acid dye solution to the surface while rubbing it in with a brush, evenly distributing it over the surface and rubbing it in. The dye solution must be washed until the hissing stops. When rubbing, the surface should be thoroughly and evenly soaked, but the liquid should not splash, drip, or form puddles in seam recesses and grooves unless required to achieve a particular color effect. Excessive dripping should be avoided. The dye solution must remain in contact with the concrete until the desired effect is achieved - a minimum of 4 hours. Apply additional layers in the same way, without removing any residue from the surface between applications. You can learn more about the capabilities of acid paints and the range of their applications in the article “Etching concrete with acid dyes”
You may be interested in similar pages: DIY decorative concrete Do-it-yourself top concrete Stamping on plasters Finishing stoves and fireplaces using stamping How to paint decorative concrete Etching concrete with acid dyes Stamps for concrete and plasters
Coloring rules
There are a number of rules that must be followed when working with artificial stone:
- Elements must be thoroughly dried according to technology.
- Store-bought materials should be aged at home. To achieve temperature conditions, 1-2 days are enough.
- Stones treated before painting should be polished.
- Impregnation should be applied according to the manufacturer's instructions. It is also important to consider their compatibility with coloring compounds.
It is worth considering: Varnishing a decorative stone made of gypsum to create shine is not always appropriate, as it creates a feeling of unnaturalness.
Materials and tools
In order for painting to go quickly and successfully, you must first prepare the tools required for the job. These include:
- sandpaper;
- rubberized sponge;
- cotton rag;
- spray gun;
- file for grinding;
- degreasing solution;
- brush;
- dye;
- compressor;
- suspension for impregnation.
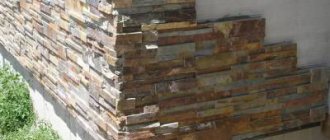
This decorative coating is often used to decorate landscapes or for finishing houses. Therefore, you need to carefully choose paint.
Tools needed
The choice of tool depends on the type of tile. To paint finished purchased parts you need a minimum of equipment. To process stones with old coating, the list of equipment is expanding. For successful work, prepare in advance:
- paint sprayer or airbrush;
- set of brushes;
- gloves;
- rubberized sponge for correcting and smoothing out imperfections;
- grinding tools;
- impregnation;
- degreasing composition;
- a vacuum cleaner to immediately remove dust and waste;
- a piece of fabric to correct imperfections.
Pay attention to: Painting the garage floor
Before painting, the decorative stone is prepared (the old layer is cleaned and treated with impregnation).
Sander
Airbrush
What kind of material
Gypsum stone is of artificial origin. With due patience and the availability of all the required materials, it is easy to make it yourself. The main component, as the name suggests, is gypsum, which is mixed with water. Additionally, surfactants, sand and a modifier are added to this mass. To give a certain shade, you can use pigments. Each company has its own recipe, which differs in the ratio of components, but the two main ones in the form of gypsum and water are always present. Gypsum stone can be designed to look like regular brick, tile or savage. Among the positive qualities of this finish are:
- pleasant appearance;
- light weight;
- the opportunity to implement a unique project;
- sufficient strength;
- ease of changing shape;
- additional sound and heat insulation;
- vapor permeability;
- environmental friendliness.
Paint selection
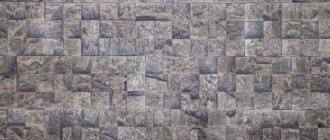
Decorative stone in the apartment
We are all used to bringing our interiors to excellence. And there are so many auxiliary little things for this that it would be a sin not to use them. Gypsum is also widely in demand in the finishing process. You need to paint a decorative stone made of gypsum where it looks out of place from the overall design of the room, and various methods are used for this.
The simplest thing is to open it with varnish, which will help shade the material. If you need to give the stone a rich color, then you need to paint it in no less than three layers. Gold powder paint looks very impressive, which, after diluting with water, is ready for application.
Acrylic paint will also allow you to create a finish with the desired effect. It fits perfectly on the material, especially if it has a bas-relief. In any case, for artificial material it is important to use only high-quality coloring compounds.
Brush or airbrush
What to use for painting - a brush or an airbrush? - this is a question asked by many novice masters. Both methods of conducting work can be applied. The advantage of an airbrush is that it sprays paint. The result is a uniformly and uniformly painted surface. By changing the distance from which the paint is applied, you can give the gypsum stone different shades. An airbrush is great for creating smooth transitions between shades and darkening raised areas. It is advisable to use several sprayers with different paints. This will speed up the work and allow you to get an unusually beautiful result.
There are different types of airbrushes available for sale. You can paint decorative stone with the most inexpensive airbrush - a spray gun. It is important to pay attention to the compressor when purchasing. The quality of applying the composition to the stone depends on it.
Using a brush results in the stone being painted unevenly. No matter how high-quality the brush is, drips and stains cannot be avoided. But it is indispensable for applying varnish to torn areas of cladding. You can slowly process each stone, enhance or, conversely, weaken the halftones, and decorate it with veins characteristic of natural stone. The technology is the simplest: dip the brush in the selected composition and paint.
The peculiarity of gypsum stone is that it absorbs dye unevenly. However, you should not be afraid of this, since the cladding turns out to be similar to natural stone.
Self-coloring: pros and cons
The main advantage of painting decorative stone with your own hands is the ability to choose the material and shades so that the lined surface harmonizes with your home interior design. The painted surface can imitate stone, wood or brickwork. It is possible to use several shades, smoothly transitioning from one to another. There is only one drawback: the work is painstaking, requires responsibility, creativity and, of course, the desire to do something on your own. Otherwise, you risk ruining everything.
Necessary tools for coating decorative stone
They will be needed not only for painting tiles, but also for preparing paints and varnishes. To obtain a homogeneous composition of the required consistency you need:
- drill or screwdriver with mixing attachment;
- measuring container;
- tray or bath.
Using an electric tool will allow you to prepare the paint with an even distribution of the dye throughout the volume. To paint gypsum stone yourself, you must have:
- set of brushes;
- spray gun with nozzles or airbrush;
- metal spatula or scraper.
Before starting work, any remaining adhesive, mortar and dirt are removed from the surface of the tile. After this, they are wiped or blown with air. Do not use a brush after cleaning tiles for painting. If the application of paint and varnish is carried out with a spray gun, then it should be placed at a distance of about 0.4 m from the surface to be painted. This will ensure an even layer without drips or sagging.
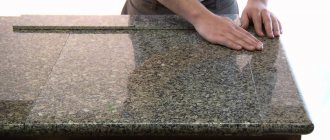
Installation of decorative gypsum tiles
Available with a relief pattern on the front side or smooth. Elements can be painted or stained, which is very practical during operation, and treated with water-repellent compounds. The tiles are easily cut with a tile cutter, a baguette saw, or a hacksaw for wood or metal. The grinder is not used for these purposes. The holes are cut with a drill. The edges are treated with medium sandpaper. A distinction is made between dry and wet installation:
- When dry, perform vertically on the surface, starting from the bottom. The elements are secured with self-tapping screws and bolts. A version with plastic locks is also available.
- When wet - perform horizontally on the surface.
The verticality and horizontality of the masonry is checked with a plumb line or laser level, a long ruler or plank. Before starting work, the surface is prepared: the old finish is removed, the glue or mortar from previous finishes is washed off, leveled and primed.
For large surface defects, drywall is used for leveling.
The adhesive composition is applied to the wall (with a volume of 3-5 elements) and to the back side. It is important that when applying the glue there are no air gaps left, otherwise the gypsum tile product will move away from the surface over time. Press it against the wall and use spacers for adjustment. A new row begins with an offset of half the element. The width, size of the joints and color scheme of the grout is an individual choice, depending on desire. The last stage of installation is cleaning the emerging glue and filling the joints. The seams are filled using special bags, syringes and carefully processed.