Peculiarities
- Epoxy grout, unlike conventional cement grout, is completely waterproof, stable in color, resistant to stains and can withstand contact with most acids and alkalis.
- In addition, epoxy tile grout has a service life of more than 50 years without changes. Over time, the seams do not begin to darken.
- On average, the mixtures allow them to be used to fill joints from 1 to 15 mm when tiling ceramic, porcelain, glass, marble, metal, clinker, porcelain stoneware, agglomerate, natural stone and even wood.
- Epoxy grout is best suited for those premises where high demands are placed on the resistance of the coating to aggressive chemicals: swimming pools, garages and car washes, laboratories, workshops. It can also be used for surfaces that come into contact with food: aprons, countertops.
- Epoxy grout can also be used as a tile adhesive. This is especially true when laying mosaics made of glass and metal, so that the color of the seams and glue does not differ.
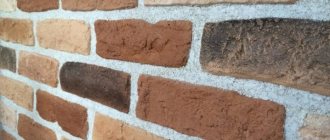
What mosaic looks like after grouting with epoxy mixture
But not everything is as rosy as we would like. There are also disadvantages:
- High price. In addition to the two-component grout itself, you need to buy a special solution to remove plaque. Imagine how much it will cost you to replace a defective element in a couple of years if you have to buy the same bucket to grout several joints.
- Difficulty at work. A technician without experience can easily ruin the entire result; if used incorrectly, the seams can turn out to be very rough and stains will remain on the surface of the tile. After application, the mixture cannot be leveled with a spatula, but only with a sponge, otherwise it will completely come out of the seam due to its elasticity.
- Rough surface. The epoxy grout itself has a surface similar to sandpaper - many people don’t like this. This is due to the coarse sand fraction, but in some species (for example, Mapei Kreapoxy) it is small and almost invisible. But this texture does not complicate the cleaning of seams from dirt.
Colors
Of course, color plays an important role and is one of the main parameters when choosing grout. It is provided by entering into the general composition immediately or by adding various pigments (dyes) during the mixing process, thanks to which the mixture can be black, white, or any other shade. This is also achieved by adding colored quartz sand and additional shiny components - glitters (for example, gold grout).
However, such diversity not only simplifies the design of the room, but also causes its own difficulties. If you can’t find the right shade, the manufacturer offers special dyes that are mixed with white grout.
There is also a completely transparent mixture that is perfect for working with stained glass windows.
Helpful tips when choosing grout color:
- Beige and pastel epoxy visually unites each tile into one seamless composition. But a dark-colored composition, on the contrary, is capable of visually dividing the wall into separate sections.
- For tiles that include three or more colors at once, or with complex patterns, the composition is selected according to the size of the workroom or surface itself. If the room is small, then the mixture should match the lightest tone, thus unifying the entire pattern. If the room is large, then the grout, on the contrary, corresponds to the darkest color.
- For single-color ceramic tiles, the mixture should be selected based on the colors that were used in the interior design. The grout should create a contrast with the topcoat, but not stand out from the background of the entire tile.
- If the facing tiles look like mosaics, then the mixture should be calm - beige or gray.
- If you can’t choose a suitable color, you can use standard white. However, if the tiles are flooring, then white grout cannot be applied, since over time it will lose its aesthetic appearance and will appear dirty gray.
- The original solution is to choose a mixture to match the furniture elements in the room, and not to match the tiles.
It is worth remembering that the bathroom should not use more than three different shades.
Advantages of epoxy grout
Note that polymer grout is much more expensive than conventional cement grout. The second drawback is the difficulty of cleaning the hardened composition from the front side of the tile or mosaic. Otherwise, grout has the same advantages:
- Seams filled with grout do not absorb dirt and dust. Cured “epoxy” resembles plastic in its properties. Even if dirt sticks to the surface of the seams, it will not be difficult to wash it off. You can use any household chemicals, even strong ones, or clean the seams with a wire brush. The main thing is not to damage the tile itself. This quality is of great importance when cleaning mosaics - the number of seams in this type of coating is an order of magnitude greater than in conventional tiles.
- Epoxy grout for tiles and mosaics does not change color when water or chemicals come into contact with its surface. This material, in principle, does not react in any way upon contact with them and does not absorb any compounds. For this reason, epoxy self-leveling floors, which are similar in formula to grout, are used in the construction of various laboratories and chemical industry enterprises.
- After hardening, epoxy grout does not change its technical characteristics throughout its service life. If you happen to dismantle tiles whose seams were sealed with epoxy grout, you will see that it is as strong as the ceramic itself, and sometimes even surpasses it.
If this is your first time working with this kind of grout, we recommend that you start working with seams in a small area. For example, experiment in the bathroom. The high viscosity of the material makes it difficult to apply grout into voids, but it is worth it.
Flaws
- high cost compared to others;
- short hardening period - you have to knead in small portions;
- Repairs can only be made by completely replacing the tiles;
- The job requires certain professional skills.
We can conclude that all the disadvantages are associated with the characteristics of this grout and its relatively high price. In all other indicators, it is far ahead of its competitors. The high cost is compensated by an unusually long service life without changing properties or appearance.
Sealing technology
For convenience, we will divide the process of sealing joints with epoxy grout for tiles into several successive stages. Before starting work, vacuum the seams, clean and degrease the surface. Next, follow the instructions.
- Mixing components Take epoxy resin with hardener and divide it into several portions. Be sure to ensure that the components are evenly distributed. If the consistency is incorrect, there is a possibility that the composition may not harden completely. This will most likely cause the seams to fail. The mixture must be mixed with a drill at a speed of no more than 300 rpm to prevent air bubbles from appearing in the mixture.
- Applying grout The technology for applying epoxy grout to tiles is practically no different from working with cement grout. Only in our case it is recommended to use a harder rubber spatula. If the area to be grouted is small, you can use your fingers instead of a spatula. This way you will do the job faster and more accurately. It is not necessary to use gloves, since the material practically does not stick to the skin. You can simply wet your fingers in water from time to time. You need to start filling with horizontal seams, and only then move on to vertical ones. To get the surface as even as possible, even when using a spatula, it is better to run your finger over the grout at the end.
- Cleaning the surface from grout The hardening of epoxy grout begins immediately after mixing it, so you need to wipe off excess grout from the tiles after application, and not after all work is completed. This can be done with warm water. If water doesn't help, use any cleaner, even dishwashing detergent. The main thing is to use colorless cleaning agents, since their dyes can affect the color of the grout that has not yet hardened. Remember that if you are late with cleaning, it will be very difficult to remove the material without damaging the tiles.
Scope of application of the composition
Grout based on epoxy resin is suitable for protecting the seams of tile coverings made of different materials: ceramics, clinker, porcelain stoneware, glass products, natural and artificial stone. Considering that this composition hardens quickly, and working with mosaics requires more time, it is better to choose a different type of mixture to cover this type.
If you use a material based on epoxy resin, it will be more difficult to clean the mosaic. It is necessary to remove contaminants from each product. In this case, the grout hardens quickly. You may not have time to remove stains from a large area of the surface.
Epoxy grout for tile joints can be used in different rooms: in the kitchen, bathroom, attic, swimming pool and even on the balcony. This material can withstand significant loads, so it is used for finishing floors, walls, and steps.
The recommended width of seam joints, which can be filled with epoxy resin-based joints, varies from 1 to 15 mm.
The material should be used not only in private housing, but also for the purpose of finishing industrial, commercial, and administrative buildings. More often, such compositions are used at larger facilities with high traffic. This is due to the fact that the epoxy mixture has increased strength. This means that it is not advisable to use it for private houses due to the inconsistency of the parameters with the operating conditions.
The material is suitable for installation of heated floors. It can withstand high temperatures. In addition, there is a lack of destructive processes during the expansion of the material.
Which grout is better - epoxy or cement?
There is a fairly widespread opinion that epoxy grout is an excellent alternative to cement mortars, which are relatively inexpensive but less effective under certain conditions.
First of all, it should be emphasized that the epoxy product has a much higher adhesion value, due to which the bond between the tiles is even several times stronger. The durability of epoxy grouts means that they are also used on stone tiles, as well as on industrial surfaces (such as in workshops and factories).
As already mentioned, epoxy grout is dirt-repellent and much more stable than cement grout. This means that you can successfully use it even in the garage. Moreover, it can also withstand higher temperatures, which is especially important in the kitchen. The width of the joints in the case of epoxy grout can reach even 1 mm, and the joint will still be extremely durable (this is especially important when laying so-called wide-format tiles).
Epoxy grout consumption.
Consumption can be determined using a formula or a ready-made table. The numbers do not differ from similar indicators for cement grouts.
Formula for determining the consumption of epoxy mixture.
On rough and patterned tiles, the consumption is higher and calculation is difficult. It all depends on the surface and accuracy during application. In such cases, economical consumption is facilitated by application with a gun (video in the playlist), and consumption is calculated based on the wiped area from one container.
How to seal seams with epoxy grout - step-by-step diagram
Step 1: Mix the ingredients
Do not rush to make a batch of the entire amount of epoxy resin and hardener. Divide the total amount into at least three servings. Be extremely careful and precise - if you mess up the proportions and add less hardener to the epoxy resin than you should, the mixture may not completely harden. This will subsequently lead to the destruction of the seams. Take the required amount of resin and hardener into a separate container and begin mixing. This should be done with a drill at low speeds - no more than 300 per minute, otherwise the mixture will become saturated with air bubbles.
Step 2: Apply grout to the seams
Epoxy-based grout is applied to the seams using the same technology as conventional cement grout. Unless the process uses a spatula made of harder rubber. If you are grouting a small amount of tile or mosaic, you can use your fingers instead of a spatula. This will turn out even faster and cleaner - fingers are a much more precise tool than a spatula. Epoxy resin does not stick to the skin much, so you can even do without gloves.
Choosing the right composition - how not to get confused in the variety?
Epoxy grout for tile joints has appeared on the market relatively recently - at first it was developed in production facilities, and when a choice of different colors appeared, ordinary consumers also paid attention to the material. Of all the brands, consumers identify only a few proven ones: Litokol, Mapei, Quick-Mix.
Epoxy resin and hardener are sold in two different buckets - purchase all components from the same manufacturer.
When opening a bucket of epoxy resin, many are frightened by its thick consistency - it seems that it has almost hardened and it is simply impossible to mix it. However, after adding the hardener, a polymerization reaction will begin, making mixing easier. However, epoxy grout, regardless of the manufacturer, is very viscous and will not be easy to work with. Especially if you intend to sand the mosaic seams.
When purchasing components, we recommend purchasing cleaning products as well. As a rule, grout manufacturers also offer cleaners. The tools you will need are a narrow spatula with a hard rubber tip, a convenient mixing container, an electric drill and a mortar mixing attachment with small blades, such as a pigtail attachment. The fact is that when mixing with a nozzle with a large number of blades, air bubbles may form, which make the grout structure uneven, reduce the brightness of the color and negatively affect the strength of the material.
Manufacturers
Several of the most famous foreign and domestic manufacturers:
- Litokol (Italy). The material is stored for two years at a temperature of +5°C. The temperature must not be allowed to drop, otherwise the components will become hard and lose all their properties. This manufacturer offers grout in 103 colors, including various additional effects. Suitable for both indoor and outdoor use. The price ranges from the smallest (1 kg) - 1300 rubles, the medium (2.5 kg) - 3500 rubles. up to the largest package (5 kg) – 4000 rubles. Positive qualities of the brand's products:
- No smell.
- Suitable for use in rooms with poor air ventilation.
- Easy to apply.
- High resistance to temperature changes and high humidity.
- Mapei Kerapoxy. The main difference between the products of this manufacturer is that the grout has minimal grain size. However, the range of products is limited: only 26 colors are presented. The manufacturer produces a grout of three components, which is even more resistant to acids and other aggressive chemicals. Price 3 kg – 3500 rub., 10 kg – 5600 rub.
- "Diamant" (Russia). The grout is available in an assortment of 46 colors. But it can only be used to treat the bathroom. Sold in packages of 2.5 kg - from 2000 to 5000 rubles.
- "Basic." The epoxy grout from this company is characterized by high resistance to temperature changes (from – 50 to + 75°C), elasticity, hydrophobic properties and is not prone to the development of fungus. The solution is usable within an hour. The grout is available in 29 colors, packing 2.5 kg - 2000 rubles. In general, it has all the properties that are characteristic of epoxy.
- "Fugue". The product has all the properties characteristic of epoxy grout. Suitable for processing both indoors and outdoors. The solution is usable within two hours. The material is available in 32 colors. The cost varies significantly, for example, in online stores you can purchase 2.5 kg of dry mixture for literally 2,000 rubles, while in retail stores the product will be much more expensive.
Whatever company the buyer chooses, when starting to work, it is necessary to read the instructions on the packaging and act on them.
Popular manufacturers
Grouts from Italian manufacturers are popular on the Russian market. One example is the Litokol , which offers mixtures of more than a hundred shades, suitable for outdoor use (for example, swimming pools), as well as for rooms with insufficient ventilation. The compositions can be stored, as well as the work itself, only at positive temperatures (from +5 degrees), otherwise they will lose their properties.
Another Italian product is Kerapoxy from Mapei . These grouts have almost no roughness characteristic of most products of this type, and they are very resistant to acids and reagents. But the color range is not as wide as that of the previous company - only 26 colors.
Among Russian manufacturers, we can note the brands “Osnovit”, “Fuga” and “Diamant” . The latest brand product is intended strictly for use in the bathroom and toilet. Available in 46 shades. Osnovit grout is distinguished by its high ductility and resistance to temperature changes over a wide range, withstanding values from -50 to +75 degrees. It is not contaminated with mold and mildew. But the brand has a small range of colors - only 29 tones.
Epoxy grout cost
Tips for use
When purchasing a mixture, you must rely on the following indicators:
- The time it takes for it to dry.
- Chemical resistance.
- Best before date.
- The volume of the packaging itself.
- Grout consumption per square meter.
- Seam sizes.
You can start processing the seams only 24 hours after the actual installation. The seams and surface of the tile must first be cleaned of excess glue.
If the tiles are light in color, then some problems may arise. Sometimes, at the cutting site, when grout mixture or any other liquid gets there, the edges darken. Therefore, 24 hours before work, you need to check the reaction of the tiles, and if the edges darken, protect them with masking tape.
Necessary tools and means:
- Epoxy grout.
- Drill with mixer for mixing the working mixture.
- Container with water.
- Grater with rubber sponge.
- Special cellulose sponge for removing grout.
- Spray bottle filled with water.
- Protective gloves.
- Mixing bucket (or basin).
- Scales.
- Any cleaning agent that is designed specifically for epoxy.
You can immediately purchase special cellulose sponges or synthetic rags from suppliers. The cost of sponges ranges from 500 to 600 rubles, while a rag costs about 150 rubles. Instead of a sponge, sometimes ordinary foam rubber is used. But it deteriorates quickly and picks up the grout a lot.
How to divorce?
The composition is sold in two packages (epoxy component and hardener), in which the substances are in the required proportion. To prepare the working composition, both packages just need to be mixed. However, the composition is operational for no more than an hour, so it is better to independently calculate the required number of components using scales and prepare the required amount of the mixture. It is worth considering that each grout requires its own proportion, so you must read the instructions before calculating.
Additional substances, for example, dye, are added to the finished mixture and mixed.
How to apply?
Instructions for applying epoxy grout yourself:
- Take a small amount of the mixture onto a spatula and rub it over the surface. It is more convenient if two people work: the first applies, the second immediately erodes the grout.
- We wet the sponge in a container of water and blur the seams, the main thing is not to reach the end of the seam. This is done in order not to wet the still dry, untreated tiles, since they must be dry.
- After cleaning the seams, take a new sponge, wet it with water and form them completely.
- Apply a layer of grout again and perform the same manipulations.
- The hardest part to rub is the inner corner. Therefore, it will be easier if you treat one corner first, and the other on the second day.
- To get perfect seams, after about 40 minutes, spray them with a spray bottle and lightly smooth them with your finger.
- If the floor finish has been treated, you should not move on it for the first couple of days, as some grouts can take four days to dry.
Final cleaning stage:
- At the end of the grouting process, a residue remains. But don't worry, it washes off quite easily.
- When painting work is carried out, the seams must be covered with masking tape, otherwise they will deteriorate when the paint is washed off.
- In order to remove plaque, mix epoxy grout cleaner with water, following the instructions.
- Spray the solution onto the wall and give it time to absorb, then wipe it with a lint-covered cloth.
- Then wash off the resulting foam. A self-squeezing mop will do this well.
- The final cleaning stage is carried out with a microfiber cloth.
- It is impossible to completely remove the grout; a thin sticky coating, similar to plastic, will still remain on the surface. White tiles need to be cleaned over a longer period of time to prevent them from becoming yellowish over time.
Preparatory stage
The first thing to do is to clean the tile joints from any remaining adhesive. They must be cleaned more than 2/3 deep.
Remember: no matter how strong epoxy grout is, it needs to hold onto something. Therefore, treat the preparation of seams with all responsibility.
The next step is mixing the mixture. First of all, carefully read the instructions included with the material. It is necessary to maintain the proportions precisely; it is impossible to “by eye”. If you add less hardener than required, the grout will leak from the seams. It will be very difficult to make a tile seam. Otherwise, if there is an excessive amount of hardener, the mixture will harden very quickly and you will not have time to wash the grout off the tile. Use a scale.
You need to mix in small doses - the epoxy quickly thickens under the influence of the hardener and it will be impossible to work with it. Mix the mixture with an electric drill and mixer at low speed. Otherwise, the composition may turn out to be saturated with air bubbles - the seam will turn out porous.
Technology of grouting joints with epoxy grout.
Epoxy grout is also called two-component grout. In a plastic bucket there are two compositions in separate packaging.
The filling process begins with preparing the mixture by mixing paste and liquid.
The first inconvenience lies in the preparation - the mixed composition hardens after 40 - 90 minutes (different manufacturers have different usage times). It begins to thicken even earlier and it becomes more difficult to work. Therefore, it is dangerous to completely mix the contents of the bucket. You have to divide the paste and catalyst in half, and in the absence of experience, even smaller doses. Some epoxy manufacturers have dispensing marks on their containers that you can use to guide you. But, basically, it is assumed that one batch (2 kg) will be made at once.
Divide the epoxy mixture into two batches.
Further, the technology for filling joints is no different from working with cement-based grouts. And the same tools are needed . The only thing is that some of them (cellulose-coated grater and foam sponges) become disposable.
Technology of filling joints with epoxy mixture.
The only thing the instructions pay attention to is the condition of the seam before filling. It must be dry, free of traces of cement and dust. It is also desirable that the seam be 2/3 empty.
Applying epoxy grout to seams
The technological process of filling joints is practically no different from working with cement-based materials. To make it easier, use a spatula made of harder rubber. Epoxy has a high density and it will be quite difficult to work with a regular spatula.
Tip: epoxy materials begin to polymerize immediately after mixing the components. Therefore, grout small areas at once - about 2.0 - 3.0 m2.
Consider one more feature of epoxy grout. It has very poor adhesion (stickiness) to wet surfaces. Therefore, when washing off the applied grout, try not to wet the adjacent unfilled seams. The easiest way to achieve this is to tape the seams adjacent to the area to be washed off with masking tape.
Removing excess grout from the surface
In this case, the process of removing excess must under no circumstances be postponed. No more than 5 minutes should pass between filling the seam and the start of removal - the epoxy thickens before your eyes and it will be very difficult or impossible to remove.
The most common method for removing fresh epoxy grout is with warm water. Wet the surface and use a brush with a fiber attachment to begin removing the epoxy from the surface. The next step is to wash off the residue with a cellulose sponge. Don’t forget to change the water more often without letting it cool down (keep the water temperature within 40°C).
After water treatment, streaks will remain on the tiles. It's OK. That's how it should be. It's still epoxy glue and it doesn't wash off completely with plain water. 24 hours after the first wash, it is necessary to wash off residual stains with special means. Every epoxy grout manufacturer also produces a grout cleaner. Apply the product to the surface of the grouted tiles and wait for 30 minutes. Read the instructions. After this, without using water, wipe thoroughly with a dry cloth. Remember that all work must be performed with rubber gloves.
Advice for beginners: despite the similarity of work with other types of grout, two-component grout has its own characteristics. Try rubbing a few test seams and only then proceed to the main ones.
Instructions for working with the composition
Before using the material, you must read the instructions very carefully. It is recommended to practice on an inconspicuous area, first diluting a small portion of the product.
You can also first work with ordinary cement grout - this will also allow you to gain certain skills. Prepare the epoxy mixture in small portions, working as quickly as possible, otherwise the composition will set in the container and deteriorate.
Materials and tools
To work with epoxy, you should definitely buy the following devices, consumables and tools:
- rubber spatula with a durable handle;
- cellulose sponge (can be replaced with foam rubber, but the latter soon fails);
- skipper (bucket with rollers for squeezing);
- a grater with a cellulose attachment for removing drips;
- latex gloves;
- Cleaning agent for tiles and glass.
To mix the grout, it is better to have a drill with a special mixer attachment. Mixing the mixture thoroughly by hand is much more difficult. To wipe the tiles, it is worth buying a cellulose sponge - it can easily handle up to 30 square meters. m of seams without losing appearance and properties.
Preparation of the solution
The two-component material requires preparation before application. Components A and B should be mixed strictly in the proportions indicated on the label. The ratio may vary between brands.
It is worth measuring no more than 300 g of the mixture, calculating the proportions and mixing. Weighing should be done on a kitchen scale - they are very accurate. If necessary, the color is added to the ready-made mass. We must remember that its vitality is no more than 30 - 60 minutes, so it is better to start working right away.
Rubbing seams
Before applying the tiles, the tiles must be dry, clean, and any remaining adhesive has been removed from the cracks. The crosses and leveling system are also removed. To reduce labor intensity, you can cover the edges of the tiles with paper tape. For mashing you will need a rubber spatula.
Operating procedure:
- apply the mixture with a spatula, carefully distribute it along the seams of the tile area;
- form joints, completely filling the seams;
- take a sponge, dip it in clean water, carefully wash out the seams (do not go all the way to the end of the seams, so as not to wet the unsanded area);
- after forming the seam, rinse the sponge again and wipe it clean (the grout will remain semi-liquid);
- After half an hour, when the joint has dried, you can spray it with water from a spray bottle and iron it again.
During work, large excess grout is removed immediately using a clean sponge or grater with a fiber attachment. After just 5 – 10 minutes it will be much more difficult to remove them.
Cleaning tiles
It is almost impossible to complete the job without deposits appearing on the tiles. You will have to clean it with special detergents (for example, Litonet for stains).
In order not to damage the formed seams, cleaning is done only after a day, not earlier. You will need a microfiber cloth or soft sponge. You need to wash off the plaque several times, periodically changing the water. Next, wipe the tiles dry. The contaminants will be completely washed off only during operation.
Possible mistakes
The most common mistake made by beginners is preparing grout without accurately measuring the proportions. You cannot prepare the material by eye; you must strictly follow the instructions. Otherwise, the mass will be spoiled.
Another possible mistake is leaving the grout on the tiles in the hope of removing it after the job is complete. The composition will have to be cleaned mechanically, because the material does not dissolve in water, and there is a high risk of damage to the tiles.
You should not work with epoxy mixture using conventional tools that were previously used for cement grout. You should purchase a special spatula and other tools, otherwise the application technique will become much more complicated.
Operation of epoxy grout joints
Remember right away - despite the quick ability to “set”, epoxy materials completely polymerize within 4-5 days. Until this time, it is undesirable to disturb them - the seams can be damaged, they cannot be corrected, only dismantling the tiles.
Further operation will not be difficult - epoxy seams do not fade or crack. They are not afraid of water - if they become superficially dirty, just rinse them. For decades, tile joints made from two-component grout retain their original freshness.
Possible errors
Before applying other types of mixtures, it is necessary to moisten the surface with water. This is done to increase the adhesion of the grout. However, when working with epoxy material, it is not recommended to wet the surface. Other errors:
- the proportions are violated during the preparation of the mixture;
- the wrong type of solvent is used; when choosing it, you need to pay attention to the manufacturer’s recommendations for the use of the material;
- To work with epoxy grout, the same tools are prepared as for cement compositions; as a result, it is more difficult to achieve the required quality of the coating.
Two-component grout
The main feature that makes two-component grout different from other types is its composition. The manufacturing process involves mixing two components - a hardener and a pigmented resin. The result is polymerization. And, although the price of epoxy grout is higher, the hardened structure does not allow liquid to pass through, is not destroyed when exposed to chemically active substances, and is almost not polluted during use.
Special properties allow the material to be used for filling joints indoors and outdoors:
- for finishing floor and wall coverings of bathrooms and toilets;
- for covering the work wall in the kitchen;
- when laying tiles on top of a “warm floor”;
- on tiles laid on the balcony, terrace, porch, sauna and swimming pool with regular or sea water;
- in catering establishments, offices, household and industrial premises.
Moscow epoxy grout can be used to seal joints between any types of tile materials - clinker, tiled, porcelain tiles, glass, stone and metal mosaics. One of the important criteria when choosing for a room is the correspondence of the shade to the finish and style of the interior. On the street it is enough that the material only fits the slabs.
To ensure that when purchasing two-component epoxy grout the price remains affordable and the quality remains high, you should contact. Here clients can take advantage of a huge range of offers and get help in choosing from experienced consultants. The reason for applying may be convenient payment terms, which can be made by transfer or cash, and delivery to any region of the country. In Moscow, the purchase will be delivered by the company's vehicle, in Russia - by road or rail transport of the carrier.