Why is grout needed?
Finishing the surface with tiles, which includes mosaics, tiles, and porcelain tiles, is a popular method. Due to the quality characteristics of the material: practicality, durability, moisture resistance, etc., it can serve for a long period. The cladding is unpretentious to cleaning, so it is easy to care for. However, if used incorrectly, all the advantages can be reduced to zero.
One of the main reasons for chipping and peeling of tiles is moisture. If wet particles penetrate the adhesive composition or the ends of the material, peeling from the base begins.
It is also worth taking into account the fact that apartments are heated, and moisture and heat are the most suitable environment for the spread of fungus, mold formation and the appearance of other harmful microorganisms.
To prevent the formation of a pathogenic environment and improve the performance of the material, apply moisture-resistant grout for joints, the so-called tile putty.
It is carried out with special solutions that are prepared independently or purchased ready-made. They differ in color, application, process technology, etc., but perform the same task.
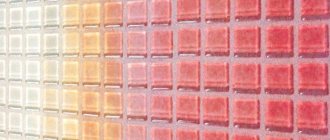
As a result, gaps disappear, tightness improves, and protective properties increase. The finish takes on a finished, pleasant look. It looks especially impressive when using high-quality colored grout for tiles (tiles)
Main functions of tile grout
The main tasks that grouting tiles on a floor or wall should perform are as follows:
- Protective. Prevent moisture from entering the ends of the material and the adhesive base, extending the service life of the cladding. Protect from fungal formations, the spread of mold and other pathogenic unwanted organisms.
- Decorative. A beautifully treated surface will emphasize the individuality of the owners, hide visible unevenness of the tiles, highlight the texture of the tiles and disguise defects obtained during installation.
How to calculate the required amount of grout
There are several ways to determine the amount of grout that will be needed for a particular room. The first method is mathematical, based on a special formula. It is necessary to add the length and width in mm, and then multiply, then the resulting values are divided by each other. The resulting number is based on the width of the tile joint, the thickness of the tile and the coefficient is 1.6. The result is measured in kg/m². It is recommended to increase the resulting number by 10% in case of unexpected losses.
The simplest method is an online construction calculator. You just need to enter the data and get the finished result.
Before starting work, you need to prepare your tools.
How to choose grout
Grouting tile joints is a special solution applied to the tile joints at the finishing stage of cladding. The main criteria by which professionals evaluate the mixture:
- homogeneous composition;
- elasticity of the material;
- type;
- price;
- color;
- manufacturer.
It is important that the composition is of high quality and meets the first two points: uniformity and elasticity. Then you can avoid lumps during application and it will be easy to work with.
The compositions can be very different by type (species), it all depends on the quality of the tiles and the financial capabilities of the owners.
Note!
Epoxy grout for tiles: pros and cons, scope, varieties, how to work with it (instructions + photos)
Do-it-yourself tile shower tray step by step: instructions, dimensions, design, installation of communications, types of structures, photos
White tiles in the bathroom: 170 photos of the best ideas and new tile designs. Layout schemes and beautiful combinations
The color of the grout of ceramic tiles depends on the preferences of the homeowners. You can choose a putty to match the tile, or you can play with contrast, i.e. choose a color different from the main background. For example, for a light cladding - a darker shade, and for a dark surface - white grout. A monochromatic mixture will suit patterned tiles. For example, for light blue - blue, and for purple - pink. The main thing is to choose a composition that is lighter than the main background of the cladding.
The price of silicone grout will differ from the cost of other types, so you can only determine the prices in the store. It also depends on the manufacturer.
For information! A high-quality composition should contain not only binding components, but also various impregnations, latex, additives, minerals and fillers that improve the performance characteristics of the mixture.
What should be the optimal seam width?
The appearance of the tile depends not only on the color or texture, but also on the width of the joints, which surround each element on all sides and affect the visual perception. The opinion that wide seams suppress the tiles is wrong.
On the contrary, too narrow seams interfere with full visual perception, and they are also dangerous from a functional point of view: grout hardly gets into them, so it is difficult to judge their integrity and tightness.
When calculating the width of the tile joints, take into account two important factors: ease of application of the solution and preservation of such properties of the grout as waterproofness and strength
The disadvantage of too wide seams is their weak resistance to external factors. The grout cracks, crumbles and requires constant updating. For this reason, sand is added to cement mixtures for wide joints. The average dimensions of the sides of bathroom tiles are from 10 to 33 cm, a suitable joint width is 3-4 mm.
Types of grout for tiles
There are different types or compositions of grouting tiles in the bathroom, kitchen or other rooms:
- Cement. It is clear that the main component is cement, and the additional components include color pigment and various additives. To prepare the solution, you will need to add water and mix everything thoroughly. The consistency should resemble thick sour cream. If you take dry grout, you can save money on it, since you don’t have to prepare everything at once. You can use the required amount for individual areas. If the seams are wide, then you cannot do without adding sand. Sand has excellent dispersion properties, is convenient to use and is inexpensive.
- Polymer. This includes silicone and silicate mixtures. Special polymer substances are added to the putty, thanks to which the composition is well applied, lasts a long time, and creates reliable dirt-repellent protection.
- Epoxy. The additional component is a hardener, and the base is resin (epoxy). The putty is not particularly popular, although it has excellent quality characteristics: it is easy to apply, dries quickly, creates a solid base and protects against moisture penetration. It can serve for a long time while maintaining its visual appeal.
The first option is the most popular and is often used. It is more profitable to take dry mixtures to save money. Grout consumption is indicated on the manufacturer's packaging.
Note!
Italian tiles for floors and walls: photos of beautiful tile designs in the bathroom and kitchen. Choosing tile color, style and size
Marble tiles for the bathroom: TOP-200 photos of original design, ideas for mixing and matching
Do-it-yourself tile shower step by step: instructions, algorithm of actions, dimensions, layout diagrams, photo of a shower with and without a tray
How to grout?
Many people say that most of the work is done the same way, regardless of the mixture chosen. Before you start, prepare everything you need:
- Individual protection means.
- Spatula (rubber).
- Roller.
- Container and sponge.
- Joining.
- A small brush.
- A piece of fabric.
- Plywood.
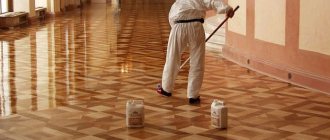
After this, grouting of the joints between the tiles begins. A small amount of the selected mass is placed on a spatula and applied to the area where the holes need to be filled. In this case, slight pressure occurs. It is better to immediately remove any excess that remains on the tile itself. Therefore, the spatula should be positioned completely perpendicular to the surface being treated. It turns out smooth and correct. When the entire surface is covered, you need to wait half an hour and then walk over the tiles with a damp sponge.
After this, we can consider that the entire process is completed. If you want, you can make the seams unusual and attractive by using a special shade of the mixture. Sometimes the surface looks beautiful if the seams are slightly recessed. The wall visually becomes embossed and unusual. Anyone can do this, take the same spatula, and use a corner to remove a small amount of grout from the seam, creating a depression. But this won’t work out very neatly. This requires a foam sponge. They pass it over the surface, and it takes on a smooth and beautiful appearance.
There are also surfaces on which any composition quickly sets. In such a situation, it is worth carrying out the work with a special bag so that nothing gets by. At the end there is a special nozzle from which the composition is uniformly supplied. The required diameter is selected, after which work begins. When cleaning tiles from grout, you need to rinse the sponge, otherwise you won’t be able to achieve cleanliness.
Step-by-step instruction
Each tiler has his own method of working with putty, but there is a general algorithm of actions that is used to correctly grout the joints on the tiles.
This is a step-by-step process that does not require special knowledge and skills, and therefore it will not be difficult to organize the grouting of the tiles with your own hands.
Stages of doing wet grouting with your own hands
The procedure consists of several stages. To carry out wet grouting, you will need a sponge and a suitable container for water. Before each use, the sponge must be thoroughly wrung out.
To carry out wet grouting, you will need a sponge and a suitable container for water.
How to apply grout correctly
The sponge is moistened in clean water and wrung out well. Treat the surface with it to remove traces of grout. It is recommended to make circular movements. These steps must be repeated along the entire perimeter of the cladding. To achieve the same appearance of the seams, you can use a screwdriver. It is recommended to ensure that no unevenness occurs when performing wet grouting.
It is recommended to make circular movements.
Final steps
Finally, use a soft cloth to give the seams a perfect look. After each wipe, be sure to rinse the cloth. The surface is thoroughly wiped and left for 15 minutes. Then the sealant is applied to the desired areas where the tiles and other elements of the room, such as the bathtub, meet. When the treatment is completed, you should not step on the tiles or seams for some time. How long to wait is indicated on the package.
Finally, use a soft cloth to give the seams a perfect look.
Tools
First you need to check the availability of the tools that will be required in the process.
- Construction drill-mixer for stirring.
- Rubber spatula for grouting (applying putty) tile joints. You may need several of them. They can be hard or softer, it all depends on the composition of the mixture. For example, working with epoxy grout requires a hard tool, but for polymer tile grout, a softer spatula will do.
- Container for preparing the mixture.
- A paint brush, solvent and knife are required at the surface preparation stage.
- Foam sponge.
- Rubber gloves to protect the skin of your hands, as well as a mask or respirator.
- A rag or any dry cloth to remove excess tile grout.
Making your own grout for joints
The packaging of the mixture contains instructions according to which it is necessary to prepare the grout. The quality of the solution depends on this. Begin adding the mixture to the water, stirring well. The grout must be poured in slowly. Stir until completely homogeneous consistency. Leave the mixture for a few minutes. The grout can be adjusted during the mixing process. If the mixture turns out thick, add water. The liquid mass is corrected by adding grout.
For mixing, it is recommended to use an oval-shaped plastic container that is deep enough.
Stir until completely homogeneous consistency.
Preparatory process
Before applying the putty, it is necessary to clean the surface from dust and dirt. To do this you will need:
- remove the fasteners that were installed when laying the tiles;
- get rid of the glue in the joints using a knife or spatula;
- Use a hard brush to remove debris from the gaps;
- Vacuum the joints, rinse well and let dry.
Some tips:
- Before buying grout for tiles, you need to read the instructions for use. Some compounds are best applied to damp surfaces for better adhesion, for example, two-component mixtures. Therefore, you need to know in advance how to use grout.
- To avoid damage to the cladding, you can replace sharp blades with a wooden stick.
- If the surface is porous, then the ends of the material can be covered with masking tape, which will protect it from the mixture. The solution can leave stains on porous tiles.
Important! It is advisable to grout or putty joints on tiles on the floor or walls after installation after 8-9, or even 24 hours. It all depends on the glue, or rather on the speed of its drying.
Note!
Mosaic from broken tiles: step-by-step instructions on how to lay it out with your own hands (140 photo ideas)
Mosaic for the bathroom: TOP-150 photos of new designs, as well as modern ideas for combining mosaic tiles
Do-it-yourself water heated floor under tiles step by step: installation instructions with photos and descriptions, installation and connection
How to grout tiles on the floor?
The following tools are prepared for work:
- rubber spatula;
- piece of cable;
- container for preparing the mixture.
The only materials you will need are the grout itself and a little water to wet the tiles. However, the liquid is used only if the seam joints of the tile covering are filled with a cement-based mixture. It is also necessary to prepare a cleaning agent, since some types of grout dry out instantly. This applies to epoxy mixtures. Polymer grout for joints does not set immediately.
Preparation
You can proceed to the next stage of work (applying a protective composition to the seam joints) no earlier than a day after the decorative coating has been laid on the floor. When necessary, they wait longer. It all depends on the type of glue used. Sometimes they move on to the next stage after a few days. If you quickly start finishing (grouting floor tiles), you can expect a deterioration in the quality of the decorative coating. In this case, the tile is displaced and pressed into the adhesive.
The process of rubbing seams begins with preparing the surface. It is necessary to remove cross-shaped beacons and excess mixture that was used to attach the decorative coating. To remove dust and small debris, use a broom or vacuum cleaner. If this is not done, the layer of grout used to process the joints will be uneven, with grains. It is not recommended to remove dust and debris using a hair dryer, since in this case the dirt will spread throughout the room and settle elsewhere.
Some people mistakenly believe that the cross-shaped beacons used during the installation of decorative material should not be removed at the stage of applying the grout. If you act according to this opinion, the fugue will dry unevenly. There will be light spots at the beacon installation points.
Laying tiles
Select an adhesive composition. This must be done taking into account the type of decorative material. The adhesive layer can be applied in two ways: only on the floor or on the floor and tiles. This depends on the dimensions of the products. The distance between them is adjusted using cross-shaped beacons. The solution is applied with a spatula. The direction of installation is determined by the configuration of the room. It is recommended to start such work from the corner of the room that will be visible after furnishing. The next step is to grout the floor tiles. Pre-prepare the tools and mixture.
How to make grout yourself?
The process of performing such work is simple, but requires attention to detail. Sequencing:
- Prepare a grout mixture for the joints of the floor tiles. It must be diluted in accordance with the manufacturer's instructions. Even the slightest deviation from the technology will lead to a change in consistency, which can result in the material losing its properties.
- If you do the finishing of seam joints yourself, you need to prepare a special tool - a rubber spatula. With its help, it will be possible to avoid deformation of the tile coating and fill the seams as much as possible. For large areas, a grout board is used.
- Cement, epoxy compounds and sealants are applied according to a similar principle. So, you need to use a little more mixture than necessary. Thanks to this, it becomes possible to fill pores and smallest cracks. To properly grout tiles, you need to be able to hold the tool. The spatula should be held at an angle. Its surface should be adjacent to the decorative coating across its entire width. Excess mixture will be removed by itself if you run a spatula along the edges of adjacent tiles. The coating must be wiped off immediately.
- The seams are being unstitched. To do this, use a piece of cable. It must be laid along the seam joint and pressed until it stops. This will remove excess mixture.
Before applying the cement mixture, the edges of the decorative coating are moistened with water. Before using resin-based grout, the tiles are treated with wax. Heat-resistant materials are selected for heated floors. To finish the self-leveling floor, you need to wait longer than a day.
Cleaning after application
Work begins some time after filling the seams. Just wait until the grout dries slightly. First, clean the areas that are more contaminated. In this case, a mechanical method is used. The dried grout is removed with a rubber or plastic spatula. Then they move on to wet cleaning. Use water, a soft sponge and detergents.
To more quickly remove the grout from the tile surface, special products are used. They are toxic, so you need to wear gloves when working. If, when applying grout, the coating becomes slightly dirty, use improvised means: soap solution, dishwashing liquid.
Preparing the mixture
You can skip this process if you buy a ready-made solution in the store. It is worth remembering that it cannot be stored for a long time, and the price is an order of magnitude higher than dry powders. If you purchased a dry mixture, you will have to prepare it yourself. To do this you need:
- Read the instructions and calculate the quantity.
- Dilute in the required proportions with water or hardener.
- Knead the “dough” using a drill with special attachments.
The prepared mixture must be used immediately, because its “life” is limited.
How to apply fugu
General recommendations for filling joints between tiles with grout mixture are as follows:
- The composition is diluted (if required) in accordance with the manufacturer's instructions.
- For application you will need a special spatula (plastic rubber) or a construction syringe (gun).
- The seams and edges of the tiles are cleaned of cement dust, glue, and dirt (they reduce the adhesion of the mixture to the tiles).
- The grout is tightly “implanted” inside the seam. It is necessary to ensure that the voids are filled completely.
- Excess cement fugue is removed with a spatula. To remove excess epoxy mixture, you will need a solvent.
- A few minutes after applying the mixture, go over the filled seam with a damp sponge - this also allows you to remove unnecessary volume of the fugue.
- When the grout dries, use a dry cloth to clean off the “grout” cement dust from the tiles. Then the tiles can be washed.
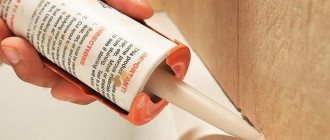
To enhance the moisture resistance of the fugue material, the dried seam is treated with special water-repellent impregnations. In order not to smear the tiles while filling the seams with the “grout” mixture, you can use masking tape. Adhesive paper tape is glued along the “grooves” between the tiles and removed after the fugue has dried.
Rules for applying the solution
A few rules that you need to know before grouting the seams on the tiles.
- Wait for the surface and adhesive to dry completely.
- Before application, you can treat the gaps with an antiseptic or antifungal primer solution.
- When working with floor tiles, use a wide spatula. The putty is applied diagonally.
- Work with tiles on the wall using a regular spatula. Gaps are filled from top to bottom.
- Place the grout mixture on the tip of a spatula and distribute the composition with slight pressure.
- If the gap is filled, the spatula will no longer be able to fit into the joint.
- After grouting the tiles, the seams are formed and expanded.
- Plastic compositions are leveled with a piece of cable wire with the appropriate diameter, and then the excess mass is removed.
After carrying out the work, it is necessary to clean the lining. It is better to remove the remains immediately before the mixture hardens. A foam sponge or a regular clean rag will do.
When carrying out restoration work with an old coating, you can completely process the gaps and remove the grout from the tile joints. Old cement grout is prone to cracking, so you need to know how to remove grout from tile joints carefully without damaging the tile.
It is better to sand the gaps, then thoroughly clean everything, rinse and dry. Only after this can you begin to apply fresh layers of putty.
Painting the seams is one of the restoration options.
To remove the old composition, it is necessary to use special means. The cleaner is applied to the old layer and wait until it softens, after which it is removed. Then let the surface dry and begin to putty.
In order for the cladding to last longer, you need to know how to grout tile joints correctly. The finishing stage is the most difficult, as it requires attentiveness and skill. Even professionals do not always manage to carry out high-quality, flawless grouting the first time.
Useful tips
There are some subtleties to this seemingly simple job. But if you do it yourself, you save a significant amount.
Optimal seam width
The impression of a tiled wall is determined not only by the quality and pattern of the tiles. Well-made seams and the right shade of pigment will only emphasize a well-executed styling.
You should not try to make the seams as narrow as possible; a narrow seam is difficult to fill with grout material.
Seams that are too wide are also bad. Excessive space between tiles weakens the structure's resistance to moisture and other external factors.
Wide seams are prone to cracking - therefore, cement-sand compositions are used for them.
If we talk about the bathroom, the standard distance between tiles is 3-4 mm.
How to prevent cracking?
Cement grout is most often susceptible to cracking. The reasons may be:
- solution too thin
- failure to comply with the required proportions when preparing the solution
- changes in the composition of the air before drying (if you started using the bathroom and turned on hot water)
- oscillating base (for example, when laying on wooden surfaces).
If cracks appear, you will have to immediately begin repair work to avoid dampening of the tiles and the appearance of mold.
In this case, the seams are cleaned and re-rubbed.
Cracks may appear directly during the application process - this means that the solution is liquid. In this case, you urgently need to rub dry grout powder into them.
The information on the packaging of the grout material may be useful; it usually states:
- rules for preparing the solution
- optimal seam width for a given material
- complete drying time.