Stone grout plays a decisive role in the aesthetic appeal and neatness of the finished finish. There is a wide range of materials such as artificial and natural stone, but the seams between the cladding elements are filled in the same ways.
All grouts for natural and artificial stone contain components that provide frost resistance and moisture resistance. When deciding which grout to use for stone, they are guided by the properties of each type of mixture.
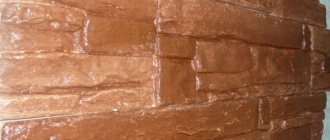
Grouting brickwork joints
Grouting is the application of a special additional layer to the surface between the bricks after they are laid.
This material is used for vertical or horizontal wall laying, after the excess mixture has been removed from the joints of each brick, but small irregularities remain. Grouting, or as it is also called jointing, is used precisely for such purposes. The brick laying turns out beautiful and even. The layer that will protect from moisture has increased tightness and strength. As a result, the service life of the structure increases. They try to carry out the jointing immediately after the construction has been completed. Of course, there are also cases when this work is done several years later. In this case, the wall has already absorbed a large amount of moisture and is gradually collapsing.
Grouting is done only on those walls on which plaster or cladding will not be applied in the future.
Care
Fairly simple care will extend the life of the decorative stone and maintain its attractiveness. To do this, it is enough to provide reliable protection from moisture, as well as regularly clean the surface.
Competent care
Decorative stone is an excellent option to make a building presentable and original both outside and inside. Its correct installation, careful grouting and basic care will allow you to obtain a high-quality finish that will retain its original appearance for many years.
Benefits of grout
The jointing is both decorative and practical.
Decorative properties include:
- emphasizing the texture of lines;
- highlighting the brick pattern;
- combining all the lines that were laid out both horizontally and vertically;
- giving the façade rigor and clarity.
The practical characteristics are as follows:
- sound insulation increases with jointing;
- it protects from excess moisture;
- heat is retained in the building;
- service life increases;
- tightness appears;
- small cracks close.
The grout covers the previous layer of cement, but in this way it is impossible to completely remove errors in the form of excess cement in the wall, its curvature and uneven masonry.
When is the best time to do jointing, and in what case should it be done? Jointing can only be done if the brick wall was built level. After all, each seam has the same standard thickness. Horizontally this number is from 10 to 15 mm, and vertically from 7 to 14 mm.
There are several well-known and common ways to make grout yourself. Let's look at some examples in more detail.
What are grouts made of?
Depending on the connecting element, there are different types of grout for decorative stone: epoxy, cement, latex. The materials also contain polymer additives that improve their properties. Depending on the main component, the grout can be:
- Plaster. The mixture is suitable for sealing joints between decorative stones indoors.
- Epoxy. It has a high level of moisture resistance. Thanks to special additives, it becomes immune to the effects of aggressive substances. This grout polymerizes quickly, so it is not easy to apply.
- Cement. It can be coarse-grained or fine-grained. The first type creates a pronounced textured surface. The composition looks natural. This material is prone to cracking, but the problem can be quickly eliminated. You should not use it to work with marble or glossy cladding.
- Polyurethane. The composition has a high price, but it is resistant to fading, moisture, and stains. Since the material does not dry very quickly, it is not difficult to work with.
- Silicone. It is elastic and provides a high level of tightness. Technical characteristics include resistance to negative temperatures and moisture.
- Latex. It has good adhesion parameters to the base, as it penetrates deep into the seam . No cracks have formed on it yet .
- Rubber. This type of grout is resistant to moisture and easy to apply. It is expensive, so finishing large areas is impractical. It is more suitable for interior walls of rooms where there is high humidity.
The technology for applying the material depends on the type of composition.
Filling joints on decorative bricks
Rubbing seams on decorative brick is no more difficult than on torn stone. The most convenient tool in this case will be a pistol. It is suitable for sealing joints between stones on any surface.
Work is carried out at positive air temperatures. If you fill the gaps at negative temperatures, the hardened mixture may subsequently collapse.
Possible options
There are several options for how to do the jointing. The visual effect that the wall will receive depends on the chosen method.
When working on the filling, you need to follow the sequence, starting first with the vertical seams, and then with the horizontal ones.
Special attention is not paid to the thickness of the seams. The indicator can vary from ten to fifteen millimeters for horizontal seams, and from eight to twelve for vertical ones. But most often you can find thin seams, four millimeters thick. This decision was driven by the desire to save on cement mixture. Also, the thickness of the seams depends on the worker’s approach to performing the procedure and climatic influence.
The process of finishing the seams is important regardless of the thickness, because a clear pattern will not only decorate the walls, but also increase the performance characteristics of the building. What methods exist to highlight brick seams?
Flush
This option is the easiest to implement. You can do jointing in this way even without a special tool. Filling mortar that protrudes beyond the brick or gets on it is removed with a trowel. After the main process, the seam is processed using a stiff brush.
Concave
This method requires a special narrow spatula. This small tool will fill the seams. For ease of working on all lines, the spatula should not be long. The cement mortar is removed from the masonry, as in the previous version, after which they go along the seam with a jointing tool. The grout solution is applied inside in the same way.
Convex
To work on jointing with a convex effect, you need an arched spatula. The tool is applied to the seam with the arc part facing outwards, the resulting space must be filled with mortar. Afterwards, the spatula is moved further to the untreated area and the construction mixture continues to be applied.
Rectangular
This option is more difficult to work with than the previous ones. First, you need to remove five millimeters of cement from the seam, even if it has already dried. After this, the gaps are filled with grout mixture. This design looks interesting, but experts do not recommend using this method for facade decoration due to poor drainage.
Beveled
This method is suitable for buildings that are being built in harsh climates. In this option, the mortar between the seams is not cut straight, but at an angle. The cutting angle should be sharp, 3-5 millimeters.
What needs to be prepared?
What is needed to start working on sealing joints in brickwork with your own hands? You won't need many materials. The first thing you need is a grouting solution, the creation of which is described a little below.
The second thing you need to get started is the tools that will be used to perform jointing and additional actions. You may need:
- spatula/trowel;
- construction mixer or attachment for a hammer drill;
- a sieve to sift sand;
- utensils for mixing materials;
- metal device - jointing.
The jointing must correspond to the size of the seam. If the horizontal and vertical lines are different sizes, you need to purchase two tools that match each. The list contains only the basic tools that are expected to be used. All devices may not be useful in all cases. For example, if you do not plan to create a figured seam, then the excess mortar can be immediately removed with a trowel.
Next you need to prepare how to seal the seams between the brickwork. To do this you need to mix a special mixture. The color is selected after the brick laying is completed. But you can first decide on the colors when selecting materials for construction. It is better to purchase materials that are in maximum harmony with each other and match the color scheme. It happens that an experiment with colors can look quite interesting; in the case of a designer approach, a contrasting grout is obtained. But this option needs to be selected more carefully. In the event that a suitable color could not be found, jointing of the joints can be done with a regular mixture of cement and sand. This is a win-win option, since the color of such a solution is in harmony with any others.
To prepare the solution that will be used for the work, the following materials are needed:
- high-quality cement - 4 parts;
- fine sand, purified – 2 parts;
- grout mixture;
- water.
The quantities of materials indicated are approximate. Based on these proportions, costs can be calculated. To prepare the mixture, you first need to sift the sand using fine force. This is done in order to remove debris or large pieces that will spoil the finished mixture and, accordingly, the appearance of the dried grout. One part of sand needs to be combined with two parts of dry cement, after which you can add a little water. Using a special mixer for construction, you need to mix the resulting mixture until a homogeneous mass is formed. After this, the grout mixture and the remaining water are added. All components must be mixed well together and allowed to stand. After the solution has infused and the liquid has been absorbed a little, the mixture must be stirred again.
Types of grout for stone
To grout the seams on the stone, you can use the material on which the decorative trim was attached. This could be glue or cement mortar.
Experts recommend purchasing a specialized product – grout. The nuances of the composition give special properties to the material, which increases its performance and strength characteristics.
Regardless of the type, all grouts for decorative stone must meet the following requirements:
- reliability;
- strong adhesion to the surface;
- frost resistance;
- resistance to ultraviolet radiation;
- elasticity.
Also important is the ease of wiping the composition off the surface of the stone. When selecting a mixture, it is necessary that it meets the criteria listed above.
According to the form of release, the mixtures are dry and wet. The latter are more convenient to use, since they are already ready for use. Dry formulations should be diluted in the correct proportion.
To grout decorative stone joints over a large area, it is better to purchase just such mixtures, since they can be diluted in the amount necessary so that the residues do not have time to harden. As for the shade, most manufacturers offer white grout. Gray and yellow are also common. Using a coloring pigment, you can easily give the mixture the desired color.
Types of plaster mixtures suitable for such finishing
Brick plaster in interior work can be implemented using the following compositions:
- Mortar based on sand and cement.
- Mixtures of lime and sand.
- Clay based solution.
- Gypsum plaster.
Brick plaster in interior work can be implemented using several compositions.
But, regardless of the main composition, the following can be introduced as additional elements:
Coloring pigments - thanks to this you can achieve a wide variety of shades and saturation of surfaces; Additives - they increase the resistance of the coating to various aggressive environments and the effects of water; Plasticizers make the material itself more flexible
Their addition is quite important, since in this case the surface does not crack, shrink or deform for a long period of time. Thanks to coloring pigments, you can achieve a wide variety of surfaces in shade and saturation.
Thanks to coloring pigments, you can achieve a wide variety of shades and saturation of surfaces.
Universal solutions
In addition to the best manufacturers, you can use universal tools from the RSS and Perel brands.
RSS
High quality grout mixture. Used for all cladding materials both indoors and outdoors. The composition of the mixture is thick, which allows it to be evenly distributed in the seams . Has the following properties:
- moisture resistant;
- withstands temperature changes;
- has a mineral composition.
Perel
The company's line is represented by many compositions with the following characteristics:
- resistant to temperatures;
- universal (for interior and exterior work);
- moisture resistant;
- suitable for syringe gun;
- multi-colored.
This composition belongs to the category of decorative, used to obtain premium surfaces of tile joints.
Fm quick mix
The line of this manufacturer is presented in 16 different shades, which makes it possible to choose the color that is most in harmony with the decorative stone. It is highly durable and absolutely safe for people.
A special feature of the mixture is the minimal use of water during dilution, compared to other types. In terms of its moisture resistance and frost resistance, it is not inferior to competitors and is suitable for both professional and household use.
Kiilto saumalaasti
This manufacturer offers a variety of color mixtures for decorative stone. Kiilto saumalaasti are made on a cement base with the addition of polymers, this gives special properties to the material.
The mixtures are very elastic, which simplifies the application process. They are easily washed off surfaces. It is important to strictly adhere to the dosage when diluting, and to use protective equipment, since the solution has alkaline properties. Suitable for sealing small seams - up to 6 mm.
Varieties
To fill the joints, different types of grout are used, suitable for the following building materials:
- gypsum tiles;
- red brick stone used for construction and cladding;
- paving stones;
- facing tiles;
- natural or artificial stone.
Conventional grouting is carried out with special waterproofing compounds or ordinary painting materials. For paving stones, a mixture containing concrete is used, the additional function of which is considered to be strong fixation of the elements.
For gypsum brick tiles, tiles and ceramics, grouts with the addition of polymers, latex and concrete are used.
Grouting is the final stage, with the help of which the seams are isolated and given an aesthetic appearance.
Preparatory activities
Joining can be carried out immediately after laying the brick or after erecting the walls. In the first case, the mason brings the masonry into proper shape after several rows have been completed and the mortar begins to set.
In the second case, when laying, the master leaves the outer part of the seam empty for subsequent filling with jointing mixture, and they begin refining the wall after a certain time has passed, necessary for complete shrinkage of the masonry.
Before restoring old masonry, it is necessary to remove the mortar from the joints to a depth of 15 mm and clean the wall from dust and dirt
Preparing the masonry is carried out in the following sequence:
- If it is necessary to update the cladding of an old wall, parts of the old jointing are removed from the seams to a depth of 10 - 15 mm. To avoid damaging the bricks, it is better to use a narrow wooden wedge and a hammer. If it is not possible to knock off parts of the frozen solution, use a chisel;
- Use improvised means to remove dust and dirt from the walls of the building;
- The seams are cleaned using a stiff brush or a high-pressure apparatus. This work should be carried out very carefully, since dirt and dust particles interfere with the adhesion of the jointing solution;
- After cleaning, the seams are moistened using a roller or soft brush and a bucket of water.
The preparation of the cement-sand mixture begins only after the surface has been completely prepared for the next stage, at which the jointing solution is prepared.
You can make the jointing mixture yourself or use a ready-made factory-made composition, which is sold dry. and in wet form. Since the solution is used for decorative purposes, concrete dyes can be added to it.
A concrete mixer will speed up the process of preparing the jointing mixture
If you prefer to do everything yourself, then to prepare the optimal mixture, take lime, sand and cement in a ratio of 1:10:1 and mix with water until the consistency of very thick sour cream is obtained. Remember that the composition remains mobile for up to 1.5–2 hours, so mix only the amount that you can use during this time.
If the mixture you receive is too liquid, you can remove excess moisture from it by placing dry red brick in a container with the solution for 1 - 2 minutes.
For large volumes of work and the presence of assistants, a concrete mixer will help speed up the process.
How to carry out work on old masonry?
Jointing can also be done on old masonry. This way it will be possible to improve the external design of the old building. This decoration method should be used if the cement between the seams begins to crumble, and this will lead to a violation of the thermal insulation properties of the building.
If grouting is done on stale masonry, then the first step is to remove some of the old cement. You need to remove a couple of millimeters. The old solution can also be partially removed using a special device, which will remove the excess using water pressure. After this, you can begin to work; apply the solution in the same way as when working with fresh masonry. You need to make sure that the mixture does not get on the vertical part of the bricks, as this may cause stains.
Preparing the solution
The color of the grouting solution is determined after the masonry is completely completed. But in general, you can choose the color scheme at the stage of choosing a brick. It is better to buy materials that match each other in color as closely as possible; they should be in harmony with each other, and not make you want to immediately look away from the wall of the house. But often designers experiment with a combination of two bright contrasting colors, and such experiments often look very impressive and beautiful.
Contrasting grout for seams
On a note! If the desired color was not available, then you can grout the seams with ordinary cement-sand mortar. In any case, it will look nice, as it has a grayish natural color that is in harmony with all other shades.
To prepare the mixture itself, which will be used to grout the joints on the brickwork, you will need the following components:
- high quality cement - 4 buckets;
- clean fine sand - 2 buckets;
- dry ready-mix for preparing grout mortar;
- clean water - about 6 liters.
Note: the volumes of materials are approximate, but will allow you to roughly calculate costs.
Cement-sand mortar
To prepare the solution, you need to carefully sift the sand using a fine sieve, removing large fractions and possible debris from it. One part of the entire sifted material must then be mixed with two parts of dry cement, after which a little water is added to this composition and everything is mixed to a thick mixture of uniform consistency with a construction mixer. Then the grout mixture and water are added, and everything is thoroughly mixed again.
The finished mixture should be allowed to brew. After the solution swells a little, having absorbed the liquid, it is mixed again. That's it, the solution is ready for use.
Quick Mix series VK 01 – Masonry mortar with route for facing bricks
Why gypsum tiles?
Tiles for interior finishing work are made from two types of materials: cement or gypsum based and synthetic bases, for example, polyurethane tiles. Gypsum is a kind of middle ground between clinker tiles (cement base) and tiles made of synthetic materials. Most often, gypsum tiles are chosen only because they have an excellent price, good durability and a wide variety of colors and textures, which is a significant advantage when decorating a room. Gypsum tiles have a very natural appearance of stone, so a wall decorated with a brick look with this material will look very natural, which will attract the attention of all guests.
How to apply grout and how it can be done
Grout for joints for decorative stone can be applied in various ways. The most popular technique is slurrying, as well as filling joints using a gun or spatula. Each of the listed methods has its own nuances and requires certain preparatory work.
Don't miss: How to Ground a Computer: Grounding the Computer Case
Application technique using a syringe gun
Grouting of natural and artificial decorative stone joints can be done using a gun or a cone-shaped bag. This method is very convenient to use and allows you to minimize surface contamination.
The technology involves performing a number of processes:
- thoroughly clean the seams with a stiff brush;
- moistening the seams to improve adhesion;
- preparing the solution according to the instructions (if a dry mixture is used);
- filling a syringe gun;
- performing jointing using a spatula or by hand (performed 15-20 minutes after applying the composition);
- removing excess grout from the decorative stone (this must be done before the mixture has completely hardened).
For more effective cleaning, you can pre-prime the façade surface.
Slurry method
On smooth and even tiles, the seam can be grouted using the slurry method. This technology allows you to obtain ideal seams with maximum adhesion to the side surface of the decorative stone. This type of grouting is much easier to perform, and cracking at the end of the procedure is practically eliminated. The only disadvantage of this option is the high consumption of grout mixture.
Sliming is performed according to the following algorithm:
- cleaning seams;
- moisturizing the entire surface of the decorative stone;
- applying grout over the entire facade, evenly filling the recesses;
- if necessary, apply an additional layer;
- smooth the mortar on the seams;
- Use a wet sponge diagonally to completely clean the surface of the decorative stone;
- Wipe the facade with a dry soft cloth.
An additional advantage of this type of grouting of decorative stone joints is that there is no need for subsequent jointing.
Spatula technique
An excellent option for filling the seams of decorative stone is to use a spatula. With its help, it ensures complete and uniform filling of the cracks, but it also has its drawbacks. Cleaning must be done before the mixture sets, so treatment should be carried out not on the entire surface, but in separate areas. This is especially true when working with embossed surfaces, where hardened grout can worsen the visual appeal of the facade.
To grout decorative stone joints with a spatula, it is necessary to carry out the following measures:
- prepare the mixture for work using a drill and mixer;
- thoroughly clean the cracks with stiff bristles;
- moisten cracks;
- Apply a small amount of mortar to the seams with a spatula;
- rub in the mixture, apply a second layer and rub in again;
- make jointing;
- Clean the wall surface from excess mixture.
After application, regardless of the chosen technology, it is necessary to provide it with protection from atmospheric influences.
Plastic film works best for this purpose. When covering the surface of decorative stone, care should be taken to ensure an adequate level of ventilation.
Tiling work
A very important point here is the time that will be allocated to complete the work. Since you are working with a composition that dries quickly, the entire work process must go quickly so that the glue does not have time to dry. You need to calculate the amount of composition when you dilute it, for 30-40 minutes of work, otherwise you will simply ruin the mixture and transfer the material.
The layer of adhesive must be calculated and applied so that it does not come out too much from the seams, otherwise it will be very difficult to remove it later. The laid layer of tiles is very difficult to clean from the hardened composition, therefore, if the mixture gets on the lining, then immediately remove it with a damp sponge or rag.
Before laying the tiles, you need to select all its details according to the required color and size, so that the texture is combined with nearby tile elements. To do this, divide the working surface into squares of 6-8 elements, so that later it will be easier to navigate in choosing the necessary elements for a given area.
You need to distribute elements according to their color and texture compatibility. That is, if you collect larger tiles in one place and smaller ones in another, you will get an extremely unaesthetic appearance that will irritate the eye with its irregularity. Therefore, lay out the gypsum elements on the floor, which will make up the first section. Select them according to size, placing a larger, taller one next to a small tile.
You need to apply a layer of adhesive to the degreased surface, but only to one of the areas so that it does not have time to harden. Now lay the tiles on the wall in exactly the same way as you previously laid them out on the floor. Try to keep the distance between parts about 1 centimeter, but if the elements simply need to be placed at a closer distance, then nothing bad will happen. There are materials and masonry in which you need to make a seam of only half a centimeter.
How to wash?
If during work the excess was not removed or it was not possible to keep the lining from contact with the grout, then it will not be easy to erase it.
Excess grout must be removed immediately after applying the joint. The cement mortar is removed with rags or hard rags. For other surfaces, a clean cloth dampened with warm water will do. You need to clean with light pressure and circular movements . Then the facing stone will not deteriorate and the design will not be erased from it. The cloth needs to be changed and washed periodically.
Grout for decorative gypsum stone can be made independently or a ready-made mixture can be selected. It can be either dry or ready-made (sold in syringes). Each package contains instructions for preparation; the master can only determine the method of suturing. When working, you should get rid of excess grout on stones immediately, otherwise they will harden and will have to be washed off for a long time.
Tips and secrets
And finally, a few tips and secrets that will help improve the quality of the work performed.
- The sand must be sifted through a sieve so that no large inclusions remain in it. Otherwise, they may ruin the appearance of the grout.
- There is no need to rush to work with the newly mixed solution. You need to let it brew a little.
- During the work, the brick is protected from the mixture getting on it. By the way, when laying bricks, it is better if the mortar does not completely fill the gap on the front side of the wall.
Decorative seams - If concave grout is done, then you can fill both horizontal and vertical joints at the same time. If it is convex, then first vertical, then horizontal.
- After completion of work, the remaining solution is removed immediately.
- You need to work with the mixture as quickly and carefully as possible, because it dries in a short time. But at the same time, it is important to seal the seams carefully and without mistakes, because after drying it will be difficult to simply fix them.
- To obtain a specific color, tints are purchased.
- It is important to carry out work in cloudy but dry weather.
- You can make the jointing yourself from any dense metal product, for example, from a knife.
Grouting errors
Grouting brickwork joints is one of the most durable ways to decorate the appearance of a brick facade wall. It looks very impressive, and all the work is easy to do yourself, without the help of specialists. And this is undoubtedly a huge plus.
Saving Tips
Treating a seam with grout is not always cost-effective, since some compounds are expensive. However, you can save money. To do this you need:
- Calculate exactly how much material is needed.
- If the joints are wide, it is better to use a rubber spatula. With its help, excess mortar can be collected and compacted into the seam.
- It is not always worth buying colored compounds. It’s cheaper to buy a white solution and a color for it
Joints must be filled carefully, so adherence to technology is mandatory.
Expert recommendations
To ensure that no defects or errors occur during the work, you need to read the recommendations from the craftsmen.
- When preparing the grout composition yourself, it is necessary to use sifted components so that they do not contain large fractions.
- After preparing the solution, it should be allowed to sit for 10–15 minutes and then mixed again to improve plasticity.
- When grouting, you should avoid applying the mortar to the bricks.
- If the solution gets on the decorative finish, it must be removed immediately, preventing it from drying out.
SNiP indicates that the thickness of the seam should be up to 1 cm, and therefore it is recommended to make small gaps between the bricks themselves, adjusting the size depending on the climatic conditions at the work site. There is no need to start grouting joints on hot days, as the solution will quickly harden, which can lead to disruption of the technological process. You should also avoid carrying out work in wet weather. The solution must be mixed in small portions in order to quickly produce it and not allow it to harden.
As you can see, grouting is a responsible but effective way to improve the appearance of a ceramic or other coating after finishing work, and it will also make it possible to create a complete finish. Professionally applied grout will improve the appearance of the base and protect the wall from damage. In addition, it will increase the thermal insulation properties of the masonry, which will allow it to stand for a long time and not require annual repairs. To do this, you just need to complete all the work according to the recommendations and written rules.
You can see an example of grouting joints in the video below.
Care
Most grouts on the market today are resistant to stains and dirt, but the joints must be cleaned periodically. This will help preserve their decorative function and color. Before sealing joints, you need to think through the roof structure, drainage system and blind area. This will protect the facade from water ingress.
Sources:
- https://stroy-podskazka.ru/kirpich/zatirku-shvov/
- https://strir.ru/vnutren-otdelka/dekorativnyi-kamen/zatirka-shvov
- https://stenaexpert.ru/vozvedenie/kirpich/zatirka-shvov-kirpichnoj-kladki
- https://1pofasady.ru/dekor/kak-zateret-shvy-na-dekorativnom-kamne
- https://okcomfort.com/steny/decorativnii-kamen/zatirka-iz-gipsa.html
- https://www.navesfasad.ru/remont/zatirka-svov-dekorativnogo-kirpica.html
- https://fasad-exp.ru/vidy-materialov-dlya-otdelki-fasadov/kirpich/zatirka-shvov-kirpichnoy-kladki.html
- https://stroy-podskazka.ru/kirpich/dekorativnyj-zatirka-shvov/