Tile
Not all tiles are suitable for the stove! You need to choose a material that will have heat-resistant properties.
They usually use glazed, terracotta, porcelain stoneware. Tile is strictly prohibited, since it does not adhere to the brick due to the difference in expansion when heated. Tiles are a universal choice, since you can choose different patterns, textures, and surface types. Some types of work can even be done independently, without involving a specialist, since it is simply installed on various surfaces.
Required materials and tools
Before you begin to line the stove yourself, you need to prepare all the materials and tools. Depending on the facing material, fastening materials and tools are selected.
Among the tools for tiling, it is advisable to take:
- Master OK;
- spatulas made of different materials (rubber, metal) and different sizes;
- measuring instruments (ruler, centimeter, plumb line, level, etc.);
- devices for cutting tiles, grinder;
- rule;
- a drill with a special attachment for stirring the solution;
- rubber or wooden hammer;
- shovel;
- container for solution;
- metal brush;
- brush.
Materials needed for tiling with ceramic tiles:
- special composition for gluing;
- grout for seams;
- the tile itself;
- Rabitz.
Facing brick
Kiln facing brick is a fairly heavy and expensive material. The masons who will do the façade masonry also have to pay a lot.
Before starting brick cladding, make sure that the stove has a solid reinforced foundation.
Brick cladding is perhaps the best option if it is possible to make a foundation. It's easy to do and the effect will be amazing. This is a reliable and durable design that will last for many years.
Why does a stove need a lining?
A simple oven is a structure made of red burnt brick. In order for the house to warm up well, the stove should be installed in the central part of the heated room. Since such a structure is bulky, various techniques are used to combine it more harmoniously with the overall interior of the room, and various methods of decorating the stove with finishing materials are also used.
Even the most neatly laid out stove, painted with ordinary paint, will not look aesthetically pleasing if it is not decorated
In addition to its aesthetic function, cladding also has practical benefits. So, in most Russian baths, the stoves are made of metal - it is heat-resistant and durable. However, a furnace consisting entirely of metal has a number of disadvantages during operation:
- When heated, thermal radiation from exposed metal creates some discomfort.
- This type of stove can cause dangerous burns.
- Metal stoves cool relatively quickly, as a result of which they must be constantly heated, which creates certain inconveniences during their operation.
- Such furnaces consume much more fuel, which leads to additional costs.
- The furnace surface temperature reaches quite high values; it follows that it must be located at safe distances from the walls or the outer surface of the furnace walls must be well insulated.
Positive properties of a metal furnace:
- Maintains temperature more effectively, which also affects fuel economy.
- Gives even and soft thermal radiation, has a more favorable effect on the human body.
- Such stoves have a higher fire safety coefficient, therefore, severe burns are eliminated.
- Creates a unique microclimate in the room.
- Has a more attractive appearance.
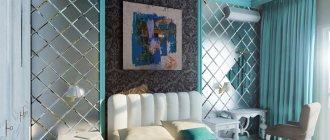
Clinker tiles (like brick)
If you want the stove to be decorated with the design of facing bricks, but you cannot afford it because of its high cost or the absence of a foundation under the structure, you can use special ceramic clinker tiles. It is especially popular in Northern and Western Europe.
This product is made from a mixture of different clays and fireclay with the addition of the necessary dyes. Next, the solution is pressed into molds and subjected to high-temperature firing. Thanks to this, a beautiful low-porosity facing tile is formed, the thickness of which is 9–12 mm. For your stove, you can choose different types in shape and color, since the range of products is huge. Laying is done in the same way as for simple ceramic tiles.
Jointing tile joints (grouting)
Grouting the joints between the tiles is done with a special mixture or clay-sand mortar with the addition of coloring pigments. The work is done with a rubber spatula. It is suitable for tiles because... allows you to fill small seams. Or with a construction gun, if the stove was lined with porcelain stoneware, terracotta or clinker tiles.
Types of grout for tiles and their comparative analysis are presented in the table (analysis of grout for clinker tiles)
Tile grout - comparison table
After applying the grout, wipe the surface with a damp sponge. This technique will remove any remaining mixture. Be careful not to press too hard on the sponge, otherwise you may damage the seam.
Advice. Users suggest using your hand to form a concave seam. It can be done with your fingers (if the seam is wide enough) or with improvised means, for example, a flexible tube or the handle of a toothbrush.
Final cleaning of the grout on tiles or majolica is carried out after the grout has dried (after 1-2 hours). Visually, this can be seen by the fact that the tiles will become lighter. Cleaning is done with a flannel rag soaked (soaked) in a solution of a cement-grout film remover.
The process of tiling the stove is complete. Now all that remains is to wait 3-4 weeks before trying the stove in operation.
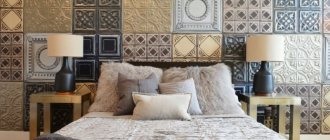
Tiles
This material was first invented by the ancient Babylonians, who also decorated stoves with it. Each tile is prepared individually from ceramics and then covered with glaze with a pre-selected pattern. As a result, you can get a very beautiful and unique stove that will look exquisite. It is believed that tiles produce the most environmentally friendly heat.
Covering a stove with tiles is very expensive and difficult, so you need to call special craftsmen for this, who are not so easy to find. But it’s worth it, because tiles have the highest heat transfer - 0.3 kW more than other materials.
If you have already built a stove, it will not be possible to cover it with tiles, since this must be done simultaneously with its construction.
Another disadvantage of the material is that you need to wait about a month until the solution completely dries and the oven is suitable for use. Thus, tiles are a choice only for those who want to stand out and create a unique interior.
Technology of oven cladding with ceramic tiles
The surface of the oven must be smooth, dry, clean, and free of mortar residues. The quality of the work will depend on how well the base for the tiles is prepared. So, we clean the brick from mortar, dirt and dust. To do this, we use a spatula, a metal brush or a small grinder with a special attachment for cleaning surfaces.
The seams between the bricks should be “scratched” with a nail or spatula to a depth of 5-10 mm. This is done for better adhesion of the tiles to the surface of the stove. After all these manipulations, the entire area of the stove is wiped with a damp cloth, that is, the smallest dust is removed, which has a bad effect on adhesion (sticking).
If the surface of the stove is not level, then you will have to level it using the same heat-resistant glue, after wetting the brick. For this we use a regular household sprayer. Our goal is to achieve the greatest evenness of the surfaces that we will tile. The better and smoother the surface, the easier it will be to work and the more beautiful the result will be.
Installation of mesh on the stove
The next stage is the installation of a metal mesh on the surface of the furnace. It is attached using dowels or self-tapping screws into the seam of the brickwork. The distance between the dowels is 30 – 50 cm, depending on the configuration and area
Particular attention should be paid to the area of the door and stove (if there is one). In these places there is a large temperature difference during the firing of the furnace and between them
This means that this is where it is necessary to make the best base for attaching the tiles.
The mesh size needs to be small. 10-15 mm will be the best option. For even faster preparation of the base, you can use a fiberglass mesh. This option is quite practical on relatively flat surfaces. Fiberglass is known to not burn and can withstand high temperatures, so it makes sense to use this material.
If your tile has a pattern, then it is first laid out on the floor, for speed and convenience in the main work. Then the glue is prepared in small quantities, since the first thing you need to do is “get your hands on it”, and only then take on the “volumes”.
Apply the adhesive to the tile with a notched trowel and spread it evenly over the back surface of the tile. Then the tile is pressed tightly against the stove and, as it were, scrolls slightly from side to side around its axis. Such manipulations contribute to better adhesion of the material. Some craftsmen apply glue of a certain area to the very surface of the stove. And only then several tiles are laid at once. Here, as they say, the choice is yours.
Any lining of the stove with tiles or decorative stone always starts from the bottom. The first bottom row must be laid out perfectly evenly, since all subsequent tiles will be leveled on it
This point should be given special attention
Then, row by row, they rise up. The easiest way to control the horizon level is with a laser level. A very convenient thing. Those who are used to it will find it difficult, if not problematic, to work without this device. But if there is no such “unit”, then a regular bubble level is an ideal assistant. The plane of the tile laying must be controlled using a rule (a construction tool for checking dents, bulges and more).
If trimming tiles is required, then a tile cutter must be used for this purpose. If you don’t have one, you can use a grinder with a stone disc or a regular glass cutter. True, you still need to learn how to work with a glass cutter and not leave several stripes on the material. That is, you only need to draw one line, as when cutting glass. Here, too, a certain skill is needed.
The cut sides of the tiles should be laid in the inner corners (if any) or in those places where they are “not conspicuous”. All external corners of the stove should be tiled only with solid tiles to preserve all the beauty and aesthetics.
When tiling a stove, you should always leave a certain size of seam between the tiles. This is good in terms of thermal expansion and in terms of beauty. For this, plastic crosses are usually used or when facing with terracotta, pieces of drywall are used. A wide seam when using drywall is quite a fashionable and beautiful option for finishing a stove today.
Use of stone (artificial and natural)
Natural stones used include sandstone and shell rock. They look no worse than tiles, but are much cheaper, and besides, you can do the work yourself. And artificial stone is very affordable.
Some people choose natural stone for this purpose, others prefer artificial stone because it is cheaper, has more variety of options, and the right colors. But the principle of installing them on a brick oven is the same.
Stone sauna stove lining
The choice of finishing materials, as well as their quantity, depends on the quality performance of the stove in the bathhouse. It goes without saying that the financial side of the issue plays an important role, but the first place should be given to the performance of the structure, taking into account the fact that the structure is not temporary.
A sauna stove must have the following characteristics:
- resistance to high temperatures;
- high thermal conductivity;
- resistance to mechanical loads;
- strength and reliability;
- aesthetics;
- moisture resistance.
The following materials are suitable for finishing the stove: brick, tile, tiles, natural stone, wood. Each material has its own advantages and disadvantages.
We improve the stove in the house: finishing it yourself, photos of finished projects
You are viewing the Finishing , located in the large Stove section.
The finishing of the stove gives it an aesthetic appearance , allows it to retain more heat , and serves as additional protection from external damage .
Various materials can be used as cladding: from plaster to artificial stone. The home owner makes a choice based on personal preferences and financial capabilities.
Stone
Most often, this method is used when facing fireplaces, and less often - stoves in steam rooms. When choosing a stone as a decoration, it is necessary to take into account that depending on the rock and type of stone, its thermophysical properties vary within a very wide range. For example, when using attractive and beautiful labradorite as a cladding, it will be possible to achieve the required heat transfer only after prolonged heating of the furnace (i.e., fuel consumption will be significantly increased), since this material has a fairly large heat capacity. On the other hand, a “stone” stove looks more attractive and takes longer to cool down - because it has a high thermal inertia.
If funds allow and imagination works well, you can show your creativity in such decorative decoration
The most suitable rocks for finishing stoves with natural stone are marble, slate, shell rock, sandstone, travertine and tuff. It is undesirable to use granite, basalt, labradorite and some other materials due to their not entirely suitable physical properties.
Recommendations for working with stone:
- First, to better select the required fragments, it is necessary to lay out the material, then use chalk to mark on the floor the outline of the surface to be finished, taking into account its size.
- Line the outlined area with stone. In this case, it is necessary, if possible, to try to ensure that the stones fit together as tightly as possible.
Before carrying out work, it is advisable to “try on” individual pieces on the floor, like puzzlesTip: in order for the mosaic to be the same, the resulting “sketch” can be photographed in order to use the drawing as a reminder puzzle during finishing.
- For the heaviest stones, it is necessary to make hooks from wire, the ends of which are inserted into the seams between the individual stones. When the bottom of the stone is rounded, two hooks are needed to fix it to prevent it from falling out to the side.
- Special glue is applied to the side to be fixed, after which the stone is laid in accordance with the sketch photograph.
- Depending on the glue used, it takes time to completely harden - from 3 to 20 days.
Finishing the stove with stone (video)
How to decorate stoves and fireplaces in a private home with your own hands? Finishing methods
A folded stove does not always look complete and in almost all cases requires additional intervention with the help of finishing materials. If for one owner the functionality of the device is enough, and he does not want to cover it with anything other than plaster, then for another, it is important that the guests of his house are amazed by the elegance of artificial stone or correctly selected tiles.
Plaster
This type of finishing involves covering the stove with the same mortar that was used for masonry .
It not only loses to other materials in terms of external components, but also reduces efficiency by 5-10% , reducing the thermal conductivity of the furnace.
The time for heating the walls increases by 20—30%.
Therefore, before applying plaster, you need to think about whether it is worth saving or whether additional investments are possible.
Reference. Plaster without the use of top material looks dull, but it will save significant money if the task is only the practical use of the stove, that is, heating the room.
Whitewash
Our ancestors also whitewashed the stove for each season, since expensive materials were not available to all people. In order to whitewash a stove, you do not need to have great skill. This is the simplest finishing method : lime or chalk mortar . It is important to remember that this type of coating requires a careful attitude on the part of the residents, since the white color is easily soiled.
Coloring
Modern manufacturers produce various heat-resistant paints . It is this type of material that is necessary when covering the surface of a folded stove, since its wall will often be exposed to thermal stress when ignited. If desired, the painted surface can be coated with a special varnish.
Photo 1. Painting the stove with white paint. When lining such products, it is necessary to choose heat-resistant materials.
Is it possible to coat it with clay?
The use of clay mortar to strengthen the stove is justified by the fact that it contains sand , which strengthens the surface of the walls and provides additional protection against chips and other cracks. This type of finishing is not original and is used mainly for practical purposes that do not involve giving the house individuality and implementing design ideas.
Decorative artificial stone: gypsum, acrylic. Photo
Many homeowners want to see their stove lined with stone. But not everyone can afford to buy expensive materials. For these purposes, artificial stone for decoration, which in many properties is not only not inferior to natural stone, but also has additional positive characteristics:
- simple masonry , which even a novice craftsman can handle;
- the laid out stove will not be bulky, because the material is light in structure ;
- saving money when choosing finishes;
- wide choice of shapes and colors ;
- the opportunity to realize various creative fantasies when decorating the interior.
In addition, the material differs in structural diversity:
- Gypsum dough. Externally it resembles natural sandstone and has good strength characteristics.
Photo 2. Finishing the fireplace and the walls next to it with artificial stone based on gypsum dough.
- Acrylic stone . Even more durable than the previous version.
Photo 3. Fireplace with acrylic stone cladding, the color of which resembles natural marble.
- Artificial stone with the presence of natural stone chips.
- Porcelain tiles. It consists of several types of clay, mineral salts, marble chips and pigments. Great resistance to mechanical damage and high temperatures.
Photo 4. Fireplace covered with black porcelain stoneware tiles.
- Heat-resistant composite. The material is made based on concrete, quartz or minerals. In terms of strength it can be compared to granite.
Preparation
The simplest method by which a stove can be faced is to apply plaster to the surface. Instead of the once familiar clay mixture, various types of heat-resistant plaster are now used. Dry formulations are available for sale, which should be diluted with water according to the instructions before use. Experts recommend starting any type of cladding by waiting a month after finishing masonry work. Since during this period the masonry has time to dry well and shrink. Whatever cladding method and cladding material is chosen, the surface must be carefully prepared for the application of plaster and the laying procedure itself. It is these works that directly determine whether the plaster and tile adhesive will adhere well to the surface.
The finishing of stoves with tiles is very durable; it does not have to be renewed every 2 - 3 years. A tiled fireplace or stove not only looks aesthetically pleasing. After all, the tile allows you to preserve the plaster layer, has an increased heat capacity and, when heated, fills the entire room with warmth. It allows you to create an interesting design to suit your taste. First you will need to remove the existing layer of plaster from the surface. In this case, the wall needs to be thoroughly soaked, for which ordinary water is used. A tool such as a spatula will also help you with this. If the solution was not made of clay, but with the addition of cement, you will need to use a hammer and chisel. Next comes cleaning with an iron brush or grinder. The surface is treated with a spray gun, the seams are cleaned to a depth of 10 cm.
After drying, the surface is well primed and left until completely dry. Experts recommend not sparing the primer and applying it in several layers. Immediately before laying the tiles, the walls are checked using a building level and a plumb line for straightness. If differences are detected, you will have to equalize them. Next comes the placement of metal beacons. If, when removing old plaster, broken corners are found, they need to be strengthened by reinforcing them with perforated metal corners. It is recommended to attach a reinforcing fiberglass mesh to the set plaster layer with a thin layer of glue. After drying, another layer of mesh is made.
If you plan to install the tiles using glue, then it is better to coat the dry plastered surface again with a primer.
When the installation of finishing material is carried out on a metal frame, the fasteners of which are made on the old one, there is a high probability that the entire structure will be able to move away from the wall surface. Preparation for decorative finishing includes the purchase of tools and materials necessary for the work.
How to line a brick oven
A brick stove in the house can be:
- Paint;
- Plaster;
- Cover with tiles or stone;
- Apply combined methods.
There is a detailed article on how to paint a brick stove in a house. And today, we’ll look at all the other methods of lining a brick oven.
In principle, there are not so many ways to line a stove. The fact is that the facing material must meet technical characteristics and certain requirements.
First of all, the cladding must be resistant to high temperatures. Good conduction of heat. Since we install a stove to heat the room, and not so that it heats itself.
Plastered stove
Previously, our ancestors used to plaster Russian stoves in huts. Even now, in villages they prefer plaster over other finishes.
First of all, because it is the simplest and cheapest way. The oven is covered with a thin layer of mortar. Then whitewash and finishing is ready.
However, if your interior does not copy an old Russian hut, then a stove covered with plaster is not suitable.
Since it is short-lived, too simple, and does not look presentable. So, if you want something more modern, then move on to the next options.
Tile or finishing stone
Nowadays, there is a huge selection of decorative finishing materials that have heat-resistant properties.
- Glazed tiles, terracotta, porcelain stoneware, clinker;
- Natural and artificial stones;
- Ceramic tiles.
Tiling
The tiles are quite easy to install and do not require special knowledge or skills. Therefore, if you don’t know how to decorate a brick stove in your house, then tiles are the best option.
Firstly, because there is a large selection of different colors and textures. You can easily select a material that will harmoniously fit into any interior.
Secondly, the tiles are light, strong, and durable. This coating will last a long time. Especially if you purchase a suitable, ready-made mixture for laying tiles on the brick surface of the stove.
Thirdly, if you lay the tiles yourself, you can save a lot of money. The costs will only include tiles and laying mixture.
Natural and artificial stones
Since ancient times, stone has served as a “finishing material” for fires. It is no less popular now.
Natural stone is heat-resistant, conducts heat well, and is durable. Stone is a noble, reliable, practical, environmentally friendly material. Speaks of good taste and high status.
The following stones are used as lining for a brick kiln:
- Sandstone;
- Shell rock;
- Soapstone;
- Marble;
- Granite and others.
Laying natural stone is a little different from laying tile. To ensure that the final result pleases with beauty and durability, it is recommended to hire specialists.
However, now there are many tiles made of artificial stones that imitate natural stone. Artificial stones are much cheaper than natural ones and are easy to install.
They are much lighter than natural stones and in many ways even surpass them in technical characteristics.
Second only to energy and environmental safety. However, when lining the stove with marble or granite, you must prepare for the fact that you will lose some of the heat.
Ceramic tiles
Heat-resistant tiles are made by hand from fired ceramics. Lining a brick oven with tiles is a creative process. At the first stage of work, it is difficult to even imagine what the end result will be.
Such stoves are amazingly beautiful, but the main thing is that they remain functional and retain all the parameters of a good heating device.
The only disadvantage of tiling is the high price and complexity of the work.
Combined furnace cladding options
By combining different materials for finishing stoves, you can get excellent results.
If you still haven’t decided what you can use to cover a brick stove in your house, then think about this method.
By using different materials, combining expensive with cheap, you can save a lot. And at the same time, your stove will have a unique, unique look.
In addition, through the use of various materials, it is possible to increase the heat transfer of a stone stove.
Adhesive materials
As soon as you decide what you can use to line a brick stove, the question of choosing an adhesive mixture immediately arises.
It is recommended not to skimp on glue for facing material. How long the stove will last without repair depends on this factor.
Now in stores there is a wide variety of means for fixing tiles to a brick base.
However, pay attention to products that are resistant to high temperatures. They are specially designed for attaching facing material to stoves and fireplaces.
Methods for diluting the composition may vary. Therefore, before use, carefully read the instructions on the package.
How can you line a brick stove, preparatory stage
The brick oven should be prepared for lining.
- Prime with primer;
- Level with a thin layer of plaster;
- Glue on heat-resistant fiberglass mesh.
After this, let the stove dry thoroughly. After complete drying, you can begin lining the stove with the selected material. Video - how to improve a brick oven in a house.
Features of tiling different types of stoves
First of all, not all stoves are suitable for lining, and with some types you will have to tinker. There are three types of furnaces:
Metal furnaces
When tiling a metal surface, you need to understand that metal and tile have different coefficients of thermal expansion. Thus, the stove and the tiles on it will heat up and cool down at different rates. This will invariably lead to the decorative tiles peeling off or even cracking. But, even in this case, tiling a metal stove is possible. Professionals recommend installing a movable bond between the tiles and the stove surface using clamps; this technology will help avoid cracking;
Double-circuit heating stoves made of bricks
An ideal option if you plan to tile a brick oven. This is due to the fact that the stove has two circuits: internal (firebox and vaults) and external. The outer contour, which is in contact with the cladding, heats up significantly less than the internal one, and therefore the cladding tile adheres best to such a stove. By the way, an additional advantage of this furnace design is the absence of local overheating. This allows you to clad a fireplace or stove with one material and using one type of mortar for its fastening;
Single-circuit brick kilns
They are often installed in bathhouses, which is why the stoves are called “sauna stoves.” The most problematic option. After all, there is only one circuit, which means that the surface heats up more than in a double-circuit oven. Craftsmen who perform cladding of a single-circuit stove must have certain experience in order to correctly select the tiles for cladding and the mortar that will hold it. Areas of local overheating deserve special attention.
Among other things, a stove installed in a bathhouse is exposed to changes in temperature and humidity. Tiling a sauna stove requires a more careful selection of materials. It is recommended to use porcelain stoneware for it, as it is the least porous material that can withstand the highest temperatures. It is also possible to line the stove with terracotta tiles, but its thickness must be at least 8 mm, and the distance between adjacent tiles must be at least 10 mm.
Note. Knowing what type of oven does not yet give you the opportunity to start working. You also need to consider what type of fuel the stove is heated with. Different types of fuel have different combustion temperatures. For example, when using solid fuel, the facing material must withstand temperatures up to 1600 degrees; wood (firewood) will allow you to expand the choice of facing tiles because burns at temperatures up to 800 degrees.
Stove in a private home - interesting design ideas
There was a time when the Russian stove seemed to disappear from our lives and even began to be considered almost an antique. However, it is impossible to give up good things forever, and now the kind beauty has again found her place in the environment of residential buildings, warming households and giving them the opportunity to cook food, the taste of which cannot be compared with anything else.
Such an object in the house is very impressive, and if the stove looks unsightly, it has a bad effect on the perception of the entire interior. But when it is clean, neat, and even beautifully decorated, a special mood is created in the home. In this case, the owners of the house can only be praised for their hard work and good taste. There are a number of materials suitable for lining a wood stove. All of them are durable and meet fire safety requirements.
Let's take a closer look at the possible finishing options.
Do-it-yourself oven finishing
There are a number of stages in finishing the stove:
- Plastering.
- Tiling.
- Painting.
- Facing with stones.
DIY ceramic tile tiling
Having completed the preparatory steps and prepared the necessary equipment, begin work:
- Determine the point where the first plate will be fixed. It is recommended to start work from the lower right or left corner. When laying tiles, adjust their placement using a building level or plumb line. This will avoid distortions or unevenness. The adhesive base is applied using a notched trowel.
- Before attaching the bottom row, attach an L-shaped steel profile or rail to “support” the first row.
- To obtain smooth and beautiful seams, use assembly crosses.
- You can change the position of the tiles using a rubber mallet, which you need to tap on the ceramic surfaces.
- After laying the main part using solid fragments, move on to those areas where you will need sections. Use tile cutters to complete installation of all remaining areas.
- Traces of glue must be erased before they dry.
Plastering
To decorate the stove with your own hands, you can use plaster. The material allows you to quickly transform the appearance of the structure, is inexpensive and accessible.
In most cases, craftsmen use dry, heat-resistant mixtures, which are applied in a couple of layers and left for at least 4 hours. The composition for the first layers may be more liquid than for subsequent ones.
Coloring
To paint the stove, you can use different coloring compounds and whitewashes. In this case, both brick and plastered surfaces can be painted.
Lime or chalk whitewash is suitable for most conditions, and to protect it from rapid shedding, add kitchen salt to the composition.
Stone finishing
If the stove is decorated with stone, follow these instructions:
- First, you should apply a layer of primer to the surface to be treated and begin laying out the first lower layer. The process involves the use of special compounds.
- Sections of stone are cut with a grinder equipped with a concrete disc.
- Next you need to embroider the seams with plasterboard.
Furnace finishing
To finish the combustion structure, it is worth taking the same materials as when finishing the stove. The main thing is that they are safe, heat-resistant and reliable. When designing the firebox, take into account all fire safety rules, since it will be subject to intense heating.
It is necessary to leave a small void between the facing layer and the firebox to ensure stable and uninterrupted air circulation. If you miss this moment, the efficiency of the furnace will be low. To protect the finish from deformation processes, sand or a heat insulator can be placed in the gap between the masonry and the finish.
If plasterboard products are used, they will increase the fire safety of the structure.
Furnace decoration using tiles
There are a lot of varieties of the mentioned material. Let's look at some of them.
Tiles
This finishing method is suitable for those who have the opportunity to spend money. We are not talking about standard flat tiles, but about a special kind of material. Each tile has the form of a plate, complemented on the reverse side by a tiller. This protrusion ensures very reliable fastening of the tile to the base and allows you to retain the heat generated by the stove for longer.
Tiles are a material that was held in high esteem by people back in Rus'. A variety of shades, an interesting relief, an original design (usually done by hand) - all this cannot but attract. A tiled stove adds an element of luxury to the interior
Tiled stove - chic in the interior
Majolica
The tiles came to us from the distant Mediterranean, those places where painting masters create magnificent masterpieces. The raw material for making plates is colored clay. After pressing and two-stage firing, it becomes very durable. The top of the blanks is then covered with glaze and decorated with a spectacular design. A stove decorated in this way will indicate the wealth of the owners.
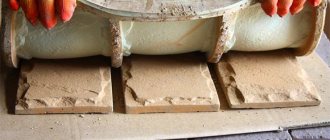
Terracotta tiles
The material allows you to upgrade the stove at a lower cost, but it has many advantages. Terracotta tiles, in particular, are not inferior in strength to the option described above - majolica. It is also renowned for its exceptional resistance to extreme heat. The tiles are not glazed. Meanwhile, the pores in its structure perfectly store stove heat. The color of this material - from beige to orange - is pleasing to the eye, as it echoes natural shades.
Terracotta tiles on the stove facade
Clinker
This is another worthy material for decorating a home stove. The tile has a very dense structure, so it is resistant to damage. Decorative flaws such as scratches and chips are not a problem for this material. Among the properties of clinker tiles is slow heating, but it also takes a long time to release heat into the room. From a design point of view, the decorative qualities of clinker are important. And this is a variety of colors and a variety of textures. Among the products offered you can find smooth glazed, rough and untreated clinker.
Clinker tiles – strength and charm
The stove is not always completely covered with tiles. Often, only the part where ignition is performed is decorated in this way. Beautiful stove design - a few more ways From tiles, let's move on to other facing materials, each of which is remarkable in its own way.
Stone
This is an excellent option for lovers of antiquity and even primitiveness. In short, a stove with such a design always looks very original. If you decide to settle on a stone, you can choose its type: natural or artificial. The first option is more prestigious, but will be more expensive - it is expensive to extract natural material. At the same time, imitation has its advantages in the form of a wide range of colors and textures.
Lining the stove with stone
Covering a stove with stone will be more difficult than doing the same job using tiles. After all, here it is necessary to adjust elements of different shapes and sizes. But when the labor-intensive process is completed, it will be possible to admire the beautiful design, and, most likely, it will bring joy to more than one generation of the family.
The use of stone in cladding
Whitewash
Treating the surface of a structure with a lime or chalk composition is an old tradition. Such a stove looks snow-white and is a standard of cleanliness and exemplary order. You need to whitewash the stove using dried plaster, which is a clay mixture or a special composition that is sold in stores. To make the whitewash stronger, craftsmen recommend adding salt to it. To ensure a rich color of the stove coating, the solution is applied in layers.
Tile adhesive and mortar for stoves
The quality of adhesion between the tile and the stove surface depends on the solution on which the tiles are placed on the stove. In view of its intended purpose, the adhesive solution must be heat-resistant, fire-resistant, and heat-resistant.
There are three types of mortars for laying stove tiles:
Clay mortar for oven
How to prepare: clay, sand and water are mixed in certain proportions, which depend on the type of clay:
- for oily clay the ratio will be 1 part clay, 4 parts sand, 1 part water. The fat content of clay can be determined in the laboratory or in a traditional way - you don’t feel sand in it, and a ball rolled out of it cracks badly when it dries;
- for normal – 1:3:1
- for skinny people – 1:2.5:1
Cement mortar for furnace
How to prepare: cement and sand are mixed in a ratio of 1:3 and brought to the desired consistency with water. In this case, the cement must be grade M 400 or higher. To improve the properties of the solution, it is recommended to add PVA and asbestos to it. Stove makers advise adding 1 kg of salt. onto a bucket of mixture;
Dry mixture mortar or special adhesives (cement, dispersion, epoxy)
They are ready-to-use mixtures intended for a specific type of tile. They are good because the proportions in them are carefully adjusted, and in addition, various plasticizers are added that improve the properties of the adhesive solution. Such adhesives have proven themselves well: SCANMIX Skanfixsuper (Finland), Plitonit-SuperKamin (Russia-Germany). Budget options: SILTEK T-84 (Ukraine), “Pechnik” (Belarus) and “Plitonit W” (Russia).
Ready-made adhesive solution - adhesive mastic
When choosing this type of glue, you need to pay attention to the markings. It should be intended for lining stoves and fireplaces. Good user reviews for NEOMID SUPERCONTACT (Russia), Terracotta (Russia), “Parad-77” (Belarus). But, in general, the quality of adhesion of the mastic to the surface leaves much to be desired.
In any case, the solution must meet the requirements for heat resistance and coefficient of thermal expansion. Ideally, laying tiles on the stove should be done using the same mortar that was used to level its surface.
All professionals and users agree that it is not worth saving on materials.
What is the best way to line a brick stove?
In private households and dachas that want to be habitable all year round, but there is no possibility of central heating, stoves are installed. Modern developments make it possible to create stoves not only for wood heating. But the main material, even now, is brick.
Often such an object occupies a fairly significant area of the house. Accordingly, you want everything to look as attractive as possible. Therefore, a logical question arises: how to reliably line a brick stove? This is not an idle situation that requires a balanced and serious approach.
Metal sauna stove
This is the simplest and most traditional option for building a stove in a bathhouse.
The design has a number of advantages that make it popular:
- ease of installation;
- ease of use;
- heating in a short period of time;
- good traction;
- high efficiency;
- a budget option;
- economy in fuel consumption.
In order for the design to work properly, it is first prepared for operation and the initial characteristics are improved. We are talking about covering the frame with natural stone or brick. Considering the high cost of these materials, not everyone can afford to build a stove from them. And for cladding you will need much less of the same brick, so this option is quite acceptable for those who want to save money.
You can’t do without lining an iron stove in a bathhouse for several reasons:
- the metal quickly heats up, so being in the room becomes unbearable;
- rapid heating is replaced by rapid cooling. To maintain a certain temperature, you will have to constantly add firewood;
- the cladding will help optimize the heating process and maintain a comfortable temperature in the bathhouse, air humidity will be maintained at an optimal level;
- finishing materials will provide protection against burns that may occur if you accidentally touch the hot surface of a metal stove.
Cladding materials
In general, the stove is considered the most important object in the house, rightfully occupying a special place. Being a source of warmth, it serves as a keeper of traditions and creates indescribable comfort. That is why you need to make every effort to ensure that the stove acquires an attractive appearance and is not subject to destruction.
The finishing material must be selected with many positive qualities. First of all, it must be heat-resistant and heat-intensive. That is, to keep the surface from heating, but at the same time, to evenly distribute the heat inside the room.
The walls of the stove can be decorated with various types of materials. These can also be coating elements known from ancient times made of special types of clay, which undergo long processing. As well as more modern materials, which are made on the basis of previously used components, but subject to more significant preparation. Let's take a closer look.
A natural stone
It has been known for a long time and has proven itself as a finishing element for brick stoves. The stone has good performance properties, many of its types are quite cheap. The most commonly used are shell rock and sandstone. Finishing the stove with decorative stone allows you to refine the heat source. The decorative component is very original. The walls of the stove have a very natural look.
In addition to cheap materials, others are also used. Among them is marble. Lined walls, thanks to its external properties, acquire an individual and quite respectable appearance.
Soapstone chlorite
It has several other names (soap stone, pot stone, stove stone). It is a natural material that is formed from a combination of magnesite and talc, subjected to long-term exposure to high temperatures and pressure.
In terms of its appearance, soapstone chlorite is very attractive. The stone does not require additional finishing.
Ceramic tile
This material is a certain type of clay that is processed.
It acquires the following qualities:
- density;
- durability and strength;
- heat resistance.
Ceramic tiles have a significant thickness, reaching eight millimeters. The most commonly used variety is the terracotta variety. It is preferable to choose one that has not been covered with glaze.
Tiles
Covering the stove with tiles has been used for quite some time, in many countries around the world. Tiles can be classified as ceramic tiles, but they have a significant difference. The fact is that on the reverse side of such material there is a bowl (rumpa). It is due to this that it is possible to obtain a kind of thermal pillow. It is attached to special points reserved for this purpose. The appearance of stove tiles varies greatly.
Cladding without glue
The good thing about carrying out installation work without glue is that such cladding has a number of undeniable advantages. It will not react to temperature changes, and the air cushion formed between the tile and the wall will perfectly retain hot air. When installing using the “dry” method, it is important to take accurate measurements and manufacture frame elements. The structure will consist of a frame created from metal profiles into which the material is laid. First, the furnace wall is marked along the upper and lower parts.
Then the space obtained inside is divided by horizontal lines, the size of which is 3 - 4 mm. The inter-tile profiles will be fastened along them. The lines are marked with a cord painted with blue. The baseboard will be attached to the surface of the walls and floor. It is made from galvanized metal sheets or purchased ready-made. To make a plinth with your own hands, you need to cut a strip equal to the height of the plinth plus 15 - 20 mm. The metal sheet should not be thicker than 1 - 1 mm. To make a bend that will extend onto the floor, the strip is placed on a metal table or fixture. The workpiece is fastened, leaving an outer protrusion of no more than 15 - 20 mm. You need to tap it with a mallet.
The finished plinth is fastened using anchors. Then they cut off part of the corner, which will be installed along the top marking line. It will hold vertically located elements on the surface. Metal strips are attached through already installed perforated corners. They must run vertically; a distance of 250–300 mm must be maintained between them. Their role is to install supporting profiles.
To make profiles into which the tiles will then be placed, strips of about 44 mm wide and a length equal to the width of the wall are cut. They require galvanized metal sheets. Manufacturing is carried out using a device - a sheet bender made of timber with a metal plate. The strip of the future profile is laid on the edge of the device with a mandatory protrusion outward at a distance of about 3 mm. At the final stage, the workpiece is fixed with clamps and bent with a mallet.
The tiles in a properly made profile should move easily inside. Proper installation of profiles is carried out from the baseboard. After the frame for several rows is installed, the material is installed in them. Next, the joints at the corners are closed. Corners should be placed around the cooking chamber. Rounded overlays are mounted on external corners. To carry out this type of work you need self-tapping screws. The inside walls of the cooking chamber are lined with stainless steel sheets. To enhance the effect, the surface can be coated with a special black paint that has heat-resistant characteristics.
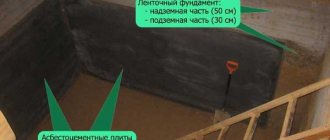
Cladding the stove in the bathhouse with bricks
The brick has an aesthetic appearance and is suitable for both the construction of stoves and cladding. For laying on the surface there is no need to install a reinforcing mesh. It is important to take into account that the material is quite heavy and puts a significant load on the foundation. It is this nuance that must be taken into account at the stage of creating the drawing.
Advice.
To create a decorative finish for a sauna stove, facing bricks are used.
Decorative brick for cladding a stove in a bathhouse can transform the stove beyond recognition, making it a kind of work of art. This material is not inferior in beauty to marble or granite. In order to line a metal furnace, fine dry sand is poured between its walls and brick to protect against metal deformation, which inevitably occurs when exposed to high temperatures. In addition, the layer facilitates the transfer of heat inside the steam room.
Do-it-yourself tiles for lining a stove in a bathhouse
Stove makers have been looking for a long time for a suitable replacement for ceramic tiles, one that can withstand high temperatures and not deform. The task became easier with the advent of tiles. In other words, this is an ordinary tile made of clay with high heat resistance. The elements have a three-dimensional shape, the reverse side is equipped with protrusions called rumps. With their help, the tiles are combined with each other and form a continuous masonry.
The tiles are laid at the same time as the construction of the stove or fireplace. This allows you to strengthen the load-bearing wall of the furnace. To connect the structure to the main masonry, wire tendrils are used, which are placed in the seams between the bricks. The tiles are connected with so-called steel brackets and secured with cement mortar.
The variety of colors, patterns and textures of tiles is surprising. With such variety, you can choose any material and make your sauna stove unique.