Laying a brick oven is a long process that requires special attention. But its construction does not end there. Craftsmen strongly recommend either plastering the stove if it is new, or putting in order the one that is in use. This will not only make it decorative, but will also significantly extend its service life.
It is quite possible to carry out plastering yourself. You can make the mixture for application yourself or buy it ready-made in the store.
In this article we will analyze all the important points of this stage of oven design.
Why plaster the stove?
The materials of the Russian stove include:
- clay;
- fireproof (fireclay) brick;
- iron (doors, grates, grates).
Each has its own heating temperature, expansion, and thermal conductivity.
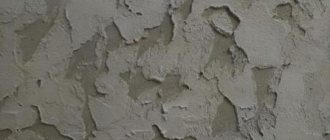
Yes, it is indeed possible to leave the stove unfinished, but after a short time it will lose its neat appearance along the colored seams. If the masonry was done in haste, cracks will begin to appear.
Plastering is performed to strengthen the structure, protect it from drying out, and give it a beautiful appearance.
In addition, the procedure is relevant in the following cases:
- The oven is not laid out neatly. The mixture will help level the corners and sides.
- The old coating began to crack and fall off.
- To increase the strength of the walls, their thickness will increase.
- Heat capacity improvements. The bathhouse or house will remain warm longer.
- The seams were filled with a natural-based mixture, which is why insects settled there.
- The interior design of the room has been changed, so the furniture needs to be decorated in the appropriate style.
- Increases the level of fire safety. It prevents carbon monoxide and smoke from entering the house through cracks in the brickwork.
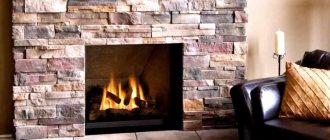
Using heat-resistant plaster is an excellent way to restore antique stoves, fireplace boxes, followed by laying ceramic tiles, marble and other decor on top.
How to close the chimney?
Clay plaster will be a universal option due to its good heat resistance.
The part of the chimney located in the house can be covered with the same plaster composition as on the stove or fireplace. It can be tiled with ceramic tiles using cement plaster as a base. The proportions of cement and sand are 1:4. A fireplace chimney does not heat up as much as a stove chimney, because there is much less draft in it.
Lime-cement mortar is suitable for very hot surfaces. It is much stronger than clay, but it is more difficult to repair.
Chimney lining outside the house
The brick walls of the chimney are subject to large temperature changes, especially in winter. On one side there is hot smoke, on the other there is cold air. Because of this temperature difference, the brick breaks down over time. In addition, stove smoke contains oxides of sulfur and nitrogen. If the top of the chimney is cold, then water vapor on its walls condenses and, mixing with oxides, forms acids. This acidic condensate, as well as the temperature difference, destroys the brick pipe.
To prevent such a situation, part of the chimney outside the house must be insulated. To do this, a frame is installed, insulation is fixed on it, and everything is covered with tin sheets. Simply plastering the brickwork will not be enough.
Classification of plaster for stoves and fireplaces and requirements for it
During combustion, a significant temperature difference is formed outside and inside the product. It disappears only after it has completely cooled down.
To avoid cracks in the brickwork, purchased or homemade plaster must meet a number of conditions:
- Be resistant to high temperatures, be heat resistant.
- Have an elastic structure. This will simplify the application process. The mixture will not begin to crumble from drying out.
- All components in the composition must be environmentally friendly and, when heated, safe for health.
- Be fire-resistant, not exposed to flames, maintain working properties.
- Adhere well to the surface.
Regardless of whether it is purchased thermal plaster or made at home, it must meet the requirements.
Ready-made factory mixtures are sold in dry form, so you need to dilute them with water in the correct ratio.
Based on the composition of the mixture, they are classified into two types.
Simple
Simple plaster is called plaster, which contains only two components: clay and sand.
Before making the solution, sand is passed through a sieve, clay through a metal mesh with small cells. This way the raw materials are clean, powdery, without any debris.
Stove makers recommend choosing fatty clay, since this way the adhesion to the surface will be much better. With increased fat content, simply increase the proportion of sand in the mixture.
Before mixing the solution, the coarse clay must be filled with water and allowed to soak as much as possible for 2–3 hours. This will make the mixture plastic, and over time the coating will not begin to burst.
Complex
A complex composition involves the combination of three or more components at the same time. There are several mixture options:
- lime, clay, sand;
- asbestos, clay, sand;
- clay, cement, asbestos, sand;
- fiberglass, sand, gypsum, lime, clay.
The basis throughout is heat-resistant clay.
It is important to maintain the correct proportions of the mixture and mix to the desired consistency, otherwise the solution will become too hard and may crack.
The composition of the purchased putty includes fireproof kaolin clay. After being fired (at a temperature of 1500 degrees), it is crushed to powder.
How to plaster a chimney if the brick is peeling
Furnaces have certain features, some of which relate to operating conditions. For example, a brick pipe located inside is exposed to hot air, condensation and smoke. Over time, soot begins to settle here.
The chimney outside the building deserves special attention. It is affected by weather factors. For example, it could be rain, wind, snow, or a change in temperature range.
As a result, the brick begins to delaminate. In such a situation, it is necessary to plaster the structure using the correct method.
Benefits of plastering
Furnace finishing is necessary not only in case of destruction of the brick material, but also to prevent such a problem.
Moreover, this process has many advantages:
- provides an attractive appearance to the chimney;
- forms an additional sealed layer, preventing carbon monoxide from penetrating into the building;
- promotes hygiene as it prevents dust from settling on the surface.
For all these reasons, it is necessary to plaster the stove, and in particular the chimney. Moreover, such a mixture looks neat, has a long service life and is inexpensive.
Selection of plaster
For finishing home stoves and chimneys, only materials that have heat resistance, high elasticity, and strength are used. Conventional mortars will not work in this situation. The most popular mixtures for plastering chimneys are clay and lime, clay and cement, clay and gypsum, mixed.
You can find many options for mixtures on the construction market. Some of them even contain moisture-retaining additives. This makes work more convenient and enjoyable. In addition to fireproof materials, decorative plaster is also often used to finish the outside of the chimney.
How to prepare the plaster mixture yourself?
The process of preparing a plaster mixture for a chimney is actually not particularly difficult. But you still need to know some subtleties and nuances. To create the material you will need the following components:
- Clay – for resistance to temperature influences. It is important that it is not too greasy, otherwise the solution will crack when it dries. But clay that is too thin will not work, as it will not be able to form an even layer.
- Sand - to ensure strength.
- Lime – increases adhesion.
- Cement - to improve the organoleptic properties of the solution.
- Asbestos or fiberglass - strengthening. It is especially often used on strong slopes.
Proportions are selected based on the individual situation. The materials are filled with water and left for a day. After this, the remaining liquid will need to be drained. The plastering mixture is ready!
These tricks will help you quickly deal with the problem of brick delamination and prevent complete destruction of the chimney. In addition, you can complete the entire process on your own.
Types of plaster
Let's look at the main types, advantages and disadvantages, and nuances of use.
Clay-sand
This is a good plaster composition for a brick oven. It's inexpensive. It is easy to prepare it yourself.
You can even dig up clay if the terrain allows it. But to knead it, you will have to clear it of debris and sift it thoroughly.
Among the advantages of using clay mortar:
- Low thermal conductivity, so the raw material retains heat for a long time.
- Environmentally friendly, safe for health.
- Low price.
- Vapor permeability.
- Long shelf life. Does not spoil even when diluted.
- Does not apply to quickly hardening raw materials.
- Plasticity of the material. It is convenient for them to carry out coating.
- The coating can be repaired.
- Does not burn even under high temperature.
- After application there is no waste left that must be disposed of.
The only negative is that it needs to be applied in a layer at least 1 cm thick, otherwise the solution will begin to fall off.
The ratio of the components is as follows: one part clay goes to two parts sand. 1:10 fluffed asbestos is added (at the discretion of the owners).
Cement-clay-sand
According to the classification, it belongs to the complex type. This mortar composition is often used for laying bathhouses, stoves in the house, and fireplaces. Forms a highly durable coating. But in comparison with clay-sand plaster, it sets worse. It hardens quickly, so mix it in small portions.
The optimal grade of cement is M150.
For preparation, take three parts of sand, one part each of cement and clay.
If the surface is tiled on top, then another part of liquid glass and chalk is added to the mixture - this increases strength and resistance to cracking.
Lime-clay sand
The addition of lime gives the solution plasticity, improves adhesion to the surface, and disinfects the mixture from insect larvae and bacteria.
To knead, it is recommended to take one part clay, one part lime to two parts water.
Gypsum based
Expert advice: gypsum plaster in its pure form is not used for finishing stoves and fireplaces. When heated, frozen plaster quickly cracks.
But as an auxiliary component, gypsum will increase the viscosity and density of the composition.
Such mixtures harden in a short time, so it is better to cook in small portions. From kneading to hardening it will take a maximum of 15–20 minutes.
There is a mixture on sale where gypsum replaces cement and is responsible for holding the composition together. It is also combined with lime to give strength to the plaster.
With added asbestos
The use of asbestos is similar to coating reinforcement - it increases strength and adhesion to the surface.
When mixing yourself, asbestos should be poured into the mixture in small portions. In addition to the crushed powder, fiber is added.
Asbestos is different:
- durability;
- moisture resistance;
- fire resistance.
This component protects the plaster from cracking.
An alternative to asbestos is chopped straw (much cheaper) and fiberglass mesh fibers.
Strengthen the mixture with salt
Experienced stove-makers have made it a rule to add kitchen salt to the solution. This increases the hygroscopicity of the clay, due to which the plaster does not dry out, remains plastic and does not crack.
In addition, insects are not interested in the salt solution, which will be a big plus if the stove is located in a private house or residential cottage.
Preparation of the solution
There are many recipes for plaster solutions in the world. You need to know how to make your own plaster. Below is the composition of the highest quality and most popular of them (proportions in parts):
- Sand – 2, cement – 1, clay – 1, asbestos – 0.1;
- Clay – 1, sand – 2, asbestos – 0.1;
- Gypsum - 1, lime - 2, sand - 1, asbestos - 0.2 (in this case, asbestos can be replaced with fiberglass in the same proportion).
It is best to use river sand. Before use, you should clean it of debris (shells, stones, etc.), if any, and dry it to accurately determine the proportions of the future solution.
The same goes for cement. If you are going to use it, be prepared that setting will take at least 12 hours to complete, and final strength will not be achieved until 20-30 days later. A high-quality plaster solution should be easily applied to the oven walls.
We suggest you read: How best to make a chimney in a garage
Plastering the stove with your own hands: step-by-step instructions
This can be done quickly if you carefully prepare in advance and correctly calculate the consumption of materials, taking into account the area of the product.
Required Tools
For plastering you will need:
- Master OK. For application, uniform distribution of the solution over the surface.
- Metal scissors. Needed for cutting reinforcing mesh.
- Spatulas of different sizes. Used for distributing and smoothing the mixture in corners and in narrow places.
- Grater, ironer. The first tool is taken for rough grouting. The second has the same shape, but the coating is not mesh, but rubber - for sanding before painting.
- Chisel. It will be needed to apply notches to the cement coating. Suitable if you have to cover a stove without reinforcement.
- Hammer, metal brush.
- Brushes for applying primer and paint.
- Construction mixer. Speeds up mixing of the solution.
- Plumb line, level, tape measure, pencil.
- Plastic film to cover the floor and wall corners from particles of the mixture and paint.
If the walls of the furnace are uneven, then you will have to install a beacon, and more than one. By plastering taking into account the beacons, it will be possible to achieve alignment of the walls and corners of the stove.
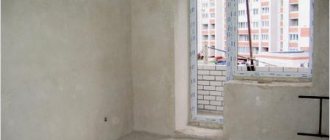
Surface preparation
Before the main work, the new and old stove should be prepared.
Finishing of a new product can only be done after the final hardening and shrinkage of the masonry mixture. Otherwise, the applied plaster will crack very quickly. In addition, it is important to heat the stove several times, even if this happens in the summer. The walls should warm up well and condensation should disappear. It is recommended to unstitch the seams to a depth of 0.5 cm and brush over the metal. It is worth making notches on the concrete surface (for better adhesion of the plaster to the walls).
If the stove is old, pieces of chipped mortar, plaster, whitewash or paint are removed. If necessary, the walls are cleaned entirely. Cracked bricks are replaced with new ones and re-laid. The remains of the loose solution are swept away with a broom.
In both types of furnaces, soot and soot are removed from the surface, and the ash is cleaned. Oil stains are removed with a degreaser.
Next, use a brush to thoroughly prime the entire surface to be plastered.
Basic rules for preparing the mixture: composition, proportions
In rural conditions, stove makers do not buy ready-made compositions in the store, but prepare them themselves.
The most popular recipe is a clay-sand mortar with the addition of lime and asbestos:
- 2-3 days before use, the clay should be soaked in water. In this case, all floating debris is immediately removed and refilled with clean water.
- It is better to pass the settled clay through a sieve. Stir until smooth.
Even small lumps should not remain in the clay, otherwise this will be the first reason for the formation of cracks in the coating.
- The clay is combined with dry sifted river sand. You can use wet sand, but then you will need more water to mix the solution. The proportion is 1:2, where one part clay goes to two parts sand.
- When adding lime, it is soaked in water overnight.
- The asbestos will need to be fluffed up.
- For one part of clay there is a tenth of asbestos and lime.
To enhance the plasticity of the solution, add 200 g of kitchen salt to the bucket of plaster. This protects well from cracks and guarantees uniform drying of the treated surface.
Another factor that is worth taking into account is how you will have to heat the stove. If the fuel is coal or peat briquettes, which give off intense heat, then it is recommended to add fireclay powder to the mixture. This will increase the resistance of the coating to high thermal loads.
For a wood-burning stove there is no need for such an additive.
Reinforcement
Reinforcement is a necessary stage of construction aimed at increasing the strength of the plaster. Prevents peeling and falling off of finish.
It is customary to add to the mixture (optional):
- asbestos fiber;
- hemp;
- slag wool;
- small fiberglass;
- chaff
Before applying the solution, it is recommended to reinforce the product with metal mesh.
Reinforcement fasteners for stoves with curved walls, where the plaster layer is more than 1.5 cm, are required.
A steel mesh with a cell size of up to 20 mm is suitable for this.
Mounting to the wall is carried out in two ways:
- Nails that are driven into masonry joints at a slightly angled angle. The length of the nails is 10–11 cm. The vertical fixation step is every 2–3 brick rows, and horizontally every 15 cm. You don’t need to hammer it all the way in, but so that the head remains 5 mm on the surface.
- The wire that was laid during laying. Wire material – copper, stainless steel, annealed nichrome. It is tied tightly to the reinforcing mesh.
There is also an old-fashioned way of reinforcing with burlap or gauze. The burlap is dipped into a semi-liquid solution so that it is well saturated. You need to cover the walls on top of the mortar. It is important to smooth it thoroughly so that there are no bubbles or dents.
But this method is unacceptable if heating is carried out with coal.
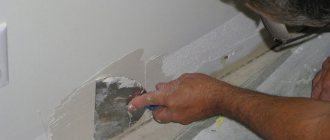
Applying plaster
Performed in the following sequence:
- Heat the oven well.
- We prepare two types of solution. One has a liquid consistency, like sour cream, the other is viscous, denser. Mix the viscous solution right before plastering.
- We check the quality of the reinforcement. We cover holes and chips in the masonry with putty.
- Moisten the brickwork with water.
- We plaster with a liquid mixture with a layer of up to 5 mm. It is convenient to do this with a wash brush.
- Let's give it time to set. Mix the viscous solution.
- We distribute the plaster evenly over the surface from top to bottom.
- Once the mixture has set, you can begin grouting.
- When drying, we repeatedly moisten the walls with water so that the solution does not dry out or crack.
You can wrap the oven with burlap soaked in water. It perfectly retains moisture and promotes uniform drying.
The cladding of an unevenly laid stove requires proper leveling. This is done using special beacons, which are attached to the walls and aligned with them during plastering. In this case, the layer of solution can reach a thickness of up to 8 cm.
Difficulties may also arise when finishing corners. An angled spatula will help with leveling.
The popular method of removal is to fix the corner of a wooden slat on one side. It is necessary to apply the solution, and as it dries, move the strip to the other side of the corner.
It is not recommended to leave corners sharp. This increases the risk of injury to children and adults during operation and repairs in the house. When rearranging furniture, a corner can be chipped or damaged. Therefore, it is better to round the edges using a corner spatula.
Finishing
It is worth paying special attention to the outer part of the chimney, located on the roof, since it is this part that is exposed to the destructive effects of the environment.
To improve the appearance and increase the strength characteristics of a brick chimney, you can resort to lining it with various finishing materials. The building materials market offers a wide range of decorative and finishing materials suitable for finishing a chimney. Read an overview of the types of caps for chimney pipes. In addition to finishing an old brick chimney with facing bricks, you can plaster the surface of the chimney walls and paint them with heat-resistant paint. Brick chimneys lined with flexible acrylic tiles imitating stonework look original. If the choice was tiles or corrugated sheets, then additional installation of a metal profile frame will be required. Fiber cement boards that imitate brick or stone can also be fixed to the frame base.
Roofing slate can also be used as a finishing material. Installation of slate tiles is carried out on a frame base using copper nails. When laying tiles, it is necessary to maintain an inclination angle of at least twenty-two degrees.
The process of plastering a brick chimney on the street can be divided into several main stages:
- the surface of the chimney is first cleaned of dust and dirt, then treated with a primer to improve adhesion;
- then a reinforcing mesh is fixed on the surface of the chimney walls (if the mesh is made of fiberglass, then the reinforcing mesh will be fixed to an adhesive base; if a metal mesh is used, then its fixation will be carried out using nails driven into the seams between the bricks;
- after the reinforcement of the chimney surface is completed, you can proceed directly to plastering (at least five layers of plaster are applied).
Keep in mind that before applying the next layer of plaster, you must allow the previous one to dry.
To plaster the surface of the external walls of the chimney, you can use any heat-resistant plaster mixtures.
You can add marble chips to the last layer of plaster.
How to insulate?
Regardless of the material used to make the chimney, the outer part of the chimney must be insulated. In the case of insulation of a brick chimney, a sheathing is mounted on the surface of the chimney structure. Thermal insulation material is placed in the space between the slats. Sheet foam or expanded polystyrene foam, as well as basalt wool, can be used as thermal insulation material. Decorative and finishing material can be fixed on top of the insulation on the sheathing, or the chimney can be lined with hollow bricks. Read the guide on how to install a sandwich chimney.
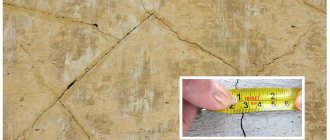
Frequently occurring defects and their prevention
If you lack experience, you may encounter the following problems:
- cracks appear on the coating;
- the plaster layer completely moves away from the brickwork;
- Parts of the mixture fall off from the oven.
To prevent such situations, it is recommended to consider the following points:
- Finishing of a new stove is allowed only 2 months after its construction. During this time, the material will shrink.
- A new stove must be heated regularly so that condensation evaporates from the chimney and walls. Each time the temperature in the furnace and the duration of combustion increase.
- It is important to choose the correct proportion of the solution. The fatter the clay, the greater the sand consumption should be.
- The plastered surface can be painted or whitened only after a month, once the mixture has completely dried and hardened.
- Even damp surfaces can be sanded. The tool is a piece of rough cloth.
- The drying time of the plaster layer is from 3 days. After this time, you can start heating.
You cannot prime a surface that is hot over 300 degrees. This will lead to the appearance of one of the mentioned defects.
Rules for reinforcement and application of mortar
- You can start applying the solution only after warming up.
- Reinforcement is a mandatory step. You shouldn't ignore him. Reinforcement will increase the strength of the coating, the service life of the cladding, and level the surface.
- The structure can be strengthened with burlap only after it has been soaked for a long time. The burlap should be kept in the clay solution for at least several hours.
- The burlap should be applied overlapping.
- It is better to secure the reinforcing mesh with wire. It's much easier. However, if there is no wire, then metal rods can be used. They are driven into the masonry. The mesh itself is attached to the free ends.
- The plaster solution must be applied from top to bottom. The pulp should be distributed evenly.
- When the plaster has set a little, it should be rubbed. For this it is better to use a wooden grater. The surface should be rubbed in a circular motion.
Reinforcement is a mandatory step
What not to plaster a stove
Many owners of country houses are interested in the question of the acceptability of using Rotband as a mixture for plastering the stove surface.
The clear answer is no. This product should not be used to finish a stove. The reason for this is the high content of gypsum in the composition, which, under the influence of high temperatures, begins to turn yellow and quickly crack.
It will not be possible to putty brickwork with compounds that are used for finishing the walls of a room, such as “Start” and “Finish” putties. Their base is also gypsum.
The most reliable is the clay-sand mixture. Although its preparation requires more time, it will last for years without repair.
How and what to grout the stove after plastering
You can start grouting when the solution has already set to the surface, but has not yet completely dried.
It’s even better to do it with a wooden grater or a plastic one with a soft cloth attachment. One hand holds the grout, the other holds the brush with which the surface is wetted.
The movements are circular, but if there are depressions or bumps, they can be modeled in order to carefully eliminate defects. The pressure on the tool is greater on convex areas and less on depressions.
The result of grouting is a smooth, even surface.
Finishing the top of the chimney
Finishing the outer part of the pipe also begins with its thermal insulation. If it is brick and in good condition, it is enough to use basalt wool and any facing material for external work. Suitable: corrugated sheets, tin, clinker, tiles or natural stone panels. If the brick is old, the chimney must first be repaired. To do this, line the brick channel with a steel pipe.
A metal chimney is insulated in the following way: a second pipe (of larger diameter) is put on it, and the space between them is filled with basalt wool. For beauty, the outside of a metal chimney can be decorated with any material that is used for a brick one. The finishing is fastened to a frame made of a metal profile, if it is a sheet material.
7 June 2014 Alexey
Proper operation of the heating device is only possible if there is a combustion product exhaust system. But it involves the installation of a pipe passing through the floors and roof.
Moreover, the connection of the channel to the roof must be airtight, have no gaps, and to maintain the style of the building, it must be lined with the most suitable material.
The process of performing all this work or finishing the chimney must comply with fire safety rules, since the gases passing through it heat the structural elements to a temperature that can cause a fire.
Features of stove plaster repair
There are several reasons for the formation of cracks on the surface:
- Incorrect masonry, due to which the structure heats up unevenly in places. This will require radical repairs - refurbishment of the stove.
- Using ordinary plaster that is not fire resistant. You will have to replace the coating with a heat-resistant one. An alternative is to add fireclay powder to the clay solution.
- The doors were loose. Reinstall with metal mesh reinforcement.
- Failure to comply with plastering technology.
If minor repairs are required without completely replacing the entire coating, then the work order is as follows:
- We clean the layer of whitewash or paint.
- We remove the cracked part of the plaster with a chisel to the brickwork.
- We remove all excess with a metal brush.
- We prime the area. An alternative to primer is cement diluted in water with a liquid consistency.
- Mix the solution. It is better to choose the same composition as was used previously.
- Apply the solution in small portions onto the moistened area.
- Let it set a little and rub it in.
- To secure doors that are loose, take them out. We clear the area from falling pieces of mortar.
- We make new holes for fasteners. For reinforcement, we wall up pieces of wire.
- We wrap the door frame with asbestos cord and put it in place, securely fixing it with wire.
- The clay mixture is applied.
- The treated areas are rubbed and polished.
Attention is paid to the correct proportion of the solution. Failure to do so will again lead to the formation of cracks on the surface.
Chimney rerouting costs for 2021
How much does it cost to move a chimney?
The average cost of relining a chimney is usually around £300
for a small chimney with easy access on a low roof. It is estimated that a chimney at the gable end of a semi-detached house would cost £800 due to scaffolding costs. Redirecting a large chimney pipe to the center of the roof is the most expensive, usually around £1,200. This average price can vary greatly depending on location, amount of scaffolding, chimney type, and whether the chimney is at the end or middle of the roof, and whether it is at eaves or ridge height.
A roofer will often charge around £150 per day in labor costs and will likely work in pairs to re-up the chimney for safety reasons, so expect to pay around £200-250 for two workers. Turnaround times will depend on the size of the chimney and location its location. A small chimney will take up to one day, a large one - on average 2-3 days.
Chimney relocation cost
Below are the approximate costs of hiring a chimney specialist to refit your chimney:
| Chimney Type | Scaffolding Type | Average Cost | Duration |
| Chimney in a bungalow | No | £ 250 | 1-2 days |
| Chimney on the side of a row house | Construction tower | £ 600 | 2 days |
| Chimney in the middle of a semi-detached house | Scaffolding over the ridge | £ 1000 | 2-3 days |
Cost Breakdown
Individual cost of hiring a roofer to refit a chimney to the front of a semi-detached house - Total cost: £600
What the job entails
A marker is the ready-mixed cement between courses of brick on a wall or chimney. The cost of relining a chimney or wall will ultimately depend on the size of the wall/chimney and the height/access. If the point degrades and crumbles over time, it can lead to moisture intrusion and ultimately costly structural problems, so it's best to have any repointing done as soon as possible to avoid further costs down the line.
If you're planning on rerouting your chimney, you probably have a leak and are hoping that rerouting will solve the problem. However, you should also inspect (and if necessary replace) the chimney and grate, the cable around the base of the chimney, and the tiles around the chimney and under the flashing. If you need scaffolding to carry out the markings (most homes will), it may be worth thinking about any other work that may be required in the near future that may require the use of scaffolding, such as any cladding, slab or drainage work .
The most difficult part of chimney conversion is gaining safe access to the chimney and working at height. This will almost always involve hiring a construction company to provide safe access. Once you have access, you should also inspect the junction at the top of the chimney and remove/replace if in poor condition. Then you need to clean the old needle and remove dust with a brush. Don't be tempted to just apply a thin layer of cement over the old needle, this is a false economy and won't last long, peeling off after just a few months.
In order for the job to continue and withstand the British weather conditions, it is vital that the old cement is scooped out to about an inch deep or more. The new cement can then be fed into the brickwork. The conversion can be completed as a DIY project if you are comfortable working at height and have the necessary safe access via scaffolding or a tower. No building permit is required.
When working at height, something can always go wrong, which increases the cost of the job. So make sure that any company you hire has the experience and qualifications to do the job properly and, failing that, they have adequate insurance in case of any damage or injury! Your location will also affect the price, as labor costs vary significantly depending on the North/South division!
Ready to get deals from local traders?
Post your job in minutes and get quotes on local, trusted deals. It 's FREE
.
No obligations. Get a price quote
FAQ
The price will vary depending on many factors, but on average a very small chimney on a low roof (eg in a bungalow, so no scaffolding required) with easy access will cost between £250 and £300. But for a standard size chimney in a semi-detached house requiring scaffolding for safe access, expect to pay in the region of £600-700.
Rewiring the large chimney located in the center of the roof is the most expensive of all. This type of work requires extensive scaffolding from ground level and from the edge of the roof through the shingles to the chimney. The cost of scaffolding will vary and really depends on the height of the roof, but a typical quote including scaffolding will be around £1000. Access to the chimney is a major factor in the cost and access issues can really drive up the price. The price of materials (sand and cement) is negligible in comparison.
Most proposals will include erecting the necessary scaffolding or supports to access the chimney, inspecting and replacing the cement in the chimney if it is in poor condition, sanding away the existing cement between courses of brick to a depth of approximately 1 inch, inspecting the entire chimney structure, and making any necessary minor repairs. , pouring new cement mixture into the brickwork, new cement cap, dismantling the scaffolding and removing all waste.
The fastest job, such as installing a small chimney in a bungalow, will take less than half a day as no scaffolding is required. A typical scaffolding job takes a full day, with some jobs possibly needing to be completed on a second day. These time frames do not include scaffolding erection/removal time and certainly do not assume any problems, other work that may be required such as flaring, lead flashing and shingles that need to be replaced will take longer and will obviously increase the cost of the job . (although roofers will often include minor flaring and lead flashing repairs in their quotes if they don't take too much time).
The brickwork and exposed chimney are exposed to strong winds and heavy rain, so over time the cement will begin to degrade. Much sooner than other mortars located in less exposed areas of the property, as chimneys do suffer from the worst of British weather! When the cement begins to deteriorate, it is washed away and the bricks at some point collapse on each other. Once the chimney has worn down to this extent, it cannot be re-stretched and will require a complete rebuild at much greater expense.
In addition, the bricks can become loose and come off the chimney in strong winds. If these bricks damage your neighbor's property or injure someone, you are responsible! There is also an increased risk of penetration into the amplifier, which can ultimately lead to structural damage and wet spots inside. Sticking your head in the sand and doing nothing will not help, in the long run it will be cheaper to re-upholster the chimney ASAP!
We don't recommend DIY enthusiasts climb on roofs and do re-stringing, but there are no laws against it, no building permits are required, and the Building Authority usually doesn't get involved. But unless you have experience with this work, you won't feel comfortable at heights and don't have access to all the necessary safety equipment - leave it to the professionals!
.
Methods for decorating a stove
After the plaster layer has dried, you can begin decorating the product. Suitable for this:
- painting or whitewashing;
- tiling;
- applying decorative plaster.
Let's look at each option in more detail.
Painting
Of the purchased paints, only water-based compositions are suitable. Oil-based ones darken quickly and are not resistant to heat. Before you start painting, the surface is thoroughly primed.
Whitewashing is more often practiced. It will be easier to achieve a white surface if lime is added to the plaster.
Old masters diluted one part of chalk with two parts of milk, adding 100 g of kitchen salt to 10 liters of whitewash. Paint is applied in two layers. The composition will not begin to burst and will not smear.
If the owners want to get a finish with a blue tint, then add a little blue to the whitewash. To obtain the desired shade of paint, it can be tinted.
The work is performed with brushes of different sizes.
A good addition would be to apply beautiful textured patterns, colors, and ornaments.
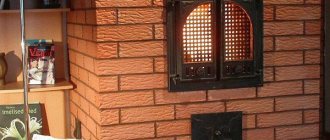
Tile laying
Used for lining fireplaces and stoves.
Material – ceramic, terracotta tiles. Tile is not suitable for such purposes because it cannot withstand constant exposure to high temperatures.
To fasten the elements you will need tile adhesive with heat-resistant properties. Conventional adhesive will not withstand such heat, and the tiles will simply begin to fall off.
Tiles will hide uneven corners. It is enough to glue the finished corner parts.
Pasting is carried out with strict adherence to horizontal and vertical levels. The uniform spacing between the tiles is maintained.
The color and texture of the parts are selected based on the style of the building.
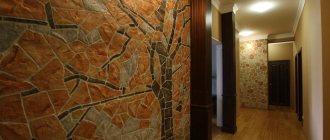
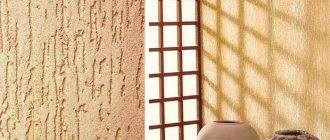
Decorative plaster
The main requirement for decorative plaster is heat resistance.
If this is not available, then you can purchase a mixture for external use, but after plastering, attach gauze around the entire perimeter - this will prevent cracking of the finish.
Acceptable basis of composition:
- mineral (containing lime, clay);
- acrylic;
- silicone;
- silicate;
- heat resistant.
Apply with special spatulas. After drying, it is complemented by painting and varnishing.
Popular brands
When purchasing a plaster composition, it is important to pay attention to the following:
- permissible operating temperature limit;
- whether the composition is intended for indoor or outdoor work;
- environmental friendliness of components;
- hardening time;
- resistance to moisture, sudden heating or cooling.
The integrity of the packaging, date of manufacture, and compliance with storage conditions are important.
Heat-resistant plaster for stoves and fireplaces
The following types of brands are the most popular.
PECHFORM PC400 W
Heat-resistant variety. Suitable for lining the flood zone, areas near the hob, side walls of the stove, fireplace.
The maximum permissible operating temperature is 400 degrees. There is no need to additionally putty the surface on top.
With skillful use of rollers and shaped spatulas, you can create a beautiful relief surface.
Can be used for outdoor and indoor work.
Surface material for application:
- brickwork;
- concrete;
- limestone;
- composite slabs.
5 minutes after mixing the solution it is ready for use and remains suitable for application after 2 hours. Do not apply on top of metal parts.
During operation and drying of the composition, the temperature should be from +5 to +30 degrees. Painting is allowed after 2 weeks.
Typhoon Master
Products from a domestic manufacturer. Heat-resistant plaster is used for finishing walls, chimneys of fireplaces, barbecues and barbecues made of brick.
The basis of the composition is fireclay clay. Suitable for outdoor and indoor work.
Has the following properties:
- heat resistance;
- tolerates moisture well;
- plastic;
- convenient for vertical application.
The average mixture consumption per 1 square meter is from 1.6 to 1.8 kg.
Kalina Master
Fireproof plaster. Contains Portland cement. It is characterized by increased strength. Excellent resistance to high temperatures. Quickly sets to the surface. Resistant to mechanical damage.
A layer of solution increases the heat transfer of the furnace by up to 15%.
Pechnik
The base is fireclay clay. Suitable for masonry and finishing of stoves. Hardens quickly. It is used in working with old and new furnaces. Convenient to apply.
Tolerates high temperatures well. The fire resistance level reaches 6000.
It does not collapse when the product shrinks, it is plastic.
Heat-resistant adhesives
Act as a connecting substance for fastening tiles to the surface of a stove or fireplace.
Two types are in greatest demand.
Terracotta
Sold dry. The main raw material is refractory kaolin clay. Does not lose properties at +400 degrees (permissible limit).
It is distinguished by its plasticity, ease of installation, and good adhesion. Used for leveling walls and plastering. All components of the composition are environmentally friendly. It hardens quickly, within an hour after mixing.
The recommended layer thickness is up to 1 cm.
Hercules
Heat-resistant glue. Used for laying fireplaces, stoves, barbecue complexes made of refractory bricks. Suitable for fixing tiles.
Packaged in bags of 5, 12 and 25 kg.
Operating temperature range from –50 to +1200 degrees.
Manufacturers
Below is a list of trusted manufacturers of stove plaster.
Plitonit
Plitonit is a German-Russian enterprise. Produces mixtures for masonry and finishing of fireplaces and stoves.
In assortment:
- heat-resistant compositions for masonry, repair of furnace structures;
- mixtures with reinforcing components for the construction of fireboxes;
- heat-resistant adhesives;
- plaster.
A striking example of a plaster composition is SuperKaminOgneUpor. The hardening time is half an hour after mixing the solution. There is no need to wet the brick before application. Doesn't crack. Resistant to moisture.
Concord East
The company has existed since 2000. Produces building materials and paints and varnishes.
The range includes:
- primers;
- PVA glue;
- water-based, acrylic, oil-based, latex-based paints;
- Bustilat;
- ready-made putties;
- heat-resistant oven plasters.
Stove plaster "Emelya" is one of the company's trademarks.
Wolfshoher
The family German company Wolfshäuer Tonwerke was founded back in 1856 by Lorenz Wolf, after whom the company is named. Has official representative offices in Russia.
The plant produces fireclay bricks for laying stoves, chimneys, and ceramic pipes. There is also an assortment of stove plaster.
BOSSNAB
The company is located in St. Petersburg. Engaged in the production and sale of plaster for fireplaces, stoves, as well as glue for facing work. The main raw material is red clay.
Terracotta
Domestic manufacturer of mixtures for plastering, cladding and finishing of various surfaces, including fireplaces. All compositions are safe for health.
Mixtures for ovens can withstand heating temperatures up to +1300 degrees.
The main raw materials are kaolin clay and fireclay powder.
RATH
An Austrian company with representative offices in different European countries.
Produces building materials with heat-resistant, fire-resistant properties. These include stove plaster.
Vetonit
A subsidiary of Weber Corporation, which has production in 64 countries. The central office is located in France.
An example of a product is Vetonit mortar for brickwork. The base is fireclay clay, cement, sand.
A competent approach to choosing a ready-made mixture will simplify the plastering process and avoid mistakes when mixing the solution. If you have experience in carrying out such work, then it will not be difficult for the master to make the plaster yourself and carefully apply it to the surface.
Instructions for stove mortars (for laying chimneys): what are they and how to prepare them?
Arranging the heating system of a private house involves certain difficulties with laying the chimney. The problem arises when using red ceramic bricks, which should only be laid using a special fireplace/stove mortar.
There are several types of compositions for laying a stove, and in each individual situation it is advisable to use only a specific type. The very use of the composition (its preparation) is quite possible with your own hands.