How hidden wiring works
When laying cables in grooves, take into account the layout of sockets, switches and lighting fixtures in the rooms.
In the kitchen
According to the requirements of the PUE, when laying wiring, the following rules must be observed:
- cables must be laid at a distance of more than 60 cm from the floor and water pipes (the same applies to sockets);
- a distance of 60 cm should also remain from gas communications.
At the lower level, wires are laid for sockets to which devices are connected for a short period of time.
At a distance of 1-1.3 m from the floor, power points for lighting devices and equipment located on the desktop are placed. The socket for connecting the hood is mounted at a height of 2 m.
In the bedroom
The wiring in such a room is laid taking into account the comfort of using sockets. It is recommended to place power points near the bed or bedside table. If there is a desk, additional cables are laid for 2 sockets. The power point for the TV is installed at a height of 1.3 m.
In the living room
In this room, the electrical elements should be located like this:
- the switch is mounted near the doorway at a height of 90 cm;
- the socket near the sofa area is located so that it is convenient to connect a lamp or chargers;
- The power point for the TV is placed behind the device;
- if there is a desktop, add sockets for a computer or other equipment.
Features of laying grooves for electrical wiring
Grooving in concrete for electrical wiring
Different materials behave differently when grating. The most difficulties arise when making grooves in concrete walls; in this case, wall chasers and hammer drills are used. If we are talking about a brick wall, you can do without gouging with a trench; the cables are attached to the wall with dowels.
If it is necessary to pre-place the wiring in a metal casing, horizontal gouging of the channels is carried out using a grinder or chisel. Brick walls, if they split, do so at the seam. This is due to the fact that cement mortar is more pliable and softer than brick.
Basic rules and features of gating:
- The depth of vertical trenches should not exceed 1/3 of the wall thickness.
- The recesses are carried out strictly horizontally or strictly vertically; tilts are permissible only if there are uneven slabs of the house.
- The depth of horizontal grooves should not be more than 1/6 of the thickness of the ceiling.
Chasing of load-bearing walls is strictly prohibited.
The nuances of laying grooves for electrical wiring
When chipping, materials behave differently. The most difficult thing is to make channels in a concrete wall. In this case, wall chasers are used. Brick walls are being chipped at the seams.
When performing work, the following rules are observed:
- the depth of the vertical channel is no more than 1/3 of the wall thickness, the depth of the horizontal grooves is no more than 1/6 of the ceiling thickness;
- trenches are positioned strictly vertically and horizontally.
Plaster first
Often, already finished walls are installed in housing that was previously in use. Among the positive aspects, one can note the master’s clear awareness of the plane of the wall, its general level and degree of evenness. That is, the worker can immediately understand how deep the groove will be enough for laying cables and how to prepare wells for distribution boxes. All this greatly facilitates the work and increases the likelihood that the electrical accessories will be installed correctly. In addition, one cannot fail to note the significantly smaller amount of construction work during such a repair: the walls most likely will not have to be leveled at all or only a thin cosmetic layer will be required - cement plaster will not be used, and the overall time spent will be significantly reduced.
Of course, there are difficulties here too: cutting grooves alone is a technically complex process, time-consuming and dirty. You can cover the grooves with alabaster, cement-sand mixture and several types of plaster. If necessary, the walls on top of the load-bearing material can be sheathed with sheets of plasterboard and lining, but in these cases an adjustment must initially be made for their thickness so that the holes for the socket boxes do not turn out to be too deep.
At the same time, this technique has a number of very significant disadvantages. For example, if the walls in the house are too thin, for example, they are laid out with only half a brick, while cutting the groove, the plaster on the back side of the partition may well be damaged - a crack will appear or a fragment will break off. It is even more difficult with wells for socket boxes in such places, because on average their depth is at least 6 cm, that is, more than half the thickness of the wall.
Gouging was and remains an unpleasant stage: if you do it with a hammer drill, you can reduce the amount of dust on the site, but the grooves will be very sloppy, and in order to seal all the potholes flush with the plane of the wall, the customer will have to turn to plasterers again.
A completely separate thing should be said about plasterboard partitions. The concept of electrical wiring after plastering does not apply here. Even if you have to do differently for all the other walls in the house, wiring in such structures is done at the stage of their construction and nothing else. In this case, the final finishing stage can be the same and simultaneous for all partitions - there are no technical obstacles to this.
Step-by-step guide to sealing gates with your own hands
The work is carried out in several stages. They begin with the preparation of channels and building mixture.
Required materials for caulking
Before plastering the grooves, select a suitable building mixture.
Most often used:
- gypsum plaster (used when working in toilets or bathrooms);
- cement-sand mixture;
- ready-made solutions (“Rotband”, “Volmu”);
- gypsum glue.
What tools are needed?
To seal the channels you will need:
- container for preparing construction mixture;
- brush for wetting the grooves;
- a set of metal spatulas of different widths;
- sandpaper.
Preparation stages
First of all, de-energize the electrical network and check that there is no voltage. The finished channels are cleaned of dust, moistened with water and primer.
After this, perform the following steps:
- Lay the cables so that they do not protrude from the groove. Prepare the building mixture according to the instructions. It is best to make small portions, as the solution hardens quickly. Plaster is applied to the areas where the wires are point-attached.
- After the composition has hardened, the plaster is prepared. Each type of mixture is designed for a particular thickness. If it is necessary to apply a layer of more than 5 cm, the work is carried out in stages. The mixture is distributed with a spatula, holding it perpendicular to the channels. The plaster is smoothed until the channel is level with the surface.
- If it is necessary to paint the walls, the treated areas are covered with reinforcing mesh or serpyanka. A new layer of plaster is applied on top.
- After the material has dried, the primer is reapplied. If shrinkage occurs after plastering, there is no need to take any action: this is normal.
- Level horizontal and vertical surfaces with putty. If the walls are tiled, this step is skipped.
Electrical work is done before plastering: pros and cons
At first glance, the idea is good: lay down the wires, install socket boxes, and hide it all with a layer of plaster on top. No tedious gating, no huge amounts of dust, quick and easy. And if something lies crooked, the finishing will hide everything.
In practice, many masters object to this method:
- wires sticking out of the walls prevent the plasterers from drawing out the mortar evenly;
- all electrical contacts and wire leads must be covered so that the plasterers do not shower them with mortar;
- it is impossible to position the electrical distribution board in the plane of the wall;
- it is almost impossible to install the socket boxes flush with the wall surface due to the fact that the thickness of the plaster on each section of the wall is unknown; therefore, after plastering work, the socket boxes will either “sink” or stick out from the surface of the plaster;
- contacts and connections are exposed to moisture from the plaster, this causes them to oxidize;
- the plaster layer under which you want to hide the electrical wiring must be thick enough.
Tips and tricks from experts
Experienced professionals recommend:
- Prime any surfaces. If the brush does not reach hard-to-reach places, the composition is sprayed onto the surface.
- Wear gloves at all stages. It is problematic to wash off primer or plaster from the skin of your hands.
- Securely secure cables in grooves. This way, cracks will not appear during operation of the wiring.
- Apply herringbone plaster. This improves the adhesion of the mixture to the wall.
- Remove excess mortar with a wide spatula. It must be held perpendicular to the surface.
When the master follows these recommendations, the work on sealing the grooves turns out to be of high quality. Even after 10 years, the mixture does not crack or fly off.
Main process steps
Gypsum plaster should be applied from.
You need to remove excess solution with a trowel, holding it at an angle of 90°. After completing the preparatory work, check that the wiring placed in the grooves does not protrude beyond the vertical/horizontal surface. In places where the wire is not recessed enough, you need to go through it again with a construction tool.
Sealing is carried out using the following technology:
- Dilute the construction mixture in accordance with the instructions for use included in the package. It is better to prepare it in portions, since the substance hardens quickly. Apply to the surface in areas of spot fixation.
- After the plaster has hardened and securely holds the wiring, the plaster is mixed. Each type has its own layer thickness limit. If a layer thickness of more than 500 mm is required, the process is carried out in several stages.
- Apply the viscous mixture with a small spatula perpendicular to the groove and cable. It is sealed and leveled until the sealed groove begins to coincide with the surface of the wall.
- If homeowners continue to paint the surfaces, the sealed areas are additionally treated with strips of fiberglass, reinforcing tape, construction tape or sickle tape. Another layer of plaster is applied on top; this is important to take into account when leveling the surface.
- After all layers have dried well, you can begin re-priming the surface. If the plaster shrinks slightly, do not worry, this is a normal process.
The final stage of all work is final putty work to level horizontal and vertical surfaces. If you further plan to apply ceramic tiles to the walls, finishing work is not necessary.
The procedure for installing hidden wiring
When assessing the volume of labor costs, two options for arranging electrical wiring hidden in the thickness of the walls are considered. This:
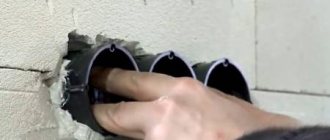
- Preliminary laying of wires on the walls with further plastering (photo below).
- Wall finishing with subsequent arrangement of grooves, laying of power cables and installation of electrical installation products.
When choosing the first option, first, wire strands are fixed in pre-prepared recesses or directly on the walls, after which several layers of plaster are applied on top of them.
Please note
:
This method is used only when the thickness of the finishing material is sufficient to hide the already installed wiring.
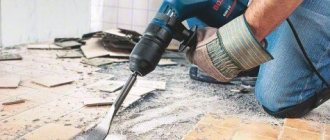
In the second approach, everything is done the other way around: first, the surfaces of the walls are plastered, and after the protective layer has dried, grooves are cut into it for laying hidden wiring (photo below).
Comparison of labor and material costs
Upon closer examination of the issue, the conclusion suggests itself that it is easier to first lay the wires on a concrete base and then cover them with a thick layer of plaster.
But this does not take into account a number of important points regarding upcoming costs, namely:
- In this case, the costs of finishing materials and payment for additional work to build up a layer of plaster increase sharply.
- Operations for installing wiring and connecting installation products will be spaced out over time, so the electrician will have to be called twice.
- The first time it will be needed to lay wires along bare walls, and the second time to secure the socket boxes in the plaster and connect the ends of the wires to them.
- It is almost impossible to do the second part of the work on a bare wall (without plaster).
- Laying electrical wiring on top of the finishing material in grooves will not be so expensive, since the plaster is made of normal thickness.
- Electrical installation work is carried out only once.
The laying of wires and the installation of sockets, switches and distribution boxes begin after the plaster has completely dried, after which it is possible to cut grooves and make niches in it. This is not a pleasant task (very tedious and dusty), but in this case the work time will be reduced and the costs of its implementation will be significantly reduced. Therefore, the option of arranging wiring on top of the plaster is generally considered more preferable (photo below).
For users who are not in a hurry and are ready to install the wiring and plaster the walls themselves, the order of the work is not of fundamental importance. They usually choose the first option (the costs of additional operations in this case are covered by the performer himself).
Source