Once upon a time, decorating the interior with stucco molding and bas-reliefs was available only to the highest nobility, the rich and large temples. Nowadays, making a bas-relief with your own hands is just a matter of labor and patience. Advances in modern technology make it possible to bypass the technical difficulties of creating stucco at home for people who do not have an artistic education, but who are not devoid of artistic taste and imagination. Create bas-reliefs like those in Fig. Below, it is quite possible for a patient and attentive amateur.
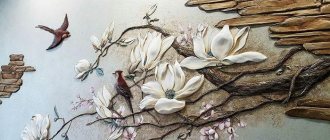
Bas-reliefs of modern work
New materials
In addition to the traditional material for stucco - gypsum - do-it-yourself stucco can be created from modern building mixtures with polymer additives; they are often combined under the general name “acrylic plasters”. You can learn how to increase the volume of a bas-relief with construction putty compounds from the video:
Video: sculpting a bas-relief from putty
Hobbyists also use a basic composition of architectural plaster, acrylic plaster and PVA glue in a ratio of 1:1:0.5 by volume .
The gypsum and plaster mixture are mixed dry and sealed with water, i.e. add water to the mixture, not the other way around. Bring to a dough consistency like yogurt or low-fat kefir and add PVA, stirring thoroughly. The thickness of the mixture is selected according to the type of work with it, in which case which mixture is needed, see below.
Materials for creating a bas-relief
The most common question among beginners is: what putty is best to use for making bas-relief? In principle, any finishing gypsum putty will do. Each master has his own favorite brands and compositions. Here are a few to recommend:
Knauf Uniflot. Very durable and flexible. It can be used to form a deep relief - it will not fall off even without reinforcement. Disadvantage: expensive. Fugen. A little less durable, a little worse to cut. Much cheaper than Knauf Uniflot (almost three times). You can also make a relief without any problems. PUFAS. This is a gypsum putty with cellulose fiber. Processing time is about 60 minutes, applied in a layer of any thickness, cuts well, and is easy to sand. “Rotband” for the lower layers and “Shitrock” for the upper ones. "Akryl Putz" (Poland). Ready-made acrylic putty. It is good because it “sets” slowly; it takes an hour or more to work on the details (depending on the humidity in the room).
In addition, impregnations are required. They are selected based on the starting characteristics of the material. There are compounds that strengthen crumbling materials, penetrating deeply and binding particles of materials to each other. This is necessary, since gypsum panels weigh a fair amount and create additional load. Without preliminary preparation, they can fall off from unstable foundations. You can use moisture-protective primer concentrate from PUFAS. It is suitable for all mineral substrates, including wood and wood-based panels. The moisture-proofing composition Aquastop is suitable for loose substrates.
Impregnations for bas-relief priming
In addition, the following compositions are used:
before starting work - to improve adhesion to the wall (or base) material; for layer-by-layer processing - when creating a deep relief, when one layer of putty is applied to the already dried one applied earlier; for finishing impregnation before painting - to level out the absorbency and so that the paint lays evenly, emphasizing the relief, and not hiding it.
For layer-by-layer processing, primers are needed that create a sticky, rough surface on the surface. In this case, you can put a new layer of putty even on an already dried surface. Ceresit deep penetration primer and PUFAS impregnating primer are suitable for these purposes. They can also be used for finishing before painting.
Methodology for self-production of a matrix for bas-relief
There is no need to take any super complex actions. The following set of materials should be prepared:
— drawing-sketch (patterns, lines, geometric shapes, etc.);
- thin sheets of durable plastic. Each stencil is used once, so you should stock up on a sufficient number of PVC sheets;
We recommend: How to choose curtains for your interior - types of curtains and tips for choosing
- stationery tape;
- graphite pencil, permanent marker.
After preparation, you should perform the manipulations in full accordance with the step-by-step instructions:
1. Selecting a ready-made ornament or drawing it yourself. You can choose interesting options on thematic websites or in special albums.
2. Preparation of material for the stencil. Here, you need to clean the sheet of plastic from packaging or dirt, if any. Additionally, it is recommended to degrease its surfaces.
Advice! The optimal blanks for flares will be sheets of PVC plastic (thickness 0.14-0.17 mm) for brochure covers. This material is flexible, very durable and transparent, and the latter property will greatly facilitate the transfer of the design from the sketch stencil!
3. Cutting out the stencil. The edges of the cuts should be smooth and clear; the formation of burrs or cuts should not be allowed - they can spoil the future stencil, which will be reflected in the final result in the form of unevenness.
4. Drawing on plastic. This can be done in several simple ways:
- using carbon paper when the planned pattern is printed on thin paper;
- outlining the contours of the pattern placed under a sheet of transparent plastic;
- neat outline of shapes cut out of thick cardboard.
Clue! To avoid displacement, it is necessary to securely fasten the sheet with the main pattern with tape to the surface of the plastic sheet!
Preparatory activities
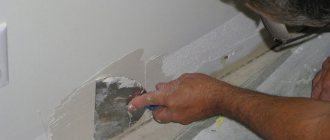
Before you start creating a bas-relief yourself, you need to choose a suitable wall. She will need to be prepared . Clean the surface of old coatings, prime and dry. After this, cover the surface with putty. Wait until it dries and draw an image on it. It should be done using bas-relief technique.
An image is selected in advance to be placed on the wall. Make a sketch using a pencil. You should not try to create complex drawings the first time. It's better to gradually develop skills. A good option for a beginner would be to depict vegetation, birds and not too complex figures. If you don’t have any artistic abilities, then you can use the technique of drawing images using cells. Divide the drawing into squares, where all the lines from the drawing on the sketch are transferred one by one. It is important to remember to respect the scale of the image when redrawing details. You don't have to paint the whole picture at once. You can draw the outlines of objects depicted on the wall.
What material is stucco made from?
To create three-dimensional drawings, any materials that can be carved or those that can be poured into a mold are used.
List of materials for creating a bas-relief:
plastic; gypsum mixtures; stone; clay, including decorative clay; decorative plaster; wood, including bamboo; metal.
Plastic elements are lightweight, inexpensive, and easy to install. Stone or metal bas-reliefs are more expensive, but they look incredibly luxurious. Gypsum is considered an environmentally friendly material, non-flammable and does not support combustion.
Creating a relief and attaching it to the wall: instructions
Clean the base surface of the wall from local finishing. Level, apply a primer, coat with a base compound. Sometimes it is replaced with any type of decorative plaster. A background texture is created, for which a foam roller or pile is used. The so-called process of “spanning” with felt or foam rubber is carried out, after which the base is tinted. These steps are skipped if the wall is treated with decorative plaster or covered with gypsum board. A relief is being formed, which, after drying, is tinted on top. For plaster, coloring is done with special paints, shading with a damp sponge into thin halftones. Acrylic paints will help create sharp transitions from one color to another. When the paints are dry, then the relief can be treated with latex made from a butadiene-styrene mixture. The solution helps preserve the brightness of the colors for a long time. After one or two weeks, it is recommended to treat the relief with acrylic varnish.
A bas-relief is attached separately to the wall, which requires fastenings to provide support for the figures and other details of the composition. Installation of the bas-relief on the wall is carried out step by step:
Use corrugated nails, the length of which is 80-120 mm. They are driven into plastic dowels. Attachment points are made in the thickest places, marked in advance at an evenly spaced distance from each other. Nails are driven into the wall 50-60 mm. 15-20 mm of nails should protrude above the wall, excess tools are bitten off. Attach a bas-relief on top, which should protrude 10-15 mm above the peg.
Finishing work
When the required image has been created , the bas-relief must be thoroughly cleaned of dust . After this, the following actions are performed:
- treat the material with a primer;
- paint the surface. It is better to use water-based emulsion for this.
It is advisable to cover the parts with lighter paint if they carry the main stylistic meaning. It is better to use a regular sponge rather than a brush to avoid unattractive streaks. They are able to change the dynamics of the picture. Once all these stages have been completed, the decoration can be considered ready.
Bas-relief in the interior
The use of bas-reliefs gives quite a wide scope for interior decoration. For example, you can create a separate panel in the form of a painting to decorate an empty wall.
DIY bas-relief on the wall
Bas-reliefs are often used to decorate home fireplaces. The bas-relief in combination with original lighting creates a truly original picture - thanks to the lighting, all the convexities of the image will be visible even more clearly.
Bas-reliefs are great for decorating various kinds of openings.
DIY bas-relief on the wall
Unlike another popular interior design option - decorative painting - bas-reliefs do not need additional highlighting with color.
In the absence of color highlighting, a three-dimensional pattern will appear due to the play of light under well-arranged artificial lighting. Thus, the owner has the opportunity to create accents on decorative elements at the specific time he needs - just turn on the lighting.
DIY bas-relief on the wall
In addition to purely decorative functions, bas-reliefs also perfectly cope with various kinds of functional tasks. For example, volumetric decoration allows you to level out uneven surfaces, decorate utility lines, visually distort the space at the owner’s discretion, and create smooth transitions between different functional areas.
DIY bas-relief on the wall
A competent combination of volumetric relief and decorative painting allows you to create truly original and incredible effects.
However, despite its many advantages, bas-relief remains not such a popular option for decorating rooms. The essence of the problem lies in the high cost of arranging such volumetric elements.
DIY bas-relief on the wall
Uninformed people often make the mistake of believing that the bas-relief is a prefabricated structure cast from plaster. In reality, such decoration is arranged manually and is inherently exclusive. Consequently, to arrange a beautiful bas-relief image you will have to put in a lot of effort, but if you really want to, you can handle all the activities yourself.
DIY bas-relief on the wall
1
Surface preparation - mix the solution and sculpt the background
Every living space needs personality. In this regard, bas-reliefs made by yourself have an undeniable advantage: their sizes and shapes are not limited, the materials for their production are sold in any hardware store at an affordable price, and their production itself is a creative and very entertaining process.
First of all, we will select a section of the wall that we will decorate. Pay attention to its illumination, whether it will be natural light from a window or whether artificial lighting will be needed, because it is the play of light and shadow that visually increases the volume and emphasizes the texture of the image.
Now let’s select the sketches and decide on the size of the image. Of course, a hunting scene or a reproduction of Michelangelo’s famous paintings in your living room would look great, but it’s unlikely that you will be able to turn them into reality, so you should start with small elements that include floral patterns, geometric shapes, or even simpler some details of abstraction.
It makes no sense to start without this set of tools
For work we will need:
Rubber gloves; Trowel; Spatula; Wide flat brush; Palette knife; Cling film.
Before starting work, be sure to prepare the surface: remove the old coating from the wall section, level it, plaster it if necessary, and be sure to cover it with a layer of primer for better adhesion of the materials. The wall is left until completely dry.
Stucco is made from clay, alabaster, gypsum or plaster mixtures based on it. The recipe for preparing a gypsum solution is 1.5 kg of gypsum per 1 liter of water. For plasticity, add a little PVA glue to it and mix everything thoroughly. From the resulting soft “dough” it is easy to form a future bas-relief, and you should start with the main background. These are usually surfaces with some texture. For example, a few random brush strokes on wet plaster or movements of a paint roller will leave original marks.
We recommend: Painting wallpaper yourself: the right materials and technology
A good background for a bas-relief would be decorative plaster, imitation brick or stone masonry, a fine “sandy” pattern left by an ordinary sponge, or a textured surface of deliberately rough plastering. If the bas-relief is planned not in the form of a panel, but as a separate protruding element, then the wall around it must first be covered with masking tape to protect it from contamination.
We recommend
How to make a horizontal bar for a house or apartment with your own hands: drawings, dimensions, how to fix it on the wall without the risk of falling off and getting injured. Attaching a sink to the wall in the bathroom - do-it-yourself installation technologies. Do-it-yourself Venetian plaster - how to make it and apply it to the walls
How to install the decor
In many ways, this procedure is similar to installing conventional ceramic tiles. Installation is carried out using tile adhesive.
During work they also use:
- notched spatula;
- glue container;
- sandpaper;
- building level;
- plumb line
You may also need a screwdriver, drill and hardware.
Installation is carried out according to the following scheme:
- Level the walls and prepare a place for installing the slab. For this purpose, slats and beacons mounted on the wall are suitable.
- The slabs are installed plumb with glue. The adhesive component is applied both to the slab and to the wall.
- If the material is heavy, then it is advisable to install small pins underneath it. They are placed in the holes. These pins should not protrude above the surface of the slab by more than two-thirds of its thickness.
- If the slab is thicker, then you will have to select a nest for it in the wall, which is covered with plaster. This is necessary to level the surface of the wall and the finishing material. After this, a bas-relief is placed at a certain height. The plaster is closed with a seam between the decorative component and the surface.
If the facing slabs are massive and have a large pattern, you have to glue thick slabs directly to the wall, sacrificing the area of the room. In such cases, additional holes in the slabs for anchoring can be considered. They are fixed to the wall or reinforcement elements are walled into the slab. They are mounted in the holes using glue.
After this, the seams between the plates, as well as the holes in them, are covered with grout, alabaster or putty, and cleaned. As soon as the bas-relief is ready, the drawing is adjusted. You can varnish it. Following this, the surface is painted to strengthen and ensure its water-repellent properties. This also allows you to achieve a decorative effect.
Bas-reliefs can be made to match the color of the material , forming a pattern through the play of light and shadow. They also come painted. Such a pattern can either cover the entire wall in whole or in part, or take on the role of a decorative insert for a picture. There is a separate variety called counter-relief. It is most appropriate on surfaces with a large area. This technique involves moving the design onto the wall, and then making carvings of varying depths directly onto the plastered wall.
Sometimes the spots of the pattern and the deepening of the lines are made by fractions of a millimeter. In standard lighting, such a wall looks like a work surface. To clearly see the finished image, you will have to use backlighting.
Types of bas-reliefs
The bas-relief on the wall is made using the technique of low relief (top left in the figure) or high, with protruding figures (top right). A high bas-relief is also called high relief. Technically, high relief differs from low bas-relief in that the figures are sculpted like a round sculpture (see below). Low bas-relief looks good in any lighting, except very dim, and high relief looks better in diffused light.
Types of bas-reliefs
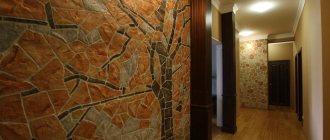
In living spaces, which are often lit quite brightly and evenly, it makes sense to use a mixed bas-relief technique (bottom left), without making the figures very convex. How to sculpt the bas-relief “Klimt Tree”, see for example. Master class video below:
Video: master class bas-relief “Klimt’s Tree”
The peculiarity of this work is that it uses almost all the techniques for creating bas-reliefs at home. Having become familiar with them visually, it will be easier for you to understand further and apply them in any of the techniques described below.
Note: at one time, the Austrian artist Gustav Klimt created the composition “Tree of Life”. Her style is so unique that the expression “Klimt tree” has become popular.
Reverse bas-relief, or counter-relief (bottom center in the top figure) is no longer stucco, but stone carving (the contours are cut in depth), which is technically much more complex. Therefore, we only note that the counter-relief needs bright and sharp oblique light, because the image actually draws a shadow. There is also a special type of bas-relief - shadow, lower right, where the entire pattern is formed by shadows from small and minute protrusions and depressions of a certain shape. When the direction and angle of incidence of light changes, the pattern changes, even changing facial expressions throughout the day. Shadow bas-relief is the highest art and, alas, short-lived: the protrusions and depressions become clogged and lose their shape when cleaned. The drawing fades, blurs, disappears.
Bas-relief techniques
Stucco molding on the wall at home can be done in one of the following ways, in order of increasing technical complexity:
Plastering of free ones, i.e. models that were not initially fixed to the supporting surface and cannot be removed; Plastering of non-removable models on the supporting surface. These methods are especially good for beginners, because... allow you to receive the corresponding high and low relief, without risking the need to redo the whole work again in case of failure; Reverse casting from plaster according to the model to be removed. The method is somewhat more labor-intensive, but also suitable for beginners, because... You can pore over the model as much as you like until it is perfect. In addition, in one mold (form, mold) made according to a model, up to 20-30 identical products can be cast at home; Artistic plaster stucco in place, i.e. directly on the supporting surface. It requires thorough skills, but makes it possible to create large relief panels covering the entire wall, with contours around corners, going to the ceiling, and complete freedom of creative expression.
In place or on a sheet?
It is possible to make a bas-relief using methods 2-4 both locally and in parts on a table or floor. An excellent basis for fragments of prefabricated bas-relief is plasterboard sheet, plasterboard. It is prepared as a base surface (see below), parts of the overall picture or complete compositions are drawn out on separate sheets or pieces of the desired shape (see figure), and mounted on a leveled wall.
Relief panels
The fastener heads and joints of the fragments are puttied with a base compound, then plastered and rubbed to match the base texture. Another good thing about prefabricated bas-reliefs is that a piece damaged due to inexperience can be remade without touching the rest. The bad thing is that the whole composition turns out to be heavy; It is impossible to attach a prefabricated bas-relief to weak walls (plasterboard, PHB partitions, etc.). however, it is generally not recommended to load weak walls with bas-reliefs - the load-bearing base must be stronger than the material of the composition.
Tools
Tools for creating a bas-relief are needed for two types of work - for applying putty and for removing/cutting off excess mortar. Therefore, the set of tools and devices is quite extensive. To apply putty or decorative paints use:
Metal trowel made of stainless steel. It is used to apply the solution, level it, and create a shallow relief of small size. Usually used when working with large areas. Plastic trowel. They also work on large areas, but with its help they form a deep or extensive (extended) relief: the solution follows the plastic well. The main tool for forming relief during decorative modeling on walls. Spatula. This is a technical tool. They apply the solution to the trowel, pick up the excess, and clean it. It is also used to apply the solution to the walls, creating a base layer, then adding it in the right places for depth. Palette knives. Small spatulas of different shapes. They can apply the composition, remove it, forming the desired relief. Sculptural stacks. A double-sided professional tool for sculptors with small spatulas and blades of different types and sizes. Used to form fine relief, detailing and precise drawing. This tool is worth purchasing if you decide to make more than one bas-relief on a wall or ceiling, but turn this into your main activity. Medical scalpel. You can do without it, but it makes very precise cuts. Professionals have several scalpels of different sizes and shapes. For precise drawing and correction Chisels for wood carving. They cut fresh plaster no worse than wood. There are a variety of chisels, with different shapes and sizes of the cutting part. They are selected depending on the shape to be cut. Cream injector. There are no special tools of this kind, so you have to use this one. It is convenient for them to add small portions of material. This need arises when the excess is cut off. When choosing, make sure that the piston fits tightly against the walls of the tube, otherwise the solution will come out. For one job you have to buy several pieces - the syringes break quickly.
These are all the tools you may need. Necessary items: trowels, spatula, chisels. Palette knives are very convenient; it can be difficult without scalpels and a pastry syringe. But stacks are a tool for perfectionists - for precise modification of the relief.
Operating technique
You can make a bas-relief using various materials:
- stone;
- clay;
- gypsum plaster;
- ordinary plaster.
The last two options are the simplest and most accessible to use.
The work is performed according to the following algorithm:
- The box is assembled from four plywood slats. It looks like a tray. Its height and dimensions must correspond to the slab of the future relief.
- A polyethylene film is placed in the mold. Straighten it so that the number of folds is minimal.
- Prepare a solution of plaster, cement-sand mixture and gypsum according to the instructions, and then pour it into the mold. You can transfer the resulting composition into a cardboard box, putting film there in advance. An alternative is a frame, which is placed on the glass and glued with tape.
If you intend to arrange a high relief, then you can install wire reinforcement. In the future, it will also be located inside the relief figures, connecting them and the bases.
After this, you need to wait until the mixture sets. If the composition contains cement, then it takes 10 to 12 hours to harden. Otherwise, the concrete layer will not adhere to the base. Using alabaster, hardening occurs after heating the surface. The product can be removed from the mold at the hardening stage. On the side of the laid film, the surface will be waxed. The opposite parts, on the contrary, will be rough.
The next stage is creating an image through modeling , when the contours of a three-dimensional image are applied to the slab. Following this, the volume within the contour begins to increase. For this purpose, a newly prepared mixture is used. This must be done in several stages so that each layer can slightly set and harden.
Working with alabaster is convenient and simple, since any excess is removed with a knife. This should be done at moments when the material is wet. It can be corrected with cutters or a chisel, which is designed for working with wood. It levels out with ease using sandpaper. Once plaster or alabaster has dried, it is much more difficult to cut and sand its surface.
If you want to perform an in-depth image , there are two options:
- deepen the drawing, selecting this or that amount of material with cutters and a chisel;
- build up a background layer around the image, further polishing the background to a smooth surface.
You can wet the tiles while working. The sculpting method is considered more economical than carving. Another way to form a three-dimensional image is to glue cast parts onto a base plate. You can also install them on the wall in advance. In this case, the seams between them are covered with plaster or sanded.
Reverse casting is considered one of the most complex and effective methods. This method was once used in the manufacture of natural decorative elements. As soon as the slab hardened, it was removed from the mold. An imprint of an in-depth image, the so-called counter-relief, was formed on the front side. It fully reflected the decorative features of the material. In the future, such a slab can be used as a decoration or a mold, casting new tiles using it. The finished products look like the real thing, and this is their advantage.
Creating a bas-relief
Preparation
An orientation marking is drawn on the wall, which is necessary for the symmetrical and even application of decorative details.
It is advisable to make markings according to existing landmarks (corners, joints, edges of openings, etc.), since they are very often not perfectly smooth. If you place the bas-reliefs according to the marks made using the mounting level, they will “lie” perfectly evenly on the walls, and this will visually show the “curvature” of the walls, openings or corners of the room.
Fixing the stencil
In order for the bas-relief to turn out to be of high quality, it is necessary to place each template evenly on the wall. You can use several options for this:
We recommend: How to paint walls with water-based paint: choose which water-based paint is best to paint the walls yourself
- use adhesive compounds, however, they often leave absorbed stains and surface irregularities, which then additionally need to be removed;
- use double-sided tape or masking mesh - they are easy to use and can be easily removed from the plaster.
As a result, the fixative is applied to the stencil no closer than 4.0 mm to the edge of the cut out ornament. Carefully, without displacement, the matrix should be attached to the wall.
Priming the wall
This step is not mandatory, however, it will only improve the adhesion strength of the bas-reliefs to the surface being decorated. The technology for covering a section of wall for decoration with a primer solution does not differ from the similar preparation of walls before painting or wallpapering.
Recommendation! It is convenient to apply impregnation with a sponge, through which the required amount of primer composition, without smudges, is evenly distributed over the required working area!
Each priming (optimally 2 layers) should be followed by sufficient drying time.
Applying a bas-relief
Spectacular, three-dimensional designs will be obtained only from a fine-grained putty mixture. When ready for use, it is a homogeneous, viscous, pasty mass.
Putty material can be purchased ready-made or as a dry mixture for diluting yourself (instructions with a recipe are usually included).
What are stencils for decorative plaster
To obtain an original pattern protruding above the plastered surface, special overlays with sections cut out in them are used - stencils. Using a similar material, you can get a convex pattern on any flat or smoothly curved surface. In order to decorate a room with the most whimsical, exclusive patterns made in any style, it is not at all necessary to be an artist or a master plasterer.
Advantages of decorating using stencils:
- the ability to use purchased ready-made templates or those made by hand;
- the ability to create unique jewelry of any style according to your own taste;
- allows you to perform complex patterns almost error-free even without experience;
- move away from template patterns of the same type applied with a roller or stamp for concrete and plaster;
- Possibility of use on any plastered surface, in any room;
- the ability to veil existing errors with decorative elements.
Such decorations look advantageous even without highlighting them with color against the background of smooth walls. A remarkable effect is provided by additional lighting, as a result of which the bas-relief pattern acquires even greater spatial depth.
Stage No. 3. Refinement, fixing and painting
The final stage is fixing the bas-relief and its subsequent painting.
The finished panel must be dried thoroughly. Then you can trim the bas-relief with sandpaper, smooth out roughness and sharp corners. The important thing here is not to overdo it or remove too much. At the same stage, all minor flaws are corrected: cracks are covered, small details are cut, etc. The finished bas-relief is treated with a primer, and after it dries, with paint. For putty, water-based paint is best suited.
Advice. To prevent the wall around the bas-relief from looking too smooth, you can apply a layer of plaster to it, and then walk over it with a folded plastic bag or crumpled paper. The surface will immediately become textured.
Application of the cord
This method of making wall bas-relief is one of the quite simple ones. It is available for self-administration. Involves the use of gypsum mortar and ordinary clothesline .
The image is applied to a piece of foam plastic or fiberboard. After this, the rope is laid in specially marked lines. It is pre-moistened in gypsum solution. After the product has dried, treat the surface and convex parts with a gypsum solution using a brush.
This kind of decor can be used for decoration by gluing it on the wall. You can use a similar method to decorate furniture, for example, benches. No tiling is required. It is enough to lay the bench in the most convenient way, and then make a bas-relief on one side. As soon as it dries, you can switch to the opposite one. After this, the bench must be painted to resemble metal or stone.
Video
So, using a wooden machine, you can make simple plaster molding yourself:
Ceiling gypsum rosette
Stucco on the wall
Gypsum high relief
Gypsum bas-relief
Decoration of the fireplace portal
Element of plaster decor
Gypsum flowers
Restoration and care
Sometimes troubles occur in the form of breaking parts of the bas-relief, or over time it begins to lose its original appearance, for example, forming gaps at the points of attachment to the wall.
Broken parts are restored with a similar composition of the solution in its exact consistency, and the gaps can simply be covered up.
Drawings with plaster or other materials allow you to highlight part of the wall or become the central element of the rest of the space, cause surprise and admiration of friends, relatives or guests, and make the room truly luxurious.
Selecting a figure
Choosing a figure for modeling
The variety of gypsum stucco today is not limited to the creation of figures of thick-cheeked cupids, graceful lines of flowers and petals, and indoor cornices. Using this material, you can create an imitation of a fireplace, “grow” a tree on a vertical wall surface or on the ceiling. The figure can be classically white or painted in various colors. The choice is determined by the wishes of the customer.