Kikimora
10193 0 0
Kikimora September 22, 2016Speciality: I love my home, I like to equip it, periodically change something, do it with my own hands. There are no special hobbies. I am the administrator of a small women's forum.
The mirror film made the lower part of the glazing opaque
Few people want to become the hero of the show “Behind the Glass.” But living in your own home or on the first floor of a high-rise building does not exclude such a possibility. The reason may be simple forgetfulness or simply a reluctance to curtain the windows during the day. But you can solve this problem once and for all, and self-adhesive window film will help you do this.
I had such a need from the moment residents moved into the house built nearby. And along with it comes the need to study the types of films and methods of gluing them.
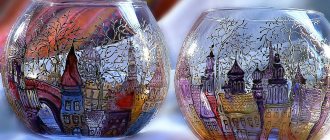
What is stained glass film for windows
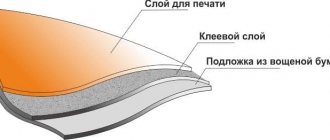
Stained glass film for windows usually means a film consisting of two layers:
- top decorative. It is made of polyester, vinyl or other polymer material with a pattern or design applied to it;
- bottom paper. Acts as a substrate and is designed for gluing to glass.
Due to the presence of a self-adhesive layer, applying a pattern or design to glass does not require additional equipment, tools or adhesives. This makes the technology of using the material simple and convenient.
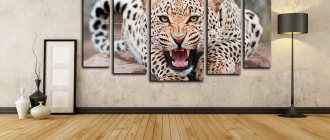
Rice. 2. Options for using stained glass film.
The relatively low cost of the decorative coating and the ease of its application allow, if necessary or at the request of the customer, to replace the stained glass pattern or design. In addition, the properties and characteristics of the decorative film coating make it universal, since stained glass film can be used not only for its intended purpose, but also to implement various design solutions for the interior and even exterior decoration of a house.
It can easily be glued to mirrors, interior and entrance doors, wooden and plastic surfaces, ceramic tiles and various slabs based on woodworking products, as well as tempered glass of shower cabins. Stained glass films are widely used in outdoor advertising. It is not surprising that this material is in high demand, given the possibility of its effective use in such a diverse range of fields and applications.
How to glue self-adhesive film?
Self-adhesive film can cover almost any surface:
- glass,
- wooden,
- plastic,
- metal,
- plasterboard,
- cork
You just need to comply with the only condition - level the base. The surface must be perfectly smooth. The most important disadvantage of self-adhesive film is its ability to expose all irregularities, even those that are not visible to the naked eye.
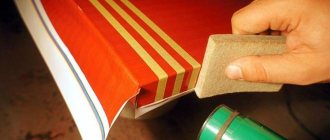
For furniture
To update old furniture, experts advise taking a roll with a thicker front layer. Keep in mind that the film with a wood pattern will have to be joined. If you only want to hide minor scratches, you can use transparent film.
If the furniture is varnished and without defects, it is enough to wash and degrease it before pasting. On a matte or rough surface, it is recommended to first apply a layer of primer or polyester varnish.
If the furniture has unevenness, chips, or cracks, you must first level it with a special putty for wood. You can prepare the primer yourself by mixing PVA glue and sawdust.
If a bubble has formed and it is impossible to re-stick the film, pierce it with a needle, release the air and carefully smooth the area with a rag.
On glass
Using self-adhesive film, you can update a glass table, mirror, cabinet, or any glass facades. There is a transparent PVC film for this. Often it has a pattern applied. Mosaic-type self-adhesive is also great for glass.
It is recommended to paste the glass surface using a soap solution.
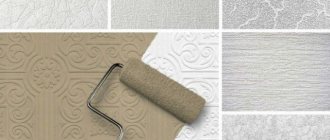
On the wall
PVC film will not stick to bare concrete, nor will it stick to material that is crumbling. For pasting, the walls are first puttied and sanded.
Self-adhesive film is glued:
- for smooth wallpaper;
- on a painted surface;
- on acrylic primer.
If the wall was painted with water-based paint, the surface is additionally treated with aerosol glue.
Let's start working with self-adhesive film
- The first and most important stage is surface preparation. It can be anything, for example, doors or walls, furniture or glass. The base for pasting must be thoroughly and conscientiously cleaned of any contaminants. An impeccable version of the prepared surface looks like smooth varnished boards. If this is not your option, then a rough, uneven or porous base must be primed with varnish or wallpaper glue.
- cutting the self-adhesive film is the most crucial moment. The convenient scale printed on its reverse side greatly facilitates the cutting process. In order to start work, you need to carefully cut the material into even pieces of the required length, preferably with a margin.
- To avoid mistakes when gluing the film, you must carefully read the recommendations on the protective layer. It shows in detail the stages of working with this material. First of all, you need to separate the protection from the paper. Calmly and carefully apply the decorative design to the base on which you want to glue and press the adhesive edge to the surface. So with your first hand, gradually removing the paper layer, stick the image completely. With your second hand, carefully press down the already pasted part, getting rid of air bubbles.
It is important to remember that if, when gluing the decorative material, you did something wrong, then until the picture has set, you have a chance to do it all over again. After complete attachment, which usually occurs within a few hours, nothing can be done.
Which film to choose
In principle, I am a rather prudent woman, and I took care of sun protection when I ordered new windows. Ours are energy-saving, with a UV filter. And tulle on them is an excellent remedy for prying prying eyes.
But not so long ago we were lucky enough to buy a plastic entrance door at a decent discount. Glazed. But completely transparent. Since a door of non-standard sizes to order would have cost twice as much, we took this one without quibbling.
The problem is immediately visible in the photo.
In fact, there are two problems: the neighbors' windows opposite and visitors, who are not always welcome, but there is no opportunity to pretend that we are not at home. They see us. But we need to see who is behind the door, while remaining invisible ourselves. Did you explain it clearly?
A mirrored self-adhesive film would just cope with this task: the uninvited guest will only admire his own reflection, and meanwhile we will make grimaces behind the glass. When the lights are on, of course, it won’t work, but in the evening we curtain the windows and close the first door leading to the veranda.
Yes, that's how bad we are. But closer to the point - it’s time to choose a film and learn how to glue it. Because calling a specialist for such a volume of work is simply ridiculous.
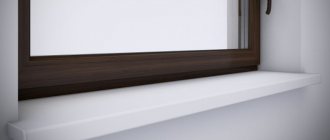
Covering the window sill with self-adhesive film
When the preparation is complete, proceed to the process itself.
Prepare for work:
- Selected self-adhesive;
- Knife, scissors;
- Long ruler, tape measure, pencil;
- Rags, sponge, rubber spatula.
The crucial moment is to cut out the film correctly. Ideally, this should be one piece with correctly cut corners and smooth edges. If you are in doubt about the calculations, then first make a pattern on paper and try it on the windowsill.
When cutting, take into account the height of the ends and the slight bend under the window sill board. If everything is perfectly marked, you can transfer the drawing to self-adhesive film. Lay it face down; on the wrong side there is a lined grid with a pitch of 10mm for ease of cutting.
Transfer your pattern to self-adhesive paper, lightly tracing the contours of the pattern on it. If you have a film with an imitation or pattern, then try to orient it so that the pattern is equally symmetrical on opposite slopes.
If there are several windows in the room, it would be correct to cut out canvases that are identical in symmetry. The self-adhesive film for window sills has been cut, the preparation has been completed, and you can begin the main process.
If this is your first time encountering this task, then before laminating the window sills, slightly moisten the base with water or a slightly soapy solution. I'll explain why. Then the film will not stick “tightly” to the surface, and it can be corrected, slightly shifted, eliminating the distortion.
Separate a piece of protective paper from the self-adhesive film by 5-10 centimeters to fix its initial location on the base. Place it on the window sill at its base and begin smoothing from the center to the edges, pressing the film well.
Peel the backing off the film in small sections and stick these sections onto the surface. And so the entire workpiece, the ends and folding under the window sill base. If there is a displacement, correct it, since you glued the film to a damp surface.
Smooth with cloths and a rubber spatula. Inspect the finished product for bubbles. They can be easily eliminated by piercing them with a needle and pressing to release the air. Usually the difficulty arises when you laminate the corners, but since you have everything cut out in advance and cuts are made at the folding points, there should be no problems.
Removing the film
When replacing the film, the question arises of how to quickly remove the self-adhesive film. The simplest method is to wet it several times with hot water, then the adhesive component will soften and easily come away from the base. Using a spatula, start removing the film.
An ordinary hairdryer can come to the rescue, as it heats the surface in a dry way and helps remove the self-adhesive. Warm up the area, and, lifting the film, pull it towards you, then the next area. Remove any remaining adhesive with alcohol or solvent.
This is how simple a self-adhesive film for window sills can transform its design. The main thing is accuracy when working, accuracy in measurements and adherence to sticker technology, then the quality will be at its best.
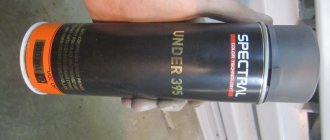
How to properly apply sun protection tape
All the necessary tools First, let's collect all the tools that we may need: - the sun protection film itself for tinting; – a spray bottle with soapy water (soap solution); - stationery knife; - scissors; – scraper; – a clean microfiber cloth; – window cleaner;
It's easy to prepare a soap solution. Just dilute 3-4 drops of any detergent in half a liter of water!
Preparing the surface
The first step is to clean the window of all excess and wash the glass. It is best to glue windows on a sunny summer day, when the glass is warm. Please note that the room temperature should not be lower than 4 and not higher than forty degrees. It is also desirable that the humidity in the room be 20 percent or higher.
Then, using a plastic scraper, you need to clean the glass from heavy dirt. Walk carefully around the edges of the window, as a rag will not remove stubborn dirt.
Self-sticking
Since I always glue the wallpaper in the house myself, I think I can handle this job, since gluing the film to the window is only a little more difficult. And the technology is very similar. Of course, if you took the glass out, processed it, and then put it back in place, it would be easier, but I won’t risk it.
Preparation
Preparatory work includes cleaning, creating suitable conditions and preparing everything that will be needed in the process itself.
I didn’t mention anything about cleaning: before work, you really need to not only thoroughly wash the glass so that there are no stains or stains left on it that will be buried under the film, but also make sure that there is no dust in the air. As it settles on the glass and the adhesive base of the film, it worsens the quality of adhesion and spoils the appearance.
Therefore, in addition to wet cleaning, it is advisable to periodically humidify the air near the window from a sprayer. The surfaces to be joined must be wetted in any case, so this will not harm.
The entire room needs to be cleaned
We also need to prepare:
- Another sprayer for soapy water;
- Detergent or baby shampoo;
- Stationery knife;
- Soft spatula for smoothing the film;
- Paper towels or microfiber cloths.
It remains to make sure that the air temperature in the operation area is above five and below thirty degrees - this is required by the instructions so that the glue does not dry too quickly, but not for too long.
Performance
The first thing to do is to thoroughly wash the window or door on both sides using a mild detergent, rinse it and rub until the streaks disappear.
Then we unroll the film and adjust the cutting to get less waste. If the glass is large, you need to measure it in advance and try to find a film of the required width to avoid joints.
- Add baby shampoo, Fairy or other detergent to clean water - two or three drops per half liter is enough to ensure the film slides over the surface. Just don’t shake the mixture too much - we don’t need foam at all. Pour the working fluid into a spray bottle.
- A regular soap solution may not be suitable for gluing anti-vandal film . Therefore, we look at the instructions, which describe the preparation of a working solution that can dissolve the adhesive base.
- We cut off a piece of the required size from the roll with a small allowance in length and width, and only after that, laying it on a flat surface, remove the protective layer from the adhesive side, wetting the freed surface with soapy water from a spray bottle. We spray the glass with it.
- Now let's talk about how to glue film onto window glass. It must be carefully and slowly lifted, holding the top edge, and applied as accurately as possible to the opening. Slowly - because sudden movements often lead to bending of the film, and it sticks to itself. It is almost impossible to unstick the glued areas without damaging the material; this piece will simply have to be thrown away.
The most crucial moment
- If this step is done without incident, then it will be easier, since the film glides well on wet glass and can be moved to achieve the desired position. And only after that you can begin to drive the water out from under it.
- If you know how to glue wallpaper, then you know perfectly well how to stick it without bubbles: to do this, use a spatula from the middle to the edges to make smooth movements with pressure. And in order not to scratch the film, the spatula must be moistened with water. The squeezed out liquid is wiped off with a soft cloth.
Smoothing
- Now you can trim off the excess film - it will no longer budge.
All. All you have to do is wait for it to dry completely. This will take from two weeks for regular film, to 3-4 months for protective film . During this time, it is better not to touch the surface , even if bubbles appear on it. They will disappear on their own.
But then no precautions are needed, the glass can be washed and wiped as usual. They say that washing windows with film is even easier than without it.
Types of films on glass
It is due to errors when choosing double-glazed windows that the windows do not cope with the functions assigned to them. This can be corrected by applying polymer coatings, which can improve a number of operational characteristics of double-glazed windows. Currently, the industry produces several types of films for glass:
- decorative;
- sun protection;
- sound-absorbing;
- energy saving.
Since the owner of windows generally has to solve several problems at once, manufacturers have developed universal films. For example, a stained glass film on glass can also have a sound-absorbing effect. At the same time, the highest demand is for polymer coating, which combines sun protection and heat-saving functions. There is a wide range of such films, and you can read more about these products in the thematic review on OknaTrade.
All types of glass films increase the safety level of windows, providing a triplex effect. Thanks to the layer of polymer coating, the impact resistance of double-glazed windows increases, and if it breaks, the fragments remain on the film.
Selection of stained glass film for the window
The huge variety of stained glass films produced makes it possible, without any problems, to buy exactly the one that most fully meets the requirements and wishes of the customer. In this case, several criteria should be taken into account to help make a choice:
- purpose of the room. Obviously, different stained glass patterns should be used for the kitchen, living room and bedroom. Of course, there are no clear requirements in this area; everything is determined by the taste and preferences of the owner of the home. However, in most cases, soft and muted colors are used for the bedroom, and brighter and more colorful ones for the living room;
- location of the room. If the windows of the room face the south side or a noisy street, it is advisable to use stained glass film for them with noise absorption and ultraviolet delay effects. This will improve the living conditions in this room and its level of comfort.
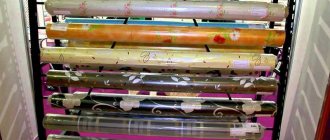
Rice. 6. Varieties of stained glass film.
Rules for caring for windows with laminated glass
When caring for laminated windows, it should be borne in mind that the polymer is much less durable than glass. If handled carelessly, it may be scratched prematurely. The following rules will help extend the service life of the coating:
- during the first week after pasting, do not touch the coating and do not wash it for a month;
- wash glass with mild detergents that do not contain ammonia;
- use only soft sponges and rags;
- do not remove dirt using abrasive powders or wire wool;
- Avoid contact of glass with cutting objects.