Home – Blog
06/19/2018 Modular paintings, Online store of modular paintings, Picasso Store, Picasso-pictures.ru, Premium class, 10 year guarantee, How to hang a painting, How to hang a modular painting, Mounts for modular paintings
Modular paintings - elegant room decoration
Who doesn't love organizing and decorating their apartment? I think everyone wants to live in comfort and beauty. Modular paintings will help with this - very original and popular compositions today. They look elegant in the living room, kitchen, bedroom - in any room. How to choose a mounting method, where to hang a picture - I’ll tell you about this.
Anyone can create original decor
If you are a true art connoisseur and want to add a touch of creativity to your home with the help of modular paintings, I suggest you explore all the ways to attach them and choose the one that suits you best!
What is a modular painting?
This is a composition consisting of several elements that depict part of a drawing or a fragment of one common canvas. When the parts are joined, a general plan is formed, so it is very important to correctly arrange the modules, comparing them with each other.
Composition of two paintings – diptych
The number of modules must be at least two. Based on the number of elements, modular paintings are called differently:
- a painting consisting of two elements is called a diptych ;
- of three parts - triptych ;
- of the five - penaptych ;
- more than five elements - polyptych .
However, a large number does not always mean a larger picture size. Elements can be small in width, which allows them to more effectively display a piece of the overall design by writing small details on it.
A painting of three segments arranged vertically
With this, you can finish the conversation about the modular paintings themselves and move directly to the main topic of the article - how to hang modular paintings on the wall.
Paintings for the living room above the sofa or fireplace
When choosing a picture that is supposed to be hung above the sofa, it is worth considering that its width should be at least equal to half the length of the back of the sofa. It looks nice if the wall behind a straight standard sofa is decorated with collages, posters equal to or greater than the length of its back. The main thing is to maintain symmetry, or not to observe it at all, that is, deliberately.
Pay attention to the proportional relationship between the size of the painting and the surrounding furniture
If there is a corner sofa in the living room, you can use corner paintings in the interior above the sofa in order to emphasize your creative approach to decorating your own home and your ability to make non-standard decisions. This approach allows you to give the recreation area completeness and integrity of the image. The use of this type of canvas in a modular version is especially important.
In the case of a fireplace, above it you can hang a portrait of the owner of the house framed by a beautiful baguette, if the interior is decorated in a classic style, or an image of animals, nature, etc. If the fireplace is corner, hang two canvases of the same subject or one corner picture, this is a win-win option. Even a very expensive piece can look dull if placed in the wrong place.
Modular vertical painting floats above the fireplace in the living room
Whatever masterpiece of fine art you decide to hang in your home, a prerequisite is your joy and harmony in your soul when you see it!
Options for hanging pictures on the wall
Let's start with the fact that modular elements are pieces of one large canvas. They are a purely structurally separate picture that can be hung in any convenient way. The main requirement is the strength of the fastener, which would allow it to withstand the weight of the item being hung. The second requirement is the exact location of the modules among themselves and in the required plane. For example, in the photo below you can see that the parts of one whole are not located on the same level. So this dimensional location on the wall needs to be accurately determined.
Model picture of five parts located in different planes
It’s not easy to do this right away. Anyone who is faced with the task of attaching paintings to the wall with their own hands for the first time should understand that the modular version differs from the usual one precisely in that it is not one painting, but several, which must be assembled on the wall surface in a certain order. The simplest option is if the modules are located either horizontally or vertically. In this case, you will simply need to align all the parts along the same line, even if they have different sizes.
In all other respects, this is the usual hanging of framed photographs or paintings. But there is one more nuance, determined by the title of the next section.
Modular painting of seven segments – polyptych
Distance between modular paintings
There are no strict standards in this regard; no one has ever defined them. Simply visually, large gaps between the modules reduce the visibility of the entire canvas. Therefore, the shorter the distance, the better. Although experts note that it is also not worth installing parts close to each other, it will be difficult to mount them to the wall. Therefore, the optimal parameter is 2−4 cm.
How to correctly place painting modules on the wall, indicating the distance between the elements
Therefore, there is such a recommendation - before attaching a modular type picture to the wall, you need to lay out its parts on the floor near the wall in the order in which they will be installed one by one. In this case, it is necessary to accurately lay them out relative to each other so that there is a single canvas of one horizon. Then the lower or upper edge of the largest part is taken as the basis for installation. And already from it the markings of all elements are heard.
The photo below shows the layout of the modules on the floor. It is in this order and in this arrangement that they should appear on the wall.
Layout of the penaptych on the floor before installation on the wall
Please note that the photo shows a composition consisting of five elements, as one of the frequently used ones. Therefore, the question of how to hang a modular picture of 5 parts comes up quite often. It should be noted that this arrangement of elements relative to each other is not the most difficult, because they are practically on the same line. It’s just that some of them are shifted up or down relative to the main horizontal line. Therefore, the middle element is taken as the basis for the installation; its canvas is the main one in terms of uniform location relative to the axis of the entire picture. This is the one that should be hung first. The rest take turns to the left or right.
Now it’s clear how to start the hanging process. Let's move on to the main topic of the article - how to properly hang modular paintings on the wall, or rather, to the mounting methods.
Preparing a modular painting for installation
In the interior of different rooms
Separate paintings on the wall are universal interior decor. A correctly selected panel can easily change the space and become an accent of the interior. Paintings for different rooms are chosen following the following principles:
Living room. You can choose any design, the main thing is to choose the right size and number of modules
The place is most often determined above the sofa or in that part of the room where attention should be focused. When choosing a theme, it is better to build on the interior style
In the living roomSource cloudinary.com
Bedroom. The main criterion here is a calm, soothing palette, and the subject matter is not limited. The best place for a composite sheet is above the head of the bed.
Panorama of the citySource oz90.ru
- Cabinet. The choice depends on the tastes of the owner of the room. Images of maps, abstractions, and reproductions of paintings are always relevant.
- Children's room. Choose a plot based on the age, gender and hobbies of the owner of the room. A child will like images of fairy-tale and cartoon characters, an older child will like anime, a map, a car, a movie poster, space.
Three-part map Source etsystatic.com
Kitchen. The logical place for modular decor is above the table, the logical theme is one that is related to food: delicious buns, fruit, a cup of coffee. The city landscape, the seashore, and a bouquet of flowers look no worse.
In the kitchenSource cdnvideo.ru
Corridor. The modest size of the hallway forces you to choose narrow, elongated modular paintings. The decor will not clutter the space and will make it visually higher.
Triptych with dragonSource ebayimg.com
About modular paintings in a modern interior in the following video:
How to attach modular paintings to the wall
There are quite a few ways to ensure that paintings do not fall and hang on the wall surface for a long time. Let's consider some of them as the simplest and most reliable.
One of the easiest ways to attach a modular picture to the wall is with Velcro
Fasteners for modular paintings
Let’s identify all the fasteners at once, and then consider how you can use them to mount a modular picture on the wall:
- An ordinary self-tapping screw screwed into the wall onto a dowel.
- Nail if the wall is wooden.
- Liquid Nails.
- Double sided tape.
- Velcro.
- Spider hook.
- Smart lock.
There is no point in considering the first two; these are ordinary fasteners that have been used for a long time. They can be classified as classic fasteners. But others need to be dealt with thoroughly.
Special hook attached to the wall with Velcro
Liquid Nails
This adhesive is known to be strong and reliable. But when using it, you need to make sure that the wall surface is very smooth. The thing is that the remaining fasteners can smooth out some of the unevenness of the plane. The adhesive composition is applied in a thin layer, and the paintings are pressed tightly against the wall. This means that surface unevenness will immediately be transmitted to the mounted modules in the form of distortions, which will be visible to the naked eye.
As for the process itself, depending on the size and weight of the painting, liquid nails are applied either to the entire perimeter of the frame from the back side, or in sections.
Liquid nails are applied to the back side of the modular picture frame
After which it is applied to the wall along the marked area and pressed with hands. Within a few minutes the element can be moved, leveling. It should be noted that in this way paintings can be installed in any premises for any purpose, because the adhesive composition does not change its strength properties either under the influence of temperature changes or changes in humidity. So paintings in the kitchen or bathroom, glued with liquid nails, hang for years.
Double sided tape
This fastening material appeared on the market relatively recently, but many home craftsmen rightfully rated it as one of the most reliable and easy to use. Basically, it is a fabric base treated on both sides with an adhesive composition. The top of the tape is covered on both sides with a protective polymer film. You remove the latter, apply the strip to the required place, and it is immediately firmly attached to it.
It is on this quality of adhesive tape that the method of using it for hanging modular paintings is based. How it's done:
- The sticky material is cut into several pieces up to 10 cm long.
- The protective film is removed from one side.
- The adhesive side of the tape is pressed against the picture frame.
- This is how all segments are installed, evenly spaced from each other. Be sure to install it in the corners of the object.
- The top protective films are removed.
- The module is pressed against its installation site.
Expert's point of view
Dmitry Kholodok
Technical director of repair and construction
Ask a Question
“Regardless of the texture of the wall (plasterboard, plaster, wallpaper with different surfaces, etc.), double-sided tape can be easily attached to it. Therefore, there is no need to perform additional manipulations related to increasing the adhesion of the wall plane.”
Double sided tape
Velcro
These fasteners are called the “Command” system. In their use, they are reminiscent of double-sided tape, but only these are two parts, each of which has one side that is a sticky adhesive composition, and the opposite side that is Velcro. That is, one of them is attached to the wall, the second - to the picture. Then the latter is applied to the wall so that both parts of the Velcro adhere to each other.
It’s easy to hang a picture with Velcro; it’s also easy to detach from the fastener.
The most unique thing about this whole option is that the Velcro can be separated from each other just as easily. Of course, when connected, they firmly hold the picture on the wall. But not very much effort allows you to separate them. So, so to speak, this is a reusable fastener. Let's add that you can install regular plastic hooks on Velcro, which come complete with fasteners, and modules are hung on them. Also a simple option with the ability to take a picture.
Velcro fastening system "Command" complete set
There is exactly the same fastening system, which is called “Creps”. You can see how to use it in the video below.
Spider hook for pictures
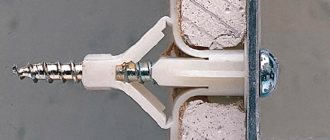
This fastener got its name from its resemblance to a spider. This is a plastic hook, the design of which has two to four nails sticking out in the form of insect legs. The nails are made of durable steel, their ends are sharp, so that with the help of a hammer they can be driven into almost any building material. The main requirement for the latter is strength in the sense that it does not crumble under impact loads.
Spider hooks come in different sizes; the larger it is, the greater the load-bearing capacity of the fastener.
Using spider hooks is simple:
- Pull the nails towards the front part of the fastener.
- They place it at the installation site.
- Hammer the legs to the plane of the hook.
- If it is necessary to remove a fastener, simply pull it out of the wall with pliers. There will be 2-4 small holes on the surface that can be easily masked.
This is how you need to hammer in the hooks with a hammer, and you can dismantle them with pliers
Smart lock
These are polyurethane rectangles that are easily attached to any surface. These are reusable products that, after dismantling, simply need to be washed with warm water, and they are ready for use again.
To help you understand what we are talking about, we suggest watching the video below.
Video: how to hang modular paintings and other household items on the wall
What else can you hang a modular picture on?
Another quite interesting option is a hanging system for paintings and photographs. Essentially, this is a strip (wooden, metal or plastic) that is attached to the wall under the ceiling. There are vertical rods attached to it, to which the painting modules themselves must be attached. In this case, the parts can be moved along the rods, lowering or raising.
Threads with hooks at the ends can be used as guides. This is a more complex design because it has a built-in mechanism that helps lower and raise the elements of the modular canvas.
On such a suspended structure you can assemble a modular picture
A few more subtleties
On average, the optimal height for placing a horizontal modular picture is one and a half meters. If the set is vertical, then the main module must be installed at this distance.
Do not combine paintings with large pieces of furniture. It’s better to set aside a separate wall for such an independent item.
When calculating the location and other parametric data, use the help of loved ones, because with both eyes you can miss something important - not maintain symmetry or deviate from the level.
How much do they cost and where can I buy mounts for modular paintings?
Today, all the fasteners described above are not in short supply. They are sold by both ordinary construction stores and online services. Let's just designate their average prices across the country.
| Name | Spider hook | Command | Double sided tape | Liquid Nails |
| price, rub. | 600 - per piece | 300 − per set | 35−350 (depending on the width of the tape) | 200 − per tube |
Variety of liquid nails
