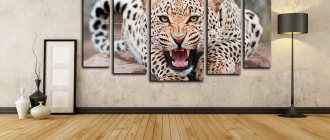
What are modular paintings?
For a long time now, beautiful canvases have replaced soviet carpets. This is a modern way to quickly and inexpensively decorate any room, be it a discreet office or a cozy bedroom. The main difference between segment paintings and ordinary ones is that they are divided into several elements that visually merge into a single whole.
The range of sizes will allow you to fit beautiful decor into a room of any size. In addition, the component elements can be shifted relative to each other vertically or horizontally, positioned symmetrically or chaotically.
Interesting! A special group consists of works on a glass base, but their creation requires special paints and printers.
Types of modular canvases
Depending on how many separate particles the canvas consists of, the following types are distinguished:
- diptychs are an option consisting of 2 segments that fit perfectly even into the interior of a small room;
- triptychs - contain 3 segments, which are most common among users, and from this they began to be considered classics of the genre;
- penaptychs - consisting of 4 pieces, freely located on the wall;
- polyptych - from five or more elements of a single canvas.
Remember! To decorate small rooms, you should not use compositions from many segments, so as not to overload the area.
In order to decorate a room, you don’t have to adhere to strict rules. With the capabilities of today's printing, you don't have to be a professional artist to create modular paintings at home. Isn't this a challenge for a truly creative person?
How to choose canvases for different rooms
Before you learn how to create modular canvases with your own hands, you need to figure out for which room a particular model of canvas is suitable.
- Bedroom. To decorate the walls of this cozy and secluded place, you should remember that this is a room for privacy and relaxation. That is why you should not choose aggressive or sharp lines or bright colors in your images. For the bedroom, a muted, calm landscape or a beautiful abstract image is most suitable, which must be in harmony with the rest of the decoration of the rest room, since a sharp resonance will attract all attention only to the wall element of the interior.
- The living room is a place for the whole family to relax together, therefore it is a testing ground for bold experiments and combinations of light or bright colors. The dimensions of the canvas should correspond to the dimensions of the room. Huge wall compositions will look awkward in a small living room, and small images will simply get lost in a large space.
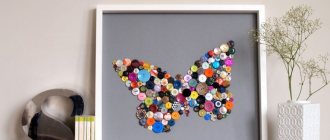
- In the design of children's rooms, bright, rich colors are often used, and their number can be very numerous. If the decor has already used a wide palette, then it is better not to choose active tones for additional decor. Few children will appreciate abstraction, so it is better to pay attention to images of animals, cartoon characters and fairy tales.
- If a teenager’s personal space is being designed, it is better to involve him in the design choice. It is better to find out in advance what kind of decoration the teenager wants to see in his room. You can invite an older child to use photos of his friends, favorite musicians or actors for a collage.
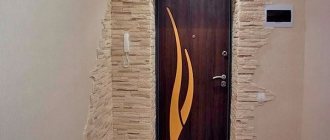
- For the hallway, choose simple canvases. This is explained by the fact that guests and residents do not stay in this room for a long time, so it is not worth spending a lot of effort and money on decoration. At the same time, it is worth remembering that the hallway is the beginning of the house, so the image should set the tone for the overall impression of the home.
- Before you start making a decorative element for the kitchen, you need to find a place for it where it will not subsequently get dirty. If the footage of the walls allows, then it is better to choose a still life or any other “tasty” motifs of wall paintings.
Children's room
Children grow up, and their tastes change over time, and the “color” of the walls changes accordingly. At the initiative of parents, the frequency of updates ranges from 2 to 5, maybe 7 years. The younger generation may have their own opinions - usually less conservative than their parents.
It is known that in adolescence (11-16 years old) a teenager's tastes change quickly - so fashion posters will be updated several times a year. Therefore, the children's room should have an easily replaceable modular image design.
In general, the simplest scenes work best for a child's room. For example, for children under 12 years of age the images are suitable:
- Pets
- birds,
- trees,
- herbs
- flowers,
- trees
Animals or plants should be presented in different shades of the main color in the design of the children's room. In a children's room up to 3 years old, you can choose segments painted in different colors that harmoniously match the overall color.
For older children, collections that should be kept in the same style and executed on canvas or printed on paper or plastic sheet are suitable. It can be in large format:
- Personal Photos;
- portraits of favorite artists;
- portraits of athletes;
- sports photo.
Regarding technical features, it should be noted that the inhabitants of the children's room are very eccentric. They can:
use school materials carelessly: pens, pencils, paints, markers; eat chocolate, cream and other products that pollute the interior; play with a ball; run and jump...
Many things can suggest an unbridled childhood fantasy. Obviously, bulky structures, fragile and non-combustible materials will be unsuitable.
The process of making modular paintings with your own hands
When you have decided on the future location of your work, you need to choose a topic. We do not recommend choosing a portrait, since a face divided into parts does not look entirely appropriate.
You can simply download any high-resolution image you like from the Internet and print it on fabric, paper or canvas.
Modular paintings from photo wallpapers
This master class is not a topic for your attention: a modular picture from photo wallpaper. To work you will need:
- printed drawing;
- wooden blocks or 2-centimeter foam panels;
- furniture stapler or glue gun.
Segmental wallpaper canvases require special preparation of the image chosen for implementation in the interior. Many photo salons can offer you already selected catalogs of options for review. You can also use a downloaded image or even draw your own personal pattern. It will be competently divided into parts in a graphic editor and printed on the required material. If desired, beautiful photo wallpapers can be purchased at any hardware store.
Next follow these instructions:
- The first thing to make is a frame for a modular picture or a foam base. Take wooden blocks with a section of 2 x 2 cm, and build as many frame frames as you want to create a canvas from. Or cut sheets of appropriate sizes from foam plastic. Remember that the dimensions of the foam base should be slightly smaller than the area of the wallpaper pieces, since the pattern will also have to fall on the side of the segment.
- Cut out the images, leaving small allowances on the sides and a small fold on the wrong side of the frame.
- Place all cut-out elements from the wallpaper face down, and place appropriate wooden frames or a foam base on top.
- Secure the pieces of photo wallpaper using a hot glue gun, first bending the edges to the wrong side of the wooden frame. For a foam base, hot glue may not be suitable, as it can melt the material, so it is better to use special glue or a furniture stapler. It is important that it is better not to fix only those parts of the picture that are on the wrong side when wrapping, otherwise the entire surface of the photo will wrinkle.
Interesting! In the same way, you can create modular paintings from photographs by printing them on photo paper of the appropriate size.
Production of modular fabric panels
Another material that is usually used for handmade creativity is fabric. For this type of decor, you can use a variety of bright shreds, of which there are many in any home.
The main advantage of this method is that you don’t have to try to match the edges of the modules. In this regard, work will be much easier and more fun.
The step-by-step instructions are as follows:
- First, you need to decide on the future number of modules and their size. For fabric material, it is better to prepare wooden frames rather than polystyrene foam.
- Cut the cloth according to the size of the modules, not forgetting about 5-6 cm for the next bend.
- Attach frames to the reverse side of the finished cut elements.
- Using needles or pins, temporarily secure the fabric to the frame.
- Turn over and check the correct placement of the fabric, sequentially secure the allowances to the frame using a construction stapler. It is better to start with the long sides, gradually moving to the short ones. At the very end, the corners are fixed.
- The wrong side can be covered with a stretcher made from a piece of chipboard or plywood.
It is difficult to overestimate the importance of decorative elements in a modern interior. Choose images that will complement and emphasize the style of the room, adding comfort and creativity to it. Do you have experience creating segment paintings? Share your secrets in the comments.
Master class made of fabric
Step 1. Preparing the base
Depending on your budget, you can buy a ready-made canvas base or make one yourself. The first option is suitable for those who are inspired to paint a picture. For the first experiment, it is better to make a triptych - three elements, for which we prepare three bases. From slats and pieces of plywood you can quickly build a base for a modular picture. To do this, we connect wooden slats into a frame, cutting off the ends at an angle of 45 degrees. They can be stapled or glued.
For strength, we attach plywood triangles (with 10 cm legs) to the corners of the frame from the wrong side. As a lining, you can stretch a neutral-colored fabric over the frame, securing it with a stapler.
It is much easier to use pieces of fiberboard as a base; you just need to process the base along the edges. If you choose the option of wallpaper or a printed image, then you can choose a very simple and light base - polystyrene foam.
Step 2. Attach the canvas to the base
Before cutting out segments, plan well and mark the cut locations using the “measure twice and cut once” principle. The size of the fabric should take into account the folds on the reverse side. We fix the fabric on the stretcher with a furniture stapler, attaching the staples from the wrong side of the work. It is important to stretch the fabric evenly without forming folds. We fasten the long side first, and then the short one.
Printed versions can even be glued to thin foam ceiling tiles using PVA glue.
Many people, instead of wallpaper with a photo, order a print of the picture they like from numerous printing services. You don't need to be a master to do this, however, when printing you need to think about making several separate elements with overlapping designs. This way you maintain the integrity of the overall picture.
Step 3. Place the paintings
At this stage, you need to figure out a place where you will hang your composition, as well as a way to position the canvases relative to each other. For mounting, you can choose ordinary small-format furniture hangers. If the paintings are mounted on stretchers, then they can be fixed with screws that are screwed into dowels and protrude slightly from the wall.
Extremely interesting are the arrangement options, where one canvas is offset in an interesting way. An element that is deliberately shifted in “flight” as if by a blow of wind looks unique.
The master class will give you an understanding of the main points of creating a modular painting. You can safely experiment with the materials of the canvas itself and the base, choosing what you have available. For the first tests, even pieces of drywall or foam plastic, on which pictures from a printer or rectangles from wallpaper are pasted, will do. When you practice using simple materials, you will be able to make more complex compositions for interior decoration.
Video gallery
Source