The most problematic area in the apartment, from a renovation point of view, is the bathroom. There is constantly high humidity, insufficient ventilation and regular contact of water with a large area of surfaces. Wall and floor cladding requires maximum installation reliability. What finishing materials to choose and how to lay tiles in the bathroom correctly will be discussed below.
Tile selection
Laying tiles is a labor-intensive process, and the cladding itself is not cheap. Choosing the right bath tiles should be taken seriously. There are seven main criteria to consider when choosing a finish:
- Thickness. If you are choosing materials for the floor, you need to consider the level and thickness of the coating on the area of the floor adjacent to the bathroom. Usually this is a corridor. Laminate, parquet, solid wood or tiles must be flush with the floor tiles in the bathroom.
- Moisture resistance. This indicator is indicated on the packaging. For bathrooms and showers, tiles with liquid absorption of no more than 3% are suitable. Such tiles are marked with the article numbers AI and BI (the letters in this case indicate the manufacturing method. A - extrusion of the tile mass and giving it the appropriate shape, B - pressing).
- Wear resistance. For finishing a bathtub floor in an ordinary apartment, strength class 2 or 3 is quite suitable. For wall cladding - 1 or 2.
- Texture. Glossy surfaces, especially on bathroom floors, can be very slippery if there is water on them. Therefore, it is better to choose rough surfaces for the floor.
For vertical areas, less textured options are suitable. They are better cleaned of contaminants, and water accumulates and retains less on them.
- Size. The smaller the tile, the longer and more painstaking its installation. When laying it, it is difficult to level the surface. If the tile is too large (60x120) and not laid correctly, there is a possibility of it sliding along vertical sections. If you have little experience in repair work, choose medium dimensions (60x60, 60x40).
- Drawing and coloring. Nowadays, the most popular finishes are those that imitate natural materials: wood, marble, granite, pebbles. Such tiles usually do not require adjustment to each other.
Finishes with a pattern or ornament may require joining. This is not very convenient in corner areas. Since the tiles will have to be cut, the pattern may not match. Laying such tiles in a bathtub requires some skill.
- Rectified or unedged tiles. Rectified is a tile whose edges are cut at an angle of 90⁰. The edges of the unedged tiles are covered with overlay glaze. Due to this, the distance between the joints of unedged material appears larger. More moisture and dirt accumulate in the joints, requiring more thorough cleaning of the bathroom.
When purchasing finishing materials, check the date of manufacture, batch number and series. Products from the same manufacturer may differ in shades in different batches.
Layout methods
The choice of layout pattern depends on the size of the tile and visual preference. There are 4 main types of installation of finishing elements in the bathroom:
- Series-parallel. The segments are laid parallel to the walls. The joints form a “cage” pattern. The simplest and most economical installation method. Trimmings amount to 3–7%.
- Chess. Unlike the previous method, the edge of a segment of one row is located in the center of the segment from the adjacent one (offset of the elements of the next row by ½). Thus, a checkerboard pattern is formed. Trimmings amount to 5–9%.
- Diagonal. The segments are placed diagonally to the walls. Requires high precision marking and complex cutting of corner elements. Material waste increases to 12%.
- Ornament. The most complex type of masonry. Used when combining rectangular, square and segments of different sizes. Great precision is required when inserting rows. Suitable for large areas. In this case, material trimmings can reach 30%.
How to install a bath correctly: before or after laying tiles
When planning a bathroom renovation, almost all people wonder what to do first: install a bathtub or tile the room? Both of these options have the right to be considered correct, because the choice of one or another sequence depends on several factors. The material from which the bathtub is made, the size of the bathroom, the skill and responsibility of the tiler and plumber are taken into account. Let's consider the features, advantages and disadvantages of both repair sequences.
Required materials and tools
For finishing work in the bathroom you will need the following tools:
- Building level.
- The spatula is rubber and serrated.
- Cross-shaped dividers.
- Tile cutting machine.
- Roulette.
- Bulgarian.
- Rubber hammer.
- Assembly mixer and bucket (for mixing glue).
- Stepladder (for vertical work).
Materials:
- Bath primer.
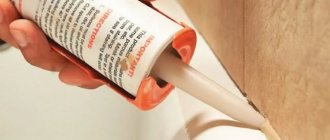
- Sealant.
- Tile adhesive.
- Grout.
- Clean rags.
When diluting glue, strictly follow the manufacturer's instructions. Violation of the technological process can lead to peeling of the cladding.
Preparing the base for tiles
Preparatory work is a very important stage. The better the base is processed, the more securely the tiles will be installed in the bathroom.
- Removing the old bathroom coating and removing adhesive materials. Remove old tiles using a drill, chisel and metal spatula.
- Grinding. Thoroughly clean off the remnants of the old adhesive component, paint, and plaster using a grinder with a grinding attachment.
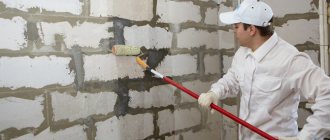
- Alignment. Using a level, determine the evenness of the walls and ceiling in the bathroom. Small irregularities up to 5 mm. smoothed with cement mortar. More serious defects are corrected using a metal mesh or profile.
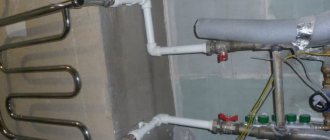
- Waterproofing. Cover the floor, walls at a level of 60 cm, as well as areas next to the bathtub or shower cabin with a waterproofing compound in 2 layers. This will prevent water from flowing to your neighbors in case of problems with drainage or burst pipes.
- Primer. To increase the level of adhesion of surfaces and, as a result, reliable masonry, the walls and floor are primed. Use the composition for rooms with high humidity.
- Marking. Before laying tiles in the bathroom, calculate the number of elements per tile. To lay the tiles evenly with a little experience, draw out the arrangement of the rows along the entire base.
After each stage of coating the base with preparatory compounds, the surface must dry completely. Wait 36 hours before starting the next work.
Preparing the bathroom and toilet for installation
Dismantling old tiles
We bought tiles and glue, which means we can start preparing the room itself.
To do this, you first need to remove all furniture and plumbing from the room; also, before turning off the toilet and washbasin, it is important not to forget to turn off the hot and cold water.
Next we need to remove the old tiles. It is best to use a hammer drill for this; if you don’t have one, you can get by with a chisel and a hammer, but of course it will be easier with a hammer drill. The technology is simple. Switch the hammer drill to chipper mode and start with the outermost tile.
To protect your eyesight, be sure to wear glasses, as the tiles crumble and its fragments can cause trouble.
Most often, the tiles will fall off in layers, along with the glue and plaster, do not try to avoid this, you will still have to remove all unstable areas later. To do this, we also use a hammer drill in hammer mode.
After the wall is cleared of old falling material, we need to level the walls of the bathroom and toilet. To do this, you need to determine the vertical slope of the wall, as well as the angles, which should be equal to 90 degrees. In the first case, we will need a plumb line, which we will hang from the ceiling and thus determine the slope; in the second case, a mounting bracket is sufficient. If the wall turns out to be level, great, but if not, you’ll have to level it.
For this we need:
- plaster mixture - gypsum is best;
- trowel and spatula for applying and leveling the plaster mixture on the wall;
- bucket for preparing the solution;
- mixer (you can use a special attachment of the same name for a hammer drill);
- plaster beacons;
- rule - a flat board is suitable for this; you can also use a metal profile.
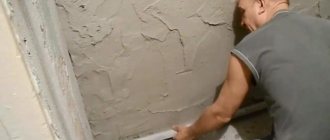
Aligning the walls according to the beacons
So, let's start leveling the wall, gypsum plaster will help us with this.
First, we attach the plaster beacons, for this you can use the plaster mixture, until it dries, we align the beacons according to the level and rule. Next, you need to wait until the mixture under the beacons has dried.
When the beacons are already well adhered to the wall, we prepare a mixture - gypsum plaster and water, mix all this with a mixer until the mixture is homogeneous.
The further technology is simple. Using a trowel, apply mortar onto the wall to the edge of the beacons, an area of approximately 0.5 square meters. m and level it from bottom to top with a spatula. In this way, we plaster the wall completely and check whether everything is the same level; if somewhere it is not enough, we add the solution to this place and remove it in a circular motion, rubbing it with a grater. The walls are ready.
Let's start leveling the floor.
To begin with, using a level or rule, let’s check how uneven our floor is; if the slope exceeds 5 mm, you will have to resort to using a self-leveling mixture, and you can prepare it yourself.
To do this, we simply make the cement mortar more liquid, with approximately the same consistency as jelly, so that it spreads over the floor and thereby covers all the unevenness. After the floor has dried, we’ll check with a level and a rule whether everything is even, if so, great, if not, we’ll have to trim it again in the same way.
Instructions for laying tiles
Laying tiles in the bathroom can start from the walls or from the floor. When laying out vertically first, leave a space at the bottom to accommodate the flooring. Installation of tiles begins from the wall opposite the entrance. When laying floor finishing, installation is done from the center.
- Installation of the bathtub lining should begin from the second row from the bottom. Before laying, a wooden strip or metal profile is attached to the level of the initial row. It will support the cladding. Upon completion of the installation of the tiles, the lath is dismantled and the bottom row is installed.
- Dilution of glue. To install tile trim in the bathroom, use special tile adhesive. It comes in powder form, which is diluted with water. The proportions are indicated on the packaging. Do not deviate from the instructions; this may lead to changes in the characteristics of the composition. To knead the components, use a stand mixer.
Dilute the glue in small portions to prevent it from hardening prematurely.
- Applying glue. Distribute the mounting compound over the base and level it using a notched trowel. Grooves should form on the surface. Do not cover too large areas as the glue may start to dry out.
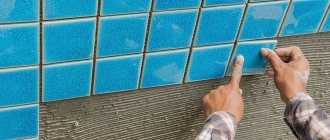
- Laying elements. To prevent the tile from absorbing the adhesive, it should be moistened with warm water before starting work. Press the tiles into the adhesive solution and tap them with a rubber mallet for better placement. Align the segment to the markings. Install the next element at a distance of 2–3 mm.
Remove excess glue with a spatula. To ensure even placement, place cross-shaped dividers at the corners of the tiles. If you have no installation experience, after installing the first row, let it dry for 24 hours.
After this, continue installation. When laying out 2-3 rows, check that the installation is level. If there are small deviations, you can level out the defects by increasing or decreasing by 1 mm. distances between tiles.
- Drilling technical holes. Diamond bits are used to make openings for sockets and bath pipes. Make careful markings first. During the drilling process, moisten the work area with water to prevent overheating.
Corner elements are also trimmed. Using a tile cutter, cut the corner elements at an angle of 5⁰. So that when joining two elements an angle of 90⁰ is formed.
We recommend watching the video instructions:
First the bath, then the tiles
In this case, a bathtub is brought into the room prepared for laying tiles and placed. This method is most often used when installing a cast-iron bathtub, since if it is brought in after finishing work, the tiled floor covering can be seriously damaged.
After installing the plumbing, the bathroom tiles are laid. With this method of wall cladding, the bathtub turns out to be embedded or built into the tiles. The tiles should not rest on the edge: a gap of 1–2 mm is left, which is filled with sanitary sealant or a waterproof fugue, for example, based on epoxy resin.
This technology has several advantages:
- The edges of the bathtub are recessed into the lining, so the water flows directly into it.
- The bathtub also takes up less space due to the fact that it is built into the lining. This is important for small combined bathrooms.
- Tiles are saved, since with this technology the wall behind the bathroom is not tiled.
The disadvantages of finishing the walls after installing a bathroom include the fact that the equipment must be protected from dirt and the possible fall of tools, tiles or other objects inside, which will damage the enamel. After installation, it is recommended to line the bathtub with cardboard, cover it with plastic wrap, and put thick plywood on top so that the master can veneer the wall above it.
Grouting and cleaning
After the finishing work in the bathroom is completed, you need to clean the surface and seal the space between the joints with grout.
- After the glue has completely dried, remove the separators. Using a mounting blade or knife, carefully remove excess adhesive component at the junction of the segments.
- Wipe the tiles and joints thoroughly with a hard, dry cloth.
- The grout can be chosen in any shade (matching the color of the tile or, on the contrary, contrasting). Dilute a small amount of grout (so that it does not start to dry) and distribute it around the perimeter of the seams.
Spread the mixture evenly around the entire perimeter with a rubber grout spatula.
- After an hour, remove excess grout with a damp soft cloth. To avoid damaging the grout layer, wipe the seams without pressure.
- Upon completion of work, the surface of the bathroom should be completely dry within two days. At this time, it is not recommended to wash the floors or use the bath or shower.
- Treat the joints between the wall and the floor, areas near the bathtub, shower stall, and pipes with sealant. It is better to choose a colorless one - it will match any tile in the bathroom. Allow the sealant to dry overnight. After this you can use the bathroom.
How to properly lay tiles on different types of surfaces
On a wooden floor
A wooden base is not suitable for laying tiles, but if you wish, you can still make such a floor; for this you need to create certain conditions.
- There should be no cracks in the coating; the surface must be sanded and sanded.
- The base must be stable, which means that individual elements must not be deformed. Otherwise, the tile will move away from the base. To prevent this, you need to reinforce the surface under the tile.
- Wooden floors must be covered with protective hydrophobic compounds.
- There should be no rot or cracks on the base.
On drywall
Drywall is rarely used for flooring, but if necessary, tiles can be laid on it.
- The material must be moisture resistant.
- Drywall should be laid in 2 - 3 layers.
- All seams and joints must be sealed with glue.
Read more about laying tiles on drywall in the article on the website.