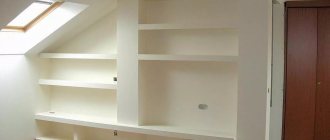
Bathrooms most often have a small area. Therefore, it is necessary to think through the interior most carefully, giving preference to functional solutions. An example of such a solution would be plasterboard shelves in the bathroom. They can decorate a room and also carry a functional load, that is, they can be used to store necessary things.
Many people want to make the interior of their bathroom original. But the small area of the room greatly limits the flight of imagination. Therefore, interior decorations must be functional, that is, bear additional load. An example of such a “useful” decoration in the bathroom would be shelves made of plasterboard.
Why drywall
First of all, it is worth mentioning that the drywall used for the bathroom must be special. These are sheets marked GKVL, impregnated with special compounds that protect the material from fungus and moisture. Most often they differ from ordinary canvases in blue or green. Any other drywall in the bathroom, where the humidity is very high, cannot be used to avoid rapid destruction.
Shelves made of this material have a number of advantages:
- They can be of absolutely any size and configuration. You don’t have to adapt to the assortment of furniture stores.
- The texture and color of the product can also be any. Moreover, if desired, it can be easily repainted in the desired color.
- Properly designed and installed shelves are strong enough and can support a decent amount of weight.
- The cost of the product, even if it is a very complex and large structure, is small.
- The material is absolutely safe for humans and does not emit toxic substances.
- The process of manufacturing and installing shelves is quite quick and simple.
Drywall allows you to create structures of various shapes and configurations. They can be wall-mounted, corner, semicircular or broken, as your imagination dictates.
Features of the material
Until relatively recently, the use of plasterboard for the construction of structures in the bathroom was considered irrational, since the material is not resistant to moisture.
But after the appearance of a moisture-resistant version of the material (GKLV), it began to be actively used in “wet” rooms. Moreover, GKLV is the most successful material option for performing work, as it has a number of advantages, namely:
- Using gypsum boards, you can make shelves of any size and shape. The material is plastic, it is suitable even for the manufacture of curved structures;
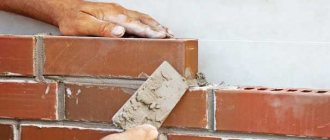
- plasterboard products can be subjected to any type of finishing; they can be painted, tiled or covered with self-adhesive film;
- Properly assembled gypsum board structures can be used for their intended purpose, as they can withstand quite an impressive weight;
- materials for production have an affordable price;
- drywall is an environmentally friendly material; it does not emit toxic substances;
- Working with drywall is not difficult; any home craftsman with minimal skills in using tools can handle the job.
Where to start: preparatory stage ↑
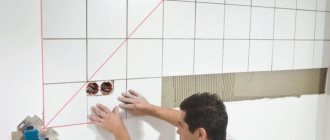
We start with the drawings. In order for them to be done correctly, you need to clearly know what the resulting shelf should look like. We schematically draw it in all details, simultaneously noting which areas need to be measured. We take measurements. We carry them out extremely carefully and correctly, otherwise there may be problems with fitting the shelf in the future. Using the obtained values, we build a drawing of the future structure. With its help you can easily calculate the exact amount of materials needed.
To make shelves you will need:
- drywall;
- galvanized profile (most often 50x25 mm);
- guide rails;
- arched profiles, if a curved structure is planned;
- dowels with spacers, self-tapping screws;
- reinforcing mesh for processing joints;
- primer.
In addition, you should prepare the necessary tools.
Curved shelves
Curvilinear shelves are the most difficult to implement. To create them, you will need to make a template from a durable material, such as plywood.
- One side of the plasterboard blank is treated with a needle roller and moistened with water.
- The shelf blank is placed on the template, fixed at the ends, and left to dry for a day. The result is a curved part.
- Its installation is carried out using arched profiles. You can also use a regular profile by making cuts and bending it.
Nuances of making shelves ↑
Standard shelves ↑
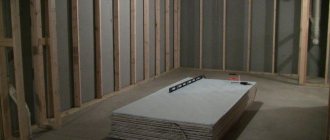
We start by making a frame, which will become the basis of the entire structure. Its shape will depend on the configuration of the future shelf. To begin with, we assemble the perimeter of the future product from guide profiles of the ud type according to the required dimensions. Then we reinforce them with cd load-bearing profiles. At the same time, be sure to take into account that the system will be covered with plasterboard on both sides. Accordingly, we install the load-bearing parts as follows: one is directed in one direction, the other in the opposite direction. This doubles the profile consumption. In this way, a frame for shelves of any geometric shape is made.
We attach the structure to the wall. If additional lighting is planned, install it inside the system. Now you can begin covering the profile with sheets of plasterboard. We cut the material to the size of the frame and fasten it with metal screws, the length of which is 25 mm. We close the corners of the structure with a perforated corner and putty the product. We clean the dried shelf with an abrasive material until smooth. Next comes the finishing touches. This could be painting or a more interesting option, for example, mosaic cladding.
“Recessed into the walls ↑
A more complex design is shelves “recessed into the walls.” To complete them, you will need to perform the following operations sequentially:
- We mark the future building. We start from the corner of the ceiling. We draw a straight line marking the inside of the structure. From it at right angles we set off the depth of the shelves and draw a second straight line parallel to the first. This will be the outside. Using a plumb line, we transfer these lines to the floor and wall. As a result, we get two parallel lines on the floor, wall and ceiling.
- We attach guides to the resulting markings. We cut the profile and fix it to the ceiling and floor.
- We install load-bearing pillar profiles. We mount them vertically to the edges of the horizontal guides and connect them. These will be the racks to which we will subsequently attach horizontal shelves.
- We cover the racks with plasterboard. We mark the sheet and use a sharp knife to cut it into parts of the required size. We screw them to the assembled frame. A small nuance: if it is not possible to install a fragment that is integral in height, we mount an element with a joint, which must rest on the internal jumper. Otherwise, the putty in this area will always crack.
- We make grooves for the horizontal profile. We fix suitable sized fragments of guides from bottom to top along the inner sides of the racks at a distance corresponding to the size of the shelves. We make sure that the grooves of the parts are facing inward or facing each other. Using a water level, we check the horizontal position of future shelves.
- We mark and cut the supporting profile. The length of the fragments must correspond to the size of the shelves. Each of them will require two supporting parts. We insert the first one into the groove and move it towards the wall. We screw the fragment to the posts and plane. We insert the second part into the groove and secure it to the outer edge of the structure.
- We strengthen the frame for the shelves with jumpers. This operation will be required if the width of the structure is large enough, about 50 cm. We insert the profile fragments between the load-bearing ones and secure them.
- We cover the finished frame with plasterboard.
Curvilinear structures ↑
Curvilinear structures are even more difficult to manufacture. To create curved shelves or their elements, you will need to prepare a template. It must be made of durable material, such as plywood. A piece of plasterboard cut to size is pricked on one side with a special needle roller and moistened. The same side of the element is placed on the finished template and its ends are fixed. In this form, the part is left for a day until completely dry.
The result should be a smooth shape of the desired configuration. It is fixed in the right place using special arched profiles and self-tapping screws. However, if necessary, you can use a standard profile; you just need to make cuts on it and bend it.
Making shelves
Project selection
First you need to make a drawing of the shelf or at least a sketch of the future interior detail. Thanks to such a sketch indicating the dimensions, it is possible to calculate the consumption of drywall in advance, and if necessary, during work there is always the opportunity to make changes to the project.
The drawing will help you figure out the dimensions of the shelf and calculate the materials for the sheathing and frame . The calculations are very simple and do not require special knowledge or extensive experience. When planning, it is important to take into account the thickness of the drywall sheet and its width and length. The width of the material is 1.2 m, the length is 2.5 m for the ceiling version and 3.0 m for the wall covering.
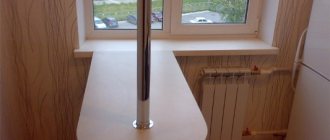
The position of the shelf in the interior of the room is determined. Although the shelves in the bathroom are made of moisture-resistant material, they need to be located away from the area of shower jets . If a single ensemble of shelves is provided, then it will be assembled on site, and a separate corner structure can be hung after the main decoration of the room.
To select sheet thickness, it is important to determine the load on the shelf in advance. There are usually no heavy objects in the bathroom except for the TV, but it is rarely installed in such a room. If you want to install something heavy on a shelf, you need to include a reinforced profile in the design.
Drywall refers to materials from which any shape, bend, arch and other original designs can be made. It looks very nice and is often used when creating built-in wardrobes.
It is imperative to take into account the presence of lighting and arrange the layers of material so that the distance between them allows you to insert a lamp there and hide the wires suitable for it. All these little things, which seem insignificant at first glance, will save the master time and nerves during the work process.
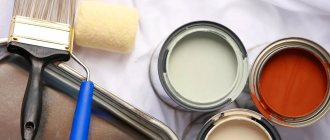
Final finishing ↑
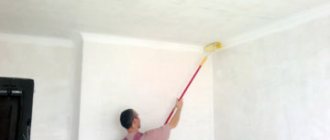
Most often, plasterboard structures are puttied, thereby preparing for finishing. At this stage, you should not forget about the primer, which must necessarily precede the putty. To get a perfectly flat surface, we apply a layer of gypsum or putty to the joints of the sheets and seal them with a special reinforcing mesh. We put putty on top of it again. Don’t forget to cover the corners with special mounting corners and putty. After drying, apply the finishing coat. Let the material dry completely and use an abrasive to smooth out all surface irregularities until completely smooth. Now we apply the primer again, the shelf is ready for painting or any other decoration.
There are several very interesting original options for finishing plasterboard shelves. Playing with color is a traditional solution, but you can also play with texture. To do this, wet putty:
- processed with a large brush with fairly hard bristles, obtaining a kind of ripples
- “stroked with fingers, which gives an intricate convex pattern
- spot-treated with a small spatula, which is rotated around the axis. The result is rounded decorative fragments.
Drywall is a fairly easy-to-process material, making it possible to create almost any structure of any configuration. This statement is absolutely true for those who have some experience in working with it. For everyone else, it will be quite difficult to complete even the simplest product. Of course, everything can be learned. But if you don’t want to waste time and effort, it’s better to invite professionals and get a competent and beautiful embodiment of your own design concept.
Tool preparation
A novice craftsman or an experienced installer should always have the right tool at hand, which is prepared in advance:
- A screwdriver for screwing screws into a profile.
- A small grinder for cutting metal profiles.
- Building level, measuring tape, pencil, plumb line.
- Hacksaw, knife, scissors.
- Hammer, pliers, Phillips screwdriver, electric probe.
- Three spatulas (3, 8 and 25 cm), a roller with a ditch for primer.
- Grouting machine with a set of diamond meshes.
You need to collect the necessary materials for continuous work:
- Profile for mounting sheets type CD and UD.
- Perforated corners or plastic bendable ones for arched structures.
- Drywall for sheathing.
- Serpyanka joining tape.
- Primer, glue for processing joints, finishing putty, water-dispersed paint.
- Metal self-tapping screws for drywall, 25 mm long, flea screws connecting profiles to each other.
Frame making
The base of the frame consists of a supporting galvanized profile . The connection to the wall is carried out using a strapping profile, which is attached to the latter using “quick installation” dowels.
The frame can be mounted at the same time as finishing the entire wall with plasterboard; sometimes the shelves are made after finishing the sheathing. In the first case, you will get internal niches, and in the second - hanging open spaces for storing items.
Making a frame for plasterboard shelves
The wall is marked using a level and a plumb line. Build a frame from profiles , checking the verticality and horizontality of all sections of the base. For shelves designed for heavy loads, the frame is made of reinforced profiles (CW and UW). Drywall can be taken with a thickness of 18 mm. If increased strength is not expected, then all work is carried out using standard common materials. At each stage it is necessary to consult the drawing.
When arranging shelves, you can move away from standard rectangular structures and make rounded shapes , arrange niches in a checkerboard pattern and make them of different sizes. Horizontal platforms are made not only of plasterboard, but also of thick glass, metal, and wood.
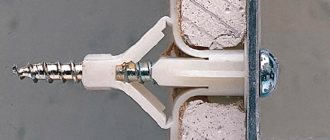
If you have to attach the frame to a wall covered with plasterboard, then this must be done with special “butterfly” dowels , which, when tightened, push the tail of the dowel toward the back side of the wall. An ordinary dowel will not stick to sheets of material and will fall out at the first effort. All connections of the material must be made on the profile, otherwise over time there will definitely be a crack there, even if this place is carefully sealed with putty using a mesh.
After all the main posts are installed, transverse crossbars are installed to support the horizontal surfaces of the sheets. At this stage, it is necessary to create all the places for installing built-in lamps, if any were planned, and connect the wires, having previously insulated them with a corrugated sleeve. Such “clothing” for the wire is necessary so that it does not touch sharp metal edges, which can cut it and cause a short circuit.
Carrying out the cladding
Many builders combine drywall with other materials, using OSB boards and chipboard . To make arched elements, you can successfully use fiberboard, which bends easily. Before applying putty, they need to be carefully glued with a mesh and attached to the frame more often than usual.
Sheathing surfaces with plasterboard is done by fastening them to the profile with metal screws. Instead of using thick drywall, which is expensive, you can lay two layers of ordinary material, which will give the shelf the same strength without spending extra money.
At this stage, holes are drilled in the sheets for installing lamps with special crowns and the wires are pulled out to make sure they are of sufficient length. After this, the wire is wound in a circle, secured with a thread and placed in front of the wall, otherwise, left behind the wall, it may begin to spring, after which it will be impossible to pull out such a wire to connect to the lamp without disassembling the casing.
Final finishing
All seams and joints of pieces of drywall and its corner joints must be glued with mounting mesh , which is sold in rolls of the required width. The tape is provided with a layer of glue, but for thorough reinforcement, such a tape is attached to a special dry glue, which is diluted with water. After drying, the areas are cleaned using abrasive mesh No. 120 and the entire surface of the shelves is putty with finishing putty.
Puttying such a complex structure, in which there are many corners and transitions, requires several steps. It is necessary to clean the layers and apply new ones, achieving a flawless appearance of the product. All layers must be primed using a roller, especially the last one. The brush can leave small grooves on the surface , which will appear after painting and cannot be removed with sandpaper. Only internal corner joints that cannot be reached with a roller can be treated with a brush.
After the putty has dried and the surface has been primed again, the entire shelf structure is painted with the chosen paint .
Making plasterboard products with your own hands is very exciting. Having made such shelves in the bathroom, the owner can continue to arrange such products in other rooms of the apartment.
DIY plasterboard shelves
You can make plasterboard shelves with your own hands. Before carrying out work, it is necessary to draw up a plan, accurately select the shape of the shelves, and carefully take all measurements. Prepare a diagram, calculate and purchase the required number of drywall sheets, fasteners, wooden beams or metal profiles for the frame.
Shelves made of plasterboard are universal, they can be created in any room:
The options for placing shelves are also different - you can install them on the wall or in a niche. The advantage of plasterboard shelves is the variety of shapes; in this case, imagination is not limited, you can create absolutely any pattern and bend.
You can make an interesting shelf design with your own hands; drywall is an affordable material, so you will not have any difficulties in creating an original interior.
Finishing the finished structure
The finishing of plasterboard shelves depends on the overall design of the bathroom, and is done as follows:
- Apply two layers of primer to the finished structure and let it dry thoroughly;
- using putty and serpyanka, seal all joints and connections to the walls so that cracks do not appear later;
- Install perforated corner elements on the outer corners and fix them with a mixture of plaster. Important! For curved structures, buy an arched corner made of plastic; it bends perfectly thanks to the sections applied to one side;
Preparing the shelf for decoration - Apply a layer of putty to the entire surface of the plasterboard structure and let it dry;
- putty the shelves again after 24 hours;
- as soon as the second layer of putty has dried, the structure must be sanded well with an abrasive mesh;
- Apply primer to the finished shelves.
Preparation for the final coating is complete. You can decorate plasterboard shelves in various ways, for example:
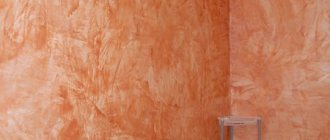
- Apply decorative plaster with a water-repellent effect.
- Paint it any shade.
- Place decorative mosaics on the shelves using tile adhesive. This cladding method can be used without prior puttying.
Interior of a room with shelves on a plasterboard wall
Shelves can replace furniture, such as a cabinet or rack. At the same time, they are quite roomy; books, vases, even dishes and flower pots can be placed on them.
Plasterboard shelves save a lot of space and make the room more modern and original:
- Drywall allows you to realize the most daring design ideas; shelves can be used both as a decorative component of the room and as a functional element;
- Most often, shelves are created in rooms designed in a modern style; plasterboard interior elements will complement a living room or bedroom in a minimalist or modern style;
- Drywall is an excellent material for a nursery; shelves made from this material can become the basis for the design of the room; they can be made around the perimeter of the room;
- Such shelves also look great in a library, because they allow lamps to be built into them, which is convenient for those who like to read;
- In the kitchen, plasterboard shelves can serve as a bar counter or table.
Plasterboard shelves are multifunctional, they can be created in any room - they will look creative and interesting.
The main advantages of drywall
To ensure the viability of drywall, you should determine its main advantages as a blank for future niches in the bathroom:
- Niches of different parameters and shapes can be constructed from plasterboard, so such structures can be harmoniously combined even in miniature rooms, using the ceiling, walls, corners, etc. If it is impossible to install full-fledged furniture, you can use an alternative option in the form of niches supplemented with shelves.
- You can make unique and reliable barriers from drywall that allow you to hide any unevenness. There is no need to apply a thick coating of putty, which will dry in a few days. A plasterboard sheet will eliminate all unevenness, making the surface perfectly flat, even with curved walls.
- Financial question. Most people pay attention to the price of the material. That is, moisture-resistant drywall will be the optimal solution, the cost of which will be low compared to the most effective results.
A niche in the bathroom, the photo of which is shown on the website, can serve as a stand for any items. You can additionally attach hooks, shelves or slats for towels to it. This design will also help hide the toilet tank. But do not forget that the bathroom is a room with high humidity, so you should purchase moisture-resistant drywall.
A niche in the bathroom made of plasterboard sheets will look aesthetically pleasing, comfortable and laconic. Acting as an indispensable detail in modern design, niches in the bathroom reflect the meaning (in large structures you can disguise a washing machine or shower stall) and look beautiful (small openings serve as a mirror frame).
How to make shelves from drywall
You can make plasterboard shelves with your own hands at home.
To do this you will need:
- Sharp knife or hacksaw;
- Wooden beams or metal profile;
- Fasteners;
- Drill;
- Corners made of plastic.
Remember that before carrying out work you must have a clear work plan and know what you want to get in the end. Take the necessary measurements, do everything without haste and very carefully.
The step-by-step sequence for creating shelves is as follows:
- Cut shelf parts from drywall using a sharp knife.
- Attach figured shelves using arched profiles.
- Make a base from the profile, a profile 50 by 25 mm.
- Drill holes according to the size of the screws, hang the profile and attach the structure. Plasterboard parts for niches and shelves can be cut with a hacksaw or a sharp shoe knife.
- Curved shelves are made from thinner plasterboard, and they are secured using arched profiles. As a last resort, if there are none, you can bend ordinary profiles by making cuts along the entire length.
If you are making shelves from thick material for heavy things, then use special fasteners for drywall. These are butterfly screws; you can also additionally secure the structure with traverses or a frame.
If the shelf consists of several parts, it is best to cover it with a mounting mesh and secure the corners with plastic or aluminum elements so that the structure retains its aesthetic appearance longer.
Curly shelves
These are the most difficult structures to install. To make them, a template is cut out of plywood, according to which a plasterboard sheet is subsequently cut. A special flexible profile is purchased for the frame. The sheathing itself for the shelves is made according to the principle described above, only instead of a rack profile an arched element is used. You should also correctly bend the gypsum board fragments so that they do not break during installation. To do this, you need to walk over the surface of the drywall with a needle roller and wet them well.
Curly shelf made of plasterboard Make sure that the core does not get completely wet. As soon as the third part of the gypsum layer gets wet, you can carefully begin installation. Fastening is carried out from the highest point, gradually moving towards the edges. In this case, the screw pitch should not exceed 15 cm.
Important! If you can’t find an arched profile in the store, you can make a flexible structure yourself; for this, the edges of the guide profile are cut into small fragments, as a result of which it acquires the required flexibility.
Installing plasterboard shelves in a bathroom
Figured plasterboard shelf
Decorative plasterboard shelves: functions and advantages
Depending on the material chosen, shelves can be either very light or quite heavy and durable.
You can create shelves for storing:
- Books and stationery;
- Decorative items;
- Crockery;
- Toys;
- Electronics.
If you additionally secure the plasterboard shelves, you can get a really strong structure on which the TV or stereo system will firmly stand.
Drywall has several advantages:
- Availability;
- Environmental Safety;
- Ease of installation;
- It can also be painted with any paint.
But at the same time, drywall is a rather fragile material and is completely unstable to moisture. If you want to make shelves or niches in the bathroom, buy only moisture-resistant drywall.
Jumpers for extra strength and hatch
Many people prefer to prepare a sufficient number of jumpers before making a plasterboard box in the bathroom. But if you are new to this business, then it is better to cut the jumpers in the process. They should be installed in increments of 40-60 cm between the central post and the wall guides. As a result, the design will be more reliable. The drywall will be attached to the studs, which will make the surface of the box stronger and smoother. The jumpers themselves can be made from both the CD profile and the UD profile (whichever you have left over). If the jumper is made of a rack profile, then it easily fits into the guides.
The jumpers can be secured with a notch to avoid bumps from screw heads
If it is not possible to insert the jumper directly into the profile, then you need to cut off a few centimeters of the ribs on both sides of the jumper, leaving its base. In other words, the side parts of the jumper are cut off so that it can fit between the profiles and there is a tongue with which it can be secured. They need to be secured with metal screws.
Sometimes it is necessary to leave an inspection window in the box for the meter or other needs. Therefore, you need to mark in advance the place where the hatch will be located. Simply insert jumpers along its top and bottom borders.
How to fix a shelf to drywall
To attach a small and lightweight shelf to gypsum board sheets, you will have to use special dowels, which tend to open up and be fixed in the hollow base.
Suitable for these purposes:
Take a close look at how much load a particular dowel can withstand and compare it with your shelf. Wall shelves in plasterboard must be secured using these dowels, as well as self-tapping screws, which should be slightly longer than the dowel itself. When screwing in a screw or self-tapping screw, the dowel head will open and take most of the load.
To hang shelves in drywall, you can use this sequence:
- Drill a hole in the wall of the required size;
- Install the dowel into the hole;
- Install the shelf mount onto the fastener;
- Hang a shelf.
If you have a heavy shelf, you won’t be able to attach it without a profile.
In this case, you need to use the following method:
- Drill holes in drywall;
- Insert a butterfly dowel or a dowel, insert a self-tapping screw;
- Clamp the structure and screw in the dowel, but be careful not to destroy the wall.
Instead of such dowels, you can use anchor bolts. The entire sequence of actions does not change, only bolts are inserted instead of screws and dowels.
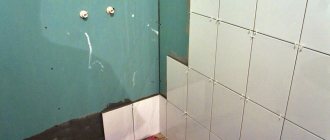
Plasterboard covering and finishing
Only moisture-resistant drywall can be used. It traditionally has a greenish color. Cut gypsum board sheets are attached first to one side of the box, and then to the other. Moreover, you need to make sure that the joints of the sheets are not at the same level (the design will be more reliable). Moisture-resistant drywall is fastened with black self-tapping screws 25-35 mm long in increments of 15 cm. Be sure to screw in the screws in all corners. As mentioned earlier, not only is the gypsum board attached in this place, but the profiles are also fastened to each other. Drywall must also be screwed in places where jumpers are installed.
The heads of the screws must be driven into the drywall so that they do not tear it, but also do not stick out. It is ideal to screw in the screws so that the head is pressed into the sheet by 1-2 mm. In this case, the structure will be convenient to putty, and it will not lose its strength characteristics.
Now it’s clear how to assemble a plasterboard box in the bathroom, but you need to prepare it for finishing. To do this, all screw heads are puttied, as well as all joints. It is advisable to chamfer the joints so that a small hollow is formed, where the putty is applied. The joints must first be primed so that the putty will adhere better. Reinforcing mesh is used to strengthen the joints.
It is necessary to pay careful attention to all aspects when preparing for finishing. You should perform the above procedures carefully, and then the entire gypsum board box should be primed and puttied again. After all, it will be in the bathroom, so good protection from moisture is required. Relying on moisture-resistant drywall and not thinking about anything else will not work. Very often the box is finished with tiles, which means high loads. Therefore, the structure must be strong, and the putty must not lag behind. Don’t forget about antifungal additives, but these are finishing details.
If you need to cover more than one pipe and the design of the box seems complicated, then this video can help you understand such nuances.
Corner shelves made of plasterboard
Corner shelves made of plasterboard look very stylish. These beautiful designs look great in modern living rooms and bedrooms. Built-in lights that can be inserted into corner shelves will add coziness and warmth to any room.
Small corner shelves can often be found in small rooms, where every centimeter plays a huge role. The decoration in such rooms is light, there is a lot of light to further increase the space.
Small things are placed on the corner shelves:
- Watch;
- Books;
- Stuffed Toys;
- Small lamps;
- Vases and boxes.
Thus, corner shelves help save space, but at the same time hold quite a lot of things. This option of plasterboard shelves is best suited for a children's room, bedroom and living room. Some even create them in the bathroom to place soap, washcloths, and various body care products on them. But remember that drywall is very sensitive to moisture - choose moisture-resistant materials.
Plasterboard in bathroom finishing
The advantages of the material can be described for a long time. Let's list the main ones:
- Shelves made of plasterboard look very good in any room . The bathroom boasts an abundance of places where sheets of material can be used to create niches and built-in cabinets that will increase the functionality of the room and decorate it.
- Drywall is an easy-to-process material . It is not at all necessary to have any special skills, it is enough to do the work carefully and show a little intelligence.
- For the bathroom, shelves are made from waterproof plasterboard , the sheets of which are painted green for ease of recognition.
- The frame material is a metal profile , which, despite its low weight, has sufficient strength. If it is not intended to load the shelves with heavy weight, then a standard designation profile is used. If you want to create a plasterboard shelf with your own hands for a TV, you should use a reinforced profile.
Tips for choosing the design of shelves in a plasterboard bathroom
To install a TV, tape recorder or transistor in the bathroom on plasterboard shelves, it is recommended to choose the built-in option. It is not recommended to constantly store all these electrical appliances in a room with high humidity, but you can bring them while you take a bath to combine business with pleasure.
To store household detergents, soap, powder and shampoos, you can successfully use the corner design of the shelves, which will fit organically into the interior. To enhance the visual effect, the side and internal surfaces are painted in different colors.
The backlit option is used quite often ; the rays from the lamps are directed in different directions, which creates a unique flavor for the design of the plasterboard shelf. Photos of such compositions can be viewed in various catalogs and albums from designers.
Various materials are sometimes used to decorate plasterboard shelves, which further expands the interior design options. The bathroom can have both small shelves and complex designs for multifunctional use .
Plasterboard shelves and niches can replace individual pieces of furniture in the bathroom. You can combine the arrangement of open shelves, made by yourself, with a large mirror installed in the center above the washbasin. For those who do their hair in the bathroom, it is recommended to combine such a shelf with a mirror and original lighting.
There is a great variety of shapes, finishing textures, combinations, and colors. All this makes plasterboard an excellent material for making niches, shelves and other built-in structures. On the Internet you can see photos showing options for plasterboard parts with a description of the work.
Material selection
Each owner can make the simplest designs of built-in shelves with his own hands. The material is really convenient to work with and does not limit the imagination of the master. You can realize the most unexpected fantasies.
For the bathroom, it is recommended to use only green sheets , which can successfully withstand a humid atmosphere. Over time, pink sheets can bend from moisture and ruin the results of your work.
For flat horizontal surfaces, 13 mm thick sheets are used, which are called wall sheets. For the side walls, on which there is no load from objects, you can install thinner sheets, 9 mm thick, intended for finishing the ceiling.
It is advisable to use a varied thickness of the material if, after completing the renovation, there are pieces of drywall left in the house, which will be useful for making shelves in the bathroom with your own hands.
If you buy ready-made material, then you need to look at the integrity of the sheets ; often their corners are chipped and the top layer peels off. The purchase of such materials should be avoided.
How to find a profile under drywall
You need to look for a profile under drywall in certain situations.
Namely:
- When you need to hang a picture on the wall;
- Hang a mirror;
- Attach a wall-mounted TV;
- Attach the lamp to the wall;
- Nail the baseboards;
- Attach wall cabinets.
In any of the above situations, it is necessary to find a metal profile under the drywall. If you installed drywall using a frameless structure, then the problem of finding a profile disappears by itself. Otherwise, you will have to search for the profile in different ways, which depend on the material.
In the case of a metal profile, use a regular magnet. You can use it to find the profile if the sheets of drywall are thin enough. A large and powerful magnet is best. Tie a string around a magnet and slowly move it across the drywall; when you feel the magnet not moving, make a note.
If wood was used, you can find the beams by tapping (the sound will no longer be dull above the slats), also try driving a nail.
However, the latter method is less practical; if the hole was made in the wrong place, you will have to fill it with putty. If you have a drawing of the room, study it and find wooden slats.
Making a frame for a plasterboard niche
Probably everyone knows that the frame in any drywall product is the main part. The strength and quality of the finished structure, as well as the aesthetic appearance, depend on it. The completed frame of the plasterboard niche will account for about 80% of the work done, so this work stage should be taken very seriously.
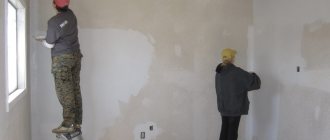
Basically, when making plasterboard shelves in the bathroom yourself (photos of the work are presented in the gallery), you should simultaneously cover the walls. Therefore, the problem of leveling walls should be approached as a multi-stage job.
The work begins with marking the contours of the future structure on the wall. To do this, you can use a rack or laser level.
This will require knowledge of geometry lessons and, by lining up parallel lines on the wall, you will need to draw a rectangle with the necessary parameters. In our situation, the niche in the plasterboard bathroom will be located in the horizontal plane of the wall, which will simplify the work. You will also need to draw 2 parallel horizontal lines, then use two vertical lines on the near walls and lines parallel to the wall on the ceiling and floor to mark the recess of the niche. The lines need to be reflected in full, since in the future ud profiles will be recorded on them.
Installation of profiles will be the next type of work in the manufacture of the frame. You should prepare a hammer, a hammer drill, dowels 4-6 cm long and 0.6 cm in diameter. Installing the guide profiles is a simple matter, but when doing it you should be very careful and attentive. You will need to fix the profile with one hand and make a hole in the wall for the dowel with the other. Any person can do such work without training.
After installing all the guide profiles, at the next stage of installing the plasterboard niche, you will need to give the structure real shape (rigidity and volume). In this case, you will need to twist a pair of ud-profile guides into a common system, which will serve as the corner of the niche. Two such products should be made, one of which will be attached to the bottom of the opening, and the second to the top. The corners are attached to opposite walls and fixed with load-bearing CD profiles, which are installed between the floor and the corner piece, as well as between the corners and walls. The profile fastening pitch is 400 or 600 mm, but the first indicator increases the strength and reliability of the structure. The same manipulations should be done in the upper area of the opening.
Attention! When carrying out all stages of installation work, be sure to control the location of the profile using a level.
In essence, we can talk about the readiness of the frame. Now, after studying the design of a plasterboard niche in the bathroom (photos of which are presented on the site), you will need to cover it with sheets of plasterboard. But first, attention is paid to carrying out hidden communications, for which all the required electrical cables are laid and pipeline outlets are installed in the required position. If necessary, the internal space of the frame is filled with insulation. Only after all the preparatory work has been carried out can the frame be sheathed with the final installation of a niche in the bathroom.
Plasterboard structures: types and step-by-step production
The main feature of drywall is that when wet it easily changes shape. Thanks to this quality, it can be used not only to implement any ideas in the interior, but also to level surfaces.
- create smooth coatings; after finishing, the material acts as an ideal base for painting, ceramic tiles and wallpaper;
- allows you to produce parts of various shapes;
Despite its positive characteristics, drywall also has one drawback - it is fragility. Therefore, it is not recommended to install it on walls that are subject to mechanical stress. If we consider the advantages and disadvantages of plasterboard structures, it is worth noting that they have many advantages:
- Ceilings. In order to level the ceiling slabs, simple single-level systems are installed. If you need to decorate the room in an original way, then choose multi-level ceilings consisting of many shaped inserts, lighting and stretch fabric.