Making a high-quality, modern renovation of your apartment with an original design is quite simple today. The market for construction and finishing materials offers a huge selection of finishes for modern interiors. Liquid wallpaper is not the last place in this segment. This material is not new, and has long been used for finishing living rooms, offices and utility rooms. But this material is rarely used for bathroom renovations.
About the advantages and disadvantages
Among the main advantages of liquid wallpaper are:
- practicality. There is no need to additionally level the surface of the room in order to apply this type of wallpaper to it. They themselves hide all the irregularities and small defects. This wallpaper has no seams. Therefore, even after repair, the surface will retain its original characteristics;
- environmental friendliness. This type consists of absolutely safe components. The surface does not allow moisture to pass through and does not attract dust. You don't have to worry about growing fungi and mold. The heat and sound insulation characteristics are pleasantly surprising;
- versatility. Liquid moisture-resistant wallpaper is suitable for any room, regardless of its purpose. And can be easily applied to any surface;
- long service life. Regular glue is enough to securely connect.
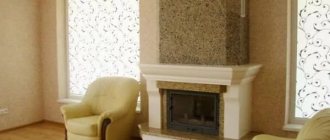
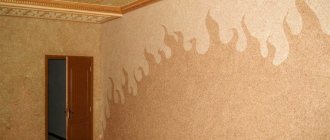
The photo shows the interior of a bathroom with liquid wallpaper:
Attention! Such cladding can be easily repaired if damaged. It is enough to wet the area and remove it with a spatula. A layer of new wallpaper is then applied to this place.
But there are also a number of disadvantages:
- high price. To purchase the required quantity you will have to spend 2-3 times more than for analogues made from other materials;
- easy to wash off with water. Liquid moisture-resistant wallpaper is not for those who like to wash everything, even walls. They wash off quickly if you rub it long and hard with a wet cloth. The walls can be coated with a special transparent varnish, but then they lose the ability to let moisture in. If any area has become too dirty, it is easiest to replace it with a new one;
- The application process may seem too laborious to some.
Liquid wallpaper compared to washable wallpaper
- Long service life
- Harmless to living organisms
- Resistance to sunlight
- Elasticity of the material
- Sound and heat insulation of the room
- Antistatic and does not absorb odors
- Maintainability
- Moisture resistance
- Versatility and practicality
Read about all the advantages of liquid wallpaper.
Varieties for the bathroom
Liquid wallpaper has not only different colors, but also different textures. In total, there are now three main varieties.
- silk. Consists of fibers of the appropriate material. It has a high price. But it is a leader in terms of attractive appearance for the bathroom. Has a surface that is resistant to ultraviolet rays. Thanks to which the colors remain bright for a long time;
- They produce so-called cellulose finishing. Much cheaper compared to the previous option. Suitable for those who currently have limited financial resources;
- combined variety. The composition contains both cellulose and silk fibers. The cost is usually determined by the amount of cotton or silk in the composition. The more it is, the more expensive the wallpaper will be.
Liquid wallpaper is sold in certain types of packaging. They are divided into several types depending on how ready they are for use.
- There are basic mixtures in dry form. Texture components must be added to them along with dyes. Reviews are both positive and negative;
- The material is produced in packages. Inside it has the appearance of flakes, and it is they that combine with texture materials, mineral dyes and water;
- Finally, liquid wallpaper for the bathroom is sold in plastic containers. Paints of different colors are added to them.
Liquid wallpaper for the bathroom: all the pros and cons
Liquid wallpaper is a mixture consisting of cotton or cellulose fibers, acrylic or silk, as well as an adhesive composition. Manufacturers can add wood shavings, glitter, and other various additives to the composition, which increase adhesion to the surface and also create the original texture of the wallpaper.
Liquid wallpaper has a number of advantages that allow you to repair almost any living space with help:
- Easy to apply, creating a uniform surface;
- They have a wide range of colors and textures, which allows you to decorate the bathroom in any style;
- Hypoallergenic;
- Durable;
- Protect from moisture, dust, and mold in the room;
- Retain heat well;
- Create additional sound insulation;
- Easy to care for - wash with a little water;
- If damaged, it can be easily restored without completely replacing the coating.
Liquid wallpaper allows you to hide unevenness on the ceiling. Moreover, applying them yourself will not be difficult. Our article is about this:
Using additional tools (for example, special rollers), you can get a variety of textures.
Important: in order for liquid wallpaper to last longer, the bathroom should be ventilated more often if it is not equipped with an exhaust hood.
All these advantages of liquid wallpaper undoubtedly attract people. But there are also disadvantages that you should also pay attention to when using this material for finishing a bathroom: high cost of the material, require careful preparation of the application surface, high cost.
How to apply correctly
Liquid wallpaper in the bathroom is applied in the same way as in other rooms. In any case, work begins by preparing the walls. The old coating is completely removed and the walls are leveled. Then putty is applied and the surface is primed.
The presence of ceramic tiles on the wall complicates this process somewhat.
Liquid wallpaper is applied to the walls in the bathroom in the following order:
- First prepare the wallpaper mixture. It's easy, just follow the instructions on the package. It should stand for some time. Knead it only by hand;
- A small amount of water is added to the material after a certain time has passed. A plastic trowel is the most convenient tool for applying wallpaper;
- the process goes from one corner to another. With light movements they are gradually smoothed out;
- The last stage is the application of a protective coating of colorless varnish with an acrylic base. The main thing is to make sure that the surface is dry before starting work. A special roller or wide brushes are best for applying varnish. It is thanks to acrylic varnish that the surface of the walls becomes matte. And it receives additional protection from external influences of moisture and steam.
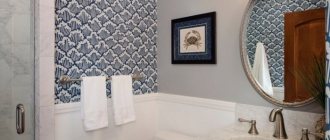
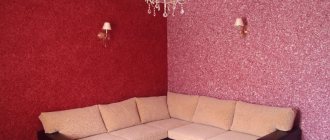
You can see what liquid wallpaper looks like in a bathroom in the photo:
Material improvement
The very first liquid wallpaper was imperfect. The material actively absorbed moisture and was not suitable for use in bathrooms. To achieve the required moisture resistance in rooms with high humidity, it was recommended to cover liquid wallpaper with a layer of varnish. In this case, the walls stopped “breathing.”
The most modern developments of this material make it possible to skip this action. The walls become absolutely impervious to hot steam and splashes. Mirrors will not fog up during bath procedures, and wooden furniture will be saved from temperature changes. Antifungal treatment of the wall surface may be unnecessary, since the solution contains fungicides.
All of the above properties make liquid wallpaper a very attractive material for wall decoration. When finished, the wall will look like it is tightly covered with fabric.
Additional rules
To glue liquid wallpaper in the bathroom, you do not need to have special construction skills. But experts give the following advice to those who want to create a truly unique interior in the bathroom.
Attention! An unfinished wall is unacceptable. After some time, such work will be more difficult to continue. Old and new layers of wallpaper will not match each other.
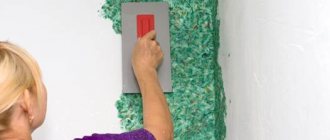
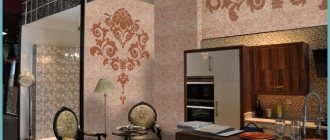
The textured finish and methods of application to the wall determine what the wallpaper will look like. Liquid wallpaper in the bathroom can be seen in the photo:
There are several ways to get original liquid wallpaper in your bathroom:
- use of a structural roller. Will help to cope with the problem of leveling wall and ceiling surfaces;
- relief rollers. They will allow you to create colored panels and stucco decorations if the liquid wallpaper has a fairly thick consistency.
Cellulose mixtures are always laid evenly on the wall. This is an excellent solution for getting rid of minor defects. Thanks to this, finishing and renovation work in the bathroom takes less time.
How to remove liquid wallpaper
It's not as simple as it seems. To prepare liquid wallpaper per kilogram of dry mixture you will need at least three liters of water; this composition covers 3–4 m2 of surface. This means that to get completely wet you need about the same amount of water, and you need to apply it in one go. It is not recommended to use a roller; it will not be able to absorb so much water at one time. You will have to process the same place several times. During this time, the top layer will already get wet, become soft and begin to stick to the roller. This is a big problem. To remove liquid wallpaper, you need to wet it with a large amount of water and without direct contact of the tool with the wall surface. The best option is a pneumatic spray gun. But not everyone has it.
Device for humidifying wallpaper with steam
Combination of liquid wallpaper with tiles
Many people choose the option when part of the walls is covered with tiles, and on the other – liquid wallpaper itself. This is completely acceptable.
To lay tiles, the walls must be leveled with plasterboard or plaster. Such processing takes up some of the free space, but the result will pleasantly surprise you with its quality.
You can create any designs on the surface of the wallpaper itself; the choice is limited only by your imagination. Then the inaccuracies can be easily corrected. Excellent quality in case you suddenly want to choose something else later. In a normal situation, liquid wallpaper in the bathroom is applied in a layer of approximately 5-7 mm. Dense layers are needed for those who use relief decorations.
How to properly glue
To apply liquid wallpaper to the wall, you don’t have to call a professional - you can do it yourself. The only thing is that for a good result it is important to follow all the rules developed over the years of using this material.
The technology for gluing liquid wallpaper differs significantly from paper or vinyl
The dry mixture must be soaked in water at room temperature 12 hours before application and mixed thoroughly. It is more convenient to do this with your hands - the material is environmentally friendly, so there is no danger. If the package contains glitter in a separate bag, it is poured into the container first. The finished mixture should be plastic, easy to spread, but also viscous enough to stick to the wall.
Before applying wallpaper, the wall is primed to better fix the finish, preferably in two layers, with a break for each to dry. You can apply the mixture to the walls using any method - roller, spray, gun or trowel. The latter is usually the most practical - a little mixture is applied to it, and then, holding the tool at an angle of 10-15 degrees relative to the surface, the mixture is laid out on the wall. The recommended layer thickness is 1-2 millimeters. The material will hide small unevenness in the wall surface, but the finish itself may not fit perfectly the first time - to even out the protruding parts, after completing application, you should walk over it again, carefully moistening it with water.
As for the time spent on work, it will usually take several hours to apply it directly if one person is working and we are talking about a bathroom. As for the final readiness of the repair, you need to wait until the mixture dries completely, and this already depends on the temperature and humidity of the room. It is noted that for reliable adhesion, too hot a temperature is undesirable, while drafts, an eternal problem for any other wallpaper, will not become a problem - the room can be ventilated even during operation.
It is especially worth highlighting the fact that the mixture does not have an unpleasant odor, that is, all household members can be at home, the main thing is just not to touch the walls until they are dry.
Other decorative possibilities
The variety of available decor options is one of the main advantages that liquid wallpaper has. When using ordinary materials, we simply glue what we chose in the catalog. And liquid material provides almost endless possibilities. You just need to decide which colors to use in the decoration.
- Using one color for interior decoration is the simplest and most affordable solution. If you get tired of the shade, it can be easily diluted with bright colors. Mosaics, stickers, a new mixture - there are really many options;
- You can purchase a composition of one color and then colorize it. An excellent solution for creating a bright, unusual interior in the bathroom;
- Various techniques are used to apply liquid wallpaper. Thanks to this, you can create paintings or patterns, geometric shapes. The main thing is to take care in advance of marking the contours of these figures. And then fill them in the appropriate way. The material can be easily washed off with water where the contours are unclear. This allows you to correct inaccuracies;
- The decor and effect of stucco molding is created using structural, relief rollers. Why apply two layers, one after the other. First comes the thin one, and the next one has more thickness.
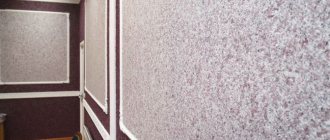
How you can make a thematic pattern in the bathroom from liquid wallpaper is shown in the photo:
Types and brief performance characteristics of liquid wallpaper
There are many articles on this topic on the Internet, but unfortunately, it is very difficult to find out the truth from them and get practical recommendations. Most articles are written at the request of manufacturers or distributors and are clearly advertising in nature. The second part of the information is provided by amateurs who have not only never worked with liquid wallpaper, but have not even seen how they were used by professionals. Hence the statements “there is nothing complicated”, “everyone can do it”, “universal wallpaper”, “easy and simple to work”, etc. Such statements are very far from the truth; in the article we will only give practical advice from independent users.
Colors and shades of liquid wallpaper
What else do you need to know
If the surface is covered with liquid wallpaper, it can be easily repaired and cleaned if necessary. A regular eraser will be enough to remove stains under the switch. Use a spatula to remove any dirty areas. To do this, you just need to pre-moisten them with water. Then a layer with new wallpaper is glued. It is better to apply more material, then it will definitely be level with the old one. Reviews confirm this rule.
Wallpaper does not need to be removed when new renovations are carried out. The paint is easy to apply directly to the wall. The texture does not suffer at all.
It is worth understanding that the texture of the wallpaper applied to the wall in reality will differ from what is presented in stores. The samples have an ideal appearance due to the fact that a small amount of water is added to them. In practice, more liquid is lost.
Video instructions will help you properly apply liquid wallpaper for the bathroom:
Is it possible to glue in the bathroom
Liquid wallpaper can be glued to the bathroom, as it does not create a greenhouse effect. Until recently, this type of finishing did not attract attention. Today they are, in fact, a universal way of finishing residential and office premises. Previously, tiles were laid en masse in the bathroom.
Is it possible to decorate a bathroom with liquid wallpaper: it is possible and necessary, experts say. They can be used separately or in combination with the same finishing tiles and mosaics.
The main thing is that they do not absorb moisture. If you decide to use this finishing mixture, it is important to choose the right material, as well as follow the manufacturer’s recommendations, which are indicated on the outside of the package. Read below about the pros and cons of moisture-resistant material.
Additional Application Tips
The main thing is to ensure that the layer of wallpaper is even. In any situation, choose the finishing method that seems most suitable:
- It is allowed to use a sprayer with a plastic float. A little of the mixture is first placed on a grater. Gradually the material is distributed over the working surface. The grater is positioned at an angle not exceeding 15 degrees;
- the mixture is sometimes rolled out using rollers. The tool itself is chosen depending on the size of the bathroom;
- There are special guns for applying liquid wallpaper. This is a relevant solution if, for example, the ceiling does not need to be level.
There are other tips to achieve the perfect result when using liquid wallpaper.
- applying wallpaper from lighter to darker corners;
- It is recommended to repeat the procedure after the mixture dries for the first time. The wall is moistened with water in small quantities;
- requires a room temperature of 15 degrees or lower, as reviews say.
Do not immediately throw away the remaining liquid wallpaper. They will help correct flaws that appear after the first drying. Or replace a small damaged area. Wallpaper can be stored for up to two weeks when wet, in a tightly tied plastic bag. It is better to dry it if you plan to store the mixture for a longer time. Next time you just need to add water to use.
The composition dries in 12-72 hours, depending on the density of the fibers. The material is elastic, making it easy to lay even on surfaces with defects. There is no need to worry about making the wall as level as possible. Even when the walls shrink, liquid wallpaper will never tear. Some compositions have silver and gold threads. They will make the simplest rooms look sophisticated. The covering effect of the fabric is created by the incoming silk fibers. The surface will look stylish and elegant if you make the layer of material very thin.
The following video will help you glue liquid wallpaper correctly:
Recommended Posts
What can be made from old wallpaper
How to make liquid wallpaper at home
Liquid wallpaper Silk plaster
Liquid wallpaper: application technology
Do-it-yourself liquid wallpaper: from newspapers, old wallpaper, sawdust, uh...
Is it possible to apply liquid wallpaper to drywall?
How to calculate the consumption of liquid wallpaper
Study the instructions for use; depending on the specific type, the consumption of dry wallpaper per square meter of surface area is indicated; it can range from 250 g to 350 g. But under one condition - the wallpaper is applied to perfectly smooth walls, the thickness is the same over the entire surface and does not exceed 2 mm. This means that the walls cannot have any flaws, and the work will be done by an experienced professional. Moreover, he should have experience working with liquid wallpaper, and not cement-sand plasters or putties. Your wall is uneven, and you have very little or no experience - increase the amount by at least 20%. If there is some material left, it will always be useful for correcting problem areas.
Liquid wallpaper consumption
How to calculate the consumption of liquid wallpaper
Application process and its subtleties
Choose a discreet palette
Pasting a toilet with liquid wallpaper is not difficult and not very expensive. For 6.5 squares of wall you will need only 1 kg of dry mixture and primer. If you add decorative filler, then even less composition will be required.
You just need to first inquire at a hardware store about whether the properties of the brand you are purchasing allow you to introduce foreign components into it, and purchase the appropriate variety.
Psychologists do not recommend pasting functional units with aggressive colors, but in the assortment of powder mixtures you can find almost any shade of the visible spectrum, so we glue the one that is more compatible with the plumbing and the design of the toilet room.
These are not photo wallpapers that can get boring in a short time, despite the fact that several hours have been spent on them. A wall coated with a liquid powder mixture gives an unobtrusive color dominant, which is easy to change if the choice turns out to be unsuccessful, or if the color scheme is boring.
A cramped space can be visually expanded if you use several compatible colors and make a combined geometric pattern out of them. This technology will only require the purchase of several colors.
The use of a decorative component and the option of a combined finishing method may be different.
The color component plays an important role, since by correctly combining colors, you can achieve the illusion of increasing the space of the room or its visual expansion.
The diluted mixture is left to mature
The process of applying liquid wallpaper is extremely simple:
- dilute the powder;
- leave for 12 hours to mature;
- apply a thin layer to the prepared primer;
- After a couple of hours, smooth the walls using a grater.
To create a relief surface, you can use the same tools as for decorative plaster. In this case, the finished mixture can stand for about 2 weeks when closed.
Application technology
To decorate walls with liquid wallpaper, you need to perform a number of simple operations:
- Prepare the base.
- Mix the ingredients and prepare the composition.
- Apply wallpaper to the wall.
- Protect the coating with clear varnish.
Completing each stage requires compliance with a number of rules. If all requirements are met, the coating will turn out beautiful and will last long enough. Detailed instructions for applying liquid wallpaper are presented in the following video:
Preparing the base
The better prepared the surface of the walls on which liquid wallpaper is applied, the more attractive the result will be. The wall should be:
- very smooth, no more than 2-3 mm per square meter. m. surface;
- uniform color, optimally white;
- with the same degree of moisture absorption over the entire surface.
It is desirable that the surface of the base be as less hygroscopic as possible. This will improve the quality of application and reduce material consumption. To prepare the wall, you must first carefully remove the old coating, as well as anything that raises doubts about its strength.
It is unacceptable to apply liquid wallpaper to old plaster, which may soon fall off.
The quality of application of liquid wallpaper largely depends on how well the base is prepared. It is recommended to plaster or putty the surface and then prime it
A perfectly smooth wall, for example, finished with expensive lighthouse plaster, is not necessary for liquid wallpaper.
However, it should be understood that significant surface imperfections, for example, a large convexity, wall slope and other similar points cannot be hidden using liquid wallpaper.
They may even highlight such flaws. All elements that protrude above its surface should also be removed from the wall and carefully masked: nails, pipes, fittings, etc.
If parts of the base are painted different colors, this may affect the shade of the wallpaper after it dries. The least expensive way to prepare the base for liquid wallpaper is regular white gypsum putty.
In the same way, it is recommended to treat the entire surface of the wall if it is covered with plasterboard slabs. For other finishes, it is usually sufficient to seal the seams between the slabs, but for liquid wallpaper it is necessary to putty the entire wall.
Of course, you can try to seal small depressions and cracks with a mass of liquid wallpaper, but this is a bad option. In such places, the shade of the coating will be slightly different, and its strength will suffer.
Preparing the base for liquid wallpaper may consist of the following steps:
- sealing irregularities, cracks, removing protruding parts and/or installing plasterboard slabs, sealing seams between slabs;
- applying a deep penetration primer;
- performing putty work.
The primer is applied in two and sometimes three layers in accordance with the instructions. You usually need to wait until the layer dries before applying the next one. Instead of putty, white water-based façade paint is sometimes used.
Preparation of liquid wallpaper
It is very important to properly prepare liquid wallpaper before laying it. This is not a very complicated process: the contents of the bags are combined and mixed.
After this, the composition is kept for several hours so that the fibers are thoroughly saturated with glue and the mixture becomes homogeneous.
Mixing is usually done by hand. The fibers are long and not very strong; with intense movements, especially if a power tool is used for mixing, they can tear or become too fine. As a result, it will not be possible to achieve the desired visual effect.
Before adding to the liquid, dry fibers should be fluffed well, this will help avoid the appearance of lumps. Sometimes the components of liquid wallpaper for the bathroom are packaged separately, but there are also compositions in which all the fibers and fillers are already mixed.
In the first case, all the ingredients are first poured into a container of a suitable size and mixed carefully. Even a fairly large piece of durable film will do. Already mixed components should also be taken out of the bag and pre-fluffed.
Before combining the fibers with the liquid, they must be thoroughly fluffed. This will make the composition more uniform.
When mixing liquid wallpaper, experienced craftsmen make two mixtures: the fibers are combined with dry wallpaper glue, and dyes and decorative fillers are added to water.
If glitter and dyes are immediately dissolved in water, they are distributed more evenly, otherwise lumps of sticky paint or decorative elements may appear on the fibers.
But this is not a fundamental point; you can simply connect all the components at once. Some craftsmen recommend adding fluffed fibers to a container of water, and do not advise pouring water into a container with fibers, since the composition may not be uniform.
But the instructions also allow the reverse order: water is poured into the dry mixture. The main thing is to achieve a mass that is homogeneous in consistency.
Fibers for liquid wallpaper are packaged in separate plastic bags. Each portion should be prepared in a separate container.
All details for preparing the composition are usually indicated by the manufacturer; it makes sense to study these instructions before purchasing wallpaper.
It indicates the amount of water that can be added to a specific portion of wallpaper. You should not reduce or increase this amount when mixing the composition.
It is unacceptable for the contents of two bags to be mixed simultaneously in one container, even with the exact amount of water for two bags. Each portion of wallpaper must be prepared separately.
If you need a double or triple portion of the mixture, you should take two or three containers. You cannot take only part of the bag for kneading, for example, half. If you only need a small amount of wallpaper, you will still have to prepare a whole portion.
Decorative additives, such as glitter, should not be added to the fibers, but dissolved in liquid so that the glitter does not clump together
After applying the composition to the wall, the remainder of the mixture can be dried and stored for later use to repair the decorative coating.
If these requirements are not met, the wall will end up with wallpaper that differs in density and color tone or decorative characteristics.
It is best to mix the fibers with the liquid by hand. For some wallpaper, it is possible to use mechanical devices, for example, a drill with a mixer attachment.
This point must be reflected on the packaging with special markings. When mixing with your hands, you can use protective gloves, but there is no particular need for them: the composition does not contain toxins, allergens and other hazardous substances.
Each portion of liquid wallpaper is mixed in a separate container, gently mixing with your hands. After the composition has infused, all portions need to be mixed
The soaking time for fibers can be 6-12 hours, this is indicated in the instructions. By the end of this period, the fibers will be sufficiently saturated with water and glue, the liquid will become viscous, and it will be possible to begin applying a decorative coating to the prepared base.
Although the composition is mixed in separate containers for each portion of wallpaper, it is best to simultaneously mix the required amount of coating for the entire room or for one wall. The lifetime of liquid wallpaper allows you to do this and have time to apply the finished composition to the entire area.
Before starting work, individual portions of the coating are mixed in one large container so that the composition is homogeneous. If you apply wallpaper from each batch separately, a slight difference in color shade, intensity of distribution of decorative elements, etc. may appear on the wall.
On two different walls this difference will be almost imperceptible, but on one surface the visual difference can appear quite clearly.
Applying the composition to the walls
First you need to make sure that the base is completely dry. Until this moment, you should not apply liquid wallpaper to the wall; it will lie unevenly and weakly. A regular construction spatula and a standard plastic or metal trowel or trowel are suitable for applying the composition.
Sometimes liquid wallpaper is even applied using a spray bottle. But it is best to use a special grater made of transparent plastic with a narrow blade. This tool allows you to observe the order of fiber smoothing directly during the application of the composition and immediately correct the process.
A small portion of the composition is taken with a spatula or simply with your hands. Then it is placed either directly on the wall or on the instrument; there are no strict prohibitions here.
The wallpaper is smoothed and the next portion of the composition is added to it, smoothed, etc. Tool movements affect the fiber pattern. There is a fairly wide field for experimentation here.
You can make movements in different directions to get the desired visual effect.
To apply liquid wallpaper, use a transparent plastic grater, which should not be held close to the wall, but at a slight angle.
The grater is held close to the wall, the angle of inclination should be approximately 10 degrees. The composition should not be attempted to be rubbed into the wall; excessive force is not required. It is enough to distribute the mixture in an even thin layer.
The recommended layer thickness is specified by the manufacturer. Typically this figure is 2-3 mm or 5-6 mm.
It happens that the liquid wallpaper solution is too thick, and this prevents the composition from being evenly applied to the wall. In this case, you can add a little water to the mixture in small portions to achieve the required consistency. The amount of water added to the mixture should not be more than one liter.
When a sufficiently large part of the wall is covered with wallpaper, for example, an area of about one square meter, you can carry out a final leveling with a damp float, and then continue applying wallpaper to the wall.
With the help of finishing leveling, you can form an interesting pattern on the surface of the coating. If you use different smoothing techniques (movements in a circle, changing the direction of movements at different angles, etc.) you can create interesting visual effects.
Do not neglect this point and randomly change the direction of movement of the grater so that the surface does not look sloppy.
Types of wallpaper for the toilet
Wallpaper will allow you to change the interior of the toilet at will at any time.
The prevailing use of ceramic tiles for finishing domestic premises leads to the relative high cost of repairs when you want a radical change of the interior. Despite all the undeniable functionality and ease of maintaining cleanliness, expensive tiles, which are always difficult to install, force owners to leave the interior of the toilet unchanged.
Wallpaper for the toilet in the apartment is not a new or innovative solution to the problem, which is becoming increasingly used. The reason for the popularity that toilet renovation with wallpaper is gaining is the new types developed by the construction industry.
Advances in polymer chemistry, which introduces new artificial components in the creation of building materials, make it possible to use economical options where previously it was considered unprofitable.
Wallpapering in the toilet has become a trend after the emergence of new categories of wall coverings that are resistant to high humidity, mold and mildew, which were previously considered a strong argument against walls with wallpaper in functional rooms. The opportunity to create a dynamic interior for people with a relatively small budget has attracted home enthusiasts to do their own renovations.
The familiarity and simplicity of the process contributed to this to a large extent. Construction stores offer a wide range of wall coverings, among which you can get confused when choosing wallpaper for your bathroom. Of the relatively new varieties for finishing a small functional space, you can consider the following:
- ceramic, (from porcelain stoneware), with increased resistance to moisture;
- vinyl (thick, which can be washed regularly);
- non-woven (waterproof, washable, applied using special antiseptic glue);
- fiberglass, easy to paint and resistant to wear;
- liquid (special powder, which is diluted and applied to the wall using a roller).
When purchasing wallpaper, you need to study the labeling.
About freedom of choice and the benefits of wallpaper
The toilet and bathroom are places where a person spends relatively little time. But it is their finishing and design that is given special importance. A correctly designed place for performing natural needs from an aesthetic and physiological point of view helps a person throughout the whole day. Doctors believe that visiting the toilet promotes good health if it is comfortable and cozy. A person improves the process of digestion and metabolism if he does not feel any discomfort, removing toxins and waste from the body.
Everyone has the right to decorate a bathroom in their own home in the way they consider most comfortable and convenient, but the familiarity of an established interior can sometimes be depressing. That is why renovations in an apartment begin with the bathroom and often end there due to lack of time.
If you need dynamics in changing the interior, there is no point in using expensive materials, the price of which will subsequently serve as an obstacle to changing the decor. Wallpaper is the best option for repairs, which industrial chemistry has made as variable and functional as possible. A good owner can only make the right choice and begin work. For more information about finishing the toilet, watch this video:
The times when renovations involved only paper wallpaper, not always of good quality, are irrevocably a thing of the past, thanks to the latest technologies. Today it is one of the most used and promising building materials, inexpensive and extremely easy to use.