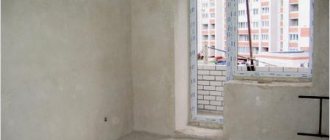
A comfortable and beautifully decorated balcony from the inside not only pleases the eye, but also evokes a feeling of pride in front of others, especially if everything is done with your own hands. The correct approach to balcony arrangement should be present at every stage of work, from glazing to cladding, so special attention should be paid to this. This will allow you to create a full-fledged living space from a nondescript room.
Do-it-yourself finishing of the balcony with clapboard from the inside
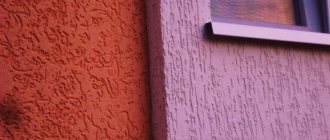
How to decorate a balcony from the inside
Among the large number of finishing materials for premises, the most commonly used are lining (regular) and eurolining. It consists of specially made oak, ash, linden, alder, cedar, pine boards (other types of wood can also be used). It is worth noting that pine material is not used for cladding the sunny side, because when heated, pine releases resins and spoils the aesthetic appearance of the room.
Wooden lining
There are also car cladding materials of artificial origin, the most popular of which include PVC, MDF, seamless and suture panels.
What is the clapboard made of?
Finishing
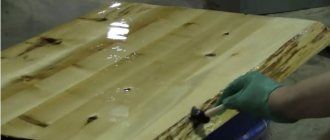
When deciding how to cover the lining on the balcony, it is important to remember: the number of layers of protection and the quality of paints and varnishes directly affects the service life of the lining. Even MDF on the balcony is recommended to be opened with one or two layers of varnish.
So, how to treat the lining on the balcony:
- antiseptic. This procedure will reduce the risk of mold and mildew;
- protection against wood-boring insects. A reasonable measure if there is a possibility of wood contamination;
- alcohol and water based stain. This type of coating is used if the tone of the wood does not match the wishes of the room owners. Using special tinting compounds, you can create the appearance of finishing with expensive types of wood;
- combination drug. Manufacturers of wood protection products offer antiseptics with a tinting effect, special tinting oils and other similar products;
- varnish, glossy, matte or semi-matte. The number of layers of varnish depends on the final wishes for the type of cladding. It is advisable to treat the intermediate layers with sandpaper (grind) for better adhesion and increase the strength of the coating.
More details about the methods of finishing wood are described in the article.
How does eurolining differ from ordinary wood lining?
Lining or eurolining is a planed board with grooves, a tongue for joining or a profile. These cladding options can last about 20 years, but provided they are properly cared for and are not exposed to direct sunlight, exposure to moisture, pests (mice, rats), insects and other factors.
GOST 8242-88. Profile parts made of wood and wood materials for construction. File for download.
GOST 8242-88
Eurolining
Below are the main differences between lining and eurolining.
- These profiles have different thickness, width, quality.
- Eurolining is more demanding to maintain than conventional wood lining.
- The materials have different manufacturing technologies. Eurolining is an almost completely dried material, and the lining has its own natural moisture (no additional drying treatment was used).
- Eurolining has specially designed grooves to drain condensate, so such panels are less susceptible to rotting. Also, these internal grooves allow you to remove stress from the board and the finished cladding.
- The cost of materials is also different (eurolining will cost more).
How the lining is arranged: 1 - tenon; 2 - shelf; 3 - facial face; 4 - compensation grooves; 5 - lower edge of the groove; a—working width; b - full width.
Preparatory operations
If you are thinking about how to properly cover a balcony with clapboard, pay special attention to the preliminary work. They consist of several steps:
- Check the condition of the walls. If you find any damage or cracks in them, be sure to repair them and wait until the solution dries;
- Assess the degree of convexity of the walls. To do this, use a level. Huge distortions need to be leveled out if you want the lining to lay flat and neat;
- Treat the walls and wood with antifungal impregnation. This precaution will not be superfluous: the balcony is constantly exposed to humidity and contrasting temperatures.
Advantages of wooden lining
The main advantages of lining include the fact that it:
- made from environmentally friendly material;
- characterized by resistance to temperature changes and mechanical damage;
- has good thermal insulation;
- has a long service life.
Based on the quality of the material, wooden lining is divided into 4 classes. These boards are produced over one period of time, and are classified when they are ready for molding and sale.
Classes of wooden lining
Table. Classes of wooden lining.
| Class | Peculiarities |
| Premium (Prima or Extra) | This is the most expensive lining option. It has no knots or irregularities. It is absolutely smooth and attractive in appearance. |
| A | There is a small number of knots (no more than 1-2 per 1.5 sq. m of surface). |
| IN | There may be microcracks and resin pockets. |
| WITH | Suitable for external cladding only. Has numerous cracks and knots. |
Characteristics of the lining
What is lining and what types does it come in?
This type of finishing got its name due to the fact that in the first half of the twentieth century, it was customary to line the inside of railway cars with thin planks. Later, grooves began to be cut on these planks, their quality improved, and the name “stuck” to this type of cladding.
Types of material
Previously, the lining was exclusively wooden, but progress does not stand still. Now the market is actively using MDF, plastic and aluminum lining. The fact is that materials change, but the principles and method of installation remain the same.
It’s not so important what the planks are made of; if you know the step-by-step instructions, then you can work with any material. After all, in general, they are mounted in the same way.
Plank configuration.
However, when lining a balcony with clapboard is mentioned, people usually mean wooden slats. You can often hear talk about the so-called eurolining. Out of ignorance, people begin to attribute some fantastic qualities to it and, by analogy with the name, believe that this material is imported.
In fact, since Soviet times, GOST 8242-88 has been in force for all such products; there were several approved standard sizes, which, by the way, are still produced to this day.
When the Iron Curtain collapsed and imported goods began to enter our market, lining produced according to the European standard DIN 68-126 appeared. It differs from our products only in clearly fixed dimensions.
The principle of connecting planks.
The plank has a total width of 96 mm, working, that is, a front width of 88 mm and a thickness of 12.5 mm. Plus, there are longitudinal cuts on the back side. They serve for ventilation and compensation of deformation processes.
The front side can have 2 finishing options. The plank with straight bevels is called Standard, and the one with rounded corners is called Soft Line. That's basically the whole difference.
The vast majority of eurolining that is now sold in stores is made by domestic manufacturers. Protection or any additional processing of wood is not provided for by European standards. So, only the manufacturer decides how to process your product and whether to process it at all.
When they tell you that covering a balcony with clapboard made according to our GOST is harder than with euro-lining, don’t believe it. If the planks belong to the “Extra” class or to the “A” class, working with them is easy and simple, regardless of their dimensions and configuration.
Configuration of plastic panels.
Finishing the loggia with lining made of plastic or MDF is also quite widely used. There are several reasons for this. Of course, the main criterion is the cost of the product; the price of plastic is lower than that of natural wood. At the same time, good, high-quality MDF costs about the same as wood.
Due to objective reasons, the range and colors of plastic and MDF are wider than those of traditional lining. And finally, these planks are thinner, which you will agree is very important for our balconies with their more than modest dimensions.
Of course, it is believed that decorating a balcony with natural wood is still more prestigious than covering it with PVC or MDF panels. Although, to be honest, the appearance of a good MDF lining is sometimes much better than that of an average wooden lining.
Plastic finishing of the balcony.
As for aluminum lining, it is practically not used for internal cladding of loggias or balconies. But she has no equal in exterior decoration. Metal is metal, for aluminum it doesn’t matter whether your side is sunny or shady; with proper installation, such cladding will last indefinitely.
What are lining classes
In this case, exclusively wooden planks are divided into classes. Plastic, metal or MDF, of course, have some kind of division within directions, but they do not have classes.
Installation of plastic lining.
Lining, with very few exceptions, is made from almost all industrial types of wood. But do-it-yourself balcony cladding is often done with coniferous planks, mostly pine or spruce.
Although I would rather use larch or aspen for a balcony, since they do not rot and are not afraid of fungus, the only problem is that the price of these planks is at least an order of magnitude higher.
Appearance of planks of different classes.
However, classiness does not depend on the type of wood. It depends on the appearance and number of defects. That is, the presence or absence of knots, wormholes and resin pockets.
As well as the condition of the joining grooves and the level of surface treatment. To make it easier for you to understand this topic, I have sketched out a small table.
| Classes | "Extra" | "A" | "IN" | "WITH" |
| Characteristics | There should be no defects, deformations or resin pockets at all. Perfect look. The presence of knots is not provided. Vacuum packaging is required. | Light roughness on the front surface is allowed, no more than 5%. The presence of fused healthy knots is allowed, no more than 2 pieces per 1 plank. | Up to 4 knots are allowed on 1 plank. Cracks up to 30 mm long and no more than 1 mm wide are allowed. A maximum of two small resin pockets are allowed. | Any defects that do not affect the quality of installation are allowed, with a total area of up to 20%. The number of knots and resin pockets is not limited. Cracks are allowed, but they should not be through. |
| Average price of pine lining 1m² | 450 - 750 rub. | 240 – 500 rub. | 140 – 350 rub. | 90 – 230 rub. |
Don’t blame me, but as an example, I took the price of pine lining, since more than half of the owners choose it for cladding their balconies and loggias.
If you have started a major, expensive renovation of the entire apartment, then it makes sense to spend money on “Extra” or “A” class cladding. For a budget option, it’s quite possible to take class “B”; of course there will be more knots there, but some people even like it.
From experience I can say that finishing with class “C” wooden lining is used only on those balconies that are initially planned to be painted. The fact is that such a low-quality product cannot be left without treatment at all, and tinting and varnish will not be able to hide such gross defects.
Aluminum lining on the facade of the balcony.
Preparation highlights
- Before finishing any room with clapboard, you must first decide on the direction of laying the planks; this largely determines how much clapboard you will need to buy . In general, it can be laid horizontally, vertically and diagonally. So, with horizontal and vertical cladding, you will spend an average of about 10% of the material on trimming. With the diagonal laying method, about 30% of the lining will go to waste;
Horizontal installation of planks.
- Again, the visual effect depends on the direction of installation . If you are planning thick insulation on the floor and ceiling, then it is better to mount the planks vertically. This method allows you to visually raise ceilings. A small balcony will appear much wider with a horizontal installation method. Laying diagonally is considered universal;
- As I already said, pine is considered the most suitable option for a balcony . But on the sunny side, coniferous lining will constantly release resin. If you want to get a bright and clean loggia, it is better to buy linden. Hardwoods have an extremely low percentage of resin. The most expensive and, accordingly, prestigious are oak and ash, although by paying once, you will receive the most durable cladding;
Texture and appearance of different types of wood.
- Another important thing here is how to choose the material . The annual rings on the wood should not protrude beyond the edges of the planks. All cuts must be even, and the planks themselves are cut strictly in the direction of tree growth;
- An important point is also the moisture level of the wood . Freshly sawn, damp wood will certainly become deformed during the drying process. As a result, after a year such cladding will warp and completely lose its original appearance. Try to take vacuum-packed lining; as a rule, its humidity level is close to the standard.
More information about existing forms of finished cladding boards
There are several forms of boards ready for cladding. Before sale, the boards undergo processing, as a result of which the following types of lining are obtained:
- block house (imitation logs);
- imitation timber;
- soft-line;
- calm;
- eurolining;
- Landhouse.
Some types of natural lining profiles
Prices for lining, imitation timber, block house
Lining, imitation timber, block house
What is required to cover a balcony yourself
Balcony cladding can be carried out either by a professional team or by the apartment owner. To carry out such work, it is not necessary to have special skills or knowledge, but you should carefully prepare and approach the task responsibly.
In order for internal work to be completed successfully, you need to know the basic rules.
- Before finishing, it is worth preparing the wall surfaces well.
- Only high-quality material is used for cladding. It is best to give preference to the “Premium” class, but if your financial situation does not allow, then you can use A or B. (C is, roughly speaking, waste, which is still used in some cases).
- Before purchasing, you need to calculate the number of consumables, but you need to purchase them with a small margin.
How to calculate the amount of lining for lining a balcony from the inside
Calculation of the amount of lining
- You also need to first prepare your working tools.
- If the balcony is cold, then care should be taken in choosing insulation. Consult a specialist about how to install insulation.
- Consider what the finish of the finished skin will be.
How much lining will be needed to finish a balcony?
To decide how much lining you need to buy, you first need to do some small calculations:
- armed with a tape measure, measure the height and width of each wall (and ceiling) that will be covered with clapboard;
- determine the area of each part by multiplying the height by the width;
- add all the obtained values together, divide the sum by 10,000.
The resulting number is the basic need for lining in square meters. Lining is sold by square meters, not linear meters. When purchasing, it is recommended to add 10–15% in case of unforeseen situations (damage or defects).
Tools and materials
Balcony cladding can only be done efficiently if you have all the tools and materials listed below.
To work you will need:
- high power hammer drill or drill;
- screwdriver;
- drills (1 mm, suitable in size for the screws);
- high-quality drills, 4 and 6 mm in diameter;
- hacksaw or jigsaw for wood;
- level;
- simple pencil, tape measure, square;
- hammer and axe;
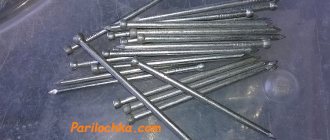
- self-tapping screws 90, 75 and 50 mm;
- 30mm large head nails, dowels; For perfectly smooth surfaces, 6*60 dowels are suitable, but for minor unevenness - 6*100.
Tools for finishing a balcony with clapboard
Prices for popular hammer drill models
Hammers
Which tree is better
Lining is made from a variety of wood species; the choice of wood depends rather on the region and personal preferences. However, there are also general provisions:
- inexpensive conifers ( pine and spruce ) are well processed, retain their aroma and fungicidal properties for a long time, but do not tolerate fluctuations in temperature and humidity, release resin, and can crack;
- cedar and larch are much more expensive, but are less dependent on seasonal fluctuations in the atmosphere, retain their color for a long time, and look elegant;
- oak and ash are durable, do not rot, do not warp, and have a beautiful pattern;
- alder and aspen are affordable, moisture-resistant and easy to process;
- linden does not need constant varnishing, is not afraid of humidity, its natural shade can vary, but is prone to darkening over time.
When finishing balconies, it is recommended not to save money, but to take lining made of linden or alder as a more or less affordable option, or from larch or oak if you have the appropriate financial capabilities.
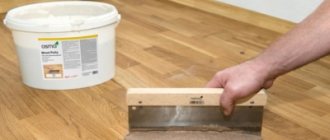
Preparing walls for cladding
Before starting work, surface preparation is required. It is required so that the lining is well attached, the walls do not crumble, and fungus and mold do not appear on them. To do this, it is worth sealing the cracks with plaster, eliminating uneven areas and treating the surfaces with an antifungal solution.
The first step is to clean the surfaces, thoroughly cleaning the balcony from dirt and dust.
Insulation works
An important point after preparation is insulating the balcony. Balcony insulation is sold in stores in the form of rolls and slabs.
Materials “Penofol” or “Izolon” have a foil base, so they are attached to the surface of the walls after preparatory work and drying. Next, a frame for sheathing is installed on top of the insulation.
Balcony insulation with Penofol (a sheathing frame is mounted on top of the heat insulator)
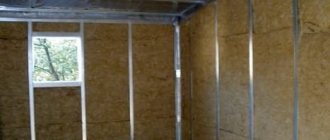
If mineral wool or foam plastic boards are used, you should immediately prepare the sheathing frame and lay the insulation between its slats.
Sheathing frame
Do-it-yourself insulation of a balcony with polystyrene foam
Prices for mineral wool
Minvata
Correct installation of the frame
Lathing for lining
Step 1. First, check the evenness of the surface using a level. If the upper section needs to be taken away more than the lower one, then work should start from the bottom.
Step 2. First of all, vertical slats are installed, and then horizontal slats are placed between them.
Do-it-yourself clapboard lining of the balcony from the inside
Step 3. The guide rail is cut to the required length.
Step 4. Places for future lining fastenings are marked. Marks are placed every 60-80 cm.
Step 5. Use a 6 mm drill to prepare holes 5-6 cm deep.
Step 6. Installation of the sheathing begins with the corner posts.
Step 7. The slats are laid as follows: one - at the level of the knee, the second - the hips, the third - the shoulder. It is necessary to maintain an interval between the bars of about 50 cm.
Frame installation (without insulation)
Step 8. There is no need to immediately tighten the screws too much. First, the guides are baited with plastic choppers.
Step 9. Before installing the rail, you need to make sure that it is level.
Step 10. The rail is hammered with a dowel, which can then be tightened with a screwdriver.
For the dowel, you need to use a plastic nozzle that fits tightly into the hole by at least 30 mm.
Step 11
It is necessary to create vertical lines along the working perimeter in order to see the evenness of the car laying during installation. To do this, cords are stretched.
Step 12. Based on these indicators, the remaining bars are attached.
Step 13. After installing the vertical slats, you need to move on to laying the horizontal ones.
Fastening horizontal slats
Step 14. If mineral wool is used for insulation, you will need to place it in the resulting cells and glue it with specially designed adhesive foam.
Insulation of walls and ceilings with mineral wool
Step 15. After this, the vapor barrier film is attached.
Vapor barrier
Fastening the frame to a deformed surface
If there are visible irregularities on the working surfaces that require a lot of effort and financial costs to eliminate, you can mount the frame differently.
- Install the rail on the most level part of the wall and attach a plumb line to it.
- Attach subsequent lower beams based on the plumb line indicators.
- Where it is necessary to reduce the distance between the surface and the lath, make a backing, and if there is a visible bulge, remove the top layer of plaster.
This way you can hide the imperfections of the walls in the most economical way accessible to everyone. After installation work, traces of deformation will be invisible.
How to cover the floor on a balcony using lining?
Covering the floor with clapboard is carried out as follows:
- install wooden logs on the floor;
- Place the boards at the end and attach them to the floor with a corner;
- install the logs, having previously installed a frame around the perimeter of the floor;
- Place transverse joists inside the frame, and then attach them to the floor and frame with a corner;
- seal all holes with foam, place insulation and vapor barrier between the joists and secure them with a stapler;
- Place floorboards or plywood on the floor, then cover with the finish of your choice.
Installation of lining
Step 1. You need to prepare all the necessary tools and materials: drill, self-tapping screws, small nails, clamps or dowels, level and wood materials for cladding.
Lining installation diagram
Step 2. Attach 1 board to the corner of the already installed frame. Check the evenness of the corner using a level.
Step 3. After making sure that the board is positioned correctly (vertically), you can use a clamp. To do this, the latter is inserted into a groove in the wood and secured with a small nail.
Clamps for lining
The wood structure is very delicate, so when driving a nail it is important not to damage it. To do this, it is recommended to place pliers on top of the nail and lightly hit it with a hammer.
Attaching to sheathing with a nail
To securely attach the lining to the sheathing with a self-tapping screw, you will need to screw it into the groove (tilting inward).
Using this method may cause the wood to crack. To avoid this, you need to make a hole in the mounting location with a drill, and then screw in the self-tapping screw.
To avoid damage to the material, you should first make a hole in the board with a thin drill
Step 4. To attach the second board, you need to carefully insert it into the groove of the previous one (from bottom to top) and also carefully fix it using a clamp or self-tapping screw.
Attaching the second board
Step 5. When installing the third board, you need to repeat all the manipulations. When the wood is in place, you need to take a hammer and tap it well against the previous boards along the entire length. To avoid leaving marks on the edges of the board, you need to apply a block and knock on it.
Craftsmen use a small (30 cm) piece of lining, which is inserted into the groove of the board and hit with a hammer so as not to damage the working part.
Step 6. The entire working perimeter is installed in the same way.
Carrying out work on covering the balcony with wooden clapboard
Ceiling frame and its cladding
Step 7. The last stage of the sheathing is the installation of skirting boards, which allows you to hide the seams in the corner places where the boards join.
Skirting boards at lining joints
To do this, you need to place the finished plinth in the corner, drill holes with the thinnest drill bit and drive small, inconspicuous nails into it. Such actions are performed along the entire perimeter of the balcony.
Video - Do-it-yourself lining of a balcony with clapboard from the inside
Recommendation! To properly sheathe a balcony, you should use eurolining. It has low humidity and is more protected from fungi and mold.
Also, euro-lining has longer tenons (8-9 mm) compared to conventional lining (4-5 mm), so it is attached easier and more reliably.
Balcony insulation
The next stage is the installation of the thermal insulation layer. Please note this important point:
- If the thermal insulation is purchased in rolls, with a foil base (Izolon, Penofol), the first step is to attach the insulation, and then perform the sheathing.
- To insulate a balcony with foam plastic boards or mineral wool, mount a frame of wooden beams or aluminum profiles, and then lay insulation in the resulting cells.
Protective coating for finished cladding
A protective coating is a special solution that allows you to protect wood material (lining) from exposure to sunlight, mold or mildew, and also give it a smooth and more attractive appearance.
The following tools are used for this:
- antiseptic preparations: covering or glazing;
- varnishes: alkyd and acrylic;
- paints: oil or acrylate.
For lining on the loggia, yacht (boat) varnish, which is based on polyurethane, is suitable. This product is used to treat wooden boats, so it provides excellent protection against moisture.
Also, to give the boards color and strength, you can use acrylic paint, which must be applied to the lining in several layers.
Traditional processing option: brief instructions
Let’s take a closer look at a solution that is suitable for any enclosed space – a room, veranda or loggia. How exactly to process the lining on the balcony, decide for yourself, based on your own preferences, but for greater efficiency, adhere to the following procedure:
- Cleaning wooden surfaces (especially for recycled materials).
- Grinding of slats (with the exception of top-class products that are completely ready for painting).
- Primer of all wooden elements requiring painting.
- Applying varnish or paint.
Make sure the primer or finish contains antiseptic ingredients.
Surface cleanliness is the key to quality painting
The surface needs to be cleaned in two cases: if this is not the first painting or if the panels were stored in unsuitable conditions, as a result of which they became damp, stained or moldy. The old decorative layer is removed using available tools - a hair dryer, a spatula. The stains are treated with bleach. We recommend replacing parts with severe damage.
It is better to sand with fine sandpaper or pumice, as well as a power tool with suitable attachments. This is a labor-intensive process, but the appearance of the panels largely depends on it. The dust generated during sanding must be removed, then you can begin priming.
To apply the primer, use a wide paint brush or spray gun. One layer is enough. Don't forget to work the gaps between the planks and hard-to-reach places - a small brush will do for this. If you did not have time to buy a special composition, prime the surface with a finishing paint.
The last stage is the application of a decorative agent, such as paint. The instructions for paintwork materials usually define the painting sequence and indicate the number of layers required to create a durable, uniform coating. Usually they paint 2-3 times, waiting for the previous layer to dry.
The number of paint layers affects the color intensity
This is a description of the standard process for processing wood panels; you can safely make adjustments to it. This instruction is also suitable for exterior work, but the materials for exterior finishing will be different.
Use of PVC lining
This option for internal balcony cladding is the most economical and accessible to everyone.
Color solutions for plastic lining
Table. Pros and cons of plastic lining.
| Advantages of PVC lining | Flaws | How to improve quality |
| Panel boards are easy to use and can be easily installed at any angle. | Manufactured artificially and therefore not environmentally friendly. | Make flexo printing. |
| They are cheap and accessible to everyone. | Capable of turning yellow due to solar influence on the PVC structure. | Apply lamination agent. |
| They have a huge color spectrum. | Does not prevent condensation accumulation. | Use thermal transfer. |
Flexo printing. After coating a plastic material with flexo printing, it becomes more resistant to light mechanical damage and ultraviolet rays. This is due to the surface varnish fixation of the pattern.
Plastic panel with flexo printing “Beige Marble”
Lamination. When using it, a special film is glued to the material. After carrying out these manipulations, you will notice that the artificial material has become stronger and more elastic, so it will last much longer. The second function of lamination is decorative decoration. After this procedure, the surface of the lining takes on the appearance of wood or stone, which designers will definitely appreciate.
Samples of laminated PVC panels
Thermal transfer. The most difficult process of drawing a picture, because it is carried out by exposing the image and surface to high temperature. Consequently, the image is reprinted and soldered into the base of the artificial lining. Using this technology, you can get bright pictures, and golden or silver shades can only be obtained using this method.
PVC panel (thermal transfer)
PVC panels are the simplest and most convenient material for interior cladding. This lining fits well in any position - horizontal, angular and vertical.
There are many colors and textures of plastic lining (there are even mirror panels). However, the “mirror” option is used exclusively on darkened balconies where direct sunlight does not penetrate. This is due to the negative impact of the sun on the shine of the PVC mirror coating.
Application of mirror plastic panels
Prices for PVC panels
PVC panels
Installation of PVC panels (lining)
To correctly install PVC carriage slabs, you will need to evaluate the evenness of the wall surface. If they are perfect, then the panels are attached with glue.
Scheme of finishing a balcony with PVC panels
If there are curvatures or unevenness on the surface, you will need to make a frame (the same as for facing boards). The process then proceeds as follows.
Fastening panels with a clamp
- The slabs are attached to the beams with a stapler or self-tapping screws.
- Work begins from the corner.
- To secure the panels together, you will need to insert the plate into the groove of the previous panel (until it clicks).
Balcony cladding with PVC panels inside
Before installing the frame and panels, pre-antiseptic treatment of the wall surfaces should be done. This helps reduce the likelihood of fungus appearing.
We finish fastening the plastic lining
Fastening PVC panels to the balcony ceiling
Features of seamless PVC lining
This type of finishing material is artificial. In its structure, it is not very different from tile PVC, but it is large in size, which is the only difference and causes inconvenience when transporting it to your home.
The walls are lined with colored seamless plastic lining
Installation of sheathing, laying insulation
This stage begins with marking the elements of the future frame. There are two options for installing timber - vertical, horizontal. In the first case, the lining is placed horizontally, in the second - vertically or, in an original way, diagonally. The latter type of design is usually not chosen for a small balcony. The reason is complexity and unreasonably high consumption of material.
When mounting the guides horizontally, the first element is fixed at a distance of 10 mm from the floor. For vertical installation, work starts from the corner. The fastening pitch is not affected by the version of the chosen sheathing: in any case it is 600 mm. When marking, the horizontality and verticality of all lines are constantly checked.
After completing this stage, they proceed to the manufacture of the sheathing.
- The timber is cut into elements of the required length. They are applied to the line, holes are drilled through them, the pitch is from 500 to 800 mm. It depends on the width of the insulation boards. The first and last hole from the edge of the beam should be at a distance of 50 mm.
- The timber is removed, dowels are placed in the holes, then they move on to securing the waterproofing. The membrane is unrolled and secured at several points with liquid nails (glue). Then the sheathing is mounted on top with self-tapping screws.
- The plane of the structure is tested with a plumb line. It is fixed to the topmost element. This role can be played by a cord stretched between the upper and lower beams. The selected insulation is placed in the cells. If a foil type is purchased, it is attached before installing the sheathing.
- To prevent the appearance of cold bridges, all joints between the material and the sheathing are blown with polyurethane foam. If mineral wool acts as thermal insulation, then a waterproofing membrane is laid on top. It is attached to the frame with a stapler.