What to hammer in: nails, screws or staples?
The lining itself is a board with a certain profile, which must have a tongue-and-groove locking connection. It is attached to the wall or ceiling using nails, screws or staples. The tools and material required to hammer in the lining in the bathhouse are as follows:
- nails, screws, staples;
- hammer, screwdriver, hardware gun;
- a mallet or a piece of clapboard for knocking a tenon into a groove;
- building level.
What nails should I take for the lining in the bathhouse? It is desirable that these are finishing nails 30-40 mm long, with an anti-corrosion coating . It’s worth taking coated screws (their length is the same, by the way). Regarding the length, you should proceed from the thickness of the board (if in a groove, then only the walls of the groove), plus you need to punch through the block to which the board is attached at least to the middle.
The staples should be the same size, although there are comrades who nail 14-mm staples with a construction stapler through a clamp, but this is rather an exception. To properly line a bathhouse with clapboard, it is better to use long staples and shoot them at an angle of 45 degrees (approximately).
Of course, it is tempting to wonder which of these methods is better . There cannot be a definite answer to this, because everything depends on the experience of a particular person. And if it is not there, then the easiest thing to do is to shoot the staples using a pneumatic gun. True, it is not cheap, and few people would agree to buy it for a one-time job. Other methods are a little more difficult to implement.
Methods of fastening eurolining
How to attach eurolining to the wall? The fastening, first of all, should not spoil the overall picture. The following types are used:
- Using self-tapping screws;
- Using staples;
- Using nails;
- Using a clamper.
4 installation methods
If you use the first method, you need to drill the holes in advance. Self-tapping screws are inserted into the workpiece and tightened using a screwdriver or screwdriver. The caps are closed with a dowel. After fastening, the surface must be sanded.
When using staples, the main condition for installation is direction. You should start from top to bottom. The staples are secured into a tenon at an angle of 45 degrees. This does not interfere with the entry of the next panel.
Fastening with nails, similar to the previous method. The only difference is that nails are used instead of staples . Make sure that the caps are completely recessed into the surface of the board.
The clamp is used for installing thin boards. It is a bracket. One edge is attached to the tenon, the other to the frame. This is a secret way. Subsequently, the structure can be easily dismantled.
Video - how to mount correctly:
Installation of sheathing
Installing eurolining with your own hands is impossible without creating a frame. It is made from a metal profile or timber. Let's focus on the latter.
To create the sheathing, slats with a thickness of 20-30 mm are used. Their location depends on the direction.
You can install eurolining with your own hands both horizontally and vertically. The first method is to expand the room , the second is to stretch it out, creating the effect of high ceilings.
The frame bars must be positioned perpendicular to the direction. To ensure a smooth finish, you must mark the surface in advance.
To do this, use a building level and a pencil. The optimal distance between slats is 50 cm for a wall. The section thickness of the timber is 40 mm for walls, 20 mm for ceilings.
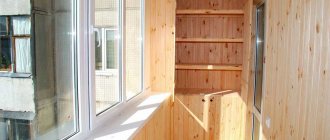
Do-it-yourself finishing of a bathhouse with clapboard inside - step-by-step instructions
The choice of facing materials is significant. But if we are talking about such a specific “object” as a bathhouse, then upon closer examination there are not so many options. And this mainly concerns only the types of panels, since both experts and land owners agree that the best solution for finishing is wooden lining. Let's consider all the nuances of finishing the inside of a bathhouse with clapboard.
The concept of do-it-yourself always means a simple tool (household level), accessible technology and inexpensive materials. This is where the author proceeds. Let's start with the preparation stage for finishing the bath.
What clapboard to cover the inside of the bathhouse
The lining for finishing the steam room is selected according to the following characteristics:
- type of lumber - when finishing a paired room with boards from a certain type of wood, eurolining is more often used;
- grade - the steam room is sheathed only with boards made from various elite types of wood, which do not contain knots or wormholes.
However, sometimes even living wooden knots fall out over time due to temperature fluctuations.
Types of wood for making bath trim
In order to choose the right specific lining for a steam room, you first need to familiarize yourself with the characteristics of the wood species from which the board is made. The lining of the steam room with such lumber is made from deciduous or coniferous trees.
Most often, bathhouse finishing is performed with the following species:
- Linden. It is highly resistant to moisture, retains the original color and structure of the board. In addition to finishing the bath, linden is used in the manufacture of a bath shelf, bench, ladle or door.
- Aspen. A soft breed that is highly resistant to water and steam. After intensive drying, the aspen becomes denser and stronger.
- Cedar. The most expensive of finishing materials. Cedar heats up less than linden and aspen, and also does not form resin like pine, so it does not burn the skin.
- Pine. An inexpensive tree that is rarely used in steam rooms. Much more often, a small dressing room or a separate room for relaxation is sheathed with pine.
The ceiling of the steam room is not covered with pine clapboard. After all, after heating, the released resin begins to drip onto the floor.
Standard lining parameters
The size of wooden clapboards is directly related to the type of wood from which they are made. Below are the recommended lumber specifications: width, length and thickness.
Such information is needed to correctly select the optimal number of lining boards. There are several differences between varieties.
| Breed | Dimensions | ||
| Width, mm | Length, m | Thickness, mm | |
| Aspen | 76-200 | 0,2-6 | 12-40 |
| Oak | 50-108 | 1-3 | 12,5-15,0 |
| Pine | 50-108 | 0,5-3 | 12,5-15,0 |
| Larch | 76-200 | 0,2-6 | 12-40 |
Wooden eurolining has the following standard dimensions:
- width – 80-120 mm;
- length – 0.5-6 m;
- thickness – 13-19 mm;
- spike size – 8-9 mm.
A simple lining has the following parameters:
- width – 8-15 cm;
- length – 0.6-6 m;
- thickness – 1.2-2.5 cm.
EU standard lumber has the following parameters:
- width – 96 mm (maximum);
- length – 2.1-3 m;
- thickness – 12.5 mm.
Russian enterprises produce the following sizes:
- width – 8-12 cm;
- length – up to 6 m;
- thickness – 1.3-1.9 cm.
More often, when lining baths, the following profiles are used:
- width – 96 mm;
- length – 2-6 m;
- thickness – 12.5 mm.
Thus, most of all, similar boards are distinguished by length. Their direct purpose is associated with this parameter.
Types of lining by profile
There are 4 types of linings, which are distinguished by the profile of the boards:
- standard;
- eurolining;
- block house (log imitation);
- American.
When finishing a bathhouse, the following grades of lumber are used:
- "Soft Line";
- "Calm";
- "Classical".
All these boards are eurolining and have a variety of sizes and profiles. They are sometimes called lamellas.
What kind of clapboard to cover the steam room of a bathhouse
When covering a steam room with wooden clapboards, the following lumber is most often used:
- linden board tolerates changes in air temperature, exposure to hot water and the formation of steam well, so lumber from it does not deform or discolor;
- aspen lining, in terms of parameters it is no worse than linden boards, and also has a lower cost;
- boards made of maple and alder; lumber made from such wood has low thermal conductivity, so they are often sheathed in any bathhouse, including a steam room.
Advice! When buying lining for a bathhouse, you must take into account the fact that in such a room the air temperature sometimes reaches 100 degrees. Therefore, to decorate such a room, it is better to buy lumber only from “safe wood”.
What is eurolining
The name “eurolining” refers to cladding boards.
But how is it different from the usual one? The main difference is the quality of workmanship and characteristics of the panel. The boards are made in one length. Standard thickness is 12.5 mm, width without tenon is 88 mm, with tenon is 96 mm. The increased width of the groove is characterized by better properties of the material when exposed to external factors.
If you covered the surface in a fairly humid room, the lining may increase in size. A larger tenon prevents gaps from appearing between the boards in this case.
Another feature is the presence of air ducts on the back of the product. They are simply necessary to avoid condensation accumulation.
A certain humidity level is considered a prerequisite for classifying panels as “eurolining” class. This is 10-16%. This ratio is ideal for operation and installation. Over time, blue discoloration will not form on it, it will not warp, and cracks will not form on the surface.
Eurolining for interior decoration is divided into the following:
- Standard;
- Soft-line;
- Calm.
Their differences are minor, but still present. The first category has straight chamfers. Soft-line – rounded. The style is wider.
Depending on the quality of execution, there are:
- Extra class (also called Premium);
- Class A;
- Class B;
- Class C.
Read more: about lining classes.
Extra class is distinguished by the absence of defects. You will not see any knots or chips on the surface. The second category includes boards with minor, almost imperceptible defects. If these are knots, they are not falling out and occupy a small area.
Class B is the most budget-friendly. There are more defects on the surface than in the previous category. Class C is the lowest grade. Usually used only for utility rooms.
Video editing
For a better understanding of the process, you can also watch this video of lining installation and preparatory activities, with nuances.
https://youtube.com/watch?v=Qd5q2wRbFQM
More on the topic
How to lay floors in a steam room?
All the advantages of a barrel sauna, design
Which foundation to choose for a bathhouse or house, and how to make it yourself
Article posted 3 years ago by Vadim Glukhovchenko
“I live in the city of Shatura, Moscow region. Since childhood, he was “turned” to construction. Mastered many professions, incl. carpenter-concrete worker, mason-builder, furniture maker. I share my experience on this blog.”
Wall decoration with clapboard
How to use lining in the interior of an apartment or house? The most popular answer is to decorate the walls with it. Wooden panels will make the design of any room homely and warm, will organically combine with wooden furniture, and will also highlight a bright sofa or decorative ornaments against its background.
Photo: degeorgeroomimprovement.com
It is not necessary to cover the entire wall with clapboard - you can lay it along the bottom of the wall, as in the photo below. For example, plastic gray lining in an interior with white walls will help create a classic light design with a slight visual contrast.
Calculate the exact cost of repairs using an online calculator
and receive a free detailed estimate for repairs
Calculate
Photo: planete-deco.fr
You can also use lining for zoning space. For example, using it to decorate a wall in the dining room, thereby visually separating it from the main kitchen. For more effective zoning, as well as to improve the aesthetic qualities of the room, you can use brushed lining with a beautiful textured surface in the interior.
Photo: toolboxprodhouse.com
Another task that lining can help solve is adding bright colors to the interior. One-color or two-color MDF lining, painted in bright colors, is suitable. The furniture will stand out better against the background of a colorful wall, and the interior of the room will become more expressive and energetic.
Photo: hotro.me
You can also use clapboard to create an accent wall, for example behind a bed in a bedroom. To do this, it is better to choose a textured lining - the interior will look even more impressive in artificial lighting due to the play of light and shadow on the accent wall.
Photo: terkultura.com
How to lay: horizontally or vertically?
Unfortunately, when choosing a method for cladding the inside of a bathhouse, we cannot be guided only by aesthetics. More precisely, not so: aesthetics can be the basis of choice only in a dry room , for example, in a rest room or dressing room.
If you decide to use it to decorate wet rooms (steam rooms and washing rooms), then it is better to focus on a method that minimizes future losses . By “losses” we mean possible damage to the planks from moisture, which will require their replacement.
So, what happens when the installation of lining in a bathhouse is carried out vertically? In a humid room, humidity is distributed unevenly - after all, gravity drives it towards the floor. As a result, each (!) plank also gets wet unevenly.
When it dries, this can lead to cracking, but more often, over a long period of time, problems accumulate at the bottom - somewhere there is not very good ventilation, for example, and in this place the water stagnates. Therefore, the planks begin to rot. And since we have them located vertically, the rotting area affects all the planks.
This is what’s inconvenient - in order to dismantle and replace damaged areas, you will have to cut (not replace the whole thing!), and then replace each piece. The cost of time and effort is especially clearly visible if we compare the situation with the horizontal upholstery of a bathhouse with clapboard - in this case , several strips are replaced entirely, which does not cause any special problems in dismantling and installation.
The only disadvantage of horizontal cladding of a bathhouse from the inside with clapboard can be considered a visual reduction in the height of the sheathed room, and in the bathhouse, as you know, the ceilings are already low. Therefore, as an option, you can combine both methods using the horizontal one at the bottom.
Horizontal and vertical installation of shalevki
When everything is prepared and you can start constructing the sheathing, it’s time to decide how your cladding will be directed, vertically or horizontally. The frame for cladding is always installed perpendicular to the finishing: horizontal arrangement of the shalevka - vertical arrangement of slats, vertical lining - horizontally located structure.
The placement of the sheathing panels will follow the goal you have in lining up the walls. Construction laws apply here: if you plan to visually expand the room, then sheathe it horizontally. If you want to raise the ceiling, choose a vertical arrangement of the shalevka. Imagine gluing striped wallpaper, the same with clapboard. So you can solve the question of how to lay the paneling vertically or horizontally by looking at interesting images of rooms with a horizontal or vertical arrangement of the paneling.
If you plan to cover curved walls with clapboard yourself, then you will need to understand the peculiarities of the vertical and horizontal arrangement of the finish.
Secrets of the masters
- When planning the vertical arrangement of the shalevka, you need to install the boards with the sound wood facing outwards, all traces of sawing should be correctly directed downwards. This cladding will allow you to qualitatively finish all uneven and curved wall surfaces. The vertical position of the shawl should start from the corner. Vertical finishing will do an excellent job with curved surfaces (photo).
- Horizontal cladding boards are installed with the core side facing outwards; work on installing the finishing should begin from the ceiling to the floor, trying to direct the grooves downwards. With such a lining, the forcing spike will also be located at the top, thereby eliminating the accumulation of moisture.
- It is very difficult to obtain curved lines on the wall surface with this arrangement of the sheathing; in some places the boards will even have to be bent. During work, you need to constantly check the already installed finish so that it is in a horizontal position. The sheathing ends at the floor; the very last board needs to be measured in width and cut using an ax or a special saw, as in the photo.
- Sometimes the location of the shalevka is fundamentally important, for example, in a bathhouse or sauna. In such rooms it is better to give preference to the horizontal method, since the finishing below will be in the most unfavorable conditions and the deformed place will definitely have to be changed. In a vertical position, replacing the lining will be more difficult. How do you change half a board?
Advanced craftsmen sheathe walls in an interesting way, installing the lining at an oblique angle - diagonally. Such walls look creative and unconventional. But you will have to spend a lot of time on this method, and without special skills nothing will work. Whatever direction you choose to lay your shalevki, the most important thing is that your finish meets your requirements and lasts a very long time.
How to sheathe a steam room correctly
If the argument regarding horizontal laying is accepted, then this is one of the main points on how to properly line a steam room in a bathhouse with clapboard.
Because the rest concerns only the issues of preventing such expansion of wood , which will lead to a violation of the geometry of the wall.
The easiest way would be to avoid swelling of the planks by using boards made of linden wood. Linden is a material that exhibits low expansion when moistened. That is why it is used for the manufacture of bath doors (as well as furniture) - the most sensitive to changes in dimensions.
It would also be worth leaving compensation gaps along the edges of the wall, covering them with decorative strips. These gaps could also serve as ventilation gaps if some distance is left between them and the covering strips.
In general, it’s surprising - in some cases the lining holds up perfectly even in the absence of any tricks for this, but in others it doesn’t just swell, but manages to pull out nails or screws and generally crumble. We believe that its behavior is influenced by the extent to which the tree was dried at the harvesting stage , and the type of wood , of course, too.
Covering saunas and baths - is there a difference?
Since we have repeatedly mentioned on this site that the Finnish and Russian baths differ from each other in temperature and humidity, and also require specific conditions that create their inherent combination of temperature and humidity, it is logical to extend this to the clapboard cladding of saunas and baths.
But the answer will still be negative. The only difference is that followers of the Russian tradition can use coniferous species in the steam room with less caution, because the Russian bath does not like high temperatures. Well, at least you won’t get burned by the resin if it decides to leak