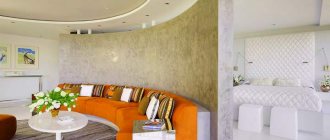
The use of Venetian plaster in interior decoration allows you to create an original interior design. This finishing material has a number of advantages: it does not crack, does not peel off, and does not change color. The appearance of the finished coating resembles natural marble. The composition can be used where conventional plasters are not suitable. In this article we will take a detailed look at the composition, application and various technologies for applying Venetian plaster with our own hands, and at the end you will find step-by-step instructions from our reader
Types of plaster
Applying decorative plaster with your own hands using a roller begins with choosing a material and a tool, but before that you should familiarize yourself with the concept of “decorative plaster.” This product contains various fillers. The most commonly used materials are wood fiber and stone chips. Acrylic and polymer substances bind the components. Such components are also responsible for the elasticity and drying speed of the product.
There are several types of material suitable for this tool.
Structural plaster
This material forms a smooth coating on the surface. To apply the product, use various tools, including rollers for decorative plaster. The structured product is usually available in light shades. To add color, a special color is used, which is mixed with the material before application.
Plastic
Textured rollers for decorative plastic plaster are considered the most budget-friendly options.
They may have bulges or depressions of various shapes on the surface. This material is not durable; after some time, chips or cracks may appear on the surface of the roller, which will cause defects in the design.
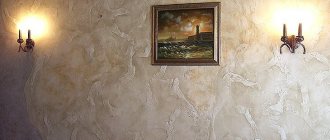
Venetian plaster
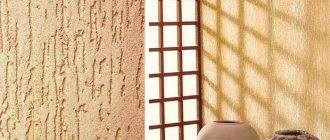
It is a product containing marble flour and water emulsion. The advantage of the material is that it can be tinted in any tone. Before using the product, the surface is leveled. Venetian plaster creates a coating on the building base with the effect of marble, leather, granite, cork, etc. The product is environmentally friendly and water-resistant, so it is used for decorating surfaces in rooms with high humidity (bathroom, swimming pool, etc.). The disadvantage is the high price.
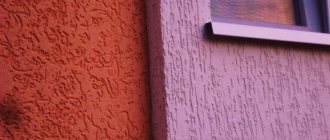
Textured plaster
This product forms a relief on the surface immediately after application. This result is achieved thanks to the granules that are part of the product. Based on this, the material is classified into large, medium, fine and fine texture. As the video tutorials show, applying textured plaster with a roller is a simple process, but requires careful study.
How to carefully apply a drawing
Surface preparation
Clean the surface from dirt, remove the old coating, remove any remaining dust and possible debris: then prime the surface and level it using a spatula. Use spatulas in sizes: 300/450/600 mm.
After processing, you can proceed to decoration, which consists of several stages. Moisten the dry plaster, bringing it to a homogeneous consistency.
Apply the finished mixture to the wall, maintaining a layer of 2-4 mm. This will allow you to move on to decor in the future. After smoothing the area with a spatula, it is important to allow the composition to thicken.
This will require a shutter speed of up to 10 minutes. The next stage involves going over the wall with a textured plaster roller to form a pattern. You need to work from top to bottom.
Principles of accurate drawing
How to apply textured plaster with a roller? There are certain rules that you should know and use in your work.
It should not be pressed too hard against the area being treated.
Hand movements should be smooth and free. The second track must be laid without overlapping with the first strip. The tool should be pressed against the ceiling with little force.
If the relief is too large and differs from the general pattern, it is removed with a damp sanding mesh.
Painting the wall is carried out no earlier than two days later.
As a gift for a beginning craftsman,
a list of several techniques for adding relief to the surface being treated:
| Type of drawing | Device | How to get a pattern |
| Chaotic | A roller with a porous structure, a brush made of rubberized material, a trowel and a small spatula will come in handy | You can form a pattern using chaotic or schematic movements with moderate pressure on the tool |
| Striped with repeating elements | Embossed roller and stencils with the necessary patterns | To achieve the result, you will need to apply the design using a stencil with one direction of movement. |
| We imitate an old surface | No tools needed | To work, you just need to cover the surface with plaster, which will crack after drying and create the desired effect |
| Various patterns and paintings of different levels of complexity | Tools may come in handy, ranging from different brushes to sharp objects | To achieve the result, you will need to apply drawings on the plaster that has not yet hardened. |
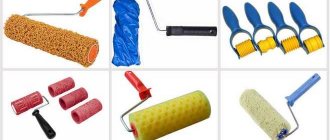
Types of rollers
Tools for decorative material are divided into several types.
By type of roller material
The final finishing result depends on the working surface of the roller. Classification of tools by type of material:
There are also foam, foam and fabric tools, all of which create texture on the wall.
By type of pattern
Based on the type of final pattern on the surface, tools are classified as follows:
To size
Types of rollers by size:
How to choose
A high-quality decorative roller must meet the following parameters.
- All parts of the tool must be strong, reliable, not “walk” from side to side and not look fragile, there should be no damage or flaws on the surface;
- The cylinder should rotate freely in both directions;
- The handle should lie comfortably in the hand, without causing discomfort or unpleasant sensations;
- The fibers of the fur coat must be of high quality; run your hand over them: there should be no lint or particles of the product left on the skin;
- Foam rollers should have good porosity and quickly recover their appearance after pressing;
- If you are in doubt about choosing a roller, give preference to a polyamide one, which is suitable for any type of pattern and plaster;
- Pay attention to the compliance of the roller characteristics with GOST and its certification.
Rules for applying the material
Textured plasters applied with a roller create unique reliefs on the surface. To achieve the best result, experts advise adhering to a certain algorithm of work.
Preparing the construction base
Free the base from the old coating. To make the work move faster, craftsmen advise using special liquids and solutions. After dismantling the wallpaper or paint, tap the building base with milk to check for hidden defects. If differences are detected, cut off the irregularities. Then degrease and remove dust from the surface. Apply primer to the walls. Fill all defects with putty. After this, apply the material to the surface. Wait until completely dry, clean the base and prime.
Application of the solution
There are several ways to apply decorative plaster with a roller. The choice of method depends on the tool used and the final finishing result.
Applying the solution with a textured roller:
Algorithm for applying plaster with a structural roller:
Instructions for applying two-color plaster:
The video in this article demonstrates how to properly apply decorative plaster with a roller.
Using a roller and decorative plaster, patterns are created on the surface that are striking in beauty. The main thing is to adhere to the rules of work.
Pattern application technique.
So, the choice in favor of the material for finishing the walls has been made - decorative plaster. The technology of applying it with a texture roller is accessible even to a novice master, but it requires certain skills and accuracy:
- The roller is dipped into a decorative composition poured into a special cuvette, and the excess plaster is squeezed out.
- The composition must be applied to the wall from top to bottom (this direction cannot be changed in the future), trying not to tear the roller from the surface to the end of the strip - the quality of the final work depends on this. The pressure and rolling speed of the roller should be uniform.
- Each strip is applied close to the previous one without gaps or overlaps; the plaster should be applied to the entire wall at once so that the boundaries are not visible.
- Decorative plaster is applied in only one layer, so it is important to ensure that it is the same thickness.
- If the texture seems rough after application, you can soften the effect with a brush.
- When using a structural roller, you should wait a little for the surface to dry, but the longer the plaster dries, the more it loses its plasticity.
- By changing the degree of pressure of the roller, you can achieve different effects on the wall surface; this technique is useful for emphasizing individual decorative elements.
Important: Rollers for decorative plaster with large relief visually reduce and narrow the space; this must be taken into account when decorating small rooms with low ceilings.
In addition to interior decoration, decorative coating is used for exterior work. Particularly popular as a reliable, simple and beautiful finish is decorative facade plaster under a fur coat. Applying it with a roller does not require any special skills.
How to apply plaster with a roller
Using rollers for decorative plaster makes it possible to give the surface an original appearance, but few people know about this. Therefore, when you come to a hardware store, ask what new tools have appeared for finishing work.
You can radically transform the interior of your apartment by adding depth and shape to the walls.
In the photo - a relief roller for plastic plaster
Application of a relief roller
This tool is one of the most popular when finishing with textured plaster. The base of its cylinder can be metal, rubber or plastic, the covering is made of fabric or foam rubber .
There are also relief rollers made of leather. From this we can conclude that purchasing the necessary tool is not a problem, the main thing is to find an acceptable texture, for example, wood, stone or marble.
When choosing a roller surface, you must understand what final result you want to see:
How to make relief plaster coat with a roller
An example of how to apply textured plaster with your own hands using a roller
How to decorate a wall with a roller
Prepare materials and tools for work:
Applying decorative plaster with a tool must follow certain rules, which the instructions will show below:
Clean the walls from dirt and old paint
Apply the first layer to the surface and level it
Prime the first layer
Tip: to achieve the necessary separating effect between layers, use masking tape, which can be used to make clear boundaries, and for arbitrary ones, use a self-adhesive sealant used for windows.
Apply textured plaster to the surface
Advice: do not press too hard on the plaster with the tool, otherwise you will simply ruin the textured pattern. Move it very lightly, as if sliding along the surface.
This is how textured plaster is created with a roller
We make the roller ourselves
Working with decorative finishing plaster is more reminiscent of a creative process than a finishing process. Therefore, in this situation, it is more advisable for each drawing to be as original as possible, for which it is best to make a roller with your own hands rather than use a standard one.
Roller for structural plaster - make the interior original
And most importantly, having your own roller and finishing surfaces with it will add to your sense of self-satisfaction.
Conclusion
Thanks to textured rollers, it became possible to quickly decorate large surface areas with a repeating pattern. In addition, if you have a great desire to give the interior of your home uniqueness and originality, you can make such a tool yourself from scrap materials.
When working with decorative plaster, you should remember that it begins to harden after 15 minutes. Therefore, you should treat with the solution as many square meters as you can decorate in a given period of time. In the video presented in this article you will find additional information on this topic.
Source
Price issue.
The cost of applying textured plaster (per square meter) depends on:
- The most expensive types of coating are Venetian and silicone.
- Material consumption. On average, consumption is 1 kg/m2; if the plaster is finely dispersed, then consumption decreases.
You can buy the material at any hardware store; prices vary greatly depending on the type of composition and its manufacturer. The most expensive coating (per sq. m) is Venetian decorative plaster, which is due to:
- multi-layer application technology;
- high requirements for the quality of the base;
- the complexity of working with the composition.
If you wish, you can make the decorative composition yourself or order it from builders. In this case, the price per m2 of finished coating will be significantly less.
The price range for rollers for decorative plaster is also wide; the higher quality material used for the roller, the more expensive the tool. A rubber or wooden relief roller for plaster is the most expensive, but its service life is much longer than that of plastic or foam analogues.
How to properly apply decorative plaster with your own hands?
ReLend.ru » Materials » How to properly apply decorative plaster with your own hands?
When making renovations, the question of wall decoration is one of the first places. There are various materials that differ in their ease of use. An important point is the cost of decoration and the complexity of such work. Decorative plaster has gained popularity due to its ease of application, its attractiveness and good resistance to external influences.
Contents of the article [hide show]
Decorative plaster - textured coating with minimal investment
06/12/2017 4.8 thousand 3.2 thousand 10 min.
In recent years, decorative plaster has been actively used to decorate walls in houses and apartments. It allows you to artistically coat various surfaces, and it is not at all necessary to buy ready-made compositions; decorative finishing of this type can be prepared with your own hands. In this article we will talk about ways to create it yourself.
Surface preparation
Before starting work, you should properly prepare the base on which decorative plaster will be applied. First, the old layer of finishing is removed, then an audit is carried out. If any defects are identified, measures are taken to eliminate them.
Cracks are sealed with cement or other mortar , depending on their size and type of wall material, unevenness is eliminated, since the finishing material will be applied in a thin layer, all flaws will be clearly visible on the finished surface.
But, if textured, relief or structural plaster is performed, then some errors are allowed, since the technique of applying them allows you to hide small defects in the wall.
What tools will you need?
In order to carry out work on applying decorative plaster, you will need to prepare the necessary tools, the range of which is largely determined by the chosen technique. The obligatory ones will be useful:
You should definitely purchase a set of spatulas of different sizes and two types: stainless steel and rubber .
Minimum set
To make decorative plaster yourself, you will need special tools. A worker cannot do without a spatula and a roller - this is the minimum set; a bucket will come in handy. You will also need:
There are also a number of tools for various types of decorative plaster finishing.
Attention! You can do it yourself at home, then you can save money and create a product with the required structure, without worrying about possible misunderstandings.
Rollers
To create decorative plaster, structural rollers made of silicone or rubber are used. They already have three-dimensional patterns, thanks to such rollers it is much easier to apply a pattern to the wall. Application will be easier and more symmetrical.
This does not mean that without a roller you cannot achieve a beautiful and unique result. You should not necessarily purchase such solutions, since an unusual ornament can be created using a rag, mitten and other improvised means, for example, if you apply shells or stones to the surface.
In this video, watch how to properly apply decorative plaster with a roller.
Technology and basic techniques
It should be noted that the basic techniques when working with different types of decorative plasters are general and, first of all, this applies to applying the material to the surface. Also, in general, the number of stages is the same, but the technique of working with different materials, of course, has its differences.
The timing depends on several parameters:
In addition, it is necessary to ensure ventilation of the room and limit access to sunlight , including installing protective screens on the windows.
Watch in this video the technique of applying decorative plaster under a stone.
To achieve the required artistic effect, the following techniques are widely used:
The final stage of working with decorative plasters is glazing , with the help of which the surface receives a completed look and the necessary protection.
To perform it wax if mineral or silicate types of plasters or varnish , which is most often used on acrylic or silicone surfaces.
Material classification
When there are so many advantages to using Venetian, all that remains is to choose which coating is most suitable.
Embossed
You can prepare and apply it yourself if you study the technology in detail, test your skills on primed cardboard or a small section of the wall.
The relief is obtained due to the presence of large stone granules in the mixture; it is interesting because the same pattern cannot be repeated. This coating makes the room memorable.
Smooth
Due to the variety of highlights and marble transitions, the finish looks deep, despite the lack of relief. And also the sun reflects off the smooth surfaces of the Venetian, making it seem to glow from within. Can be glossy or matte, as desired.
Artistic
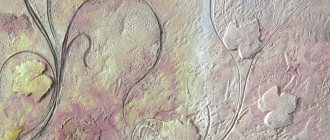
With the help of the Venetian, paintings and amazing drawings are created. The finished work is amazing, but requires experience in finishing and careful preparation.
Artistic finishing requires a lot of experience.
Methods and techniques
To apply decorative coatings, not only finishing materials of different compositions are used, but also various techniques. They may differ in the tool used, the specifics of application, and the most common of them are:
Each option requires certain skill during application and the use of additional tools. There are features of application and drying for each method. The wall surface must be prepared. The work does not involve long breaks or stops in work; the material hardens quickly.
Textured
The roller can create a textured and structural surface . The difference is the way to achieve the pattern; in the first case, this is influenced by the roller itself, and in the second, by the structure of the putty material and its features.
To create a surface using a roller, you need to apply a layer of the mixture to a previously prepared and cleaned wall, and use a roller to create the necessary pattern. Such a tool will not cause any difficulties, just go over the entire wall with it, you can also use a creative approach and achieve a unique result by applying strokes in different directions.
You can use special stencils to create a design; they are simply pressed into the plaster.
For the exterior decoration of buildings, a method called “fur coat” is often used. It also looks great on indoor walls. The cost of such an application will be small. There are several options for creating such a decoration:
Plaster with small drops and liquid mortar will be more durable.
Important! The difficulty of this method is the uneven application, and therefore you need to ensure that the solution is applied with the same density.
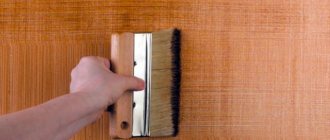
Hatching stripes
To apply decorative stripes to the wall, you will need an ordinary brush. Before using it, it is advisable to thin out the bristles. On a separate piece of plywood it is worth testing how the brush behaves with the solution. If the rows are too wide, then in these places it still needs to be thinned out.
Common Mistakes
The main mistake can safely be called insufficient preparation of the wall for applying decorative plaster . The surface must be perfectly flat. Proper dilution of the dry mixture also affects the result and ease of use.
It is important to apply the solution evenly on the wall ; if applied unevenly, the pattern will look unnatural and errors will be visible to the naked eye. Work must be carried out before the material has time to harden, otherwise further work will be impossible.
Applying too thin a layer leads to the fact that over time, “bald spots” appear and the wall becomes visible. If you use the wrong tool or plaster that is not intended for a specific technology, the texture will not work and will look unnatural.
How to delete?
Removing decorative plaster is difficult and the process takes a lot of time. So, let's look at the steps:
The procedure for removing decorative plaster is done from top to bottom. It is necessary to pry up the layers of coating and separate them from the base. In rare cases where the bond is too tight, a hammer drill may be needed.
You can “erase” the coating using a grinder with an abrasive disc. The plaster should be constantly moistened. After removing the decorative coating, go over the surface of the wall with a wire brush and then wash it.
Important! Only after all these procedures can you begin new decorative work.