Bark beetle is a decorative plaster that consists of several components. The appearance resembles granulated flour. The size of the fine particles affects the pattern. 2 mm granules give a clear texture. Bark beetle plaster, a video on the application technique of which can be viewed on the Internet, is used for finishing interior spaces and exterior walls. In the second case, mixtures with large granules are used. But it all depends on your preferences. In addition to the walls, plaster is also applied to the ceiling.
The main condition for obtaining a beautiful coating is good adhesion.
Plaster is used on brick, stone, concrete, drywall. Glass and metal are not suitable for this. Bark beetle plaster is a finishing coating and is not used to level the geometry of walls or seal cracks. For exterior decoration, a vertical texture or a cross pattern is used. In interior decoration, the designs are more varied; this is achieved using different tools, grouts, and paints.
Properties of bark beetle plaster
Chemical and physical properties of decorative bark beetle plaster.
- Lets air through.
- Repels water.
- Resistant to mechanical damage.
- Environmentally friendly.
- Does not shrink.
- Long service life without additional repairs.
- Resistant to environmental influences.
- Heat resistant.
- Resistant to mold and mildew.
- Light weight, less load on the building.
The main components of the bark beetle.
- Chalk.
- Mineral filler.
- Titanium dioxide.
- Marble chips.
- Acrylic binder.
Necessary tools for applying decorative bark beetle plaster.
- Fur roller.
- Painting spatula (100–300 mm).
- Brush.
- Venetian trowel.
- Container for composition and water.
- Mixer (electric drill).
Characteristics
There are two types of bark beetle plaster - acrylic and gypsum based. The acrylic type is sold immediately ready for use, but the gypsum type is sold dry and will need to be diluted first.
The solution, depending on the manufacturer, has a different composition. But in almost every bark beetle plaster you can find mineral chips and marble particles. The grain size is different and depends on the size of the added crumbs.
Now let's look at the advantages of this wall decoration.
Stages of bark beetle application
The technology for applying plaster is quite simple and anyone can master it. To carry out decorative work we will need:
- Finished plaster or mixture. For the second case, you will need a container and water for cooking.
- A narrow spatula and a metal trowel - for applying the composition to the surface.
- Plastic grater - for rubbing plaster.
- Electric drill (mixer) - for stirring the solution.
Surface preparation
Preparation of decorative plaster is required when using the mixture. Ready-made compositions based on silicone or acrylic are easily kneaded by hand. The recipe is written on the packaging of decorative plaster. It must be strictly followed; mixtures from different manufacturers may differ significantly. At the first stage , prepare a small amount of plaster and apply it to a small area.
This will help determine the expected consumption and setting time. You can knead the decorative bark beetle plaster with your hands or with a drill at low speeds. This is necessary to obtain a uniform consistency. If the tool only works at high speeds, then it is better to do everything manually.
When mixing, the following rules should be observed:
- The dry mixture is poured into the water, and not vice versa.
- The water temperature should be room temperature.
- Follow the recipe on the package exactly.
- No water is added to the finished mixture.
- After receiving the solution, you need to let it stand for 15 minutes.
- Prepare the amount of plaster that you have time to apply before setting begins (the time is indicated on the package).
How to apply bark beetle to a wall?
The bark beetle is applied to the wall with a spatula or steel trowel.
The tool is held at an angle of 30° relative to the surface. There is no need to apply excessive force during operation. The layer is applied evenly in one direction, each subsequent application overlaps the previous one by 5 mm. If you plan to make vertical furrows, then this should be the case for applying putty. This is done so that the joints are not noticeable. Do not apply the mixture to too large an area; you must have time to process it before it sets. When performing work for the first time, practice on a small area and only then increase it.
Grout
After applying the decorative plaster, you need to give it time to dry and then start grouting, use a polyurethane or plastic float.
To determine the readiness of the composition, bring the instrument to it; if it does not stick, then you can begin the procedure. In which direction you move the grater, this will be the pattern. The main thing is to stick to this movement when working over the entire surface to get the same pattern. After processing the first row, proceed to processing the next and so on. To clean the joint, spray it with water before grouting. After completing the procedure, the decorative plaster is allowed to dry for 24 hours. Do-it-yourself painting can only be done on a dry surface.
Subtleties
When applying bark beetle, you need to work on planes, not square meters. Having started processing on one wall, you need to completely finish it and only then move on to another. If you can't complete the job in one go, use masking tape to create a dividing line. This is done so that the junction of the two sections is not noticeable. To improve quality, work with a partner - one person applies the solution, and the second mixes and serves fresh. Do not apply bark beetle in hot weather. The drying process happens too quickly and spoils the final result. You may not have time to give the desired structure. If bark beetle application occurs in the summer, then do it in the evening.
When using façade paint, try to choose it from the same manufacturer as that used on the plaster. Before painting, the surface must be primed. The paint dries within 24 hours.
Description
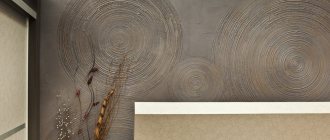
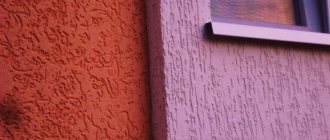
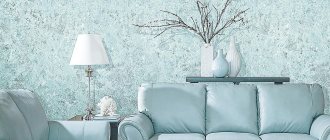
“Bark beetle” is a textured decorative plaster with grooves on the surface formed by mineral granules in the mixture. Usually the grooves are created in any direction, and they resemble the passages of a bark beetle in a tree. If the texture has a vertical direction, then the “rain” effect is obtained.
This decorative material is used for finishing building facades, plinths, landings, balconies, corridors and halls in public places where the operational load on the plaster is high. In the interior decoration of residential premises, bark beetle is also used, but less often than other types of textured plaster due to the simplicity of the design.
Kinds
Depending on the binder base, bark beetle plaster can be:
- Cement (mineral). Sold dry in 25 kg bags. Popular brands: Ceresit (Ceresit CT35), Knauf (Knauf Diamant), Bergauf (Bergauf Dekor), Perfekta, etc.
- Silicone (and silicate-silicone) . This is a ready-to-apply white mixture in a 25 kg bucket. The plaster can be tinted directly in the container. Examples of manufacturers: Ceresit ct 75, Farbe Silicon Kratzputz, Baumit, Alpina Silikon.
- Acrylic. The properties are similar to silicone and are also sold in plastic buckets. Brands: Farbe Acryl Reibeputz, Dufa Reibeputz, Raduga-34, Optimist Elite D710 a, etc.
Advantages and disadvantages
Advantages of this decorative plaster:
- Easy to apply. No knowledge of complex techniques is required; anyone can do it.
- Durability and wear resistance. Suitable for finishing external walls, not afraid of moisture, resistant to temperature changes.
- Elasticity of silicone and acrylic coatings.
- Low price. This applies to mineral plasters. Cement dry mixes are much cheaper than polymer ones.
- Looks good in any color. Acrylic and silicone mixtures can be painted in bulk with any available color.
Finishing the staircase
The disadvantages of the “bark beetle” include:
- Simple texture and one-color design. There are more beautiful options for finishing the inside of the house.
- Cement compositions require additional coloring. After drying, they are coated with water-dispersion paint (acrylic, silicone, etc.).
- Cracks are possible if you use a mineral type of plaster mortar.
- Depressions in the texture of the plaster accumulate dust over time, so after a few years the color fades a little.
Specifications
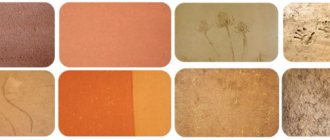
- The main characteristic of the “bark beetle” is grain size , i.e. the size of marble granules that form grooves in plaster. It can be 1 mm, 1.5 mm, 2 mm, 2.5 mm, 3 mm, 3.5 mm.
Important! Decorative plaster is applied in one layer, the thickness of which is equal to the grain size. Therefore, the larger the granules in the composition, the deeper the bark beetle grooves will be, and the higher the material consumption.
- Material consumption varies from 2.5 to 3.5 per 1 m2.
- Water consumption per 1 kg of mixture is 0.2 - 0.25 l.
- The pot life of cement-based mortar is 60 minutes.
- Application temperature +5 +30 °C.
- Frost resistance - F50 - F100.
- Vapor permeability - 0.1 mg/m•h•Pa
- Substrate for application: brick, concrete, cellular concrete blocks, cement and gypsum plaster, putty, OSB boards, plasterboard.
- Service life from 5 years - cement-based, from 10 years - silicone and acrylic plasters.
- Shelf life is 12 months for cement, 24 months for polymer.
The texture of the finish directly depends on the size of the fraction
Basic mistakes
The main mistakes can be divided into 3 groups: failure to follow the recipe for preparing the composition, improper surface preparation, improper use of plaster. When applying bark beetle (plaster) with your own hands, the wall surface must be smooth and clean and covered with a special primer. The ambient temperature should not be more than 30 ºC and below 5 ºC. Irregularities in the pattern are eliminated with a spatula.
Bark beetle is a decorative plaster that is used for interior and exterior decoration. Ready-made formulations and dry mixtures are available for sale. To get a good result, you need to do everything according to the recipe on the box. Follow the order of movement when finishing grouting. The surface can be painted only after the surface has completely dried after 24 hours.
- Author: Yaroslav Pershin
Rate this article:
- 5
- 4
- 3
- 2
- 1
(0 votes, average: 0 out of 5)
Share with your friends!
Application technology
Now we will analyze in detail how to correctly apply protective and decorative plaster “under the bark beetle”.
- The solution from the bucket is applied to the trowel.
- Apply the material using a bottom-up motion, starting from the corner of the wall. The thickness of the created decorative layer should not exceed the thickness of the filler grain. The entire amount of mixture on the trowel should be distributed over the surface in one movement of the hand. The remaining solution from the tool is thrown back into the bucket, because they contain fewer marble grains.
Leveling the mixture on the wall - It takes 20-25 minutes to plaster one area. Then you need to rub over the plaster - give it texture, create grooves. To ensure that work is not interrupted and the prepared solution does not dry out, it is recommended that two people complete the finishing process. One person applies and levels the mixture, the second one rubs it in after him.
- The texture of the bark beetle is created using a PVC grater. The tool is applied to the wall and, with light pressure, made in a circular motion. Marble granules are rolled under a grater and leave grooves on the surface of the plaster. To get the “rain” effect, you need to rub vertically or at a slight angle. Horizontal movements of the grater will, accordingly, leave horizontal stripes on the surface.
Grout options - The finish is left until completely dry. Can be painted after 48 hours.
Finishing the facade using insulation
It is possible to finish the external walls of a house using this decorative plaster not only on load-bearing bases. Often plastering is carried out using the “wet facade” technology, when the material is placed on a layer of insulation.
You can learn more about this technology using the link above. Briefly the process looks like this:
- Thermal insulation (mineral wool, polystyrene foam, Penoplex) is attached to the hard surface of the wall using a special adhesive for insulation.
- The adhesive composition is applied again on top of the insulation. The reinforcing mesh is pressed into it, smoothed, completely immersed in the solution.
- Use a trowel or a tile spatula with jagged edges to create horizontal stripes on the surface of the adhesive. This is necessary for better adhesion to the decorative layer.
- After three days, the facade can be plastered “under bark beetle” using the technology described above.
For external walls, it is better to choose mixtures with a coarse grain of 2.5 mm or more, so that the texture of the finish is not lost at a distance.
Decoration of the facade
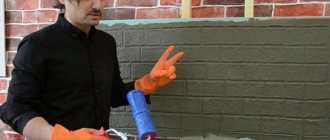
Video master class
The video tutorial below shows how to decorate façade walls with your own hands. Pay attention to the master’s comments; he talks about important nuances in working with this textured plaster.
Selection of plaster
Before starting work, you will first need to select and purchase material. There are a huge number of manufacturers and each of them has their own recipe for making bark beetle plaster. When purchasing, first of all pay attention to the grain size and type of mixture. The result you get at the end of the work will depend on this, namely texture and depth.
Also, do not forget about the type of solution - dry or immediately ready for application. The ready-made option is much more convenient, but its price will be higher. However, if you prepare dry bark beetle plaster correctly, it will be no different from the finished one.
The nuances of choice depend only on your personal preferences and financial situation.
This mixture should only be applied to walls with good adhesion. The ideal option would be concrete, brick, drywall.
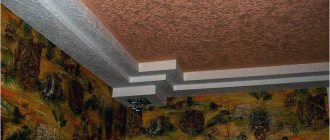
This plaster is a final finish, so its use for sealing wall defects is not recommended. This solution would also be a good choice for treating the ceiling. The technology for applying plaster with your own hands is quite simple and even a beginner in the construction craft can handle it.
Types of decorative plaster
Its conditional classification will help you understand the variety of decorative plaster. Finishing materials can be divided into the following groups:
- Structural plaster ensures the formation of a pattern thanks to the inclusions in the composition. The surface texture in this case depends on the size of the solid particles. For the Traventino texture, decorative mixtures with 1.5 mm granules are suitable. The choice of the size of fractions of decorative plaster “Bark beetle” depends on the location of the surfaces: it is better to perform external finishing with a solution with 3 mm granules; for internal decoration of walls, inclusions of 2 mm are suitable. Watching a video lesson with a master class on applying the Bark Beetle mixture will help you make sure that the process is not complicated. https://www.youtube.com/watch?v=xSUFCmtCE0s
- Textured plaster for decorative finishing can be used in two directions. In the first case, a thin layer of mortar is applied to the smooth surface of the walls, after which it is given the desired relief using auxiliary tools. The second option - the design of the walls consists of smooth transitions of color of the decorative mixture without adding volume to the surface.
- Venetian plaster is considered the most difficult to apply independently. The presence of artistic talents allows you to give the surface a unique design. The proposed video with a master class describes in detail the process of applying Venetian plaster.
When choosing a finishing material, study the composition of the mixture, focusing on modeling components and fillers. Depending on the location of application, preference is given to solutions with organic or mineral binding components.
Application methods
The grain size of the solution and the quality of the base directly affect the thickness of the layer of decorative plaster.
Among the many application techniques, it is better for beginners to focus on simple methods, which video lessons will help you master. A detailed description of the process outlined in the master class will allow you to independently decorate the wall with decorative plaster. The key principle of each method is that an even base layer is initially formed, then they move on to structuring the wall using auxiliary tools and devices.
How to apply plaster
Do-it-yourself application is done using a special grater. The tool is positioned at an angle and the mixture is spread over the entire area of the wall. The thickness of the layer directly depends on the grain size index. After covering the entire wall, you will need to form an ornament on the surface.
The pattern may have different textures and directions, depending on your choice. It is better to apply the material without interruptions. It will take about a couple of days for the wall to dry. If everything was done according to the instructions, no joints will be visible. We recommend watching the following video to better understand the technology of wall finishing:
As you can see, the presented decorative plaster has a lot of advantages. Applying it yourself is quite simple; you just need to carefully follow all the instructions. Watch a special video to learn more about bark beetle plaster and how to apply it yourself correctly:
Over the last decade, there has been a clear tendency to give preference to decorative plaster when decorating walls. The widest range of materials is combined with unlimited surface structuring potential. Involving labor in the finishing process significantly increases the cost estimate. Familiarization with the intricacies of the process and studying master classes on the use of decorative plaster promotes independent mastery of application techniques.
Preparation of plaster
If you have chosen a dry solution, you will need to dilute it according to the instructions on the package. We recommend using the following tips:
- it is necessary to pour the dry mixture into water, and in no case vice versa;
- the water temperature should be about twenty degrees;
- you need to mix the mixture using a construction mixer or a drill with a special attachment;
- Once the desired viscosity has been reached, let the solution sit for a few minutes and then stir it a little more.