Wallpapering remains a common type of wall decoration. The materials are distinguished by a variety of colors and low cost.
But the technology for performing repairs using decorative canvases requires high-quality preparation of the base, so when decorating concrete walls, the question often arises: is it possible to glue wallpaper to such a surface? In this article we will tell you how to choose a new coating and prepare the surface for gluing.
Types of surfaces
The performance characteristics of wall structures depend on the materials used in their production process:
- Aerated concrete has high strength and is not prone to shrinkage. Concrete has a porous structure and absorbs moisture well, so before gluing the walls it is necessary to treat them with special compounds with waterproof properties and plaster them.
- Foam concrete differs from aerated concrete by lower moisture permeability, but also by lower strength. Over time, cracks may form on the walls as a result of shrinkage of the building material. The blocks have a porous structure and wallpapering is possible only after preliminary puttying.
- Expanded clay concrete - the rough surface of the material ensures high-quality adhesion between plaster and walls, allowing you not to use reinforced mesh during the work. Pasting wallpaper directly onto the rough base is not advisable.
- Slag concrete is a durable but hygroscopic material, so before starting decorative finishing work, the walls need to be plastered.
- Reinforced concrete is a material that is highly reliable, durable and has a relatively smooth surface.
Concrete contact
To prepare the walls for pasting, concrete contact is used. A special polymer solution gives the surface high resistance to alkali. The soil contains quartz sand, which improves adhesion.
You can stick the concrete contact onto the wall using a roller. Apply evenly. The solution must first be thoroughly mixed. The entire surface must be treated. The soil levels the concrete wall, filling small cracks.
The concrete contact tightly bonds the paper covering to the wall, so you don’t have to worry that it will fall off over time.
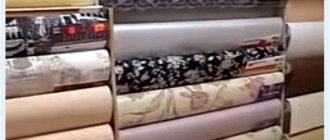
Choosing a new coating
When choosing decorative products, be guided by the following criteria:
- Condition of the walls in the room. If there are defects in the base, it is advisable to purchase dense, two-layer products with a relief front surface and an applied pattern that will help visually hide the unevenness.
- To decorate a room of a non-standard shape, with various niches, recesses, avoid decorative material with a large pattern - such canvases look beautiful in large rooms (how to calculate the amount of wallpaper per room?).
- Wear resistance and resistance to fading under the influence of ultraviolet radiation. If you are going to renovate a room with high traffic, a suitable option would be canvases that can be washed and painted (what kind of wallpaper is suitable for painting?). For a room where the sun's rays constantly fall on the walls, choose wallpaper with a protective layer against ultraviolet radiation.
If the windows in the room face south, materials in cold or dark, rich colors will help create a cool atmosphere. And vice versa: orange, beige, apricot, coffee shades will visually make a house with windows facing north “warmer” (how to choose the right wallpaper color?).
Try to purchase rolls from the same batch to eliminate possible material discrepancies in color.
Important
An important criterion for choosing wallpaper is the type of walls being finished: any concrete base, even if it appears even, will have slight roughness that thin, plain products will not hide.
Advantages and disadvantages
Before purchasing the Prospector concrete contact, you should consider its main advantages and disadvantages.
- The technical characteristics of this mixture will please even fastidious buyers, because the Starateli primer product is moisture resistant, has high gas permeability and has antiseptic properties. The wear resistance of the material is obvious.
- The big advantage of concrete contact is its excellent adhesion to any surface.
- The surface coated with the primer composition of this concrete contact dries as quickly as possible. Subsequent work can begin after a few hours.
- The economical consumption of primer material is noted not only by specialists, but also by many clients who carry out repairs on their own.
- Product solutions do not require preliminary preparations; they are ready for use immediately after opening the container.
- Product consumption can be called economical. So, approximately 0.2 - 0.3 kg of concrete contact are used per 1 m2. According to the craftsmen, it is quite possible to reduce material consumption.
The disadvantages of some buyers include slightly inflated prices for concrete contact and, in their opinion, high consumption. But opinions vary, so it’s impossible to definitely call the material bad.
How to prepare the surface for gluing?
The initial stage of preparation is to completely clean the surfaces of the old coating, otherwise how will the wallpaper stick to a concrete wall? Cleansing is carried out in several steps :
- To remove old wallpaper, pull it by the loose edge or cut the canvas with a metal spatula and remove the covering (find out how to easily and quickly remove vinyl, liquid and photo wallpaper from walls).
- Remove oil-based paint mechanically (using a chisel, grinder) or apply a special reagent to the wall, wait until the coating softens, and remove it with a metal scraper.
- You can get rid of old whitewash or water-based paint using a grinding machine (during work there will be a lot of dust, so perform the procedure in a respirator, having first removed all interior items from the room or protected them with film). A longer, but “clean” method is to wash away the wall coating with water.
If plaster has been applied to the surface, it needs to be removed only if voids have formed under the finishing layer: tap the wall, if a dull sound is heard, the area must be removed (with a spatula, scraper).
After dismantling the previous covering, remove all protrusions on the walls, seal cracks, and clean the walls of dust and debris with a sponge.
Regardless of whether you plaster the walls or not, the concrete base must be primed :
- a special deep penetration mixture strengthens the surface, preventing concrete particles from peeling off;
- the primer forms a kind of film on the wall, ensuring uniform distribution and absorption of the glue into the decorative fabric;
- During the process of applying the composition, the wall is completely cleared of the smallest dust, due to which the adhesion of the bonded surfaces will be of high quality.
Apply the primer with a roller or sprayer in several layers, and work the corners with a wide brush. During work, make sure that no streaks form on the walls and that liquid does not accumulate.
If you don’t have a special primer, you can use a “budget” option - wallpaper glue:
- dilute the composition, taking 2 times more water than is necessary for wallpapering;
- Apply the mixture to the cleaned surface and wait until it dries.
Advice
The glue method is not suitable for decorating walls with heavy canvases.
How to putty?
You can paste wallpaper directly onto a concrete base, but plastering the rough surface before finishing work has a number of advantages:
- The quality of adhesion of the canvases and the service life of the coating. Concrete, regardless of its type, has a porous structure, and in places where there are even microscopic voids, the wallpaper will not stick. As a result, the decorative coating will not stay on the wall for long.
- The slightest defects of an uneven rough base will be visible in daylight, even if there is high-quality, thick wallpaper on the walls.
- If you carry out interior finishing of external walls without first plastering them, there is a risk of mold and mildew appearing under the wallpaper.
To ensure the strength of the putty layer, before applying the solution, fix a coarse mesh (metal or fiberglass) to the wall using dowel nails or mounting tape.
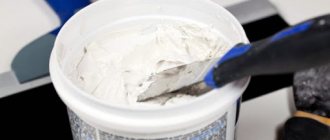
The following mixtures are used for puttying walls:
- Based on polymer materials (acrylic, latex) - easy to apply and have moisture-resistant properties.
- Water-dispersed - create a durable layer on the concrete surface, but can shrink.
- Cement-gypsum - most used for wall decoration, strong and durable. Some compositions have increased moisture resistance.
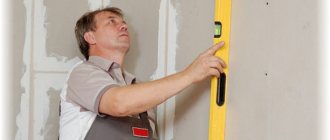
Before carrying out work, prepare the following tools: spatulas, a drill with a kneading attachment, a metal rule, a building level, sandpaper.
The process of starting puttying of walls:
- Prepare the mixture for use.
- Using a spatula with a wide blade, transfer the solution to the wall and spread the mixture in a thin layer over the surface.
- Apply the next layers overlapping, immediately smooth the solution using the rule and control the evenness of the surface with a building level. The thickness of the starting plaster depends on the curvature of the rough coating and can be up to 1.5 cm.
- Let the material dry and carefully work the wall with a hand float.
Perform final puttying with special finely dispersed mixtures:
- after the rough finish has hardened, apply a thin layer (up to 2 mm) of the composition to the wall;
- After the surface has dried, treat it with fine-grained sandpaper;
- Cover the walls with a primer mixture.
Important
Often, newcomers to the construction business confuse the concepts of plastering and puttying. If you need to eliminate significant unevenness in the walls (height differences of more than 1 cm), use plaster or a special starting putty as a mixture for the rough layer.
Consumption
How to glue fiberglass wallpaper to a wall: technology, sequence of work and requirements for the surface before pasting.
The amount of primer required depends on the porosity of the surface to be applied to.
To determine the required amount of Betokontakt, you can use the following data:
- for surfaces with high porosity (brick, concrete slabs, stone), the optimal consumption per 1 m² is 0.4–0.5 kg;
- for materials with an average porosity coefficient (monolithic concrete, decorative brick, self-leveling concrete floors) consumption is 0.2–0.38 kg per square meter of treated surface;
- surfaces with a low porosity coefficient (reinforced concrete structures, ceramics, oil and alkyd enamel, glazed tiles), the optimal consumption is 0.15–0.25 kg per 1 m².
In order to slightly reduce the consumption of Betokontakt primer, a conventional primer is first applied to the surface, which after drying reduces the porosity of the material. This method is most often used for highly porous surfaces, but it may reduce the adhesion of Betokontakt.
You can also determine the consumption rate per 1 m² using a test application, for which you should perform the following steps:
- measure a 1x1 m square on the surface to be treated and limit it using masking tape;
- mix the primer thoroughly before application and pour 500 ml into a small container;
- you should weigh the container with the primer and the brush or other equipment used for application;
- apply primer in accordance with recommendations, ensuring high quality coating;
- weigh the container again along with the tool and the primer remaining in it;
- the resulting value is the consumption of Betokontakt primer per 1 m². To calculate the required amount of primer, this figure must be multiplied by the area to be treated.
How to properly glue canvases to concrete?
- Before starting work, prepare the necessary tools:
- rubber rolling roller;
- wide brush or paint roller with a tray;
- stationery knife;
- roulette;
- pencil;
- level.
- Apply markings to the prepared walls using a pencil and tape measure, and check the vertical lines with a level.
- Measure the height of the walls and cut the canvas to the appropriate length (remember to leave allowances on both sides of 4-6 cm or more, if it is necessary to join the pattern).
Technology Basics
The room temperature during operation should be within 15-25 ⁰C. Pasting walls in a cold room will cause the canvases to move away from the base.
Optimal humidity is up to 60%. Too dry air also negatively affects the quality of gluing, so if the indicator is low (50% or less), humidify the room by spraying water from a spray bottle.
Different types of wallpaper require a certain period of drying , during which there should be no drafts or open windows:
- paper sheets - you can ventilate the room every other day;
- vinyl (paper-based) – 1.5-2 days for drying;
- vinyl (non-woven backing) – windows can be opened after 3-7 days;
- non-woven ones should dry for at least a week.
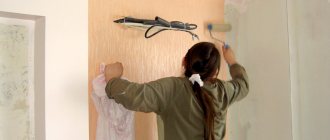
Start pasting the walls from the far corner of the room. Apply the adhesive composition to the base or canvas, depending on the type of decorative material:
- when working with paper products, treat the wall with the mixture;
- in the case of using vinyl sheets, the glue should be on both the concrete base and the wallpaper, and after applying the composition, wait a couple of minutes for the material to become saturated with it (what are the features of gluing vinyl wallpaper?);
- To glue non-woven fabrics or vinyl on a non-woven backing with glue, treat only the wall.
Tool
A necessary attribute of how to properly glue wallpaper on concrete walls is the choice of tools. Their set is small; you will need a few simple devices:
- paint brush;
- rubber roller;
- paint roller and tray;
- building level;
- stationery knife;
- pencil (not necessarily construction pencil);
- piece of fabric.
The list may be expanded, but the basic tool is presented in full.
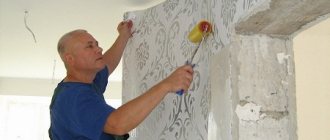
Step-by-step work process
- Prepare the glue for work.
- Apply the composition with a brush to the canvas, paying special attention to the edges.
- Place the edge of the wallpaper against the top of the wall and smooth it out.
- Glue the canvas along its entire length, while moving from the center to the edges, smooth it with a stitching roller, squeezing out excess glue and air.
- Prepare the next piece of wallpaper for work, apply the mixture and glue it end-to-end to the first piece. Fix the remaining material on the walls in the same way.
Trim the dried canvases near the ceiling and floor with a utility knife.
Advice
To prevent the wallpaper from moving away from the wall, you should stick a narrow paper tape along the marking lines - the edges of the canvases, going onto such a substrate, will not peel off over time.
How to tear off the old coating?
You can easily remove old wallpaper using a metal spatula . If it is difficult to peel off the coating this way, do the following:
- fill the container with hot water;
- turn off the electricity in the room;
- soak sponges in the liquid and moisten all decorative surfaces or use a spray bottle;
- after 20-30 minutes (10 minutes is enough for thin paper sheets), try to peel off the finishing material with a spatula.
If it is necessary to remove vinyl or non-woven wallpaper, before moistening, cut the top, water-repellent layer with a knife in several places or roll the canvas with a metal needle roller - this will facilitate water access to the base.
Applying a special liquid for removing wallpaper to the walls will significantly speed up the process of dismantling the old coating.
Attention
Steam will help you quickly peel off old canvases: moisten a piece of fabric, apply it to the wall, iron the surface with a hot iron, and then remove the wallpaper. To quickly process large areas, you can use a steam generator or an iron with a vertical steam function.
Recommendations
- Before gluing unplastered walls, cut a small piece of wallpaper, moisten it and fix it on the wall: if after the material dries, no concrete stains appear on it, the work can be done without preliminary finishing.
- If the glue is applied unevenly, whitish streaks may appear on decorative canvases.
- For ease of gluing wallpaper with a complex pattern, number the cut sheets in order.
- Before starting work, remove sockets, switches and door frames in the room in which you are repairing. Upon completion of pasting, cut holes of the required diameter in the wallpaper and install the sockets in place.
A well-prepared base is the key to a long service life of decorative wall finishing. The process of puttying surfaces is not very difficult, but if for some reason you cannot complete it, use the “old-fashioned” method - gluing sheets of white paper, non-woven fabric or other special substrates under the wallpaper.
Types of concrete walls
Concrete walls can vary in quality and the type of material they are made from. They may be as follows:
- Expanded clay concrete or concrete blocks are distinguished by the fact that their surface cannot be perfectly flat and smooth. For this reason, before you start gluing wallpaper, including paper, these walls must be plastered and puttied;
- monolithic reinforced concrete walls are smoother, and generally before gluing wallpaper, it is enough to putty them;
- foam concrete or aerated concrete blocks are often used in the construction of low-rise buildings and prior to wallpapering, preliminary puttying and plastering is required;
- large-panel houses - the alignment of such walls occurs mainly at the junctions of the panels with each other. If a person plans to stick thin wallpaper or with a monochromatic pattern, putty must still be applied underneath it. This is explained by the fact that even the smallest unevenness will be noticeable on such wallpaper.