In the list of materials in demand in interior decoration, paper wallpaper is far from the last place. Invented back in medieval China, they are practically the cheapest and, most importantly, environmentally friendly solution, with the help of which you can create a cozy and pleasing environment without much effort. But in order for an interior made with paper wallpaper to serve as long as possible without causing unnecessary trouble, it is important to study the basic criteria for their selection and understand the practical intricacies of gluing and caring for them during operation.
Types and features of paper wallpaper
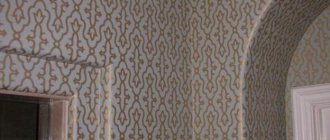
Assortment of paper wallpapers
Paper is a fibrous material whose structure is easily penetrated by moisture and fat. It is an excellent springboard for dust and can even absorb odors. All this must be taken into account when decorating the premises - if you choose the wrong wallpaper, the atmosphere that reigns here will very soon leave its indelible imprint on it.
Protection of the paper web from aggressive operating factors is provided by a number of modern technologies. In accordance with them, the following types of paper wallpaper are distinguished:
- Smooth
The basis is paper of various types, sometimes with a light-resistant base, and the design is applied to the front side using a printing method.
Smooth paper wallpaper
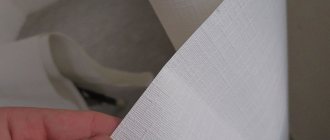
- Duplex
They have 2 layers, thanks to which they do not tear, and, if necessary, can be easily removed from walls or ceilings.
Duplex wallpaper
- Embossed
Also double-layered, but the front side is embossed, i.e. has a certain, often patterned, relief.
Premium embossed paper wallpaper
- Structural
They are made with the addition of sealants - sawdust, crushed nut shells, etc., due to which they acquire a unique facial relief.
Paper wallpaper with a structured surface
- Acrylic (foam wallpaper)
They are a two-layer canvas, on the front side of which a thin layer of foamed acrylic is laid - the result is quite unusual designs.
Paper wallpaper with acrylic pattern
- Moisture resistant
This type of wallpaper has a moisture-resistant coating, thanks to which it can be cleaned and washed.
Moisture-resistant wallpaper with a paper backing
Obviously, the more aggressive the atmosphere in the room being finished, the more wear-resistant the wallpaper should be and the more it will cost. But the most important thing when purchasing is not to confuse different types of fabric. For example, some paper wallpapers are practically indistinguishable in appearance from vinyl ones, but the same cannot be said about their price. In short, make sure you don't accidentally overpay for features you don't need.
Why choose paper wallpaper
Before you learn how to glue wallpaper correctly, you need to decide on the type of canvas. On the construction market you can find non-woven, vinyl and other types of wallpaper, but the emergence of new materials could not significantly affect the popularity of paper sheets. In this regard, it is worth figuring out how to properly glue this type of wallpaper in the house. Knowing the benefits of paper wallpaper will also help you make your choice:
- First of all, this is, of course, the cost of the rolls. At the same time, on the market you can find the cheapest options, and quite expensive ones that look very presentable. Thus, everyone can choose a suitable option for themselves;
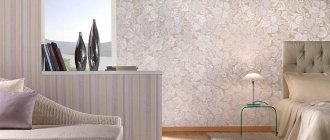
- With a variety of colors and patterns, it will be easy to choose a roll that suits the interior of the room;
- Possibility of gluing paper wallpaper in rooms where humidity is low (40-60%), suitable for use in halls, corridors, bedrooms;
- Environmental friendliness and the ability to allow air to pass through, which creates a favorable indoor microclimate, suitable for use in children's rooms.
It should also be noted that they are not as durable as other types, but this makes it possible to change the interior more often. It’s easy to stick them on, you can carry out repairs yourself, the main thing is to master the operating technology.
With a variety of colors and patterns, you can easily choose a roll that suits the interior of your room.
Preparation for gluing
Wallpapering
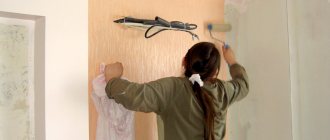
Paper wallpaper is a fairly simple material to work with, which is not difficult to handle even if you have no pasting experience and alone. But first, it is necessary to properly prepare the surfaces to be finished: dust, remnants of whitewash and old wallpaper, etc. will not allow the gluing to be completed properly, and defects in the rough finishing will immediately appear on the front side of the canvas.
To hang paper wallpaper you will need:
- roller or brush;
- wallpaper brush;
- tracer;
- plumb line;
- construction knife;
- sponge;
- container for glue;
- wallpaper table;
- ladder;
- roulette;
- long ruler;
- wallpaper glue.
Tool for wallpapering
Having collected everything you need, you can begin the preparatory work. They are performed in the following order:
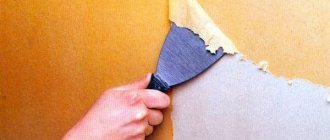
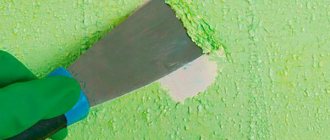
- Removing old wallpaper, whitewash and peeling plaster
Old wallpaper can be removed very easily if you first scratch it and moisten it with a soapy solution using a sponge. It is most convenient to work with a metal spatula. Those areas that come off poorly will have to be moistened again.
- Removing paint residues
Oil paint or enamel is removed using coarse sandpaper. Water-based emulsion and whitewash, similar to old wallpaper, are first soaked in a soap solution and then removed with a spatula.
- Elimination of defects in pasted surfaces
For high-quality gluing of paper wallpaper, it is necessary to carefully plaster all the cracks and smooth out any unevenness on the walls or ceiling, after which they should be cleaned using a plaster mesh.
- Primer
Before wallpapering, the surface of the walls and ceiling must be primed. This will ensure normal adhesion of the glue and prevent the formation of air bubbles under the wallpaper.
- Cleaning
After completing the preparatory work, the room must be wet cleaned. This will avoid contamination of the new wallpaper during the cutting process.
Preparation for gluing paper wallpaper in the photo
How to properly apply liquid wallpaper to walls
Liquid wallpaper is a cellulose mixture containing environmentally friendly fiber components. There are three main types of wallpaper:
- Cellulose;
- Silk-cellulose;
- Silk.
All of these types have a number of advantages compared to conventional wallpaper:
- The method of applying them is similar to ordinary plaster, which allows you to hide minor irregularities in the walls;
- The treated surface has no joints and there is no need to select a pattern. The percentage of material waste is almost zero;
- The work process does not require special skills and equipment;
- Damaged or damaged areas of the wall can be easily restored;
- Various decorative elements, wall paintings, drawings and panels are created;
- When exposed to direct sunlight, they do not fade or crack;
- The service life of wallpaper reaches up to 10 years.
Liquid wallpaper application technology
Before applying wallpaper, the walls are thoroughly cleaned of old finishing and whitewash, bringing them down to the concrete wall. The surface is primed or painted white with water-based paint.
This step is important to achieve the desired result and avoid mixing the color of the wallpaper and the wall.
Liquid wallpaper is sold in bags, each of which is diluted with 6 liters of warm water. The mixture is kneaded by hand, the consistency should be similar to sour cream. It is advisable to leave the resulting solution overnight to swell. Stir again before application.
Features of applying liquid wallpaper to walls
The surface is covered with a spatula, and a special roller or grater is used for uniform distribution. The thickness of the coated layer should not exceed 2 mm. Applying the mixture to the walls, reciprocating movements are performed. The solution is prepared with a reserve so that it is enough for the whole wall and there is no need to mix a new one.
Recommendations!
The excess mixture is dried and stored for local restoration during operation.
Liquid wallpaper is used to create original drawings and entire panels. For this purpose, white wallpaper and special colors are purchased. The solution is prepared in several containers and creates as many colors as the design requires. The application is similar to a children's coloring book. The outline of the future pattern is applied to the wall, plastering is carried out in stages in each outline.
Fabric preparation
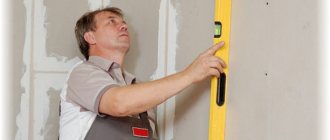
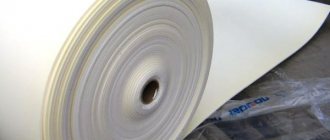
Wallpaper is sold in rolls, which are printed immediately before starting work. But first you need to mark the walls. To do this you will need a plumb bob and a tracer. If you don't have the latter, you can use a level, a long ruler and a pencil or chalk. You should mark the top level of the wallpaper (for rooms with high ceilings) and use vertical lines to mark the joints of the canvas.
Vertical marking of walls using a plumb line
There are two methods of wallpapering: butt and overlap. If the first option cannot be used, gluing the canvas should be done in the direction towards natural or electric lighting.
Wallpapering with an overlap followed by trimming
Immediately before gluing, you can perform wall stripping: apply a 10-cm strip of glue along the corner lines, as well as the area along the baseboard and ceiling line. After 2-3 minutes the wall will be ready for gluing.
When starting to cut wallpaper, you should wipe the surface of the table or, in the absence of the latter, the area of the floor on which you will temporarily stack the cut pieces of canvas. The cutting is carried out with a 3-5 cm margin on both sides of each segment for a small overlap along the line of the plinth and ceiling. The finished stack is shifted with a 10-15 cm indentation, due to which, when applying glue to the top sheet, you will glue the joint strip on the next one. And remember that paper tends to get wet quickly, so the glue should be applied in a moderate layer.
Gluing the fabric using a wallpaper brush
After gluing, the top strip is folded in half, after which the same action, only in the opposite direction, must be repeated. The folded strip is set aside, after which you can proceed to the next one while the previous one is soaked in glue. It’s not worth using more than 3-4 strips: you may not be able to complete the pasting in time, since wallpaper glue dries very quickly in air.
Option for folding a glued sheet of wallpaper
Types of Wallpaper
Over the years, people got tired of the first and already boring wallpapers, and technology began to change. They learned to make them using only a paper base or only a paper top layer, leaving room for high-tech materials.
You can buy wallpaper right now!
TO THE STORE
Now wallpapers are divided into three types:
- Single-layer or “simplex”, i.e. contains one layer of paper. The characteristics include low cost and density, light weight. They do not tolerate water, so glue is applied only to the wall.
Simplex - Multilayer or “duplex”, i.e. in this case, layers of paper or paper are glued to other materials. Thanks to this, they achieve moisture resistance, relief patterns, and make embossed wallpaper that lasts for many years and looks beautiful.
Duplex wallpaper - Restoration, produced on a non-woven basis from textile and cellulose fibers. They are especially loved for their incredible strength and softness.
Non-woven wallpaper
Selection, preparation and application of wallpaper glue
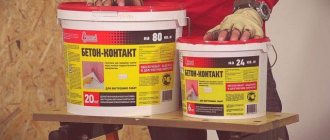
For gluing medium-density paper, lightweight wallpaper adhesive, for example, KMC, is ideal. As for its quantity, it depends on the area to be pasted, which, like all the necessary proportions, must be indicated on the packaging. When purchasing, it is very important to pay attention to the presence of a quality certificate. The glue must not contain substances harmful to health.
Lightweight, quick-drying glue for paper wallpaper.
Preparation of wallpaper glue:
- 5-7 liters of water are poured into a pre-prepared container;
- the water is shaken and the dry adhesive mixture is poured into the resulting whirlpool;
- the resulting mass must be thoroughly stirred and then left for some time to swell.
Thickened wallpaper glue should be uniform. If you find lumps, they can be easily eliminated by re-stirring the mass.
Ready-to-use adhesive mass
The glue should be applied evenly to the back side of the wallpaper, distributing it over the entire surface. It is most convenient to use a roller for this. After applying the glue, you need to wait 5-7 minutes so that it is well absorbed by the paper web.
If the glue accidentally gets on the front side of the wallpaper during application, it must be removed with a damp sponge. You shouldn’t put too much effort into this – it’s better to use more water. This will preserve the structure and color of the front surface.
Gluing the fabric with a roller
Some types of wallpaper glue have special additives that reduce its setting time. Therefore, before cooking, you must carefully read the instructions, otherwise you will face unpleasant surprises in the form of a composition that thickens too quickly.
It is recommended to buy wallpaper glue at reliable points of sale, having previously learned basic information about the brand and properties of the product you are interested in.
Which wallpaper glue is suitable for paper wallpaper?
Repair begins with the selection of necessary materials. Before gluing the wallpaper, you need to choose a suitable glue that will do the job well. It depends on the adhesive solution whether spots will appear on the surface after drying, whether the canvases will not come away from the wall, and whether they can be easily removed if necessary, and new canvases will be glued on. The selection of glue is made based on the type of wallpaper rolls themselves, namely duplex or simplex:
- Simplex. Thin fabrics with one layer use base compositions that use recycled cellulose or cotton. Universal options also apply;
- Duplex is a canvas consisting of two layers of paper, which also includes embossed wallpaper. They are intended for creating painted finishes, they are heavy in weight and high in thickness, so adhesives for non-woven wallpaper or CMC are selected for them.
It is possible to use vinyl glue with PVA added to it. It is permissible to use bustylate and only PVA. In the instructions on the packaging of special glue, manufacturers indicate the rules for preparing the adhesive solution.
The selection of glue is made based on the type of wallpaper rolls themselves.
Technology of pasting walls and ceilings with paper wallpaper
You need to glue wallpaper quickly and carefully. That is why it is advisable to work together. Paper wallpaper is almost always laid with a slight overlap, otherwise, due to the low wear resistance of the canvas, the joints will fray very quickly.
The sheet of canvas that you glued first, after 5-7 minutes, is unbent so as to gain access to the upper edge. Next, you need to stick the top strip on the wall - just on the section of the wall that you treated with glue. Now, holding the canvas by the top, you need to carefully unbend it and stick it on the wall. At the same time, using smooth arcing movements using a dry sponge or rag, you need to smooth the wallpaper until it sticks properly.
Gluing wallpaper to the wall
Small air bubbles can be left alone. When the glue dries, the paper wallpaper will shrink slightly and allow air to escape. If large bubbles have formed, they need to be carefully pierced with a needle and the air removed. In such areas it won't hurt to add glue. This can be done using a syringe, while the edges of the canvas are best glued using a brush.
Removing air bubbles
After gluing 4-5 sheets, it is very desirable to remove the indents - after the glue dries, carefully cutting them off without affecting the main sheet will be very problematic. Do not forget to control the orientation of the pattern on adjacent sections of the canvas - it must match.
Wallpapering the ceiling is done in the same way, with the only difference being that the canvas should be placed perpendicular to the direction of lighting. Please note that wallpaper on the ceiling is always glued end to end.
Rolling joints with a rubber roller
The joint lines between adjacent sheets need to be rolled with a narrow rubber roller. It doesn’t hurt to carry out this operation when gluing wallpaper onto walls with an overlap - as practice shows, this is where they most often come off due to the different microstructure, and therefore the absorbency, of the front and back surfaces of the wallpaper. You also need to remember to cut out the fabric in the currents for placing switches and sockets. It is advisable to do this before gluing - after the hole, all that remains is to correct it with a stationery knife.
Wallpapering the ceiling
If you have carefully prepared for gluing, chosen reliable glue, and correctly cut and pasted the paper wallpaper, it will serve you for as long as possible. Of course, provided that you protect them from damage, moisture and dirt.
How to properly glue paper wallpaper to walls
Preparation for repair
They start by clearing the room of furniture, hanging paintings and photographs, and creeping floor coverings. Next, to hang new paper wallpaper on the walls, remove the old ones. To do this you will need a spatula, a lot of warm water and a sponge. They turn off the power to the room, but preferably the whole apartment, moisten the walls with a sponge, wait, and then remove the wallpaper from the top edge, helping with a spatula. On our website you will find the necessary information on how to make quality repairs.
If the wallpaper is washable, then holes are first made in it, which can be done using a needle roller. When difficulties arise, use an iron with a sender, a metal brush, a wallpaper tiger, wallpaper remover, or a steam stripper.
Afterwards, calculations are made of the required number of rolls. It would be a good idea to buy a couple more rolls, as it will be possible to cover defective areas and save money if there is not enough wallpaper.
Recommendations!
It is important to remove protruding bumps, because they are quite noticeable in a linear pattern. Small irregularities are removed with putty, sanding it. For serious unevenness, alabaster or putty on plaster is suitable. The ideal result is achieved by sheathing and gluing drywall.
Correct cutting of wallpaper
When gluing wallpaper, the rolls must be strictly from the same batch, so that after gluing the wallpaper your walls do not turn out to be different shades. Therefore, it is necessary to take an additional couple of rolls, especially if the pattern on the surface of the wallpaper is large. In this case, joining the pattern will be easier. If the shades of some rolls differ, those that differ from the main mass should be glued to closed and inconspicuous places (sections of walls behind cabinets, radiators, curtains, etc.).
Note! Foreign and domestic wallpapers differ in that the former have the edge most often located on one edge, while the Russian wallpaper has an edge on both edges. The edge needs to be cut. If the wallpaper is thick and fits into a joint, cut on both sides; if it is thin, it is enough to cut on one side.
The roll must be cut strictly in accordance with the height of the wall. Before cutting the roll, you should measure this value and know it. When joining the resulting strips, you should strictly ensure that the patterns on them match each other. It is also necessary to leave a so-called allowance, the size of which is different for single-color and decorated wallpaper designs: if it is single-color, then leave 10 cm, if there is a pattern, all 30 cm. Before gluing the first strip, draw a perfectly straight vertical line along the wall. This is done to set the vertical direction for all subsequent stripes. The easiest way to do this is with a plumb line or laser level.
Note! After applying the glue to the roll, you should wait 1-2 minutes for thin wallpaper, and from 3 to 7 minutes for wallpaper made of denser material. In this case, thicker wallpaper must be coated twice.
So, let's draw a line under the above.
In order to cut a roll of wallpaper, we perform the steps in this order:
- We look at the packaging for the method of joining the wallpaper strips: end-to-end or overlapping.
- We mark the height of the wall on the canvas with a pencil, having previously measured it.
- You can cut several strips (5-10) at a time, leaving a margin of a few centimeters.
- Number the stripes on the reverse side with a pencil, indicating the direction in which the wallpaper will be hung.
- The fabric should be cut using a wallpaper knife along a metal ruler.
The pasting process is quite labor-intensive; it is quite difficult for one person to cope with it. Working in pairs is best suited for this. One person should feed the prepared strip, while the other should lay it on the prepared wall base.
How long does it take for paper wallpaper to dry?
The average time required for drying paper wallpaper takes from 8 to 20 hours. At the same time, the single-layer look dries faster than the two-layer look. The dependence also depends on the temperature in the room; drying in unheated rooms will take longer.
It is prohibited to use fans, hair dryers and other similar means to shorten the period. For reliability, it is better to wait a little longer for gluing.
The average time required for drying paper wallpaper takes from 8 to 20 hours.
The article described how to hang paper wallpaper correctly; if you follow all the recommendations described, you can do the repairs yourself, without resorting to the services of specialists, and saving money.
Wallpaper
0 votes
+
Vote for!
—
Vote against!
wallpapering at least once . Of course, you can hire a designer and a team of finishers and return to a house that smells like fresh renovation. Or you can go through the search for the right color, arguments with your spouse and children about the design and tone, gluing that lasted almost until the morning, and the first rays of the sun playing on a piece of wallpaper that had fallen off the wall...
how to glue paper wallpaper and enjoy it.
Content
- History of paper wallpaper
- Preparing to hang paper wallpaper
- What glue to use for paper wallpaper
- How to properly glue paper wallpaper
History of paper wallpaper
Paper wallpaper has been used by humans for decoration for many centuries. The Chinese were the first to cover their homes with rice paper. Later, the secret of creating paper became available to the people of Japan. And around the 12th century, the question “how to glue paper wallpaper” was also puzzled in Europe. Here they decided not to weave the design on the canvas, as on carpets, but to apply it to the finished surface.
And today, when stores are full of vinyl, non-woven and other wallpapers, and fashion designers advise simply painting the walls, paper wallpapers do not go out of fashion and do not become less popular than before. Why? The advantages are obvious:
- Paper wallpaper is cheap and affordable for any pocket
- Anyone, even a teenager, can wallpaper a room with paper wallpaper if desired and with some skill.
- Paper wallpaper is easy to stick in a room where the humidity is less than 40-60%, that is, almost everywhere in the house
- Paper wallpaper is environmentally friendly, easily breathable, and has some sound-absorbing ability.
There are, of course, disadvantages - paper wallpaper is fragile, quickly fades in the sun and absorbs odors.
Preparing to hang paper wallpaper
There is nothing more difficult in renovation than choosing wallpaper, especially if you do it together with your other half. As a rule, tastes differ and compromise is impossible, and therefore the question “how to properly glue paper wallpaper” sometimes freezes at the level of “how to choose them.” In this case, try to take into account the designer’s recommendations:
- Paper wallpaper is made in one layer , applying a pattern on top - simplex . The main advantage here is price and simplicity. A country option if you don’t have a chalet or villa outside the city. Wallpaper consisting of two layers - duplex - is more reliable, it fades less and is forgiving to a damp cloth in case of contamination.
- A large pattern looks great in a large room, but will not fit into a small room at all. The same with a small pattern, only exactly the opposite - in a studio apartment, for example, it will simply get lost and merge into one canvas.
- We “brighten” dark rooms with pastel, warm wallpaper, and those facing the sunny side can be hung a little darker, adding a rich tone.
- The interior should be in harmony with the wallpaper in the room, so a classic small flower will completely “kill” your high-tech set. Textiles are also matched to the overall mood.
- Shades of red are stimulating, rich brown is depressing, turquoise is refreshing, yellow is uplifting, but if it has a poisonous acidic hue, it causes irritation.
The next step in preparing for gluing is cleaning the surface of the walls from old wallpaper, paint, putty and leveling, priming the walls. This stage is the most boring, tedious, but almost the most important - when the paper wallpaper is dry, all the irregularities will immediately catch your eye.
Often old wallpaper does not want to leave the wall. They need to be wet, wait a little and cleaned off with a spatula. Sometimes such wallpaper is ironed with a hot iron through a wet cloth, and ammonia or soda is added to the water.
Before wallpapering, you need to turn off the electricity in the panel and remove the covers from switches and sockets. We apply the canvas to the wall and make a cross-shaped cut in place of the socket. This way the paper strip will stick to the wall much better, and we bend the corners and, if necessary, trim them a little.
If it is possible to remove the old baseboard, it is better to do this, and after wallpapering, replace it with a new one. In this case, the bottom of the wall will look perfect.
What glue to use for paper wallpaper
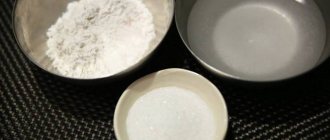
What's good about paper wallpaper is its susceptibility to glue. There are few brands that won't fall for this wallpaper. You can put paper wallpaper on non-woven glue - it won’t fall off! If there is no glue or it has run out, and for some reason you cannot get to the store, you can glue the wallpaper with homemade paste: pour flour into water, stir and bring to a boil. Remove immediately, stir, cool slightly. Thicker wallpaper sticks better with warm paste.
However, if there is a special glue for paper wallpaper whose price suits us, we will use it. The most commonly used glue for paper wallpaper is CMC. Sold in powder form. If you don't leave it in a damp place, it won't spoil for a long time. The glue is poured with warm water and mixed thoroughly. Then they leave it in the room where the wallpaper will be glued for 10-12 hours, until completely dissolved. It is worth stirring periodically. Initially we pour a little water, but later add it until it becomes a jelly, stirring continuously.
Bustilat glue and Gumilax glue are also suitable for paper wallpaper. The preparation is approximately the same as for CMC, but you should also read the instructions on the box before starting work.
How to properly glue paper wallpaper
Even in the store, you took into account all the signs, letters and numbers on the wallpaper rolls and now, having opened them before gluing, you see that they are the same in tone. Paper wallpaper is accompanied by an edge. Sometimes it comes only from one side, and sometimes from both. If the wallpaper is thin, then you can glue it overlapping, then cut the edge only on one side. If they are tight, this seam will become noticeable, so we cut off both edges and glue them end to end. We pay very close attention to the window: we glue it from the window, on the right side, and cut it off on the right side too. And then it’s more convenient to remove the edge from the left.
Cutting and trimming is a very important stage. We measure the height of the space that we will glue, adding a little “to reserve”. If the drawing is small, this “reserve” will be enough for 10 cm, but for a large one it’s worth adding 30 cm. Sometimes the floors and ceilings in apartments are so crooked that only a horizontal border can correct the situation. In accordance with the first stripe, we cut the second, with the second we align the third and further. It is very important not to confuse the direction of the wallpaper when cutting; it is especially easy to make a mistake if it is a floral pattern.
Ordinary scissors are completely unsuitable for cutting wallpaper - the edge may turn out uneven. wallpaper knife in our hands , measure a straight line using a level or a ruler with a triangle, mark it with a pencil, bend it exactly according to the markings and cut it.
The remaining scraps must be rolled up and put away, as they will be useful for small areas near windows, doors, and later for minor “patch” repairs, especially if children are growing up in the apartment.
Before gluing the first panel on the wall, mark a vertical line. To do this, you can use a plumb line with a cord rubbed with chalk, or better yet, a laser level. All subsequent canvases must be glued strictly vertically. We start gluing wallpaper from the window. Mark a vertical line on each wall.
It is especially difficult to glue a corner: we cut the wallpaper sheet in such a way that the overlap on the other wall at the widest point (our apartments usually have almost no even corners) is no more than 3-5 cm. We make several cuts with scissors so that the sheet lays on the wall without folds . The next strip is glued immediately from the corner along the newly set vertical line.
The wallpaper will lie flat on the wall, without bubbles, and will not fall off if you first coat the wall with glue at a strip distance, apply the glue to the panel evenly and, applying the wallpaper to the wall, go over the strip from top to bottom with a rubber roller or a soft, clean napkin, smoothing every centimeter and expelling air from the middle of the panel to the edges. If necessary, coat the edges with a thin brush and go over again with a roller or napkin.
Glue that appears on the front side of the wallpaper must be immediately removed with a damp sponge, otherwise it will appear unsightly on the wallpaper after drying.
Thick paper wallpaper should be rolled into twos after spreading with glue and wait about five minutes until they get wet. Thin wallpaper is glued immediately.
Wallpapering is more of a collective endeavor than an individual one. Of course, one person with experience and dexterity can wallpaper a room, but it’s much easier to do it with two people. And if you let children spread glue on the wall or canvas, difficult work will turn into family happiness!
In order for the wallpaper to dry faster and remain on the wall, hugging it tightly, it is necessary to exclude the slightest possibility of a draft. It is also better not to use an electric heater, so that drying occurs naturally.
If you were planning a paper border, you can glue it only when the wallpaper is completely dry.
Sometimes something bad happens and the new wallpaper gets torn. This place can be sealed by selecting a pattern and using a sharp knife, cutting out from the patch exactly the piece that will be inserted into the damaged area. When the wallpaper is dry, you won't find any trouble if you did everything carefully.
Let’s summarize our conversation about how to glue paper wallpaper by watching the video and noting for yourself the nuances of future repairs:
Wallpapering process: basic recommendations
Pasting walls with classic wallpaper begins with preparing the rolls: you need to lay out the pieces, spread them with glue, roll them in half and leave them to “ripen.” For thin, cheap paper wallpaper this is 1-2 minutes, thicker ones should sit for 5-7 minutes. Experienced repair experts advise painting canvases of different thicknesses and coating them in different ways: thin ones - with cold glue in one layer, those that are thicker - with warm glue in two layers.
To make wallpapering with your own hands as high-quality and fun as possible, it is better to take on this task together, with your significant other or a faithful friend. In this case, the process of laying the paper sheet will look like this: one person takes the coated wallpaper with both hands by the upper part and gives it to a partner standing on a stool/stepladder.
The canvases must be glued very carefully so that there are no gaps between them
He places a piece of the roll against the wall and easily connects the joints with his fingertips. Then he unfolds the panel and completes the trimming (the second person helps from below, slightly pulling the strip and finishing connecting the joints). Then the wallpaper needs to be smoothed, from the middle to the edges, from top to bottom, to expel trapped air and remove bubbles and excess glue.
Note! It is most convenient to level a smooth coating with a plastic spatula with rounded edges, but when gluing foamed paper wallpaper, it is better to use a roller or a special brush so as not to damage the relief.
The edges will stick firmly if you roll them on top with a special rubber roller, covering a width of at least 7 centimeters. Again, this gluing technology is ideal for thin or smooth, rather than structured wallpaper.
Excess glue that protrudes from the edges must be removed with a damp sponge. Take special care when working with light-colored paper - when smoothing such a strip, place a sheet of printer paper under the paper or roller so as not to stain the coating.
A little advice: during the process, periodically stop and look carefully at the already pasted strips: this will allow you to notice wallpaper errors in time and correct them.
[vimeoyoutubepopup_video displaytype=”image” videoplayer=”youtube” videoid=”hH9F2Uhp9m4” text=”How to glue wallpaper in corners” autoplay=”true”]
Paper-based wallpaper paste
Previously, our parents prepared the adhesive composition on their own using inexpensive environmentally friendly materials, and not surprisingly, such glue worked, fulfilling its purpose with a bang. To prepare it, we used starch (corn or potato), any flour (preferably wheat, it has a higher viscosity), water, and in some cases wood glue.
Such mixtures had significant advantages. Firstly, it was cheap, because in the era of the USSR funds were tight, and secondly, the mixture turned out to be super environmentally friendly, no chemicals, only a natural product. In addition, the adhesive properties were high, but only if the composition was freshly prepared. The disadvantages include a short period of use - only 10 - 15 hours, so for large areas it was necessary to prepare new mixtures.