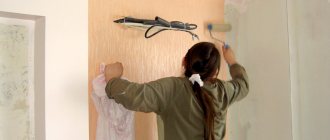
The condition of the walls of a living room has a strong influence on its visual perception. Therefore, every owner tries to give them an aesthetic appearance and create decent comfort in their home. Quite a lot of construction methods have been developed to solve this issue.
One of them, the method of sticking wallpaper on the walls of a room with your own hands when renovating an apartment, is shared with readers of the site by experienced builder Dmitry Chernov.
His advice will help you understand the secrets of this method and master them in full, including the steps:
- choosing wallpaper and glue;
- selection of working tools and materials;
- wall surface preparation;
- treating wallpaper with glue and directly gluing it onto the surface of the building structure.
Rules for choosing wallpaper
The optimal choice of wall covering should not only be based on color and pattern, but also taking into account:
- the material of its manufacture;
- roll dimensions;
- indoor operating conditions.
Coating material
We offer a wide variety of wallpaper coverings for sale:
- paper, as the most common and cheapest. They are made: one layer - simplex or two - duplex;
- vinyl or acrylic coverings with a paper or non-woven base made of semi-synthetic, paper-like or non-woven materials. They are treated with polyvinyl chloride - vinyl or synthetic fabric - acrylic;
- natural materials from:
- fabrics: silk, linen, cotton;
- wood processing products: cork, veneer;
- as well as plant materials: straw, jute, bamboo or reed.
The basis for all coatings is usually paper.
Main sizes of wallpaper rolls
Typical dimensions are shown in the table. They are convenient to use to calculate the covered area.
However, in practice, rolls of other sizes may be encountered. Pay attention to this question.
| Blade width (cm) | Roll length (m) | ||
| 53 | 10 | 15 | 25 |
| 75 | 10 | 15 | 25 |
| 106 | 10 | 15 | 25 |
Compatibility with walls and operating conditions
When choosing wallpaper, you first need to pay attention to the conditions for its further operation, which depend on a number of factors:
- indoor air humidity;
- placement locations on the inner or end surface of the wall;
- condition of the wall covering.
Wallpaper compatibility table
| Room category | Recommended varieties |
| Smooth, even walls in dry rooms | All types |
| Rooms with high humidity | Vinyl or acrylic only |
| Uneven walls | — |
| Walls with damaged or uneven surfaces | Relief designs with large cells or dense patterns |
It is strongly recommended not to use wallpaper that has vertical lines in its designs.
Calculation of the number of rolls
To calculate the required number of rolls, you need to do the following:
- Find out the width of the wallpaper you like.
- Make a mark on the tape measure and walk around the room to be repaired, excluding the wall with the window and the doorway.
- Measure the distance from the ceiling to the floor to determine the length of the entire cuts.
- Calculate the number of cuts in one roll, taking into account the height of the room and the size of the pattern fit.
- Divide the number of whole pieces required by the number of cuts that can be obtained from one roll.
- Determine the required number of rolls to purchase.
Figure 1. Calculation of the required amount of wallpaper for the room along the perimeter.
There are also separate rules and tables for calculations around the perimeter of the room, including doors and windows (Fig. 1), as well as calculations by area (Fig. 2).
It is recommended to make any purchase of finishing material immediately before carrying out work. Then, if it is damaged or in short supply, you can quickly buy more in the same store. This will guarantee a complete match of all patterns and shades.
If difficulties arise in calculating the required number of rolls, sales consultants will help you correctly determine the required number. The help of professionals will also be needed in cases where the wallpaper has a large pattern or the interior of the room provides for a combined wall design option.
If during the work it becomes clear that there is not enough material, and it is not possible to purchase more, then you will have to save on the quantity available. To do this, you can not paste over the sections of the walls behind the furniture or paste them over with other wallpaper with a similar pattern. It is necessary to take into account that rearranging the furniture in this case is no longer provided for.
When a shortage of material is discovered at the final stage of work, the design of the room has to be changed. To do this, they are thinking through options with artistic wall painting, stencil decoration, and textile decoration. The use of large-sized paintings or collages of several small ones remains relevant.
Related article: How to draw an electrical circuit on a computer - review of programs
Preparing tools and work area
Before directly applying the sticker, you need to prepare:
- the space in which the work will be performed;
- tools and materials for cutting and stickers.
The workplace and tools must comply with the rules for safe use.
An ordinary table or a flat section of floor slightly longer than the height of the wall will allow you to work with a roll. You can also use a flat sheet of fiberboard or chipboard.
Tools you will need: tape measure, metal ruler 55 cm long, paper cutter, brush or roller, glue container, plastic wallpaper spatula or rag, plumb line, pencil.
The floor surface must be washed from dirt and dust. Even small grains of debris can damage the front surface of the decorative material. The workplace covering should be periodically wiped with a damp cloth to remove any adhesive residue and kept as dry as possible.
Useful tips and tricks
Specialists in repairs and decoration of wall coverings have many useful tips that help in their work.
Many people forget to remove switches and sockets before gluing. But working with a perfectly flat wall is much easier and more convenient. All electrical installations are removed and put back in their original place after the walls have completely dried. Skirting boards are also removed before work. This way the result will be very neat, and the whole pasting process will be much faster and easier.
Glue must be selected individually for each type of wallpaper. Walls with protruding decorative elements, around the platband and near the door opening are coated with adhesive more thoroughly, so the gluing will be of higher quality and more durable. Using available tools, the edge of the cut can be pulled behind the platband, which is very important if there are interior doors in the apartment.
It is best to choose the glue that will not leave marks. The work area on the floor must always be kept clean and dry. To work, you need to prepare several clean rags at once. You need to choose them only in light shades and without patterns, so that when wet they do not leave streaks and marks.
Rules for preparing the wall surface
In most cases of apartment renovation, the walls are already covered with old wallpaper or paint. They should be cleaned.
Paint removal technique
The painted surface must be sanded to create a rough surface that will be well saturated with glue. Then it is washed with a soapy solution to degrease and rinsed with clean water.
Method for removing pasted coatings
Old wallpaper material must be removed from the wall. This can be done by treating with a liquid to remove glued paper or with regular warm water.
Apply the liquid to the wall area with a brush or sponge and leave for 10-20 minutes.
This time is usually enough for it to be absorbed into the base material and to be detached from the wall surface.
Then use a spatula to separate the paper from the wall, moving it from top to bottom. You should work carefully so as not to damage the surface of the building coating on which the sticker will be applied.
If the impregnation of the base material was done efficiently, then almost all the wallpaper should come off. You don't need to scrub too hard with a spatula to completely clean the surface. This procedure will not only damage the wall putty, but will also take a lot of time. The remaining pieces of paper that have not been removed should be re-treated with liquid, wait a while and remove.
This “wet - wait - tear off” method is well suited for paper bases. But with vinyl or acrylic coatings you will have to tinker a little. Their top layer practically does not allow water to pass through.
To remove such wallpaper, you must first remove the top layer. In principle, it can be easily removed: just grab the corner of the coating material and pull it down. And then treat the remaining part with liquid to remove the lower base.
Rules for preliminary wall preparation
In most cases, after removing the old wallpaper, places of chips and cracks on the wall are revealed. They should be cleaned and puttied. When the putty dries, it is treated with sandpaper for final leveling with the base coating.
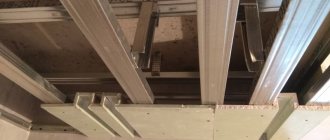
If there are sockets, switches and baseboards on the wall surface, then it is advisable to dismantle their covers, and the exposed ends of the electrical wiring must be reliably insulated to ensure electrical safety.
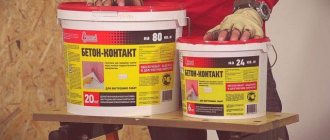
A completely cleaned wall surface must be treated with a layer of a special primer or a weak solution of the selected adhesive with the consistency indicated on the packaging. It will create a protective coating film that ensures good adhesion of the material.
Disadvantages of the solution
You can glue new wallpaper onto old ones, but this procedure has many disadvantages.
Among them:
- The fragility of the repair.
- Reduced attractiveness of new materials due to unevenness and swelling.
- Clearances.
- High probability of fungus.
To completely remove the old covering from the walls, you can use an innovative tool - the “wallpaper tiger”, which efficiently removes paper from the walls and leaves the plaster intact. Also, new materials make it possible to prime walls very quickly. Therefore, such a procedure as pasting the second layer of wallpaper will not save much time.
Gluing wallpaper onto old wallpaper (2 videos)
The nuances of wallpapering old wallpaper (20 photos)
Wallpaper technology
Selecting a starting point
Each home craftsman, when renovating an apartment with his own hands, must determine where to start gluing. The answer to this question depends on the method of joining the blanks at the edges:
- end-to-end;
- overlapping method - laying sheets on top of each other.
Nowadays the first coating method is usually used. It allows you to start gluing from almost any place and work sequentially.
The second method has often been used in the past. To do this, a control strip ran on each side of the wallpaper roll. To make the overlaps invisible, the sheets were glued away from the window so that the light emanating from it would hide the connecting seams rather than highlight them.
Experienced builders recommend starting to glue wallpaper from:
- the most complex unit, where there are vertical obstacles in the form of heating pipes and various hanging structures;
- or from the most visible (large) angle.
Roll marking
First, you should draw a strictly vertical line on the wall near the location of the selected corner, removing its distance less than 2-3 cm of the width of the wallpaper. For example, if the roll has a size of 53 cm, then you need to measure 50 or 51.
Use a tape measure to measure the required height of the wall from floor to ceiling. Then unroll the roll on the prepared workplace and transfer the tape measure to it, creating a margin of 5 cm.
From the resulting point on the workpiece, draw a line perpendicular to the side. It is convenient to draw it using a construction square or simply fold the roll in half, aligning its edges. Using this marking, the workpiece is cut using scissors or a sharp mounting knife along a ruler or fold.
The marking of the next roll blank depends on the pattern on the wallpaper. If it does not require precise joining, then you can cut several strips at once, applying the cut piece as a template.
When it is necessary to combine a pattern, the consumption of wallpaper will be increased. To mark a new workpiece you will need:
- lay out the cut template fabric face up;
- unroll the roll and match the pattern on it and the prepared workpiece;
- Mark the required length on the template and cut it from the roll from the bottom and top.
If you take into account the arrangement of the pattern on several rolls, you can reduce the length of unused sections and save material. Each piece should be numbered on the reverse side or cut off before impregnating the previous one. This eliminates the possibility of them being mistakenly pasted onto the wall in an arbitrary manner.
Rules for applying glue to wallpaper
The adhesive mass must be prepared according to factory instructions, following the technology and allowing time for the mixture to mature. Only in this case will it work effectively.
The strip prepared and cut from the roll is laid out face down on the work table, and the wrong side is treated with glue using a roller or brush. After impregnation, it is folded in half using the accordion method, placing two edges in the middle. The layers are pressed lightly, but do not put pressure on the fold. In this position, the strip is left for 5–15 minutes, necessary for the glue to be absorbed into the pores of the paper and its structure to be well impregnated.
If you use colored adhesive compositions, it will be easier to visually assess the uniformity of its distribution over the surface of the wallpaper material, which will reduce the likelihood of creating unglued areas.
All wallpaper with a paper base swells from moisture, increasing its size. To prevent this process from having a different effect on the quality of the sticker, you should observe the same time for impregnating them with glue.
The order of placing wallpaper on the wall
Let's look at the example of a modern method of butt gluing blanks. It is convenient for him to arrange them sequentially in a circle, using, for example, a clockwise direction.
Take the prepared strip with glue impregnated by the upper edge and apply it to the top of the line near the ceiling so that the side of the workpiece strictly adheres to the drawn vertical line on the wall.
The wallpaper is pressed with a dry rag or rubber spatula, creating slight pressure on the adhesive using the herringbone method. Using movements from top to bottom and from the center to the edge, rub the surface of the base, achieving a tight fit to the wall and removing the air cushion.
If swellings with air bubbles have formed on the surface of the workpiece to be glued, then they need to be pierced with a thin needle in the center and excess air or glue should be released in a circular motion from edge to center. This must be done because the resulting cavity will not allow the wallpaper to stick securely to the wall.
After gluing the first strip, proceed to the second and then, moving clockwise, glue each subsequent blank to the opposite corner of the wall.
The joints between the strips are carefully smoothed so that they are less noticeable.
When gluing wallpaper above sockets and switches, small holes are made in them with a cutter, which serve as marks for the locations of electrical switching devices.
On the next wall, the entire sticker stage is repeated from the moment of marking a vertical line near the adjacent corner for the width of the roll. The first strip is glued along it, and the rest are sequentially distributed to the opposite corner.
Features of wallpaper stickers on wall corners
Strips of blanks on the internal and external corners are glued so that one edge of the blank overlaps the adjacent wall, and the next strip is glued with a slight overlap of up to 2-3 cm.
Features of wallpaper stickers near window openings
At the side surface of the window, measure a strip of wallpaper that will need to be glued. An incision is made on it at the place where the window sill and slopes protrude. The workpiece is impregnated with glue in the usual way and pressed against the wall.
Measurements are also taken above and below the window opening, and strips are cut according to them and glued to the wall.
Features of wallpaper stickers near radiators
The wall plane behind the radiators has difficult access and limited space. Wallpaper is usually not completely glued to it. They are placed only at the edges.
To do this, just cut off an extra piece from the workpiece, place it over the edge of the battery and press it with a spatula.
Important reminder: after finishing working with glue, pour the remaining glue into a hermetically sealed container, for example, a plastic bottle with a lid. They will soon be needed for gluing defective areas.
Types of wallpaper and features of their gluing
Modern wallpaper is presented on the market in a fairly wide range, allowing consumers to choose any material and any properties that are indispensable in the conditions of a particular room.
So. They may be:
Paper , perfect for dry living spaces. They are cheap, breathable and can be glued with any wallpaper glue. But at the same time, they fade under the influence of the sun's rays and are afraid of moisture. Such wallpaper should not become limp when hung, so it is not spread too thickly and does not soak for too long;
Vinyl , which includes two layers: durable white paper or fabric on the bottom and PVC film on top (the latter increases their strength), and the last layer is covered with a pattern or embossing. They are non-toxic, invulnerable to fungi, resistant to wear and tear and can be used for many years. Not only can they go around bumps and corners perfectly, but they can also stretch out in tight spots. And with the help of their relief surface, wall defects are perfectly hidden. Also, vinyl wallpaper is not afraid of the sun's rays (they will not fade), water and dirt. At its core, this is washable wallpaper - it washes well and even rubs with a brush;
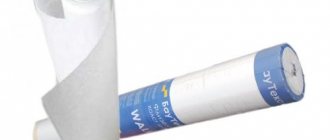
Non-woven , that is, having a non-woven base instead of a paper one. Non-woven fabric is a combined material that includes combined fibers and cellulose. It is much stronger than paper and, unlike it, sticks more easily, in addition, it will not stretch or shrink if it gets wet and then dries. The main thing here is to apply the glue directly to the wall, and then apply dry wallpaper onto the glue, which ensures exceptional precision in fitting the wallpaper strips;
Textile , consisting of a paper backing on which a natural or artificial textile fabric is fixed. As a rule, they are made from linen, silk, and viscose. And since the canvas is made from a wide variety of threads, it becomes possible to create any color scheme that satisfies the tastes of any of the most demanding customers and designers. Here it is worth remembering another subspecies of them - velor wallpaper, which is essentially a paper canvas, onto which, during production, a pattern is first applied, and then velor fibers, leading to the formation of a soft velvet surface. The need to adjust the pattern for such wallpaper is completely eliminated. The unique texture of textile wallpaper allows it to imitate a solid fabric wall - so they seamlessly connect with each other. True, such beauty turns out to be vulnerable to abrasion and various mechanical damage. And if you consider that the sources of such damage are pets and small children, if they are present in the house, it is better to do without fabric wallpaper. In addition, to stick them you will need perfectly smooth walls, otherwise after gluing and drying all the defects of their surfaces will be evident;
Fiberglass wallpaper (fiberglass wallpaper), which is made from fabric or special yarn, the material of which is thin threads drawn from glass under the influence of high temperatures. They are suitable for any premises and last up to thirty years. After gluing, be sure to paint them. They are glued in the same way as non-woven ones;
Liquid , made from natural cotton or cellulose fibers, high quality dyes and adhesive composition. In some cases, their composition can be supplemented by quite specific ingredients: mica, tree bark, dry algae. These wallpapers can be sold either as dry mixtures or ready-made. And their microporous structure gives them excellent sound and heat insulation, antistatic properties and the ability to “breathe”. They almost never burn out. A wall covered with liquid wallpaper acquires a soft and pleasant-to-touch decorative coating 1–10 mm (but usually 1–3 mm) thick, without seams, with a rough texture. Such wallpaper will perfectly fill the gaps where platbands, baseboards and frames adjoin the walls, in addition, they are indispensable for hiding cracks and other defects. They don’t even need to be repaired: it’s enough to clean the damaged area of the wall and apply a new composition there with a spatula or sprayer. They dry in about 12 – 72 hours.
Read more about existing types of wallpaper and their choice here.
How to properly dry pasted wallpaper
To ensure reliable adhesion of the wallpaper to the wall, it is necessary to withstand the drying technology of the adhesive composition. It must harden simultaneously on the building structure and inside the fibers of the impregnated paper.
To do this, it is necessary to ensure stable conditions of temperature and humidity:
- close all windows and doors in the room to prevent drafts;
- turn off heating devices to prevent temperature changes;
- limit the access of people to the premises as much as possible.
Final work on the sticker
Normal glue drying usually lasts 18-24 hours, and with high humidity it increases up to two days. It is important to maintain this period and only after its completion is it allowed to cut off excess pieces. You cannot cut wallpaper that is in a semi-moist state. Their wet structure is very fragile. It will not allow you to smoothly remove unnecessary parts.
Excess pieces are cut off with a cutter, and a straight spatula with a blade length of 20 cm or more is used as a guide.
A layer of glue is reapplied to the loose edges with a small brush and the surfaces to be glued are pressed tightly.
Sometimes in hard-to-reach places or on curved surfaces it is necessary to glue wallpaper using the overlapping method. Their appearance can be improved in the following ways:
- a metal ruler is placed in the middle of the gluing;
- cut through both layers with a cutter;
- remove the cut pieces from both sides;
- re-coat the surfaces with glue and smooth the joint with a soft rag.
Closing covers on sockets and switches
Marks are found on the wallpaper, indicating places for the covers of sockets and switches. They probe the outline of the switching device housing under the finishing material and cut out an extra piece of the workpiece along it.
After this, all that remains is to remove the previously installed insulation layer and screw the protective decorative cover to the front panel.
In conclusion, we recommend watching Andrey KMV-Stroy’s video “How to glue non-woven wallpaper.” For general development, look at the questions to him and his answers right under the video.
Now it’s convenient for you to comment on this material and share it with friends on social networks.