The master class discusses a fairly simple way of how to glue ceramic tiles in a short time not with tile adhesive, but with polyurethane foam. The advantages of this method and the features of the material are highlighted. Please note that the applied foam dries quickly enough and therefore you can begin to grout the seams almost immediately.
Recommended reading
Add a comment Cancel reply
Every day, various mobile applications appear on the Internet. Which of them are beneficial for the child? Let's consider the criteria for their evaluation, and also give examples of developmental applications.
Many consumers believe that all entrance doors are the same and that you can choose the same model for both a cottage and an apartment. But in fact, there are subtleties and nuances that should be taken into account when choosing.
How to lay ceramic tiles on plywood? Is there any point in trying to use regular tile adhesive or should I look for other installation methods? In this article we will list several relatively simple ways to solve the problem.
Is it possible to tile a plywood partition? Without a doubt.
How to properly glue ceiling tiles
A beautiful, flat ceiling immediately transforms the room. When renovating, not only expensive materials create a beautiful design. Using ceiling tiles will help eliminate several problems: wasting money, curvature of the ceiling, difficulties working at height. Gluing ceiling tiles is easy; a beginner in this matter can handle this task. Just before work you need to familiarize yourself with the gluing technology.
Surface preparation
Before gluing the tiles, it is necessary to carefully prepare the ceiling surface. In order for the result of the work to please you, and for the tiles to stay on the ceiling for a long time, you must follow a number of rules. The ceiling must be cleaned of old coatings. The whitewashed ceiling should be thoroughly washed off, the plastered layer, wallpaper and paint should be peeled off and removed. Depending on the type of coating, you can use a spatula or a punch for this.
Then it is necessary to correct the defects that remain on the cleaned ceiling. More often, cracks, bulges and depressions appear on it. To correct an uneven ceiling, you should use putty. Using this composition you can grout defects. Putty can correct defects of any complexity.
After the putty has dried (after about 12 hours), you need to start priming the ceiling. It is better to apply the primer in several layers, observing a certain time interval so that each layer dries completely. The primer will improve the adhesion of the tiles to the ceiling surface and make the coating more reliable. It will make the overlap uniform due to its penetrating ability.
An exceptional option for preparing the surface is when the whitewash is in good condition and adheres securely to the ceiling. In this case, the ceiling is not cleaned of whitewash, but immediately primed. However, it is worth considering: on such a base, the tile covering will not be able to last long; over time, it will come off and may become deformed. This solution should only be resorted to if you need urgent cosmetic repairs.
Surface preparation with a primer varies depending on the type of ceiling:
- For concrete ceilings, a special composition called concrete contact should be used.
- It is better to treat a gypsum ceiling with a deep penetration agent.
- If the room is damp, it is worth treating the surface of the base with a primer with an antiseptic effect to prevent the creation of an environment for microorganisms.
If the ceiling is loose and loose, it must be primed. After the preparatory composition has been absorbed, you can proceed to gluing the tiles.
Foam
In another way it is called stamped or PVC. It is more loose in composition. The surface of such tiles is grainy and porous.
The presence of a large number of pores on the surface makes it difficult to care for foam tiles. They become clogged with dirt and the color of the tiles fades. To avoid this problem, such material is often coated with paint. But water-based compositions are not suitable. It is advisable to use acrylic dispersion paints to paint such ceiling tiles.
READ What is the best corrugated sheet for a fence?
How to quickly glue CEILING TILES without WASHING WHITE
The thickness of each plate ranges from 6 to 8 mm, depending on the specific model. The pattern on it is extruded using large press technology. This tile has a huge drawback: it is loose, breaks quickly, deteriorates, and is translucent. It is difficult to trim it. Therefore, such models should be purchased with a reserve. The big advantage of foam tiles is their low cost.
According to the drawing
Models are divided by type of pattern. There are interesting types of tiles with:
- geometric print;
- floral ornament;
- lace motifs;
- imitation of gypsum stucco;
- laconic lines.
A neutral option is smooth tiles without a pattern. From the wide selection presented by modern manufacturers for sale, you can choose an option for finishing the ceiling to suit every taste and budget.
Injection
These varieties are made from polystyrene foam, which is baked in a certain shape, creating the desired pattern on the surface. The drawings are clearer than those of previous analogues, the texture is more interesting. This material is of average cost and quality. Manufacturers allow this material to be painted. With the help of such tiles you can make a completely seamless ceiling, which is why it is in demand.
The big advantage of this composition is that it is fireproof and environmentally friendly. This material has good sound insulation and does not deteriorate from high humidity. However, it is always produced in white, so it is often painted with different compositions after installation.
Most types of ceiling tiles are produced in squares of 50 by 50 cm. But there are also non-standard models of rectangular tiles.
By edge type
There are different types of ceiling tiles, which differ in the type of edging. There are models:
- with straight edges without seam;
- having clear boundaries between each slab;
- with curved edges that look more interesting.
A different type of edge does not affect the gluing of ceiling tiles, it only changes the appearance of the ceiling.
How to stick ceiling tiles
Ceiling tiles are square elements with a front and back side. In the process of laying beautiful slabs, it is necessary to carry out proper fixation. If this moment is neglected, then the drawing will not turn out smooth and beautiful. First you should choose a drawing, then follow it.
Surface preparation
The ceiling slab, although of good thickness, will not be able to fully hide all the upper irregularities. Therefore, the ceiling should be prepared:
- The old coating is removed.
- The cracks and cracks are plastered.
- The surface is rubbed, dust is removed and primed.
Irregularities are smoothed out.
If the ceiling has flaws, it is advisable to level it with plasterboard. A primer is also applied to the drywall.
The leveled plane must be marked. The markings will help you correctly stick the ceiling tiles and clearly lay out the pattern. To correctly apply the markings, you need to consider the following points:
- Using a measuring tape, measure the ceiling diagonally.
- According to the tape data, two ropes are measured.
- Pull two pieces of rope diagonally to create a central intersection.
- Using a pencil and level, draw diagonals and mark the center.
- The ropes are removed, a square is drawn in the center, with sides corresponding to the slab. This will be the place where the first ceiling material will be glued, from which the finishing of the upper plane will begin.
How to choose the right glue
Not all expensive adhesives have high-quality adhesion properties. It is better to select adhesive for foam ceiling tiles with high adhesive strength. Thanks to this quality, the glue will reliably fix the material.
Also, when purchasing, you need to pay attention to the speed of drying.
Working with quick-drying adhesives is more convenient and faster.
The viscosity of the mixture is also important. Liquid compounds will not allow the ceiling tiles to be fully fixed; they will move. And a displacement of even a couple of millimeters will lead to a failure of the entire drawing.
The color of the composition is also an important point. It must be white. The mixture must be safe for the body, so it should not contain solvents.
Several types of glue are produced that are used to fix ceiling tiles:
- Universal. Eltitans – good adhesive, universal, transparent. Used for plaster, concrete, wooden surfaces. A flexible seam is formed between the ceiling tiles and the ceiling. Disadvantage: the drying process is lengthy.
- Titanium. Widely used by craftsmen and in everyday life. Has a viscous consistency. Has a fast drying speed. Transparent, sold ready to use. Resistant to temperature changes and humidity.
- Silicone. Provides fast, reliable setting and is used economically. The adhesive protruding between the tiles closes the space between the tiles to prevent moisture from entering.
- Acrylic putty. It has increased viscosity and adhesion to any surface. After drying, the mixture does not ooze, even on thin ceiling tiles. Used to seal tile joints between tiles and walls.
- Liquid nails (Moment Installation) – used for gluing ceiling tiles and sealing seams. Provides a high-strength connection that will be in use for as long as the material without changing its properties. When glued to liquid nails, it will not be possible to dismantle the tiles for reuse.
- Polyvinyl acetate (PVA) glue is odorless, after complete drying the layer is transparent. Low viscosity, so consumption increases. The negative point is that it takes a long time to set and dry.
Calculation and purchase of necessary materials
Before purchasing ceiling tiles, you need to calculate how much you will need. With standard sizes (50cm*50cm), four slabs per square meter are required. To determine the area of the ceiling, you will need to measure its length, width, and multiply. Then multiply the resulting area by four (the number of slabs in one square meter). This will be the amount of material required for purchase.
Buying material costs 15% more. This amount will be used for trimming and corner elements.
How to glue panels in the bathroom using polyurethane foam
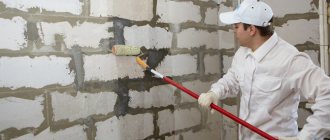
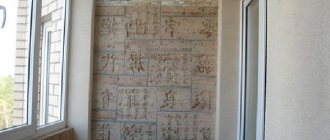
SAM_0730.JPG (108.47 KB) Let's start gluing . The wall should not be dusty, so we go through it in advance with a deep penetration primer. We wipe the back side of the PVC with a damp cloth or sponge - at the same time, dust is removed and the surface is wetted. We prepare several pieces at once, apply mounting foam to the wall in strips or, as here, with a snake, and lightly press the panels. SAM_0731.JPG (124.54 KB) This way we cover the entire wall. However, not forgetting about: electrical, plumbing and other conclusions. After about 20-30 minutes, you need to press the panels again. Just don’t get carried away, otherwise you’ll push into the hole. I use PRO foam for pistols. You can use a household one, but you will have to press it more often, otherwise it tries to swell all the time. The thickness of the dried foam is 2-3 mm, if there is a hole in the wall, you can add it.
When can you glue drywall to a wall without a profile?
Glue sheets can be glued
- small rooms where every centimeter of space is important;
- the unevenness of the wall is up to 5 cm;
- when gluing drywall to the ceiling, you need to choose a good glue and make additional fixation with self-tapping screws;
- finishing of slopes.
In a large room with large uneven walls, the frameless method is not practical.
READ Wallpaper glue in clumps what to do
How to choose the right gypsum board adhesive for gluing plaster
Wall covering with plasterboard is carried out by choosing the right adhesive composition. The mixture is selected according to environmental factors. Stroy market offers mixtures:
How to quickly glue ceiling tiles
- Gypsum glue "Perlfix".
- Plaster based on gypsum: “Start”, “Finish”.
- Gypsum-based putty “Knauf-fugen”.
- Tile adhesive "Ceresit -SM 11". This is a cement composition with fillers.
- Silicone sealant made of acrylic and polyurethane, “liquid nails”, assembly adhesive mixture. These mixtures are used for smooth surfaces or for gluing sheet to sheet.
- Polyurethane foam . Select a composition with a “min” coefficient.
Sealants are mainly used on brick, concrete walls, and foam blocks.
Method
This technology is great for relatively flat walls. If you have not yet decided how to glue drywall to a concrete wall, it is recommended to use glue in this situation. Please note that the layer of glue will not be thick, which means that the wiring simply will not fit under the drywall. First you need to groove the wall to make recesses for the wires. To do this, use the following algorithm.
- Make markings for the mowing line and electrical wiring.
- Punch the wall with a hammer drill.
- Lay out the wires. They need to be secured with clamps every half meter.
- Using a diamond bit on concrete, make sockets for the socket boxes. They are needed so as not to make additional holes in the drywall to route the wire.
- Prime the surface. If you are dealing with untreated concrete, use a regular primer. For a painted surface, use a special primer. Otherwise, you can remove the paint and treat it with a regular primer.
- Wait for the primer to dry.
- Read the instructions on the glue package and mix the adhesive solution. Please note that some brands set quickly. Study this question on the packaging before you start making the solution. Otherwise, by the time you glue the first sheet, all the glue will dry out.
- Make markings on a sheet of drywall for outlets and switches.
- Drill out these exits. Use a regular wood crown. The holes in the sheet must line up exactly with the holes in the concrete.
- Apply glue in strips to the sheet. To do this, use a notched trowel. Process the entire surface completely so that you can accurately align the sheet on the wall.
- Place drywall on pads facing the floor. They can also be cut from drywall.
- Push the sheet against the wall, but do not press it. Route the wires through the holes.
- Lift the material and press it against the wall. You need to apply maximum pressure in the most protruding places.
- Check verticality using a level.
Sources:
https://ecoteploiso.ru/raznoe/mozhno-li-kleit-na-montazhnuyu-penu-plitku-mozhno-li-prikleit-na-plitochnyj-klej-penu-ili-gkl-klej-oblicovka-gipsovymi-panelyami- betona-kirpicha-ili-penobloka-svoimi-rukami.html
Pasting schemes
There are several schemes for gluing ceiling tiles. According to the chosen scheme, it is necessary to draw diagonal stripes on the ceiling plane, along which a diagonal or rhombus will be laid out. After marking, glue is applied to the surface of the tile, it is fixed in the center. For reliable fixation, it is necessary to wait up to a minute.
Materials are fixed from the center to the corners. It is necessary to ensure a visually even structure.
Classic scheme
The classic scheme involves gluing parallel to the walls. To do this, the central square must be located parallel to the walls. From it the sticking of the same name is carried out.
Also, with this scheme it is easier to join the slabs. Pasting is done in any direction. For example, initially glue one side of the central plate. This will make it possible to adjust the density of the slabs until the glue has completely hardened.
Diagonally (obliquely)
Diagonal covering does not mean gluing the material from one corner to another. The correct direction is if the slabs are at an angle of 45 degrees in relation to the walls. This method also involves laying from the center of the ceiling plane.
There are two options for correctly applying the angle:
- Stripes are drawn from the center to the corners. Each corner is divided in half, resulting in 45 degree angles. These lines serve as guides when installing the tile material.
- Two transverse stripes are drawn from the center; they pass through the centers of the opposite walls. For more precise marking, use a painter's cord.
Checkerboard
The checkerboard laying order also involves starting in the center. The center is established by drawing diagonal lines. An important point is the parallelism of the laying of the slabs relative to the wall.
But it doesn’t always work out beautifully if the laying starts from the center. This is in cases where the room is small or narrow and long. If the room is small, there will be an overconsumption of the starting material. In the second option, gluing begins from the edges and proceeds to the center.
The checkerboard order of laying the slabs always produces an effect.
Snake laying
When laying out a snake pattern, materials of two tones are used. They must be combined with each other and the materials in the room. The marking is carried out according to the scheme with diagonal gluing. The main thing here is the alternation of colors.
Most repairs are made this way.
Caulking seams
Seams are also treated during seamless installation, since gaps may appear after the coating has completely dried. For such purposes, it is better to buy acrylic sealant. For uniform application, use a gun:
- Fix the sealant in the gun.
- The tip on the tube is cut at an angle of 45 degrees.
- The tip is directed to the beginning of the seam.
- When you press on the handle, the composition will begin to come out, which will spread exactly along the seam.
- After completion, the sealant is removed and the time for complete sealing is waited.
Transportation of glass
Foam is useful when moving and simply transporting glass objects if necessary. Fill the prepared box halfway with foam. Without waiting for it to dry, immerse the items wrapped in plastic into it. Foam the remaining space and seal the box. In this form, the glass will not break even if the packaging falls. Removing glass items from the box is very simple, you just need to cut the foam and take out the items wrapped in plastic.
Useful tips
At the beginning of the process, you should familiarize yourself with useful tips:
- It is necessary to calculate the material and its use with the maximum use of each tile. The amount of trimming depends on the calculated area.
- Excess glue is removed immediately after fixing the tiles, since subsequent removal will damage the material.
- The remaining scraps can be glued together and used for gluing in some places. Trimming is done under a ruler with a sharp knife to prevent curvature and breaking of the tile.
- If the marking is perfect, then the dimensions of the trims on opposite sides should match.
We recommend watching the video instructions:
Is it possible to insulate walls with foam?
It is widely used for insulating walls outside and inside.
Apply using a special apparatus or a pistol. The material fits well on vertical, horizontal and inclined surfaces. Features of wall insulation:
- The walls become thicker, which leads to greater resistance from environmental influences.
- The material can withstand temperatures up to +80.
- Vapor permeability.
- Resistant to various damages. It will not crumble from impact or become deformed.
- The material does not burn.
The following objects are insulated:
- window openings;
- walls from the street;
- foundation;
- balcony, attic;
- pipelines;
- attic spaces.
After application there are no seams or joints. The foam hardens in 1 to 3 days, depending on the number of layers applied.
Inside
Warming indoors is carried out as a last resort.
Only when it is not possible to carry out work, if the apartment is on the upper floors. This is indicated in SNiP 23-101-2004. When insulating walls indoors, you should take care of waterproofing, because the dew point shifts. The walls will be wet, which will lead to the appearance of fungus and destruction of the supporting structure.
Outside
Insulating the outside is the right solution. The main factor is not the violation of the dew point. The walls will be warm and dry.
Benefits of insulating from the outside:
- High energy saving data.
- Inside, the footage remains the same.
- No condensation.
- Sound insulation performance improves.
Disadvantage: foam insulation requires the use of equipment.
Even with the inflated cost of the materials, the equipment used, and the work of the craftsmen, this pays off in savings (payment for heat), silence, and comfort.
Advantages and disadvantages
The foam used for insulation has a number of features that distinguish it from other materials:
- When applied, it penetrates into all cracks, sealing them.
- High thermal insulation rate.
- After installation there are no seams or joints on the surface.
- A light weight. This does not put a load on load-bearing walls and foundations.
- After hardening, the foam does not pose a threat to human health or the environment.
- Increases noise insulation performance.
- There is no corrosion upon contact with metal elements.
Disadvantage: cost of material and equipment.
Thermal insulation
An excellent solution to using foam would be to insulate the wall. There is no need to purchase expensive and bulky building materials. Enough bars and several bottles of foam. Absolutely anyone can handle the work; the bars need to be fixed to the wall at a distance of about 30-40 cm from each other, and the gaps should be filled with foam. Level the surface, screw in sheets of drywall and you can begin finishing.
Types of foam insulation
There are 3 types of foam:
- Assembly room.
- Polyurethane, consisting of 2 substances.
- Liquid polystyrene foam - penoizol.
Other types, the packaging of which clearly indicates the scope of application.
Polyurethane foam in cylinders
This is a one-component thermal insulator.
Insulation can be carried out independently. Types of polyurethane foam:
- façade – having a large temperature range. It can withstand minus and plus temperatures;
- ordinary - for sealing cracks, sealing seams;
- with special strength;
- glue-foam.
A construction gun is used to apply the material.
Penoizol
Penoizol is similar to polyurethane foam, but it has a different composition. It has a low level of density, does not allow cold, sounds, or moisture to pass through. It is most often used to insulate houses.
To apply the material you need equipment and dry, warm weather. After completing the work, it takes 5 days for complete drying, only finishing work is carried out with topcoat.
Spray polyurethane foam
Polyurethane foam consists of 2 substances. This is the best material for thermal insulation of a building. Cylinder equipment is used for installation. The material on the surface hardens within 10-20 minutes. The structure is closed cells that have minimal thermal conductivity, noise insulation, and moisture penetration.
One layer of applied material is 6 cm thick. Sometimes after complete hardening, a 2nd layer is applied for strength.
The difference is very good adhesion to various materials.
Ceramic tile
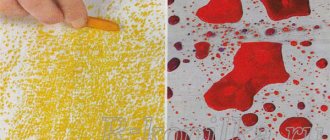
Polyurethane foam is suitable for express repair of fallen ceramic or tiles. Special glue is not always at hand, and mixing it requires more time than using foam. The tile will be securely glued to its original place in just a couple of minutes. This is especially true if you do not have the skills to lay tiles.
Is it possible to insulate with foam yourself?
Basically, they carry out internal thermal insulation work on their own. For this you need:
- Wooden slats or metal profiles as guides for sheathing.
- Foam cans and a construction gun.
- Construction knife.
First, the surface in the house is cleaned of dust, flowers, and cobwebs. After this, the profiles are fixed in increments of 50 cm vertically along the wall, with horizontal jumpers of 50 cm.
- Safety precautions: glasses, protective clothing, gloves.
- Apply a little automotive lubricant to the construction gun for better performance.
- Insert the can into the gun.
- Apply foam to the surface.
Clean the gun after use. If there is any liquid left in the container, close it tightly.
Wait for complete drying - from 1 to 3 days. Then carry out the final finishing.
Installation of wooden or metal beams
Before installing the sheathing, it is necessary to prepare the surface.
Cleans from dust and cobwebs.
If installation work is carried out outdoors, then remove old whitewash, swollen plaster, pieces of cement, and other protruding objects.
After cleaning, fix the guides (wooden slats or metal profiles) in increments of 50 cm. For strength, horizontal jumpers are made every 50 cm. Hardware is used depending on the surface material (anchor, dowel-nails).
All work on laying electrical cables and other communications is done before insulation begins. Electrical wires are laid in corrugation.
Spray foam application by compressor
First, you need to fill all the cracks, joints, and cracks with material. This will get rid of voids where a cold bridge may occur. As well as voids that arise at the junction of the sheathing and the surface.
After this, spraying is done with even sweeping movements from side to side. The surface is covered from top to bottom.
While performing the work, make sure that the sheathing remains visible. The finishing coating (plasterboard, chipboard, other materials) will subsequently be fixed onto it.
Drying
Foaming of the material takes place inside the equipment.
After application, hardening will occur within 15-20 minutes. Complete drying occurs in a day or three. Experts recommend starting finishing after 5 days.
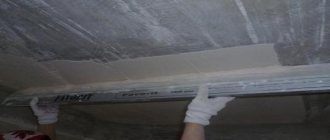
Alignment
After 5 days, you need to level the surface before finishing coat. To do this, use a construction knife to cut off excess frozen foam. They do this level with the sheathing. The surface should be smooth, without depressions or bumps. If it is difficult to work with a knife, take a hacksaw with fine teeth.
Afterwards the finishing is fixed onto the prepared surface.
Finishing
The surface of their foam is not covered with various types of plaster, putty, or wallpaper. For cladding use:
- drywall (regular, moisture resistant);
- plastic, glass wood panels;
- lining;
- Chipboard, fibreboard, OSB.
The material is fixed with hardware to the previously created sheathing. A waterproofing layer is not required.
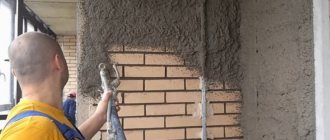
Burst masonry
Under the influence of temperature and humidity changes, masonry made of concrete blocks and bricks may burst. The only option for repairing such a wall is to cover up the resulting gap. Solutions and mixtures do not completely penetrate deep into the crack; polyurethane foam can handle this. It will completely fill all the voids and securely fix the damaged area. The excess must be cut off after drying and plaster applied on top.
Is it possible to increase sound insulation in this way?
The foam has sound insulation properties. This is affected by:
- The thickness of the applied insulation layer reflects the incoming noise.
- Elasticity absorbs vibration from sounds.
- The tightness of seams and cracks prevents noise from penetrating into the room.
But the foam in the cylinders does not have the same characteristics as the material sprayed through the equipment.
The only type of foam in cylinders that has good performance is MAXFORTE SoundFLEX.
Today, foam is widely used to insulate walls indoors and outdoors. It is used in attics and basements, attics and loggias. Insulation of pipelines and chimneys is carried out.
The material has many positive aspects and has good sound insulation properties. When using insulation, you should familiarize yourself with the application method and also think about the cladding.