Detailed instructions for dismantling plastic windows
Major renovations are a common phenomenon. Many people hire a team of repairmen who do everything themselves. But not everyone can afford such a way out of the situation. In order to save the family budget, repairs are most often carried out on our own. But what is a major renovation without replacing windows? And what should you do in this case - should you run to specialists or can a home handyman do it? Disassembling window frames is not difficult, even if the structure is not wooden, but plastic. How to dismantle a plastic window? We will try to answer this question further.
Where to start replacing windows
Needless to say, dismantling is carried out after preparing the housing - covering and, ideally, removing furniture, household appliances, and valuables. Provide an unobstructed approach to the workspace. Replacing windows is a dusty procedure, so cover everything that could not be moved to another room with plastic wrap.
Plastic windows are the best option for your home. First of all, such structures can be used for 50 years, and their affordable price makes such a purchase also a profitable solution for the family budget. And if you are not satisfied with old windows not because of wear and tear, but only because of cosmetic or functional features, do not rush to write them off as trash. Dismantled structures can be modified to suit your needs, installed in other premises (for example, in a country house), sold or gifted to friends.
Another preparatory stage is collecting tools. You will need:
- sharp knife;
- Screwdriver Set;
- chisel;
- small crowbar;
- putty knife;
- screwdriver, regular Phillips screwdriver;
- hacksaw and hammer drill;
- hammer, pliers.
Removing the glass unit
Dismantling a double-glazed window begins with removal from the structure. You need to work very carefully and carefully; haste at this stage can result in damage to the glass unit.
If the window mechanism has sashes, then after removing the glass unit you need to remove them. When the sash is installed in the classical way on standard hinges, the steps are as follows for the hinges:
- remove the metal rod from the top,
- lift the sash and remove it from the bottom.
Such fastening and correct dismantling allow the sash to be used for another destination; no window adjustment will be required. In other cases, you will have to unscrew the fastening screws and only then remove it.
Dismantling a fixed window - you also first need to remove the double-glazed window. It is attached to the inside with plastic beads, which need to be disassembled from the long edge. It is convenient to remove the glazing beads with a spatula with a rounded tip. Start working from the middle of the sash. When removing the last bead, be extremely careful when removing the glass unit. Safety net - suction cups for installation - this minimizes the risk of the glass unit slipping out of your hands.
Extraction operation
You need to remove the frame after removing the double-glazed windows. Having gotten rid of the breakable parts, you can begin to remove the frames themselves.
- Internal slopes made of plastic or plasterboard:
- remove configuration profile F,
- then unscrew the remaining structural elements in order.
- The last stage is the dismantling of the starting profile, reinforced with self-tapping screws.
- Plastered slopes:
- Knock down with a hammer drill and a chisel. At the same time, work very carefully, without damaging the plastic window surface.
Methods for repairing slopes after installing plastic windows
Repairing slopes after installing plastic windows is a necessary measure that helps to give completeness and additional protection to the surface. This process can be carried out using different materials that require different technological approaches. But the most important thing is that all work is carried out exclusively with your own hands.
Why do you need finishing slopes?
Slopes are important not only from an aesthetic point of view. They directly affect the performance properties of window structures. For example, if the external slopes of the windows are not finished, then it is not the exterior of the building that suffers first (for residents of multi-storey buildings this is not very important at all), but the functionality. The polyurethane foam used to seal the joint between the metal-plastic frame and the opening during the installation process should not be exposed to atmospheric precipitation. Foam is able to absorb moisture, which freezes in the cold season and begins to destroy the polyurethane foam from the inside. Ultraviolet radiation has a similarly negative effect on it, activating the processes of loss of initial operational properties.
As a result, after a few years, and often earlier, complaints about blowing and drafts appear. Homeowners often think that their windows need repairs. In reality, this is not the main problem. I just had to immediately think about how to seal the slopes after installing the plastic windows.
By the way, moisture eventually permeates the seam from the inside of the room. But there cannot be such a serious negative impact from the apartment. Therefore, repairs to slopes located inside cannot be carried out immediately. At a minimum, it is better to wait until other work is completed if it is being carried out on site, such as leveling and finishing walls.
Ignoring the need to finish internal slopes is rare. Especially if the installation of metal-plastic windows was preceded by dismantling work. In such a situation, it is impossible to avoid serious damage to the opening, which means that aesthetic defects are very noticeable. And without proper actions to eliminate them, it will not be possible to achieve a state of comfort and create an attractive interior.
In general, it is better not to postpone the repair of slopes both indoors and outdoors for long. You should entrust the finishing work to professionals. Thus, it not only manufactures, sells and installs windows in Kyiv, guaranteeing competitive prices, but also specializes in all popular related services.
A little about slopes
Slopes are divided into external and internal and represent a part of the wall that is directly adjacent to the window block at a certain angle. It is necessary to approach the finishing of those areas that are located indoors most carefully.
Why is it necessary to install slopes of plastic windows? There are a number of functions that they directly perform:
- Creating external attractiveness and aesthetic completeness. Indeed, it is difficult to imagine how new windows will look if the adjacent surface is poorly finished.
- An additional source of heat and sound insulation. This means that the slopes allow you to protect the room from the penetration of cold and noise pollution.
- Protection of assembly seams from external influences, as well as preventing windows from fogging up.
Finishing slopes is a procedure that is not only decorative in nature, but also a protective function.
Thus, sealing window openings is carried out not only to restore damaged areas, but also to create a whole complex of additional protection.
Plastering window slopes with your own hands: technology and process features + video
After replacing window frames, many were faced with the problem of finding a responsible craftsman to plaster the slopes. Most workers, even if they are ready to do this work, most often do it poorly, while demanding unreasonably high wages. You should know that if the windows are improperly finished, they lose their heat and sound insulation properties. Moreover, the appearance of harmful fungal organisms is guaranteed, which can negatively affect human health. You can plaster slopes with your own hands; we will tell you how to do this in the article.
General requirements
Slopes on windows should not only have a beautiful appearance, but also meet a number of requirements
Slope is a section of the wall (according to its thickness) that is adjacent to the window frame. A high-quality slope has the following characteristics:
- good moisture and vapor impermeability of the surface, which will make it possible to ensure high quality of the installation seam, subject to compliance with GOST requirements;
- increased resistance to delamination during wet cleaning or cleaning;
- resistance to mechanical and external influences (temperature changes, sunlight);
- high thermal insulation properties.
Slopes on windows can be oblique and straight, narrow and wide, external and internal.
Preparatory stage
Before starting work on the production of plaster slopes, it is worth paying due attention to the preparatory stage.
If you have a “new building”, then the slopes are made only after finishing plastering of the remaining walls. In this case, you should wait several days until the plaster on the walls dries.
The area under the slopes must be well prepared, cleaned of dirt, dust and any grease deposits. Mortar protruding from the brickwork or beads of concrete should be removed.
Protruding foam residues must be removed
To improve the adhesion of the mortar to the wall, the brickwork must be embroidered in advance to a depth of at least 10 mm. To improve thermal insulation, it is necessary to caulk or blow with foam (which is more convenient and faster) the gaps between the window frame and the wall.
If you have wooden window frames, then you need to lay a special insulating material that will protect the wood from absorbing moisture and subsequent rotting.
In the case of metal-plastic windows, it is recommended that after applying the solution and drying it, make a small notch up to 5 mm wide between the slope and the frame. Then fill it with silicone sealant. This notch will serve as compensation for thermal expansion of the frame and guarantee the absence of cracks on the surface of the window slopes.
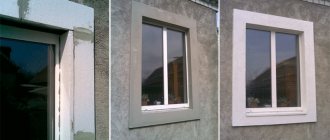
Various finishing options
Do-it-yourself finishing of plastic windows is carried out using various methods. The most popular options are:
- Applying a layer of plaster, which is subsequently painted with suitable paints.
- Installation of plastic panels. They are in perfect harmony with the material of the window blocks, and also allow you to cope with the work in a short time.
- Application of gypsum boards. This method differs from the previous one only in that it requires higher quality subsequent finishing.
Options for finishing window slopes
Of course, after installing plastic windows, slopes can be lined with other materials. For example, an excellent solution would be to use wooden panels if the window itself is made in this style.
How to beautifully make slopes on windows - Window Guru's Guide
The design of PVC windows after their installation includes finishing of the slopes. After completing this work, the corners are decorated with decorative corners or internal slopes are installed on the windows.
Why do you need window treatments?
The interior decoration of plastic windows has not only a decorative function, but also a protective one. The installation seam must be reliably protected from the influences exerted on it so that the window system as a whole functions correctly: the glass does not fog up or freeze, and condensation does not accumulate on the slopes .
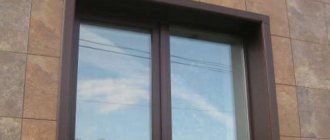
The installation seam on the outside must also be reliably protected from exposure to precipitation, wind and sunlight, under the influence of which the polystyrene foam is destroyed. You can effectively protect it by installing metal slopes and trims on plastic windows for exterior decoration, which will give the window a neat, finished look.
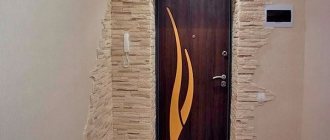
For the interior decoration of a window opening in a house, different types of material are used. This could be decorative plaster, do-it-yourself installation of PVC panels or drywall on the slopes of plastic windows. The finishing of internal slopes with decorative artificial stone looks impressive. To understand which of these methods is better, it is worth considering each of them separately.
Surface preparation
Before sealing the surface, it must be prepared for work. The process consists of several stages:
- All protruding or collapsing areas are knocked down. To do this, a hammer and chisel are used; they can do the work precisely without damaging adjacent areas.
Cleaning window slopes from unnecessary areas
On a note! Considering that the work involves the collapse of some pieces of cement or brick, it is advisable to prevent damage to the window and sill. To do this, they are covered with corrugated cardboard.
Advice! There is a film sticker on the plastic frame; it is removed only after all work has been completed.
If you plan to plaster the slopes, the area is first coated with a layer of primer. In other cases, it is advisable to use antiseptics.
Applying primer to window slopes
Plastering
Sealing slopes with plaster is the cheapest existing option. To work, you will need a dry finishing mixture (gypsum, alabaster), a small set of tools (bucket, spatulas, roller) and water-based paint.
This method has several disadvantages. Firstly, you will have to put in enough effort to get a flat surface. If you have little experience, this may require a lot of time, since you will need to carefully study the plastering technology and watch a lot of videos. Secondly, cracks may appear, which occurs for various reasons.
The technology for applying plaster is as follows:
- The dry mixture is diluted in the required amount of water. It must be taken into account that the work must be completed quickly enough so that the solution does not lose its properties.
- The composition is collected with a spatula and transferred to the surface. If the area has significant potholes, then they should be covered first. The fact is that a thick layer of plaster will not adhere well and will also cause cracking of the material.
- To achieve perfect evenness, use beacons or even wooden blocks.
- Check the sealed area for level.
Work on painting slopes, as well as the pros and cons of all finishing methods
Even small cracks at the joints must be sealed with sealant. Further, if necessary, such joints with polyurethane foam can be painted over. The sealant can be leveled with a rubber spatula. For convenience, masking tape is also used (allows you to apply the sealant evenly and beautifully). Painting can be done with solvent-based enamel. Sometimes builders also use acrylic paint. Before painting, to prevent cracking, the surface of the slope is primed. You will have to apply the paint in two layers - otherwise the base will show through the existing layer of paint. Yes, and keep in mind that such a large number of manipulations will take you at least a week.
Application of plasterboard sheets
How to seal slopes using gypsum boards? There are several methods, but the most acceptable is the one that involves installation on putty. The process is:
- The work area is well prepared. No voids should be allowed. The polyurethane foam is cut off in advance.
- Measure the surface. It is necessary to obtain the dimensions for height and width. Considering that the slopes consist of three parts, each is measured individually. Although it would be much better to install the top part, and then, taking into account the new dimensions, measure the side sections.
- The measurements are transferred to the drywall. The necessary fragments are cut out.
- Putty is applied to their reverse side. They do this pointwise, capturing the edges and center of the element.
- The fragment is pressed to the surface and a support is placed. In a day, adhesion should occur.
- Perforated corners are applied and a layer of putty is applied. If required, other decorative material (tiles, stone, wallpaper) is laid.
Slopes made of plasterboard are excellent when the walls are lined with gypsum plasterboard. In this case, they can be included in part of the frame being built.
DIY instructions for repairing window slopes
Once the plaster has been applied, it needs to be given some time to completely harden. Now you can proceed to the installation of drywall. It sits on mounting adhesive. When carrying out work, be sure to take into account that the glue is not applied to the drywall, but directly to the slope. This is due to the structure of the drywall. This material is quite porous. Glue is applied to the slopes with blobs. Only in those places where there is direct contact with air can it be applied in a continuous layer. This will allow you to escape from the flow of cold air that enters the apartment in winter.
You should start gluing the parts from the top of the slope. It will be more clear this way. You can use a level to level the drywall. It allows you to achieve a truly even arrangement of all elements. A plumb bob may also be needed. It performs leveling in a vertical position. This is exactly how the entire surface is covered with drywall. After this, you can begin further work.
Plastic panels and working with them
The use of plastic panels is the fastest option, allowing you to improve the opening after installing window blocks within one day. Do-it-yourself slopes for plastic windows are installed in this order (without auxiliary profiles):
- The slopes are measured.
- The panels are cut to the required size.
- “Liquid nails” or putty are applied to the reverse side.
- The fragment is pressed to the surface.
- A sealant is applied between the frame and the panel.
- Plastic corners are glued to the outside.
Installation of plastic panels on window slopes
Indeed, this option allows you to close areas in a short time.
Of course, everyone chooses the method of repairing the slopes of plastic windows, which is used after installing the frames. The main thing is to strictly follow the technology.
Source
Description
Any materials for repairs from OBI - https://goo.gl/N9I3qe How to disassemble the slopes of plastic windows! Continuing the topic of dismantling work, we got to the slopes. And despite the fact that in the 21st century it has become very fashionable to make cheap plastic slopes, Max and I will break them safely in video No. 105, and the title of the episode is “How to disassemble the slopes of plastic windows”! Science is simple! First of all, you need to cut the silicone around the perimeter of the slope with a knife and then remove the plastic corner of the frame! After that, all that remains is to carefully dismantle the plastic itself. Nuances. Of course, there is, but removing (disassembling) the slopes of plastic windows is not so difficult! But making them from drywall is much more difficult! Wait!
You can see how to dismantle the slopes of plastic windows in VK - https://vk.com/guysstone And Instagram will be replenished with a collection of photos about dismantling slopes from plastic panels - https://www.instagram.com/guysstone/ Video No. 105 will be a hit in the “Dismantling works” playlist – https://www.youtube.com/channel/UC5wB9-FFt2hmPmRq5ge8U5g
How to disassemble the slopes of plastic windows! Continuing the theme of demolition work you and I have reached and slopes. And despite the fact that in the 21st century, it became fashionable to do a very cheap plastic slopes, Max and I will be in the video No. 105 they safely to break and release the title – “How to disassemble the slopes of plastic windows” ! Science is ingenious! First of all it is necessary to cut with a knife silicone around the perimeter of the slope and should be removed the plastic frame corner! Then only will carefully dismantle the plastic itself. Of course, there is, but remove (disassemble) the slopes of plastic windows is not so difficult! But to make them out of the drywall where it is more difficult! Wait!
The best option is plastic
PVC is a universal material that is used today in almost all areas. Chemical resistance allows it to be used even when directly exposed to UV rays.
What do we need
First, prepare the following set of tools and materials:
- Plastic panel at least 8mm thick. They are usually sold in 6m strips.
Tip: Larger stores can cut them to your size.
- F- and U-shaped stripes.
- Thermal insulation material (we recommend basalt wool).
- Hammer.
- Wooden slats up to 1.5 cm thick.
- Level (ideally laser).
- Scissors for cutting metal.
- Construction stapler.
- Sealant (silicone and preferably white).
- There are two types of self-tapping screws: 95 mm and 4.5 mm.
Sequence of work
If you are repairing the slopes of plastic windows with your own hands for the first time, then the panels are an ideal option. Their installation is simple and fast. It is carried out in the following sequence:
- We clean the original surface from dirt and remnants of previous materials.
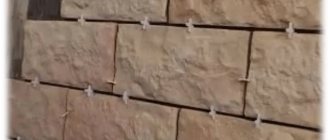
- Then we install the slats around the perimeter. We fasten them with self-tapping screws (95 mm), and drill holes using a hammer drill. It is important that the slats do not go beyond the level of the wall.
- Along the outer edge of the window (which is closer to the street) we fill a U-shaped strip. We fix it with 4.5 mm self-tapping screws.
- Then we install F-shaped stripes around the entire perimeter. The upper part of the F panel (located above the opening) is installed with an overlap. Therefore, its grooves are cut off with a knife.
- The panels are joined at an angle of 45%. A miter box will help with this.
- Having pressed and fixed all three F panels with your hands, we shoot them with a stapler. The bracket needs to be driven into the rail. This technique is convenient because it eliminates the need to glue wallpaper (or other material) - all defects are hidden by a plastic element.
- Now the most important stage - we cut the panels strictly according to the size of the slope (length and width).
- Next, we place thermal insulation material on the slope. It can be secured with liquid nails so that it does not interfere in the future.
- The last step is to insert the PVC panel into the grooves. If the joint is not perfectly smooth, seal it with white sealant.
How to properly plaster with your own hands: step-by-step instructions
Surface preparation
Surface preparation is an important step. If you treat it carelessly, you may soon end up with fallen or cracked plaster. Therefore, remember the following:
- Dirt, dust, oil stains must be removed. A clean surface will significantly increase the adhesion of the work site to the mixture:
- Concrete or brick walls can be cleaned with a solution of hydrochloric acid (3%), and then rinsed with cold water.
Oily clay works well for oil stains: lubricate the contaminated areas with it, let it dry, and then remove.
- Remove old layers of plaster. Tap the internal and external slopes with a hammer and fan them with a broom so that as much of the plaster as possible falls off. Clean the cracks, moisten the cleaned areas with water, and apply a new solution. As soon as the surface is dry, spread a layer of plaster over it.
You can repeat the procedure if necessary.
Composition of the solution
You have two options - buy a ready-made mixture in the store or make it yourself. If you have little experience or are not confident that you will correctly calculate all the proportions, it is better to choose ready-made plaster.
Homemade plaster requires the presence of some kind of binding element - for example:
- cement;
- clay;
- gypsum filler.
The composition can be simple or complex, but another thing is important: you should not change the number of components or their volumes. Do not skimp on the ingredients, otherwise the mixture will turn out to be fragile, and the slopes will quickly become unusable
If you add too much, the plaster will quickly crack after drying. A good quality mixture should cling slightly to the spatula.
Advice It is advisable to add slaked lime to the mixture. It is suitable for stone and wooden walls. The store sells quicklime, so you will have to carry out the slaking procedure yourself.
Depending on the type of lime:
- Pour quick-quenching lime into a container of suitable size, fill with water, covering completely. Vapors will be released within a few minutes. When the activity subsides, add a little more liquid. Mix everything thoroughly.
- Pour ¼ of the medium slaking lime into the container and fill it with water. Vapor release will begin in half an hour. At the end of the process, dilute it with water and stir.
- You don’t even need to pour slow slaking lime, just wet it. The extinguishing process will take more than an hour.
Some people use gypsum mortar, but keep in mind: the mixture with it dries instantly (in 5–10 minutes), so you have to act quickly, which is not always convenient. Gypsum does not like a humid environment; you can only work with it in a very dry room. The gypsum solution dries completely in 3 days.
There are no such problems with cement. It adheres quickly and well to the surface and dries in 24 hours. Cement is an order of magnitude cheaper than gypsum.
Each mixture has its own expiration date. Cement can only be used for 20-30 minutes, so there is no point in making a lot of it.
The process itself
Do-it-yourself plastering of internal and external slopes is carried out in the following order:
- First, the internal slopes (lower, side, upper), then external. Take a little liquid solution onto a spatula (make some of the putty thinner - this will increase adhesion to the surface, but the solution should not spread in all directions), distribute it over the openings. Let the layer dry.
- Install the corner profile using a building level and, continuing to monitor the leveling of the surface, continue applying the solution. When it's dry, adjust the corners.
- Grout with a float and apply a primer.
- The final stage is finishing according to your taste: with decorative tiles, plaster or a decorative corner (read about how to make decorative slopes from plaster, corner and stone here).
Advice When plastering the slopes of plastic windows with your own hands, you should adhere to the same principles. With one exception: on a plastered slope you need to make a long, narrow depression (no more than 5 mm), and put a layer of construction silicone in it (silicone can be replaced with sealant or liquid plastic).
Cracks often appear at the junction of the window and the slope (because plastic windows expand under the influence of high temperatures), and silicone will help avoid this trouble.
Read our publications:
- How to install plastic slopes on windows?
- How to make slopes from sandwich panels with your own hands?
- How to install PVC slopes with your own hands?
- All about plasterboard slopes.
The cheapest - plaster
The slopes of plastic windows can be sealed using plaster. This is the most economical way. However, that's where its advantages end. The disadvantages include a short service life (the plaster will begin to crumble over time), high thermal conductivity and labor-intensive installation.
You can purchase a ready-made mixture (for example, “Emaco”) or make it yourself, using cement and gypsum in a ratio of 1x3. We carry out the work in the following sequence:
- We clean the original surface from old materials, dirt, stains, etc. If concrete protrusions are observed, they need to be cut down.
- Then we widen the seams of the corners and slopes by 1 cm. This measure is necessary in order to achieve maximum adhesion.
- We plaster the walls.
- Align the angles of the slopes. To achieve maximum accuracy, use the rule.
- The plaster must be applied in layers, and a new one can be applied only when the previous one is completely dry.
- We seal the resulting seams with polyurethane foam. Instead, you can use tow or felt, after moistening it in a gypsum solution. We proceed to the next stage only after the foam (felt) has dried.
- We throw the solution into the groove of the slope. Before leveling it, you need to let it partially dry. Depending on the consistency of the mixture, you will need to wait 15-20 minutes.
- Next, apply a little more solution to finally even out the sinuses. No more than 1 cm of layer is applied in one go. If it gets too thick, it may fall apart.
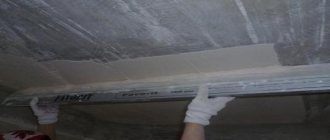
- To seal the top part, you should install a wooden batten strictly level. It can be secured with nails or large self-tapping screws. It is also advisable to install slats on the side. We check the evenness by plumb line.
- To level the solution you will need a small tool with a rounded handle. Its length should be approximately the same as the width of the slope. It is advisable to make an incision at one end. It will allow you to move the tool along the box.
- You can level the edges of the corners only when the solution has set.
- After setting, apply another thin layer - it is needed for grouting.
- To maintain the integrity of the layers, flat fissures are used. When all layers of the solution have completely dried, the slats are dismantled. This must be done carefully so that the plaster does not start to crumble.
- The remaining sides of the window are processed in the same way. Ideally, you should ensure that the plaster layers on all sides are the same thickness. Optimal - 22 mm.
- After waiting at least a day, cover the plastered surface with a primer. It acts as an antiseptic and also increases adhesion.
- Then we cover the slope with several layers of paint. The color doesn't have to be white - you can experiment. As for the type of paint, there are no special recommendations. Most often in such cases, oil is used.
External slopes for plastic windows cannot be made using this technology, because in this case they will quickly become unusable. For cladding the façade, it is better to use metal or metal-plastic products.
Installation of slopes of plastic windows
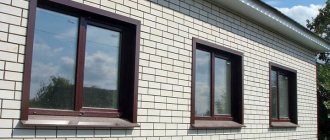
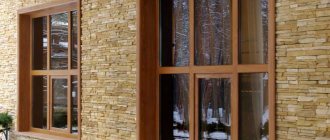
Slopes made of plastic have a rather attractive appearance.
In terms of aesthetics, they are even similar to the plastic windows themselves, so when choosing them, pay attention to their uniformity with the windows. Also, plastic slopes can be insulated, which gives good thermal insulation performance
They are not afraid of moisture, do not lose their color when exposed to direct sunlight, and the possibility of fading is excluded. It should be immediately noted that the installation of slopes of plastic windows made of plastic, as such, is more associated with accuracy of execution than with labor intensity, since subsequently no layer of plaster or other putty is applied to the slopes, with the exception of plastic ones, but more on that later.
Compared to slopes made of plaster, finishing window slopes with plastic is done much faster, literally within a few hours, depending on our skills and theoretical knowledge.
Installation of slopes of plastic windows on video: