What requirements must slopes meet?
All requirements and standards for the arrangement of window openings are specified in SNiP and GOST. Each type of building material has its own standards.
- Plaster. The surface of the external and internal slopes must be equally flat and have an equal slope along the entire length. Depending on the characteristics of the solution, unevenness of no more than 1-5 mm is allowed. There should also be a bevel from the frame and frame outside to drain rainwater. Modern builders, when installing plastic double-glazed windows, do not use plaster, but use additional elements included in the kit or ordered separately;
- Drywall. Finishing an opening with even sheets is much easier than with mortar, but the material must be: moisture-resistant, tightly adjacent to the frame and surface, and it is also important that it be carefully primed and painted;
- Plastic and sandwich panels must be free from flaws, equipped with a layer of insulation and also not leave “cold bridges”.
Any type of arrangement of external or internal sides must first of all fulfill its main functions: create an aesthetic appearance, prevent heat loss and moisture penetration, and have a service life no less than the window frame itself. In addition, windows and slopes should fit as tightly as possible to each other, preventing moisture and sunlight from entering. Only in this way can the destruction of sealants, heat-insulating gaskets and box foam be avoided.
The need for interior decoration
The interior decoration of plastic windows has not only a decorative function, but also a protective one. The installation seam should be carefully protected from external influences so that the window system functions as correctly as possible: the windows do not freeze or fog up, and there is no accumulation of fumes on the slopes.
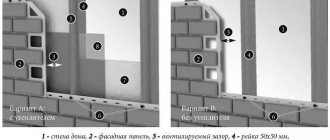
The mounting layer must also be protected as best as possible from condensation accumulation, exposure to sunlight and exposure to wind, as this causes the polystyrene foam to begin to deform. You can properly protect such material by installing special metal slopes, as well as platbands on plastic windows for exterior finishing, which will give the window a more attractive appearance.
A variety of materials can be used for interior window decoration in a residential area. This could be decorative plaster, installing plastic windows on slopes, or creating PVC panels or plasterboard yourself. The decoration of the internal window slopes using decorative artificial stone looks beautiful. To determine exactly which of these methods is better, you need to look at each of them in more detail.
External factors that affect the deformation of windows and slopes:
- wind, sun rays, high humidity;
- the presence of fungus, mold and harmful parasites;
- sudden constant changes in air temperature.
Working materials and tools
Before purchasing materials, you should carry out the appropriate calculations and, for convenience, draw a small cladding diagram. First, the total area of the sheathed surface is determined by multiplying the length by the width, and then the number of auxiliary structures, additional elements and fasteners is calculated.
List of required tools:
- building level;
- marker;
- brush or roller for primer;
- spatula for applying leveling solution;
- roulette;
- square;
- screwdriver for screwing in screws or self-tapping screws.
Other tools may also be needed, depending on the type of decorative material used.
Do-it-yourself plastic slopes for windows
If the apartment has a plastic window, the slopes can also be made of plastic. Installation work in this case does not require serious skills and can be easily done with your own hands.
Installation of plastic slopes is carried out in the following sequence:
1. The starting profile is cut to size depending on the dimensions of the window and attached to the very edge of the window block and across the window sill. The last segment should not extend beyond the wall. Special screws are used for fastening;
2. Plastic panels are cut to size. Their dimensions must correspond to the distance between the installed and secured starting profile;
3. The prepared elements are carefully installed inside the starting profile. For ease of positioning, you can help yourself with a wide and thin spatula;
4. Plastic elements are connected to each other and secured along their entire length to prevent them from being squeezed out after filling the gap between it and the wall with foam. To do this, first, using self-tapping screws, the vertical and horizontal strips are connected to each other, and the mounting foam is introduced into the free space in small quantities and in increments of 20 - 25 cm. In this case, when the space is finally filled, the plastic elements will not change their position.
In some cases, the starting guide profile can be mounted around the entire perimeter of the installed plastic elements.
In this case, the design turns out to be more beautiful, but not everyone can design the slopes in this way.
Characteristics of plastic panels
Now plastic panels are produced in various versions, differing in size and appearance. The length of finished products can start from 2.7 m and reach up to 6 m. Previously, the maximum width was considered to be 37 cm, but now half-meter panels can be found.
Inside plastic panels without insulation there are stiffening ribs that are located along the entire plane. These ribs form air channels that provide sound insulation and keep out the cold from the street.
Most panels use plastic, for which temperature differences of no more than ± 20 degrees are acceptable. If this indicator is not satisfactory, then you can buy special panels for which a difference of ±50 degrees is acceptable. Drawings and various textures can be located on the upper side. The top coating is a special varnish, which protects against external factors.
That's all the theory you need to know. Now you can study the main question - how to trim window slopes with plastic with your own hands.
Plastic panels
You can finish the internal slopes on the windows using ceiling panels made of plastic or multi-layer structures, which are also called “sandwich”. The installation of these products can be easily done with your own hands.
In such situations, sandwich panels are more preferable than ceiling panels, since they have an inner layer of insulation. However, ceiling structures also have thermal insulation properties due to the air chambers located between the stiffeners inside. Similar designs can be used for cladding window openings due to the characteristics of the material:
- the panels give the slopes a neat and aesthetic appearance;
- installation can be carried out on arched structures;
- ease of installation - window openings can be lined yourself, and the procedure does not take much time;
- It is very easy to care for internal plastic structures; it is enough to periodically wipe them with a soft cloth soaked in a soap solution;
- this finishing option minimizes the risk of fogging and freezing of window structures;
- PVC products are durable;
- thanks to the wide color palette there are many finishing options;
- if necessary, you can easily carry out repair work;
- This finishing increases the energy efficiency of the entire window structure.
Installation of plastic internal slopes must be carried out in stages . Algorithm of actions:
- The first step is to carefully remove excess foam from the windows. This can be done using a knife (stationery, kitchen or construction knife does not matter).
- Then fasten a wooden block along the entire perimeter of the window frame with self-tapping screws and fix the starting profile.
- Install slats along the outer perimeter of the window structure.
- Next, insert the plastic panels one by one. Experts recommend starting with the side elements, and then proceeding to install the top part. The part on top needs to be bent a little, slightly foamed and secured in the desired position. Similar manipulations are carried out with the side elements.
After the structure hardens, the corners are decorated with platbands or special corners. Sandwich panels are installed in a similar way.
Plaster slopes on windows for beginners
Plaster slopes are a universal option. Such slopes will look appropriate on both plastic and wooden windows.
The work is performed in the following sequence:
1. Masking tape is glued to the window frame to prevent it from being damaged during installation work. Markings are applied in accordance with which the slopes will be formed. To ensure the correct geometric shape, a square should be used to mark. The slope should begin at the edge of the window block;
2. The rule or metal corner is installed perpendicular to the mark made on the window sill and pressed tightly against the wall. Fixed with self-tapping screws;
3. The space between the frame and the wall is sealed with a prepared solution to prevent drafts and achieve an optimal level of tightness of the window unit;
4. Beacons are installed. A solution is used to fix the beacons. The correct spatial position is checked using a square along several lines. It should barely touch the beacon. Using a level, the position of the beacons in the vertical plane is controlled. We leave the beacons for a day;
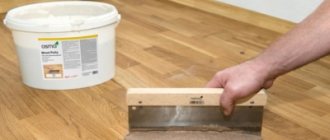
5. We remove the mixture from the frame and rule, carefully scraping it off with a spatula. Mix the gypsum mixture. We plaster the slopes, leveling the composition in the plane along the beacons. Letting the mixture dry for about 10 minutes, stretch the surface several times. After the mixture has completely dried, unscrew the rule.
Attention! After the solution has completely dried, the slopes are painted in the desired color.
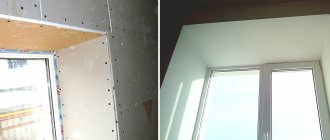
Photo report 1: installation of slopes from sandwich panels without starting profiles
This method is suitable when the window is installed so that the distance from the window frame to the opening wall is too small. In this case, installation with a starting profile (see below) is either very difficult or - usually from the hinge side - completely impossible.
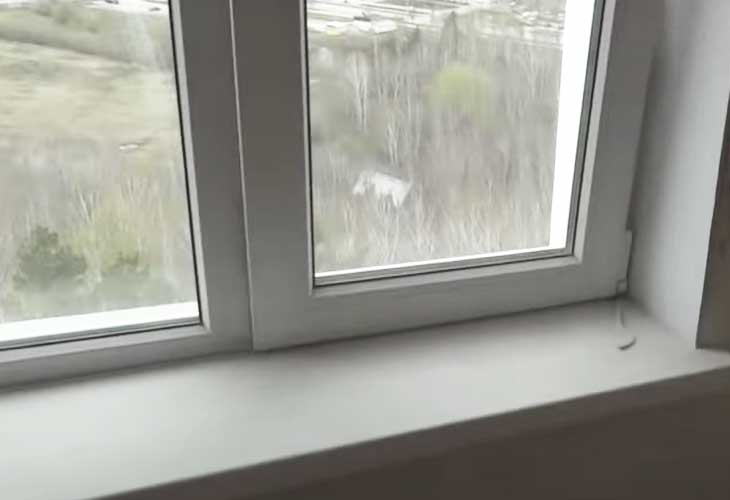
After installing the plastic window, the following picture was observed.
Picture after installing PVC windows
The installation of slopes for plastic windows begins with preparing the opening: we cut off the remaining foam with a stationery knife. It is easy to cut, just don’t overdo it, cut it flush and don’t cut it out - the foam both holds and insulates the frame. Pieces of plaster that interfere and protrude are also removed. If they hold up well and do not protrude beyond the plane of the future slope, you can leave them - the foam will slide less.
Then, around the perimeter of the window we nail (we place it on dowels if the wall is concrete) a thin strip - 10 * 40 mm - with the wide side facing the slope.
Nailed around the perimeter of the rail
Usually they don’t level it, they nail it as is, but if you want, you can make it level by placing pieces of plywood, thin boards, etc. in the right places.
Groove for plastic sandwich panel
Next, we cut the foam around the perimeter of the frame so that the sandwich panel fits there. It should go in about 1 cm. We cut off the foam carefully so that there are no residues on the frame, but without damaging the plastic.
Now you need to cut the plastic panels correctly. You can do it in a standard way: using measurements, you can make a stencil. It seems easier with a stencil. Take a sheet of paper larger than your window (I had old wallpaper). Apply to the slope, crimp, bending the excess. Cut along the curved lines, try on, adjust as necessary.
It is more convenient to start from the upper part of the opening. Having made a paper stencil, we outline it on the plastic. Considering that about 1 cm will go into the foam groove, add this centimeter along the edge that will be inserted there. We cut it out with a small margin - it’s easier to cut it off than to cover it up later.
We cut it with a hacksaw and a metal blade, try it on, adjust it so that the plastic stands up straight, without bending. We level it so that the panel is flush with the plaster. The edge turns out to be almost even; where necessary, we trim it with a file.
Inserted plastic slope top
Having removed the tried-on and adjusted strip, along the outer edge that will be nailed to the plank, we drill holes according to the thickness of the nails, retreating about 0.5 cm from the edge. This will make it easier to attach and will not damage the plastic.
We put it in place again, take a balloon with mounting foam and short “sprays” to fill the gap with foam. We try to get as deep as possible, but don’t pour too much: when it swells, it can distort the plastic.
Fill it out like this
There are several points to consider when working with polyurethane foam. If the plastic is smooth, the foam does not have a very good grip on it. To improve it, either treat the surface that faces the wall with sandpaper, and/or prime it with something to improve adhesion. The second nuance: for normal polymerization of the foam, moisture is needed. Therefore, before installing the plastic, the slope is sprayed with water from a spray bottle. Naturally, there should be no dust on the wall - it should be swept away with a brush or removed with a vacuum cleaner. If the plaster or mortar is loose, the opening is pre-treated with a penetrating primer, which will bind the concrete particles together.
Then we lift the panel, pressing down the foam, insert the nails into the holes and fasten the outer edge to the bar. The inner one rests against the window frame.
Fixed top plastic panel on the window slope
Using the same technology - cut out a paper template, try it on, transfer it to plastic - cut out a plastic side. Here you need to be especially precise so that the gap between the slope panel and the window sill (upper slope) is minimal. To do this, the edge will have to be sanded. To make the edge smooth it is easier, it is more convenient to process it with sandpaper attached to a smooth block, a file or a sharpening stone (half a circle, as in the photo).
Processing the edge of a plastic panel
We adjust it until it matches perfectly (as best as possible) at the top and bottom, and install it in place, driving one edge into the groove near the window. When the result is satisfactory, we level the outer vertical edge to the same level as the wall plaster. You can do this with a stationery knife on the spot, or you can draw a line on the panel (with a pencil, a thin marker, scratch it with something sharp) and then modify it with whatever is convenient.
Having removed it, we also drill holes for nails along the outer edge. We install the panel in place, take foam, and fill the gap from bottom to top. Too much foam is not good here either, as it can bend the plastic. Therefore, we fill it in short portions, trying to fill it as deeply as possible.
On the vertical parts of the slopes, you can do it differently: apply foam to the panel ready for installation along the far edge, which goes under the frame, before installation. The strip is made continuous or applied as a small snake. Only you need to do this not from the very edge, but stepping back a little. Then the plastic part is inserted into the cut-out groove, positioned as needed, and the rest of the gap is filled with foam (do not forget to wet the wall before installation). Once filled, press, level, and secure with nails into the bar.
The upper and lower joints are fixed with masking tape until the foam polymerizes.
To prevent the foam from moving the edges of the slope during the polymerization process, tape the joint at the top and bottom with masking tape. No matter how hard you try to adjust the plastic evenly, gaps, albeit small ones, remain. They can be covered with acrylic. It is sold in foam-type tubes and placed in the same mounting gun.
Squeeze the strip into the gap, rub it, level it, remove the excess with a damp soft cloth or sponge. This operation needs to be done in small areas and wiped carefully - completely clean. As long as the acrylic has not hardened, it cleans up well. Then - with great difficulty. It is more convenient to start sealing cracks from the top - immediately - the horizontal panel of the slope, then the joints, then move down first along one side, then along the other. The last to be sealed are the joints with the window sill.
After drying - 12-24 hours, depending on the sealant (written on the tube), acrylic can be pulled into the seam - this is if the cracks are large. Go through all these places a second time using the same method. After the second layer has dried, if there are any roughness or unevenness, they can be smoothed out with fine-grain sandpaper, folded in half. In general, it is better to carefully level it while it is still wet, otherwise you may scratch the plastic.
Installed plastic slopes
That's it, the plastic slopes are installed. After the final polymerization of the foam, the bevels must be puttied, leveling with the surface of the walls. After this, you can remove the protective blue film. As a result, the window will look something like this.
Window with plastic slopes (sandwich panels)
When installing these plastic slopes, sandwich panels were used. These are two layers of plastic, between which there is a layer of foamed propylene foam. Using the same technology, you can make a window frame from inexpensive plastic window sills or white PVC wall panels. The most unreliable material is panels: even wall panels are pressed through quite easily, and if the front layer of plastic is thin (cheap), then the jumpers are visible in the light. This is not the case with sandwich panels and plastic window sills. And it takes a lot of effort to push through, and there are no jumpers even for clearance.
Installation of plastic windows is described here.
Drywall slopes - step-by-step instructions
Quite often in private houses and apartments, slopes are made of plasterboard.
Installation work is carried out in the following sequence:
1. Dimensions are taken to determine the dimensions of the upper element of the mounted system. The sheet of drywall is cut to size along the front side. Only the cardboard itself is cut through;
2. Prepare an adhesive composition designed specifically for gluing drywall. The composition is applied to the cut drywall element. The latter is installed in place. Its correct spatial position is controlled using a level;
3. The side elements are measured and cut to size. Mounted in the same way as the top one. Measurements are taken and the metal mounting angle is cut to size;
4. Putty is mixed. With its help, the mounting angle is mounted along the entire perimeter of the installed slope. Its spatial position is verified. A putty designed specifically for drywall is being prepared. The composition is prepared in accordance with the instructions;
5. Slopes are plastered. The composition is carefully leveled using a spatula. After the composition has completely dried, the sagging is cut off with a spatula, the surface is cleared of dust, and a second layer is applied. After the composition has dried, the sagging is cut off and the surface is carefully leveled using sandpaper.
Do-it-yourself wooden slopes for plastic windows
If plastic windows are installed in a wooden house, the slopes can also be made of wood. For this purpose, a board 18–20 mm thick is used, which is cut to size and varnished on all sides.
Installation is carried out in the following sequence:
1. Polyurethane foam is applied around the perimeter of the upper part of the window opening;
2. The wooden element is installed in place and leveled. Self-tapping screws are used to secure it. The side panels are installed in the same way;
3. Sealant is applied along the perimeter of the window block in places of contact with the slopes;
4. A wooden corner is installed along the perimeter of the installed slopes.
Massive slopes
Massive slopes are edged boards, polished on all sides, made of dense wood. They are distinguished by durability, structural strength, and ease of installation. However, they can only be mounted on concrete, brick surfaces or timber walls. Before installation, it is imperative to impregnate the material with an antiseptic, fire retardant, and then apply a decorative layer.
Stacked slopes
To cover slopes, you can use stacked wooden planks (siding panels). Finishing is carried out in a direction perpendicular or parallel to the plane of the window. Unlike solid boards, they are characterized by lower cost, as well as strength and durability. But, despite this, they are in no way inferior in decorative properties, and due to their lightness they can be installed on materials even with minimal load-bearing capabilities.
To protect against external negative factors, stacked structures should be protected by applying appropriate coatings.
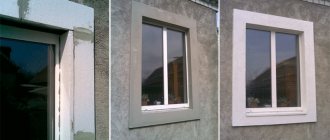
Finishing of external slopes
Slopes on the outside of the house perform several important functions:
- aesthetic;
- insulating;
- protective.
Properly selected materials can give the double-glazed windows and the adjacent wall an attractive appearance and become the final chord of the architectural composition.
High-quality finishing increases the degree of sound and thermal insulation and seals the structure. In addition, the slopes protect the frame from corrosion and prevent condensation and freezing of the glass unit.
Ceramic tile finishing
Finishing slopes with ceramic tiles is in demand for rooms with high humidity or unheated. For installation, it is necessary to level the surface to an almost ideal plane. Deviations of no more than 1 mm per linear meter are allowed. The screed is made with a cement-sand mortar, on top of which tiles, chipboard, and moisture-resistant plasterboard are laid.
Laying is carried out by building up vertical slopes, and then the upper horizontal one. The thickness of the seams is controlled by special plastic beacons. Seams should be treated with moisture-proof impregnations.
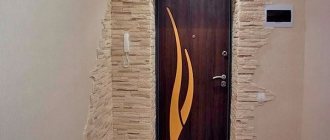
Artificial or natural stone
When decorating windows with stone, the main thing is to correctly match the width of the opening and the size of the decorative items. Decorative elements should not make the window massive; their thickness should be a maximum of 2 cm. Artificial and natural stone is laid on a special glue, on a previously leveled surface.
Slopes made of stone and tiles are the most expensive option. They enhance the status of the room, making the window expressive and presentable. The high-strength material is not deformable, has a long service life, and is easy to clean. It is laid out only in a horizontal position. If necessary, you can trim with a hacksaw or a circular saw, depending on the composition and type.
After installation, the joints are grouted. A special epoxy and silicone mixture is applied to the joints and smoothed with a rubber spatula. Artificial bricks can be laid end to end without rubbing.
Exterior materials
Many modern materials are used to decorate windows outside, some of them are also successfully used for slopes inside the house.
Plastering
A classic, but still popular, finishing method. It is considered the least expensive, but durable and reliable. The use of the solution allows you to ideally level the plane of the slopes for any materials for cladding the facade.
Plastering an external slope Source oz90.ru
Moisture-resistant drywall
Using sheets of moisture-resistant material, an absolutely flat surface is obtained. The disadvantage of drywall is the need for subsequent additional coating - for example, tiles, decorative plaster, paints and varnishes.
Plastic slopes
PVC panels can be used for both interior and exterior decoration. Plastic can be combined with any facade material, and especially with vinyl siding.
PVC slopes Source rem-okna74.ru
Expanded polystyrene
Expanded polystyrene panels are often used to design slopes when additional thermal insulation is required. But, like plasterboard sheets, they need to apply a decorative protective layer.
Slope finished with polystyrene foam Source o-remonte.info
Clinker tiles
The option using tiles is one of the most aesthetic. The material is often used for facades finished with porcelain bricks or tiles, decorative bricks for jointing, or simply plastered and painted.
Finishing with clinker tiles Source www.remontnik.ru
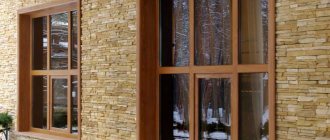
Lining
Natural lining is ideally combined with facades made of logs or timber, covered with a block house. The material harmoniously complements the composition of the exterior, especially when using platbands.
Finishing with natural lining Source 2gis.ru
Sandwich panels
The material consists of plastic plates, between the layers of which a rigid thermal insulating material is laid. The panels are suitable for both indoor and outdoor use. They harmonize perfectly with any façade cladding.
Vinyl lining
Available in a wide variety of colors and can be used in conjunction with any heat-insulating materials. Combines with any home exterior design.
Application for cladding external slopes of vinyl lining Source forum.na-svyazi.ru
Metal slopes
Galvanized steel sheets are particularly durable. The facade side is treated with a powder composition that provides anti-corrosion protection, durability and a beautiful appearance of the entire house. The sheets are extremely resistant to atmospheric factors, have high thermal and sound insulation properties, are easy to install, and do not require maintenance.
Sheet metal slopes Source oz90.ru
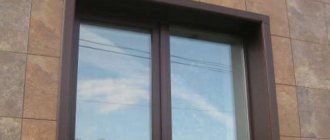
A natural stone
The use of natural stone is considered far from a budget option for designing slopes, but the decoration against the background of the facade looks very impressive. The material does not absorb moisture at all, therefore they provide an ideal humidity regime for double-glazed windows.
Natural stone has a magnificent appearance and unique texture, combined with brickwork and plastered facade.
Slopes finished with natural stone Source stoneplanet.ru
Foamed plastic slopes
This material is easy to process, which allows you to finish even slopes of non-standard shapes and sizes. If necessary, foamed PVC can be bent and cut using an angle grinder. Flexibility in processing allows you to create spherical and other shapes of slopes.
To bend the slope in the required shape, cuts are made on the inside of the plastic panel. The number and distance between cuts is determined based on the shape that needs to be obtained in the end.
The main thing is not to make too deep cuts, this will negatively affect the strength. After bending, the material must be treated with glue in the places of cuts.
Installation of such slopes is also carried out using a metal profile. It is recommended to fill the space between the panel and the wall with insulation or polyurethane foam. Including, you can use sprayed insulation. This will ensure reliable fastening and good thermal insulation.
- Glue slope
This is when thin plastic is glued to the surface of the slope. Despite its simplicity, this method has serious drawbacks. Namely, unreliability due to thermal expansion or contraction of the material used. And, as a result, the plastic peels off. Moreover, there is the formation of condensation and freezing of slopes, since they are not insulated due to the specifics of this method.
Since this article discusses the finishing of window slopes using all existing methods, it is impossible not to mention this. Thin plastic is glued to a sheet of drywall. The disadvantages are that the adhesive connection is not particularly reliable due to the high labor intensity of the work performed. And the notoriously weak resistance of drywall to dampness and moisture.
Some friends of mine developed cracks on their plasterboard slopes after some time. Now they really regret that they didn’t immediately install plastic slopes. So we will not consider plasterboard slopes due to the high probability of their destruction in the near future.
Materials for internal slopes
The material is usually chosen based on the purpose of the room within which the structure is located. There are many options. Let's look at some feasible solutions.
Decorative plaster
It is often used as one of the interior finishing materials.
Thanks to its use, the details are very unusual. Plaster usually contains fillers with different textures and technical characteristics. For example, they use artificial granules of different sizes, stone chips, and natural wood fibers.
Decorative plaster usually becomes the finishing layer , contributing to the appearance of patterns with unusual shapes and surfaces with a beautiful texture. The main thing is to figure out in a timely manner how to level the slopes on the windows.
Decorative plaster itself has the following set of characteristics:
- Easy to carry out repairs if necessary.
- Breathability.
- Creation of a moisture-repellent layer.
- There is no need to carry out repairs when minor defects are detected.
- Sound insulation qualities.
- Safety, environmental friendliness, resistance to flammable materials.
- Lack of ability to absorb odors.
- Can be applied to any surface.
- Effective camouflage for the base.
Fillers together with basic substances make it possible to distinguish the following types of material :
- Textural. With pre-known patterns, clearly expressed.
- Structural. In this case, the relief is not so clearly reflected on the surface, but the pattern cannot be predicted in advance.
- Venetian. Has a large number of layers. Those who choose this method will easily understand how to level the slopes on the windows.
How durable the finished material will be depends on the quality of this stage. Therefore, preparing the foundation should be the first step when performing work:
- The surface of the slopes must be dust-free and cleaned of excess building materials . Cracks are expanded and puttied when the need arises.
- After this, the base is coated with a primer. The starting layer of plaster is applied. The surface is leveled. Perforated metal corners are fixed separately.
- The layer of plaster is rubbed down, and then it is allowed to dry a little. After this, the primer is reapplied.
- The last layer to be applied is for decorative purposes.
Other unusual materials for finishing slopes
The original design of the window can become the highlight of the interior. And we are talking not only about different color options for the plastic frame, but also about the design of the entire window opening.
To finish slopes you can use:
- Ceramic tiles are an excellent option for a bathroom or kitchen (here you can make a smooth transition from the apron to the window);
- Mirror plastic (mosaic or film) - suitable for small rooms where there is not enough sunlight;
- Artificial stone - in combination with imitated frames, this material can create a unique window opening design.
In all cases, the design arrangement of elements looks good when part of the tile or mosaic extends beyond the slopes onto the walls near the window. In the same way, you can “frame” the doorway to give the room a certain style.
Which slopes are best for plastic windows?
All slope finishing options have pros and cons. There is no ideal material that is better than others in every respect. Therefore, when choosing, you need to decide which properties and characteristics are more important in a particular case.
| Requirements for slopes | The most suitable material |
| Speed and ease of installation | Plastic |
| Durability | Plaster, gypsum fiber |
| Strength | Plaster, gypsum fiber |
| Moisture resistance | Plastic, gypsum fiber |
| Natural material, natural look | Plaster, drywall, gypsum fiber |
| Tightness of the structure | Plastic |
| Practicality, no need for maintenance and care | Plastic |
| Best maintainability | Plaster, gypsum fiber |
| Low price | Plastic |
| Original finishing options (decorative plaster, tiles, mosaic) | Plaster, drywall, gypsum fiber |
| No corners or visible frame elements | Plaster, drywall, gypsum fiber |
| Possibility to change the design | Plaster, drywall, gypsum fiber |
How to install slopes on special profiles
To make a slope you will need plastic profiles and sandwich panels.
PVC panel and profiles
The sizes of the panels are selected taking into account the window parameters. During the installation process, pieces are cut from the entire panel according to the dimensions of the vertical and horizontal slopes. You can cut with a grinder with a metal disc, an electric jigsaw, a mounting knife or other tools. If burrs are formed during circumcision, they are removed with the tip of a knife or sandpaper.
First of all, we install the window sill
Step 1. A plastic U-shaped profile is screwed around the perimeter of the window frame. Check the horizontal and vertical position carefully. The ends of plastic slopes are installed in this profile. Use small self-tapping screws to secure.
We cut a U-shaped profile slightly larger than the width of the window. We screw small screws into it
Installation of the starting profile
On the side where the profile will be adjacent to the window, apply a layer of sealant and attach the profile to the window
Profile layout diagram
Important. It must be remembered that violating the integrity of the metal profile of a window frame with self-tapping screws negatively affects its performance.
First, fix the two outer screws, and after checking the position of the element, screw in the fasteners every 15–20 cm.
Frame for plastic slopes
Step 2: Make sure the dimensions are correct. Everything is fine - insert the slope into the profile. To make work easier, use a piece of plastic. Insert it into the gap between the panel and the profile and gradually move it along the panel, pressing on the end. The element will fit into the seating groove along its entire length without much effort.
Installation process
Inserting panels into the profile
Along the depth of the window, we cut out a slope from the plastic panel and insert it into a U-shaped plastic profile pre-attached to the window.
On the other hand, the slope is inserted into the F-shaped profile, which is then attached using a stapler
Step 3. Place strips of masking tape on the second (free) end of the slope and leave free pieces. With their help, it will then be fixed to the wall before foaming. The tape will prevent the slopes from bending under the influence of expanding foam.
Step 4. Carefully seal the gap between the slope and the wall, install the elements in a horizontal position and secure its positions with loose pieces of tape. Don't forget to wet the surfaces. Water not only improves adhesion, but also speeds up the hardening of the foam.
Foaming
Use of PVC panels
Advantages and disadvantages
PVC panels are considered an equally popular material for slopes on plastic windows.
The advantages of plastic are obvious:
- low cost;
- obtaining a completely flat surface;
- good connection to the frame;
- the possibility of additional use of heat-insulating materials;
- speed and ease of installation;
- moisture resistance.
Plastic slopes also have several disadvantages:
- lack of resistance to mechanical damage;
- impossibility of replacing any part if deformed;
- periodic replacement of additional elements - over time, under the influence of the sun, the corners turn yellow;
- incompatibility with some interior design styles.
Finishing a slope with plastic Source gramha.net
Preparation
The master begins installing slopes on plastic windows after preparing the adjacent wall. Excess construction foam is removed, dust is blown off the wall, the surface is treated with an antiseptic compound and primed. Then the frame is installed from metal guide profiles.
Cleaning a wall using a hairdryer Source province.ru
Installation of the guide profile
The craftsman measures the frame along the inner edge, and then the outside width and the distance from the edge of the frame to the window sill. The U-shaped profile is cut into pieces of the required length, determined based on the measurement results. The sections are secured with screws at intervals of 20 cm along the outer part of the frame.
Installing a mounting profile Source samstroy.com
Installation of sheathing and panels
To create the sheathing, craftsmen use wooden blocks measuring 20x40 mm, fastened at the top of the distant corner of the opening at a distance of 30 cm. To create a perfectly flat plane, the thickness of the bars is leveled with a plane and controlled by a level.
Fastening the sheathing Source svoimi-rykami.ru
The panels are secured with self-tapping screws, the work is done starting from the top profile. The resulting gap after installing the panels is filled with foam. Then the panel is placed against the sheathing and secured.
Fastening PVC panels Source cmt.ru
Installation of F-profiles
The elements are used to increase the external attractiveness of the window slope, protect the angle of mechanical influences, and premature wear.
The craftsman cuts the finishing corner to size and inserts it along the outer edges of the panels. A small cut is made at the points of contact of the profile with the fasteners. Sealant is applied to the joints.
Finish F-profile Source oknanagoda.com
Options for finishing window slopes
A plastic window installed in accordance with all the rules will not be able to fully perform its functions if the finishing of the slopes is done poorly. This is due to the fact that the window opening is the main source of moisture, extraneous sounds and drafts entering the room.
This is important! Some believe that to form slopes it is enough to use only polyurethane foam. But this is far from true. Over time, the foam changes its structure and even loses its original properties.
This finishing method also includes a number of finishing works that need to be done for a more aesthetic appearance.
Finishing slopes with plastering
The building materials market offers a large number of plasters that have thermal insulation, waterproofing, and antimicrobial effects. Despite this, over time, plaster slopes tend to lose color and become covered with cracks. Insufficient thermal insulation capacity contributes to glass fogging. The plastering process itself takes place in several stages. Each layer must not only be applied evenly, but also wait until completely dry.
Finishing slopes with plasterboard
Finishing with plasterboard can increase the level of thermal insulation. To do this, it is necessary to carry out preliminary insulation using special materials, for example, cotton wool. In addition, the surface is repeatedly primed and painted. This may take more than a week.
Finishing slopes with plastic
Currently, specialists in the field of PVC structures use exclusively plastic slopes. This is explained by the advantageous features of the material, which allow achieving maximum thermal insulation, waterproofing, sound insulation, practicality and aesthetic appearance of the room. Modern plastic finishing of window openings occurs through the installation of sandwich panels.
Arched slopes
To design the openings of non-standard windows, seamless sandwich panels that are easily bent are usually used. They are suitable for installation on arches with a large radius.
Sandwich panels are often used for gently sloping arched openings. To bend them at the desired angle, it is enough to make several cuts on the back of the canvas.
To join the arched and vertical parts when working with curved structures, a special H-shaped profile is used, and decorative corners are used for finishing.
Decorative window decoration with textiles
A beautifully designed window opening can act as the accent of a room, on which the interior of the room will largely depend. Such designs should not be hidden behind massive curtains; it is enough to use tulle and organza. If this option is not suitable, you can hang roller curtains. They are attached to the frame, leaving all the details of the opening visible.
When choosing the right type of curtains, you should consider the following points:
- Room area. For small rooms it is better to use light blinds and roller blinds; for spacious rooms, massive models in darker shades are suitable.
- Location relative to cardinal directions. If the windows face north, then use pastel, beige, peach tones; to add coolness to the house - gray, blue.
- Illumination of the room. It is better to hang reflective textiles on windows located on the sunny side.
- Seasonality. In summer, you can use chintz, satin, in winter - velor, velvet.
- General design style. For example, for a country style, the color of the curtains should be combined with the color of the furniture and tablecloth; it is advisable to choose cotton or linen. In minimalism they use Roman and Japanese curtains that do not have bright colors.