If you want to achieve such a result as a perfectly flat ceiling when carrying out repairs, then, of course, you need to make some effort. And, first of all, to achieve this effect, it is important to eliminate any differences and irregularities that are initially present on its surface. Leveling the ceiling is carried out using beacons, and also, contrary to controversial opinions on this matter, without them. It is on consideration of both methods that we will dwell today.
- Pros and cons of leveling the ceiling with and without beacons
- Necessary materials
- Preparation for work
- Aligning the ceiling with beacons
- Leveling the ceiling without beacons
Leveling the ceiling with and without beacons: pros and cons
Leveling a ceiling made of concrete slabs is not easy, and often it lies unevenly and with differences. There is little attractiveness in this, so you can only rely on leveling the ceiling with your own hands and strength. You can turn to specialists, but often the ardor in this direction is dampened by the price of work on leveling the ceiling, which, depending on the characteristics of the room and the general “front of work”, practically “bites”.
Aligning the ceiling with beacons is one of the main solutions to solve the problem under consideration. This leveling method is also accompanied by plastering the ceiling, and it is often stated that there is no specialist who could make a perfectly level ceiling without using beacons.
This statement is partly true, but there is also a refutation for it, and it is one of the options that we will consider in this part of our article. Its main advantages are that the use of this method allows you to reduce time and financial costs. It is precisely in the event that savings in these parameters is a determining factor for you (that is, you are short on funds), you can level the ceiling without beacons - the cost of this activity will be reduced due to the smaller amount of material consumed.
Plastering the ceiling along beacons makes it possible to achieve an almost ideal surface. In this case, the leveling process is extremely simple: beacons are installed, then a solution is applied, after which, using a rule, minor defects are repaired (leveling with a rule). The advantages of this option are the already noted quality of the surface, the absence of a gap between the leveling layer and the ceiling itself. In addition, the ceiling thickens only within the thickness of the leveling mortar layer, and not as in cases of using a frame and drywall. The downside is that if the ceiling is long or curved, then the layer can become wide, and therefore the consumption increases in terms of labor costs and, as you might guess, in terms of the material used.
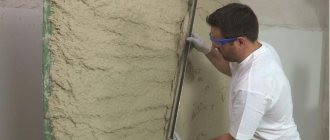
When plastering without the use of beacons, the relief of the ceiling is more or less repeated while simultaneously smoothing out its unevenness. As a result, both time and materials are saved, but the downside is that the ceiling is not leveled as such. This method may be suitable for large rooms where high quality is not required.
Leveling the ceiling using the rule
How to make a ceiling even
The technology for leveling ceilings and walls is very similar, therefore, having studied the theory of plastering ceilings, you can safely apply it to walls in practice.
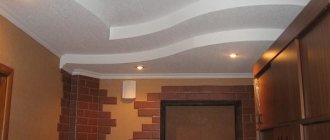
Only overhead or pendant lamps and chandeliers can be installed on a plastered ceiling. Leveling the ceiling with plasterboard allows you to use any lighting devices (surface-mounted, spot).
It will perfectly hide all the irregularities and hide any communications passing under the existing ceiling.
It is important to know! If the ceiling difference is more than 5 cm, then plastering of such an area is carried out in two layers.
The second layer is applied after the first has dried.
- Water or laser level
- Upholstery painting thread
- Rule with a level of 1.5 m
- Electric impact drill or hammer drill
- Set of wood crowns
- Screwdriver
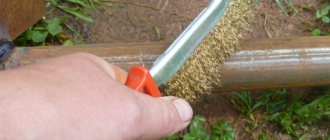
- Grinder or hacksaw for metal
- Tape measure and pencil
- Hammer
- Metal scissors
After the plaster is applied to the entire ceiling, it should dry and set. The beacons are removed and the seams are sealed with mortar. The entire surface of the ceiling is rubbed with a grater - this will remove small irregularities from the rule.
Ceiling leveling: materials
Before moving on to explanations on this topic, I would like to point out that in each specific case, specialists use their own, so to speak, proven method of puttying. Nevertheless, there are general principles that will allow you to determine how to do this correctly. These statements are also true regarding the tools used, not to mention specific materials or technologies.
For example, the choice of spatulas. Spatulas used as the main tool can be selected that, in your opinion, will be more convenient to use, the main thing is that they are of different sizes. Most often, large spatulas of 60 and 45 cm and small spatulas of 8-12 cm are used. The latter are more suitable for applying the mixture used on a large spatula.
Considering that in most cases, not a ready-made mixture is used (it is also more expensive), but a mixture that requires preparation, that is, diluted with water in a container, there is also a nuance that concerns the mixing method. Therefore, the recommendation on this point can be boiled down to the following: if possible, do not mix the mixture by hand, use a mixer or drill with an appropriate attachment - the result obtained when using the technique manually simply cannot be achieved.
To begin the process, you will need the appropriate materials. In particular these are:
- materials for leveling (gypsum plaster, putty);
- primer;
- wooden goats (a stepladder will not work here, it will simply be inconvenient for you to perform the necessary actions and even take a stable position for this);
- plastering rule 1.5-2 meters (special strip for this type of work, it can be metal or wood);
- spatula 10-12 cm, 45 cm and 80 cm wide;
- an electric drill equipped with a special nozzle for stirring the plaster mixture or a construction mixer;
- building level;
- strong thread or special painting cord;
- a 10-12 liter bucket, a basin or container with a similar volume (for mixing the solution);
- lighthouse perforated profile;
- maklavitsa - it is advisable to have this tool on hand, in particular it is necessary if you have to work with uneven concrete floors;
- paint roller – this tool will allow you to prime the starting putty in an even layer;
- a brush used for subsequent washing off of primer and whitewash.
What does the preparatory work include?
Preparing the ceiling surface requires special attention from specialists, because otherwise, the beacons and plaster may simply fall off. To avoid a negative result, some additional work must be done. Let's look at it in more detail:
- Maximum cleaning of the ceiling from various deposits, chips, and, of course, dirt. The fact is that it is these elements, if present, that can become the main cause of an undesirable result;
Application process
- Applying a primer, or, in other words, a primer. This solution will help to significantly increase the adhesion of the surface of the floor slab to the plaster mixture. In this case, you should not save money and purchase a budget primer. It is much more important to consult with specialists and buy a more expensive, but also higher quality impregnation, which will retain its properties for a very long time;
- Gluing a bandage, which is a regular nylon mesh, which is shown in the photo below. It is often used as a reinforcing material for penoplex and other similar materials. PVA can be used as an adhesive base for the mesh, applying it with a brush or spatula. Next, you should wait 48 hours, because this is the time it will take for the glue to dry completely and you can begin installing the beacons.
Preparation for work
Initially, an important point is to clean the ceiling from excess materials, this could be peeling plaster, lime or paint, etc. Ideally, of course, the ceiling should be leveled along the base itself (concrete, etc.), removing absolutely all finishing materials from the surface . This will ensure more stable adhesion of the new layer of material to the surface and eliminate, as an option, the destruction of the remaining finish under one or another influence. If you are sure that the old plaster has sufficient strength, you can level the ceiling directly using it, as a base.
After the excess layers have been removed from the surface of the ceiling, using a painting cord, you need to draw a control line - it will become the level based on which beacon perforated profiles will be installed in the future (they are also beacons). Using a level, you need to mark marks in the corners of the room, and stretch the paint cord between them, also marking an approximate line.
The final part of the work
As a result of the work carried out, there is already a smooth surface of the wall. However, no matter what materials were used to level the walls, in this form it is only suitable for laying tiles; even in this case it should be primed. For all other facing materials, the wall surface should be sanded and putty should be used to finally level the wall surface to a smooth state.
The starting putty is first used. Apply a layer of putty in accordance with the requirements of the mixture manufacturer. To paint walls or stick thin wallpaper, they also use finishing putty, which is subsequently rubbed with a special mesh until it is perfectly smooth.
Aligning the ceiling with beacons
- Before installing the beacons, you need to prime the ceiling and then wait for it to dry, which may take several hours. Then the mixture is prepared using water and starting putty. If you wish, you can purchase ready-made mixtures for leveling the ceiling, which will make the process easier, but this cannot exactly be called a rational step, especially if you adhere to certain restrictions on repair costs (ready-made mortar is more expensive).
- Next, a path is applied to the ceiling using a putty mixture, and a beacon is applied to it. Such a path is made at a distance of 10-15 centimeters from the wall. The thickness of the beacon profile is usually 6-8 mm, and this value does not affect how the putty should be applied. The thickness of the profile determines, first of all, its rigidity, which means that the thicker the beacon is, the stiffer it will be. In addition, the thicker the beacon, the more solution you will have to add.
- When installing a beacon, you need to focus on the previously created control line. The profile used usually bends from side to side, so this feature will have to be adjusted, leveling if necessary. This is done using a building level.
- The installation of the next beacon is carried out so that between the new and the previous beacon there is a distance of 15-20 centimeters shorter than the length of the building rule used. So, if the length of the rule is 200 cm, then on average the distance between the beacons should be 180-185 cm. This condition is explained by the need for the free use of the rule for its intended purpose.
- To ensure a common plane for the position of the beacons, a thread must be pulled under the profiles in the middle of the ceiling. After installation in one common plane, they should be smeared using starting putty, this will prevent them from becoming unsteady in the future.
- Before starting to putty on the beacons, you need to let them dry, and it is better if the work is continued the next day. Don’t be surprised if you find out that the craftsmen move on to the next stage within a few hours; it is their professional experience that allows them to start work before the specified time.
- While the beacons are drying, you can start filling up potholes, cracks and floor joints.
- Now the beacons are installed, so you can move on to the next stage, which consists of throwing the starting putty onto the ceiling while periodically running it over the beacons as a rule, thereby eliminating the possibility of the solution getting out of the beacons. These actions continue until the space between the beacons is filled with putty.
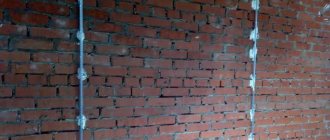
Location of beacons on the ceiling
If necessary, leveling the ceiling along the beacons, the video will be the best and, in addition, a clear example of the necessary actions. You can view it below.
The next step after the beacons have dried is to putty on the beacons. As the final stage in leveling the ceiling for further painting, the application of the next, second layer of putty to the ceiling surface is considered. Only this time a finishing putty is used, and it should be applied after priming the first layer of putty. Usually, specialists apply it, so to speak, “lightly”, without the need for subsequent sanding, which allows you to achieve a smooth surface. For beginners in the repair business, this will add more work; for sanding, a special grater is used, to which, in turn, a diamond mesh or sandpaper is attached. Be sure to take care of eye and breathing protection for working in such conditions, using a respirator and special glasses.
To conclude this point, I would like to give a recommendation regarding a layer of putty, which should not be more than 50 mm. Otherwise, too thick a layer can lead to the collapse of the mixture, even if the layers are applied gradually, layer by layer. Taking this into account, monitor the thickness of the layer, and if it is exceeded, use additional reinforcement elements or a cement-sand mixture with mesh.
Perforated beacon profile
Applying markings for beacons
To successfully install beacons on the ceiling, we make markings in the form of parallel lines. We don’t need to try to get perfectly parallel lines; the main thing is to mark the first and last attachment points for each beacon under the holes. We carry out the markings in the direction of laying the floor slabs with a distance from parallel walls of 40-50 cm and a distance between the lines that allows you to rely on them as a rule. When placing lines, you need to take into account high and low areas of the ceiling, placing lines on high areas. This will reduce the thickness of the plaster.
The distance between the lines should not be too large, otherwise it will be inconvenient to stretch the solution between the beacons. For example, with a room width of 3 meters, we will get 3 beacons with a distance from wall to wall of 50-100-100-50cm. When stretching the solution, we will need a rule length from the wall to the middle beacon.
| ATTENTION! All materials presented on the site belong to the site mastertim.ru and are written for people. Full or partial copying of text and (or) images, posting on other sites, use for personal gain is PROHIBITED! |
Leveling the ceiling without beacons
Considering the specifics of the work, this method is also referred to as leveling the ceiling according to the rule. We noted the features of this type of alignment above, so let’s move directly to the main stages of the process.
- First you need to prime the ceiling surface, and then decide on the scope of work. To do this, take a rule and apply it in different areas of the ceiling surface. This is done without a solution; the essence of this stage is to visually identify existing problem areas and depressions; you need to outline them for yourself with a pencil. The areas where the ceiling meets the wall also need to be checked in this way.
- To mix the solution, as for many other works with mixtures, you will need a mixer or drill equipped with an appropriate attachment. If you plan to apply a layer of solution that is not too thick, then it is better to mix it in a small amount. This is explained by the fact that if the solution is used too slowly, stirring it after 25-30 minutes will be ineffective for the simple reason that chemical reactions of this type will occur in its composition, which will lead to hardening. As you might guess, it will no longer be possible to use it due to its unsuitability, and even such a cost-friendly method of leveling the ceiling will turn out to be unjustified.
- Spreading the solution on the ceiling surface is carried out using a 45-centimeter spatula and an 80-cm spatula that assists in application. The solution must be applied in slightly larger quantities than is initially necessary at those stages when work is carried out on areas previously marked with a pencil. Next, set aside the tools you are using and run the rule over the surface of the ceiling, thereby cutting off the excess amount of mortar. The result is a fairly flat surface, on which the layer in some areas can rise up to several millimeters or even be even with the overall surface. Without pauses, you need to continue producing the solution, and you should not pay attention to the surface, which in some cases is not entirely smooth.
- The rule is used for a surface in a vertical position; it should be drawn from the corners and to the center. In areas where the ceiling plinth meets the wall, the tool is used in a horizontal position. If you need to stretch the solution when turning the rule with it taking a different angle as a continuation of the already leveled section of the ceiling, then there is no need to rush. This area needs to be allowed to harden, so it’s better to work on another part. After about half an hour, you can switch again to this problem area, completing the alignment.
- By similarly dealing with the rest of the ceiling surface, you will thus be done with the rough work. After this, although the solution will look hardened, it will also be damp. To continue the work, you will again need a 45-centimeter spatula, with whose help you will need to cut off the existing irregularities formed during the plastering process, and also remove those flaws that remain after using the rule.
- It is recommended to additionally make the solution slightly more liquid in consistency for passing through the ceiling in the areas where the layers transition.
- Next, the ceiling needs to be allowed to dry, after which the next day you can proceed to putty. Upon completion, the ceiling surface must be cleaned using a spatula, even better if this is done using a special grater with a diamond mesh or with sandpaper attached to its base. After cleaning, the surface must be primed (this will strengthen the surface).
Read more
Add a comment
Preliminary stage for critically uneven surfaces of plaster ceilings
Technology for installing beacons for plastering walls
You can plaster any surface: concrete and wood, columns, beams and other structures made of steel. Before applying plaster to the ceiling, preparatory work should be carried out.
Preparation
The concrete ceiling must be thoroughly cleaned of various contaminants.
Particular attention should be paid to mold or other stains of fungal origin, which must be treated with a special disinfectant solution. For example, copper sulfate, the German-made Pufas preparation or Homeenpoiste, the Finnish company Tikkurila
If the fungus has occupied large areas on a concrete floor, combat it using open fire (blowtorches, plasma welding, etc.). If the ceilings have already been painted or whitewashed, the old coating should be removed. Apply primer with a strengthening compound, and then with a special primer mixture “Betonokontakt”. For better adhesion of primer compositions to the concrete surface, it should be treated with a sandblasting machine, which creates roughness. For the same purpose, it can be slightly incised or cut. Before applying plaster, a metal mesh with cell sizes of 10x10 mm is stretched onto wooden ceilings, as well as onto the surface of structures made of steel. It is attached to the surface to be treated, including joints and seams, with special nails with a wide head or staples.
Installation of beacons
Plastering work is usually carried out on beacons, the installation of which is the most critical moment. If they are installed correctly, you will end up with a perfectly smooth plastered surface.
Therefore, it is important that the entire technology of plastering the ceiling according to beacons is followed
- This work must begin by leveling the room. A zero mark must be marked on the walls. A paint cord is used for this.
- The location of the point that is the lowest on the ceiling is determined. This is the site where the first lighthouse was installed.
- Under the beacons, every 300 mm over the entire surface, plaster marks are applied in small molds, on which they will be installed. This must be done in such a way that there are as few connections as possible, since these are where errors are most often made.
- It is not recommended to lay a layer of plaster on the ceiling more than 5 cm. Therefore, the height of the beacons should not exceed this value. To control them in the horizontal plane, a two-meter level will be required. It is carried out after the installation of all beacons is completed.
Plastering on beacons
When you are finished installing the beacons, you can begin finishing the ceiling with plaster using the following technology:
- Prepare a working solution - gypsum, cement or lime. It must be remembered that when using a gypsum-based solution, each subsequent layer is applied 20-25 minutes after applying the previous one; cement - no earlier than two hours; lime - only after the previous layer has turned white, without allowing it to dry completely.
Apply an even layer of spray without leveling it. Several primer layers are distributed onto the spray, observing the time required to consolidate the applied solution. They must be leveled each time and ensure that they do not exceed the level of the beacons, and also that various defects such as cavities or pits do not appear on the primed surface. The thickness of the covering layer of plaster depends on this. Remove beacons with stamps. This is done after the last primer layer has been distributed, and the solution used is applied to the places where they were located. Check the evenness of the plaster using a rule that is applied while changing direction. The irregularities identified in this case are cut off or, conversely, enlarged with an additional layer. At the same time, it is necessary to seal the internal corners and the joints between the ceilings and the wall. This work is done with a grater. At the end of the plastering work, apply a covering layer, which is carefully leveled, creating a smooth surface.
If the difference in the ceiling level is less than 5 cm, you can level the ceilings with dry mixtures. It is advisable to use them for small volumes of work, in particular for filling potholes, when purchasing large quantities of other materials is not financially profitable. The best of them is considered to be Rotband (made in Germany) - a universal mixture for plastering work, based on gypsum.
After completing the “rough” leveling with plaster, you can begin finishing leveling with putty.
Primer, why it is needed and which one is better
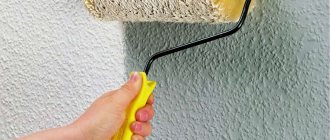
You won't be able to properly plaster the ceiling without a thorough primer. It improves the adhesion (adhesion) of the plaster mixture to the base. Basically, all problems with falling and peeling finish on the ceiling are due to the fact that the base was not primed. That’s why we don’t skip this stage. Moreover, if there are several layers of plaster, it is advisable to treat each of them with a primer (with complete drying).
First, we prepare the base - we clean it of old coatings, and then treat it with a primer. To do this, pour the composition into a paint bath, take a roller on a long handle (telescopic rod) and distribute the composition over the ceiling. If there are any depressions - recesses, defects on the surface of the ceiling, into which the roller simply does not fit, we pre-treat them with a brush dipped in primer.
Ceiling primer before plastering
Now about which primer for the ceiling is better. According to the masters, this is “Betonokontakt”. After drying (24 hours), a rough, sticky film remains on the surface. The putty “clings” to it perfectly. Just one thing: you need to make sure that while the primer is drying, no dust gets on it. Otherwise, there will be no effect from such processing. It can only get worse.
How to properly install beacons for spider plaster and its structure
This device got its name for one simple reason - it can be vaguely compared to the web that this living creature weaves. A person, of course, is not able to weave such networks, but he can manage a certain minimum, which is quite enough to install beacons under plaster.
Before we start weaving a web, let’s first figure out how it will help us mount beacons. In principle, this is the same option as in the previous case with threads, only more accurate and with much greater capabilities. As in the previous case, the beacons are installed on a quickly hardening solution, and the threads serve as guides. There are only two things that distinguish this device from the previous version. Firstly, to create a spider you do not need a level - it uses a plumb line, the accuracy of which does not depend on the human hand or the machine used to make modern rack and pinion levels. Secondly, it is possible to quickly shift the installation plane of the beacons towards the wall or away from it - it is this moment that allows you to calculate the required layer of plaster with millimeter accuracy and, if necessary, reduce it to a minimum. In general, the economic justification is clear.
How to install beacons on a wall photo
Now as for its manufacture. Let's imagine this process in the form of a certain sequence of work.
- We install fastenings for plumb lines. Here everything is elementary simple - we take a hammer drill with a drill with a diameter of 6-8mm and drill a couple of holes under the ceiling at a distance of 100-150mm from the corners (on one side of the wall and on the other). We insert plugs into them, into which we drive long dowels - they should remain sticking out from the wall by at least 50mm. The only thing to consider here is the fact that in most cases electrical wiring is laid under the ceiling, so try not to damage it.
- We install clamps for plumb lines. In principle, these are the same dowels as those on top - they need to be placed clearly on top of each other. This is the only condition that needs to be met here (naturally, without fanaticism, since half a centimeter in the direction of the weather will not be built).
- We level and fix the plumb lines in the desired position. Now you need a couple of plumb lines - tie them to the upper dowels. As you understand, these plumb lines can be moved closer or further from the wall - at this stage of work, make the distance from the wall approximately 15-20mm. Then it can be easily adjusted as needed. When the plumb lines calm down and take a clear vertical position, take a marker and mark their location on the lower dowels. Noted? You can immediately pull the plumb line and tie it to the lower dowel.
- We stretch the sliding horizontal guidelines. Here everything is generally simple - we stretch two or three horizontal threads between the plumb threads. We simply tie them and get several sliding guidelines, in relation to which the immediate question is solved: how to install beacons for plaster?
In principle, that’s all; all that remains is to talk about how to select the correct plane for installing the beacons, which is able to provide a minimum layer of solution. It’s also not very difficult here - by moving one of the sliding guidelines, we find the shortest distance from the thread to the wall. After it is detected, we measure it and check how far we can move our web to the wall. The minimum distance between the thread and the wall should be equal to the height of the beacon. Having determined the desired size, now we simply move the threads on the dowels to this distance - as at the very beginning, it is better to mark with a marker. In this case, you will never go astray from the right path.
How to install beacons for plaster photo
Today, these two technologies are the most optimal. There are, of course, other technologies, for example, installation of beacons for plaster can be done using a level or laser level. They are good in their own way and allow you to achieve high accuracy, but not every craftsman (and not even all craftsmen) has a high-quality laser level.
Author of the article Alexander Kulikov
Where and why you can apply plastering technology without beacons
It is clear that any conscientious homeowner strives for the ideal plane of walls during construction and finishing. However, there are often cases when such an approach still does not seem justified.
Agree, for example, that when building a utility room (workshop, barn, poultry house and other outbuildings) located in the “backyard,” perfectly laid out walls are simply useless. It is enough to ensure that they are visually smooth, have no obvious surface defects, and the material from which they are constructed receives reliable plaster protection. Moreover, if the masonry was carried out carefully, with constant monitoring of the verticality of the wall and the straightness of the rows.
Does it make sense to bring out the walls of auxiliary buildings on the site that are invisible to the prying eye to perfect evenness?
There doesn’t seem to be much point in complicating the work when plastering the utility rooms of the house, the internal surfaces of the walls in the garage, workshop, or boiler room. A thin layer of plaster will hide visible flaws and prepare the surfaces for, for example, painting or whitewashing, but checking their perfect evenness as a rule is unlikely to occur to anyone.
When plastering residential premises, if the walls initially do not have significant plane curvatures, this method is also quite applicable - large defects will be eliminated, and the final “gloss” before the final decorative finishing, one way or another, will still have to be achieved by puttying.
This approach has one important advantage - it is a significant reduction in the material used for plastering. Practice shows that the total consumption when leveling walls in this way can be reduced by almost half or three times
The installation of beacon profiles in itself already means that the minimum layer, even on the most protruding flat area, will be at least 7÷8 mm, and in fact it can be even significantly larger. If beacons are not used, then the master can limit himself in such areas to a thinner layer - 4 ÷ 5 mm, and in large areas this gives very noticeable savings. In addition, in small rooms this can be important from the point of view of reducing the usable space of the room - it happens that literally every centimeter counts.
True, if the question concerns interior decoration, and the differences in the plane of the wall exceed 10÷15 mm, then it is hardly worth expecting a positive result from plaster without beacons. In such conditions, it is extremely difficult even for a very experienced craftsman to properly level a wall “by eye.” So in such a situation there is no way to do without installing profiles.
If the requirements for the quality of finishing are high, and the difference in the surface level of the walls exceeds 10 mm, then it is better not to experiment, but to carry out plastering along the beacons
Another important point to keep in mind. Less material consumption does not mean that the work will go much faster. Everything is exactly the opposite - the productivity of even an experienced finisher when plastering without beacons - decreases sharply, and therefore, prices for the work done increase. So the total financial result, if you plan to invite specialists, should be thoughtfully assessed in advance. It remains to be seen what will become more profitable...
Well, if you plan to plaster walls without beacons with your own hands, and the novice master is not particularly keen on increasing the speed of work, then the saving effect will be obvious.