If you are undergoing renovations, but you don’t want to put up wallpaper, the question inevitably arises: how to cover the walls in your apartment instead of wallpaper. There are two options: decorative plaster and painting. To work with plaster, it is desirable to have experience, but painting the walls in an apartment can be done at a fairly high level without experience. You need desire, time and careful execution of operations. By the way, there is paint that imitates some plasters quite well, but costs less.
Painting walls in an apartment is an increasingly popular way of decorating
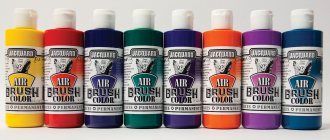
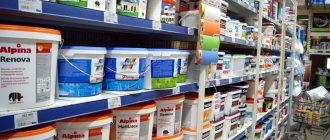
Paints for living rooms
The most important thing in choosing paints for this group of rooms is their safety. There are also high demands on the decorativeness of coatings and resistance to sunlight. Such a characteristic as cleaning ability is not the most popular, except that it may be necessary in a children's room. It is very good if the paints do not smell, or almost no smell, during application, and it is also desirable that they dry quickly.
Water based paints
Water-based formulations meet these requirements more than others. The binding component in them may be different, which is why some qualities change, but they have one thing in common: they are harmless to people, do not harm the environment, dry quickly and have almost no odor.
Water-based
The most popular in this group are water-based paints. These are compositions based on polyvinyl acetate (more familiar to us as PVA). This paint is easy to apply and has good coverage - usually two coats are enough to get an even color. After drying, they create a dense film on the surface that allows water vapor to pass through; they also say that such a wall “breathes.” It can be tinted very well - any color can have dozens of shades.
Water-based paint "Tikkurila" and tinting card
One of its main advantages is its low price. And this, perhaps, is the decisive factor that makes water-based emulsions leaders in sales, even despite their rather serious shortcomings.
The first serious disadvantage is that it is not very resistant to mechanical or abrasive influences (it is easy to scratch). Secondly, it does not hide surface imperfections and requires careful preparation. For the wall to look good, it must be absolutely smooth. The third drawback is the fear of water. A wall coated with water-based emulsion can be wiped several times with a damp cloth, but not all shades. On some, the stripes will be clearly visible. But the walls can be tinted - leave a little “in reserve” to eliminate stains and abrasions that appear after a while in the most “loaded” areas.
Water-dispersible silicone
These colors are almost perfect. They are easy to apply, and are able to heal even quite decent cracks - up to 2 mm. The film that remains after drying does not fade, is not afraid of moisture, and is easily damaged (you can wash it as much as you like). Painting the walls in an apartment with silicone paint allows you to get a very smooth surface even without ideal preparation and careful leveling.
After drying, the film is so smooth that even microparticles do not linger on it and dust does not accumulate. What is important is that the paint is vapor-permeable, which makes it possible to use it in wet rooms. High resistance to ultraviolet radiation allows it to be used for exterior decoration (its main use).
Water-based silicone paint - excellent quality coating
It has essentially one drawback: its high price. This is the most expensive paint today (not counting textured ones). This explains the fact that they are not very popular. But if you want to have a durable, beautiful coating for the walls in your apartment or house, choose silicone paint. In any case, it can be used in the hallway and kitchen.
Acrylic water-dispersible
This type of paint is perhaps ideal: it tinters well, does not fade, applies well, even paints over cracks, albeit smaller ones - up to 0.7-1 mm. It has average vapor permeability, the coating is difficult to damage, and can be washed even with detergents. She has no particular shortcomings. In some parameters (vapor permeability) it is slightly worse than water-based paints, in others (hiding power) it is slightly inferior to silicone paints, but in general it gives a very good result.
Acrylic paint does not fade, is not afraid of moisture
Painting the walls in an apartment with this paint will not be too expensive: the price is average. So, if we take the price/quality ratio, this is the best paint, both for walls and ceilings.
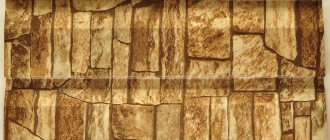
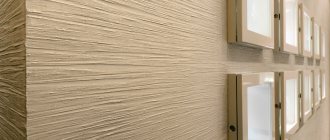
Decorative textured paints
This is a relatively new direction. Painting the walls in an apartment using textured paints allows you to get not a smooth, evenly painted surface, but one with a certain or chaotic relief. The basis of textured paints is an acrylic water dispersion with pigment and various additives - sand of different fractions, mineral fibers and other similar substances that form the relief.
These paints differ in thickness; accordingly, they can be applied with a spatula, brush or roller. Some types allow you to use a spray gun. The texture can vary depending on the type of application, and significantly. For example, in the photo below, you see the result of applying one paint with different tools - a brush, various rollers and a spatula. The photo shows decorative paint for walls and ceilings from the German company JOBI. It's called PUTZEFFEKTFARBE (PutzEffectFarbe).
One of the textured paint options
This composition can be painted in any color from the palette, so there are a lot of options. Can be applied to plasterboard, concrete, chipboard, fiberboard, plastered surfaces. For best results, preliminary priming is recommended.
There are decorative paints with imitation fabric, suede, with pearlescent stains, aged surfaces and many others. The application is sometimes multi-layered - three layers or more - using different tools. Typically, such compositions are accompanied by detailed instructions for application and operating procedures, as well as recommendations for choosing a tool.
You will see several ways to apply decorative paint in the video.
Protect furniture and interior elements
Painting can be quite a messy job, so stock up on protective film and furniture covers: even if you're careful, it's easier to protect the surrounding area in advance than to clean up stray paint drops later. You will also need masking tape, which can not only fix the film, but also make an even border of paint - at the junction of the wall and the ceiling or floor, around sockets and in other similar cases.
instagram.com/sofia.skog
Paints for bathrooms, kitchens and hallways
For kitchens and corridors, the decorative acrylic paints described above and water-based silicone paints are suitable. They have sufficient abrasion resistance and can be washed frequently. The use of paints with a pronounced relief in kitchens is not entirely justified - it will be difficult to keep the walls clean. But pearlescent stains can make a small room visually more spacious, especially if the base color is light.
But there are also several moisture- and temperature-resistant paints that can be used in wet rooms - kitchens and bathrooms - but are undesirable in living rooms.
Alkyd compositions
Alkyd paints are very similar in consistency to oil paints, but have a significant difference both in the base (alkyd resins) and in performance characteristics. The surface painted with them tolerates high humidity, elevated temperatures, and exposure to ultraviolet radiation. It has average vapor permeability, and therefore can be used in damp rooms. It applies well to wood and metal surfaces. What is also attractive about these paints is that painting walls does not require significant investments - they are inexpensive. However, a well-prepared surface is required for a normal appearance. Depending on the type of surface created, alkyd paint can be glossy, matte, or semi-matte.
Examples of alkyd paints
There is only one serious drawback - they are diluted with organic solvents - white spirit, gasoline, turpentine. Therefore, when painting and drying, there is a persistent characteristic odor in the room. Another minus is that over time they lose their color brightness and a yellowish coating appears. The option is inexpensive, but not the best in terms of durability. They are very good for painting radiators and heating pipes - they can be heat-resistant - but for walls it is worth using a different composition.
Paints based on silicates (liquid glass)
If we talk about the specific properties of silicate coating, then this is a good choice for the bathroom: the chemical composition is such that fungus or mold never appears on painted walls. If there is such a problem, this is one of the options for solving it. The coating is very strong and durable, and vapor permeability is the highest among all paint and varnish compositions existing today. Therefore, you can use these paints both in the kitchen and in the bathroom.
Silicate paint - prevents the development of fungi and mold
But there are significant disadvantages. Firstly, until it dries, the composition is very harmful to health. You need to work with it in protective clothing and respiratory protection (a good respirator). After drying, the film is absolutely harmless, but it cannot be kept indoors until it crystallizes. Secondly, silicates are not compatible with other types of coatings. They do not apply to surfaces previously painted with any other paint. In the same way, no other surface will “lie” on a surface painted with silicate paint. In both cases, complete removal of the previous layer is required. Thirdly, the compositions are tinted only with mineral pigments, and this significantly narrows the number of colors and shades.
We're still getting ready
Now make sure there are no cracks or gouges in the paint on the wall. If the cracks or gouges are small, they can be sanded with fine sandpaper until the surface is smooth. You don't want your newly painted wall to have an expressionist texture.
If the damage is large, then repair it with putty, having previously primed the surface. If the previous painting of the walls was done a long time ago, then it makes sense to treat the entire surface with fine sandpaper.
Wall painting design
There are a lot of options for painting walls, because there are no restrictions on quantity. It is important to find the right suitable color combination when painting your walls. The easiest way to do this is to select shades according to the tables that designers use. They contain groups of shades that can be used in one room, while the interior will be harmonious.
Now about the methods of combined painting of walls. There are quite a lot of them, they will look different in the interior. Choose the one you like.
Horizontal division into two or three zones
This method is traditional. Usually the room is divided into two zones. At the bottom they paint with darker shades, at the top with lighter shades. The classic version is divided into three parts by height - the lower third is painted with a dark shade, the upper two are lighter. But this is just a classic; in reality, the dark paint can end in the middle or almost at the ceiling. You just need to be careful with this technique: it visually makes the ceilings lower. The exception is a light strip almost under the ceiling.
Painting a room in two colors: horizontal division
The border between two colors, if you paint the walls in an apartment yourself, is rarely ideal. To decorate the imperfections, you can glue a molding or some even stripes. Another option is to apply masking tape evenly along the border before applying the second shade. After painting, remove it, you will get a perfect line (if you applied the tape evenly).
The molding can be left white - it goes with any colors, or it can be painted in one of the suitable colors
This technique can be used in premises of any purpose, and the style can be of any kind. Only with moldings - this is more of a classic, it is acceptable for country style, for one of the ethnic styles. Just a clear border or a division decorated with a shiny stripe is already minimalism or hi-tech.
Accentuating a wall
A fashionable trend in decorating rooms is highlighting a wall with color. There are two options here:
- a darker shade of the same color;
- another color from a compatible palette.
With well-chosen details in the interior, both methods look attractive. This is the easiest way to make the interior more memorable and vibrant.
A bright color from the same palette is the easiest way to brighten up your interior.
Just keep in mind that in bedrooms, for example, it is better to use less harsh combinations - the atmosphere in such rooms should be softer. Sharp contrasts are good in living rooms and children's rooms. Children generally like bright combinations.
The colors in the bedrooms are calmer
Horizontal stripe
This is a fairly wide strip that runs approximately at eye level. Most often, this type of painting of a room is used if it is necessary to pay attention to some decorative elements - paintings, for example.
A wide horizontal stripe is another way to paint a room in two colors.
This technique looks good in corridors - by lowering the height of the ceiling, it makes it seem wider. Another popular application is children's rooms: children's drawings look very good against a prominent background.
The stripe does not have to be monochromatic - a slight gradient is also good
Striped walls
An interesting technique, but it’s not worth using it for the entire room. This way you can decorate one wall - one of the varieties of an accent wall - or just part of it.
Horizontal stripes can be multi-colored. The main thing is that they are repeated in the interior
An interesting effect is achieved by combining stripes of the same color, but with different textures - matte and glossy. Strictly speaking, these are not two colors, but they look exactly like that.
Combination of matte and glossy paint stripes
Highlighting some interior details
Often, some details are emphasized with a different color - brighter or calmer. For example, niches, frames, placement of an interesting shelf, etc.
Highlighting some elements is another way to combine painting a room.
One option is to outline the walls with a stripe of a darker color, thus highlighting all the corners. This method will help make a small room more spacious: it will appear taller and wider.
A way to visually enlarge a room
How to paint walls yourself
As a rule, for high-quality painting it will be enough to apply two layers of paint.
The first coat of paint is applied in one direction, and the second coat of paint is applied in the opposite direction.
This order of paint application should ensure an even and rich color.
If you cannot paint over some difficult areas with a roller, use a brush.
Time must pass between the two stages of paint application. The second coat of paint is applied on top of the first only after complete drying.
How to paint the walls in an apartment with your own hands: video
Choosing the type of paint is good, but you also need to know how to work with it. Each paint has its own characteristics of application and surface preparation. But in general, the following steps are almost always present:
- Removing old coating, if any. The thoroughness of this stage depends on the compatibility of the old finishing layer and the new layer. If they are compatible, only the loose or poorly adhering fragments need to be removed. If the coatings are incompatible, you will have to remove everything completely.
- Wall putty. The technology is standard: take a suitable composition and apply it with a spatula, covering cracks and irregularities.
- Surface grinding. Use either sandpaper or a special mesh attached to a holder or wooden block. Using circular movements, remove all excess, leveling the walls.
- Dust removal from the sanded surface. It is better to use a vacuum cleaner, but you can wipe everything with a dry cloth several times, but each time it is clean.
- Primer. The primer for each surface and paint must be selected separately. It is advisable to purchase it together with paint. Priming performs two tasks: it improves the adhesion of paint to the surface (it will not peel off) and reduces paint consumption.
- Painting. Usually paint in several layers, applying the composition in different directions. if we talk about walls, then from top to bottom, and then from right to left. Each layer is applied after the first has dried. The instructions usually indicate this time and it is advisable to maintain it.
That's all. The painting of the walls in the apartment is finished. But a verbal description cannot convey some of the features of working with paints or putties. Watch the video tutorial, some subtleties will become more clear. After watching it, painting walls with water-based paint yourself will not be a problem.
Watch the video to see how to create the effect of decorative paint on walls using simple means.
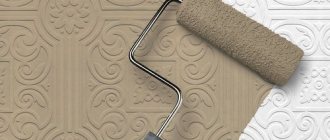
Tools
paint it white
Painting it white is not just a matter of proper preparation and good paint coverage. Roller tools make a big difference too! The most versatile are those with medium bristles (suitable for painting mineral plasters and structural wallpaper). However, if you need to paint white on rougher concrete, brick or structural plaster surfaces, it is better to use a roller with long bristles. This will allow you to cover the uneven surface tightly without gaps.
The material from which the roller is made is no less important. Here the choice should depend on the type of paint used. Waterborne paints are best applied using microfiber rollers. Oil paints are usually applied using wool, acrylic or velor, latex and dispersion, string, and sponges. You need a ditch to apply the paint evenly. A film that will protect furniture and floors from dirt and masking tape.
The main question: how to paint black to white? The first step is to prepare the video. If it is new, it should be moistened and excess water squeezed out. It is also worth removing loose bristles using self-adhesive tape. They can leave unsightly marks.
Start by painting the ceiling (if the room has a window, work from the frame to the inside), then move on to the corners and walls. At the very end, the surface should be smoothed by moving the roller from top to bottom. This will avoid streaks and stains and thus ensure a perfectly painted wall.
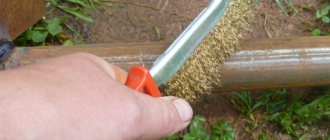
Surface preparation
The preliminary stage before painting is preparing the walls: removing the previous coating, cleaning the surfaces, priming. Then check the base with a level and, depending on the magnitude of the height differences, level the walls:
- putty and plaster;
- plasterboard.
How to putty correctly?
If the height difference is up to 5 mm, use finishing putty for leveling; if the walls are curvature up to 3 cm, they need to be plastered and covered with putty. If surfaces have significant differences in height, they should be plastered using reinforced mesh.
Stages of work:
- stir the dry mixture with water to the consistency of sour cream, scoop the mixture onto a wide spatula, apply it to the base and distribute evenly;
- Apply the next layer with an overlap of the previous one by 50 mm;
- When working corners, use a spatula with a smaller blade or a corner tool.
After the starting plaster has dried, treat it with a finishing compound (its thickness should not exceed 2 mm).
12 hours after finishing work, sand dry surfaces with a float or vibrating sander and apply a primer.
We suggest watching a video on how to putty a wall for subsequent painting:
Read more about how to properly putty and evenly paint walls here.
How to level it professionally?
There are two ways to prepare surfaces using drywall:
- frame;
- frameless method.
The fast frameless method means gluing the drywall directly to the wall. Depending on the degree of curvature of the surfaces, there are several options for implementing the method:
- for height differences of up to 4 mm, the material is fixed to the wall with gypsum putty applied in longitudinal rows to the back side of the sheet;
- for unevenness up to 20 mm, use special glue for gypsum plasterboard (place a small amount of the composition on the sheet every 35 cm);
- if the height differences are more than 40 mm , cut the drywall into strips, glue them to the surface, then fix solid sheets on them.
Before painting, seal the seams between the gypsum boards with a special mixture, then putty the entire surface of the drywall. After the mixture has dried, apply a primer.