Advantages
The main advantages of metal siding are:
- Long service life . Most manufacturers guarantee the service life of their products for 20-25 years without burnout and up to 50 years before through corrosion;
- Light weight structure . Since thin sheets of metal (about 0.5 mm) are used in production, and protective coatings are applied in a layer calculated in micrometers, then 1 m2 is only about 4 kg;
- Economical . By using domestic metal, creating an extensive logistics network and distributing production facilities throughout Russia, manufacturing companies can offer metal siding cheaper than foreign manufacturers;
- Environmental Safety . Metal panels, unlike PVC, are not only non-flammable, but also do not emit harmful substances during operation;
- Ease of installation . Due to the fact that metal is not so susceptible to thermal deformation and is not afraid of low temperatures, the installation process is not complicated by the need to control the tightening force of fasteners, there is no need to leave special temperature gaps, etc.
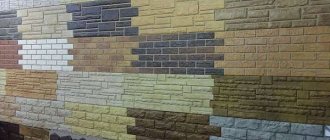
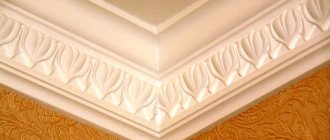
Performance characteristics of stone-look metal siding
Metal siding panel imitates masonry
- Light weight. Allows finishing of buildings without the need to strengthen the foundations. It is possible to overhaul old buildings with a high percentage of deteriorated architectural structures.
- The service life is estimated at tens of years if the technology recommended by the manufacturer is followed and high-quality materials are used. Metal siding coatings are not afraid of harsh ultraviolet rays and withstand dynamic and static loads well. Modern topcoats scratch little.
- Easy to care for. Dust does not accumulate on perfectly smooth surfaces, which inhibits the development of moss. The siding is washed with ordinary water from a garden hose or a soft brush.
- Manufacturability. You can do the installation yourself; there is no need to buy special tools and equipment for the work.
- Low price. The estimated cost of finishing work using metal siding is one of the lowest among all existing options.
Basement metal siding
All types of metal siding have these advantages, but the “stone-look” option has one significant drawback - it bears little resemblance to natural stone. Why?
The main difference between the stone is its volumetric texture. Stone-look metal siding has flat surfaces on which a pattern is applied. Only people with great imagination can see natural stone in it. It is very difficult to find such siding sold, and not because it is in great demand among consumers, but quite the opposite. Manufacturers know that this material is purchased very rarely and therefore almost never produce products of this type. There are many other much more advanced materials that imitate natural stone.
Metal siding "Vertical"
Photo of vertical metal siding with stone imitation
It is advisable to use stone-look metal siding during the renovation of old buildings and only to protect the basement part of the foundation. Let's look at two examples of work: protecting a small base and finishing an insulated base.
Basic rules of work
Metal siding is supplied packaged not only in bundles, but each sheet is individually wrapped in a special protective film, which must be removed after installation. This film prevents abrasion of surfaces during transportation.
Cutting metal siding must be done only in compliance with safety precautions. Some companies offer the production of panels to customer size . This will not only make installation work easier, but will also save you from the need to purchase additional equipment. Moreover, the linear dimensions of the sheets will be observed much more accurately than with manual cutting. This may complicate the preparatory and calculation stages, but will significantly simplify installation.
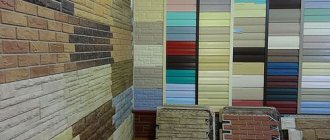
Accessories
To frame and decorate window or door openings, external and internal corners of a building, or to join panels together horizontally, special strips and slats are used. They can be selected either in color with the main panels or in contrast, to give the facade a certain charm and taste.
Also, depending on the chosen color and shade, it is necessary to select the color of the fasteners.
All these issues will be helped by sales consultants and measurers who, using tables of average quantities of fasteners, will help calculate the required number of screws, anchors and seals.
Instructions for finishing a house with metal siding
There are two methods of attaching metal siding: hidden and external:
- When finishing the façade with metal siding, the fastening elements are located on the inside of the panels and are not visible from the façade. Panels for hidden fastening methods are made to exact geometric dimensions and require cutting and fitting, so this type of metal siding is unique and individual. This increases the cost of work and practically reduces to zero the possibility of self-installation of metal panels due to the need for highly qualified workers performing the installation.
- The external method of attaching siding does not require high qualifications and skills; it is enough to strictly adhere to the manufacturer’s recommendations for installing the finishing material.
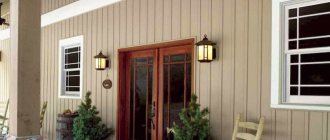
Metal siding under a log - installation of imitation solid wood
For a long time, sheets of metal siding were produced in the usual “flat” form. Relatively recently, three-dimensional structures have appeared that exactly repeat the structure of centuries-old log houses - geometrically, in texture and in color. This material is intended specifically for walls; there are no precedents for using logs for roofing work even in ancient Russian architecture. A log roof covering would be even less appropriate these days - but as a wall cladding, such a repair solution is distinguished by its versatility and practicality.
Sequence and technology of metal siding installation
Before starting all work, the walls of the house are prepared. The siding is fastened using the frame construction method and does not impose any special requirements on the surface. The main requirements are the absence of fungi, shedding, cracks and destruction. By attaching the frame slats using brackets, you can smooth out uneven walls without additional leveling.
Installation of sheathing
Installation of siding is mainly on a metal profile. This is due not only to durability, but also to the lightness of the design. To fasten the frame, special brackets are used, which are mounted to the wall of the building using anchors. The length of the brackets is selected depending on the thickness of the heat-insulating layer. After placing the “beacon” cords, to obtain a flat wall plane, profiles are attached to the brackets using self-tapping screws.
Less commonly, a wooden frame is used for facade systems:
- Firstly, wood is flammable and susceptible to rotting, which negatively affects the safety and durability of the structure as a whole.
- Secondly, the tree can begin to behave if it gets wet or the material is not sufficiently dried before installation. Wooden sheathing installation diagram
Installation diagram of metal sheathing
Depending on the linear dimensions of the structure and the distance between the wall and the frame, the required frequency of mounting brackets is selected. You can calculate the required frequency of fastening to the wall using the installation recommendations of a specific metal profile manufacturer.
Installation of insulation
The insulation is installed in the spaces between the frame in such a way that a solid heat-insulating surface is created without cracks and
passes. If polystyrene foam and its derivatives are used as a heat-insulating material, then the joints of the sheets can be additionally foamed with polyurethane foam.
Mineral wool mats have the property of swelling and over time can themselves close small gaps and joints between the mats. Another feature of cotton materials is hygroscopicity, that is, the absorption and accumulation of moisture during operation.
Moisture significantly reduces the thermal insulation characteristics of the material and increases its weight, increasing the possibility of caking or sliding of the material. Therefore, when using cotton wool materials, it is imperative to install a vapor barrier. You should pay attention to the markings of the vapor barrier so as not to install it inside out, which will lead to the opposite consequences. If polystyrene foam or its derivative materials are chosen as a heat insulator, then a vapor barrier membrane may not be installed. This is due to the fact that polystyrene foam does not absorb moisture and acts as a water barrier.
Installation of additional elements and seals
After attaching the frame, it is necessary to install additional elements:
- Installing external and internal corners is not difficult. The only thing that can be noted is the cutting method if the size of the part is smaller than the actual size of the corner.
- Framing window openings, doorways, starting strips and joining profiles. The joining of frames around window openings or doors is made at an angle of 450 or at a right angle with overlap.
Video: Exterior window decoration with metal slopes
Installation of metal siding
The gaps between additional elements are filled with siding panels. The first (bottom) row is attached to a special starting block and fixed with self-tapping screws. After fixing the bottom sheet, the next one is fastened. The joints of the panels along the length of the wall are mounted overlapping with trimming of the upper groove for fastening to the sheathing or through the installation of an H-profile (connecting).
The façade of a house is finished with metal siding from the bottom up, but there are also some models of panels that can be attached in the reverse order. Typically, the panels are attached to each other using a special tongue-and-groove locking device.
Since metal siding is practically not subject to deformation by temperature, fastening and tightening must be done without gaps, tightly pressing the sheets of panels to the frame.
Video instructions for installing metal siding with your own hands
Preparatory work
Before installing the main covering, it is necessary to carry out a number of previous activities:
- All excess is removed from the base. The old decorative finish can be left if it does not interfere with further work and will not lead to problems in the future.
- The condition of the surface is assessed. Seams and cracks are unstitched, treated with a primer and sealed. If the damage is more than 10–15 cm, then additional reinforcement is performed.
If the facade has defects, they must be eliminated - The base is prepared separately. The foundation must not have significant defects.
- The surface is treated to prevent the appearance of microorganisms. The wooden facade is impregnated with fire retardants.
- The coating is thoroughly dried.
- If required, a vapor barrier is attached (most important when working with wooden houses). The peculiarity of this material is that the film is placed with the rough side facing the wall. The joining is done with an overlap, everything is glued with mounting tape. Fixation is carried out with staples directly to the covering or using slats. The fastening areas are sealed.
Wooden and frame buildings require preliminary installation of vapor barrier
At the same time, the missing tools and materials are being prepared.
Construction of sheathing
When deciding how to properly cover a house with metal siding, take into account that the simplest and most affordable option is to create a frame from standard elements.
Wooden
Due to the fact that a properly fixed sheathing is a guarantee of the reliability and durability of the coating, the work must be approached very responsibly. Step-by-step algorithm of actions:
- To install the frame, a beam with a section of 50*40 or 50*50 is used. The material is pre-treated with antiseptics and fire retardants.
- The surface is being marked. The main posts should be placed perpendicular to the cladding panels. Lines are drawn in increments of 50–60 cm.
- After drying, the timber is drilled out for screws. The pitch of the mounting holes is from 20 to 40 cm. These fixing points are transferred to the previously marked lines. Using a puncher, holes are drilled for dowels according to the marks.
- The racks are aligned and pre-fixed, after which the beam is leveled and substrates are placed under it. Final fixation is carried out.
- For greater convenience, corner posts are set using a plumb line and level. A cord is stretched between them, allowing you to quickly align the remaining elements.
To construct a wooden sheathing, carefully processed and dried timber is used.
The resulting gaps between the wall and the timber are carefully filled with polyurethane foam. This will eliminate the appearance of “cold bridges” after laying the thermal insulation material.
Metal
Do-it-yourself lathing from metal profiles is erected according to the following scheme:
- Marking is being carried out. Installation lines are drawn in increments of 50–60 cm. When working with a base, 35–50 cm.
- The hanging frame elements are being fastened. To do this, holes are drilled at a distance of 35–45 cm according to the markings, hangers are attached to self-tapping screws and dowels and bent to the desired shape.
- The corner segments are positioned first and carefully aligned along the plane. A cord is stretched between them to align the remaining racks.
The alignment of the racks of the metal frame is done using a cord, which is stretched between the corner profiles.
Carrying out work on assembling the frame requires care; all parts must be placed exactly level and form a single plane.
On a note! Regardless of the method of creating the sheathing, windows and doorways are faced separately. The racks are placed along their perimeter, forming a closed system connected to the main fragments.
VIDEO:
Hydro- and thermal insulation of walls
Covering a house with metal siding often involves additional insulation. Various materials are suitable for this, but the most affordable and preferable for self-installation are mineral wool or penoplex (an improved version of polystyrene foam).
Thermal insulation and waterproofing are carried out as follows:
- When choosing a wooden frame, mineral wool is placed in the resulting cells. It is laid tightly, without gaps. Work is carried out wearing protective equipment for the respiratory tract and mucous membranes.
Laying mineral wool between wooden studs - The metal frame is excellent for laying penoplex. To do this, even during installation of the sheathing, the slabs are pinned onto installed and bent hangers. For additional fastening, dowels with a large head are used. The material is placed without matching the joints of adjacent rows, the corners are overlapped. Additional sealing is carried out.
Attaching penoplex to the wall - A film is stretched over the entire surface to protect against moisture penetration. The joining points are combined with a large supply of material.
On a note! If a façade with a ventilation gap is being installed, then a strip of the required thickness is mounted on the wooden frame strictly along the beam, and a Z-profile or similar element is mounted on the metal frame.
Price
The cost of installing metal siding in Moscow and the Moscow region is 550-650 rubles per sq.m., without insulation and 750-850 rubles with insulation. This price for installing metal siding includes the installation of panels, all components, flashings, sheathing, and for insulation, installation of insulation and vapor barrier film. The indicated figure implies professional installation with a written guarantee for the work, the availability of all necessary tools (+ scaffolding), direct responsibility for the material (scratched, bent, etc.). The average cost of 1 m2 of material is 350 rubles.
Conclusion! In general, metal siding is a durable and practical finishing material that protects the walls of a building from the negative effects of external destructive factors and gives the building a presentable appearance.
How to cover a house with metal siding - step-by-step diagram
Step 1: Calculation and preparation
It is necessary to measure all the walls (and the basement with the roof, if included in the cladding plans).
It is best to take measurements from scaffolding - this way you can evaluate the strength of the wall base for metal siding. If the plaster from the wall is falling off in whole layers, if the masonry is loose, and the beams are cracked, decorating a rotten house with siding will not help, you will only waste money and effort. For proper fastening reliability, the strength of the walls is necessary. If necessary, a mesh can be applied to individual areas, followed by plastering with cement mortar, or individual bricks or beams can be replaced. It is necessary to carry out such installation preparation several days before installing the siding panels - the cement must “set” well.