Sheathing that imitates natural materials with a higher quality than themselves is, if not a dream, then at least an object of desire for most homeowners.
If such cladding is relatively inexpensive and can be installed in a short time, then its preference is undeniable. These are the characteristics that siding has.
Houses covered with siding have clear, even outlines and look neat and stylish. Such a finish, for all its external ideality, is quite simple and accessible to everyone; you just need to familiarize yourself with the general structure and several installation rules.
The installation itself is simple and intuitive for anyone; some questions arise when decorating elements of the house, in particular window openings.
What is siding
Siding is a cladding material that imitates various types of finishing, consisting of long narrow strips connected into a single homogeneous coating.
Each strip has a stamped profile that repeats the structure of a particular coating - logs, stone, etc. The surface has a textured pattern, making the imitation completely reliable .
There are several types of siding made from different materials.
Can be found:
- Wooden (natural or pressed wood).
- Plastic (vinyl, acrylic, etc.).
- Metal (steel, aluminum, copper).
- Fiber cement.
In addition, according to the intended purpose, siding can be:
- Basement.
- Facade.
By panel arrangement:
- Horizontal.
- Vertical.
Profile types:
- "Ship board".
- "Herringbone."
- Under a log.
- Under the beam.
- Under a stone.
- Under the brick.
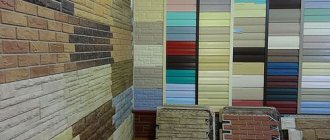
Each of these types has several varieties with different colors, width, panel length and other parameters.
Tools for work
There are practically no differences in the installation of vinyl and metal siding in terms of technology. The same can be said about the tools used during installation.
The only exception is cutting panels or additional elements - it is better to cut vinyl parts with a fine-tooth hacksaw, a hand-held power saw or, which is somewhat worse, a jigsaw.
The most suitable tool for cutting metal siding is tin snips or a hand-held power saw with a special blade.
A very convenient tool is cutting shears, which allow you to make cuts or holes of any configuration , which is convenient when it is necessary to design elements of a non-standard shape.
CAREFULLY!
Cutting metal siding with a grinder is prohibited. In this way, the protective coating will most likely be damaged, resulting in the immediate onset of corrosion processes that destroy the material.
The remaining instruments are almost identical in composition:
- Ruler, tape measure.
- Pencil, chalk for marking.
- Hammer.
- Cutter knife.
- Screwdriver, screwdriver, electric drill.
- A square, in some cases a protractor is convenient.
- Building level.
- Hammer.
The listed tools are a general set; in special cases, additions to this list are possible.
Kinds
Vinyl siding is panels that are installed on the surface with an overlap. This creates high-quality ventilation, while at the same time protecting the surface from exposure to the atmosphere.
Although metal products are also made in addition to vinyl, plastic is more often used to protect windows. They weigh less and have little impact on the slopes. Finishing window slopes with metal siding is rarely done.
Product advantages:
- withstands low temperatures well;
- are not afraid of moisture and protect openings from it;
- Dust and dirt can be easily removed from the surface with a simple soap solution;
- serves for a long time - does not lose its positive qualities throughout the entire operation;
- the surface is reliable and looks beautiful, no need to paint;
- plastic does not rot, corrosion is impossible on it;
- easy to process and install on the wall, during operation there is not a lot of debris and no dust is generated;
- lightweight products do not load the structural elements of the house.
Even metal panels are not afraid of corrosion; they are covered with a polymer protective coating. A variety of shades allows you to choose the material for any facade.
Steel siding is noticeably stronger than PVC and is less susceptible to mechanical damage. High temperatures will not damage, does not burn or melt, does not support combustion. But it costs more.
Important! Using metal siding is beneficial because it is stronger and will last much longer than its plastic counterpart.
What siding components will be required?
To decorate windows, special components are required:
- Platbands.
- J-straps.
- Finish profile.
- Corner strips (complex).
- Simple corner.
- Sections of main panels.
The listed elements are not needed all at the same time; this list includes elements that may be needed in one case or another.
A more specific list can only be compiled with a specific opening in front of your eyes with its own parameters, the main of which are the presence and depth of slopes.
NOTE!
Many manufacturers produce their own elements for decorating window openings, which are used only for a certain type of siding. When purchasing casing, you should find out what components are needed for it and whether there are any specific parts.
Useful recommendations before installing window profiles
Before you start, read some recommendations that will help you make the installation better for the entire life of the siding covering.
- If, according to the installation technology, you need to install a drip sill, then it must be installed at the very beginning of work. Then the slopes will be covered by side cuts and fasteners.
- When attaching panels around the opening, it is necessary to press them as tightly as possible. Sometimes, for a tighter seal, it is recommended to use a sealant.
- The cuts at the corners are made at 45 degrees so that there are no significant gaps between the panels.
- Use only self-tapping screws with corrosion protection, otherwise the appearance of your finish will deteriorate very quickly.
- When screwing in screws, do not try to press them all the way. A temperature gap of 1 mm is necessary, since deformation of elements may occur due to daily changes; the same rule applies to nails and other fasteners.
- Self-tapping screws and other fasteners must be screwed in strictly at right angles. Any deviation from the vertical can lead to a violation of the integrity of the entire structure.
- The entry point of the screw into the panel must be exactly in the middle, otherwise the siding may become deformed or even crack.
- Consider how deep the window opening is into the wall. According to the standards of our country, slopes are made 20 cm. In this case, the slopes need to be inserted into a J-profile, which is mounted around the frame.
Installation of slopes with J-profile - European standards have slope widths of less than 19 cm. In this case, a special near-window strip is used. Its edges are hidden by a J-profile.
- There are windows that do not have slopes, then the edges are edged with platband.
Finishing without slopes - If the window is arched, the profile is cut in several places for bending or a plastic profile is used.
Installing frames on arched windows
Preparing slopes for cladding
Before starting work, you should prepare the opening. To do this, you need to remove all the design details - old slopes, casing, external window sill strip, etc.
The opening must be freed from all additional elements - brackets for lights, fasteners or other elements that interfere with the installation of the casing . The surface of the slopes should be cleaned of old paint, various layers, and all crumbling or peeling areas should be cleared and removed.
The presence of a large number of imperfections on the surface of the slopes may require the application of a leveling layer of plaster; in simpler cases, putty can be used.
Careful preparation of the surface is mandatory; it should be treated as responsibly as possible , since after installing the siding there will be no access to the slopes.
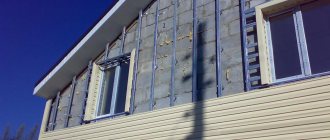
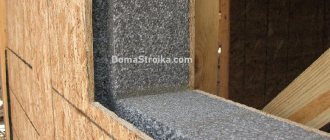
Installation of sheathing
The sheathing along the slopes is installed simultaneously with the main one. All procedures are carried out - insulation, installation of sheathing strips, etc. The same material is used as for the main sheathing - wooden blocks or metal guides for gypsum boards.
At the same time, it should be taken into account that the installation of sheathing on slopes of great depth should be carried out taking into account the thickness of the insulation, the ventilation gap and other technological dimensions.
The fact is that the dimensions of the window block have a certain size and do not always allow you to completely install all the necessary elements - the casing may turn out to be too far from the plane of the slope and partially block the light opening of the frame .
In such cases, it is necessary to reduce the thickness of the insulation (or completely abandon it in this place), reduce the ventilation gap in order to achieve an acceptable position of the design elements of the window opening.
Video description
An option for professionally made drip sill is shown in the following video:
The side parts of the drip bent upward will allow you to avoid through gaps during installation and will prevent water from penetrating into the opening. Moreover, during installation they are covered with slopes.
The manufactured part is screwed to the bottom of the window frame. It is first recommended to apply a layer of liquid nails directly to the joint. They will completely close the gap between the window frame and the ebb. The lower part of the cladding is also fixed on the vertical walls of the opening. Fastening is carried out through previously created side bends.
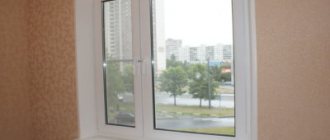
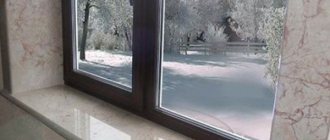
Window finishing with siding without slopes
To decorate windows installed in the same plane with the wall (without slopes), platbands will be required.
To install them you will need:
- A starting profile is installed on the frame around the perimeter of the window. If there are many windows and they are large, then the consumption of the starting strip may be large . To save money, you can get by with pieces about 8 cm long; you don’t have to install whole strips. The profile is attached approximately 5 mm from the edge of the box with the locking part towards the window.
- The platbands are adjusted in length, their outer planes are cut at an angle of 45° , for which it is convenient to use a miter box or electric saw on a special stand, which makes it possible to make precise cuts at a given angle.
- The internal elements of the platbands are cut according to a certain pattern. The upper casing along the end part is trimmed and bent down so that rainwater falling inside can flow down these bent parts into the side elements. The side platbands are cut from the inside so that the fastening and profile elements do not intersect with the upper platband, and the lower platband is cut in the same way . When trimming internal parts, remember to leave temperature gaps of about 3 mm.
- Installation takes place according to the usual scheme - the platband is snapped into place with the locking part in the starting profile, and secured to the sheathing along the nail strip with self-tapping screws. First, the lower casing is installed, then the side ones, after which the installation is completed by installing the upper casing.
- Installation of platbands is carried out simultaneously with the installation of corner and H-profiles before installation of the main siding panels.
How to carry out winter installation
Installation of siding can be carried out at temperatures not lower than -15 degrees.
Covering doors with siding is allowed even in the cold season. To eliminate unwanted risks, it is recommended to take into account important aspects of the planned event:
- The siding should rest for several hours. A mandatory requirement is compliance with a suitable temperature regime. The material must be cured at outdoor temperature, which at the same time should not be lower than +15 degrees Celsius. Otherwise, the cold will have a negative impact on the material that has not yet been installed on the door.
- It is advisable to use a suitable cutting technique for cutting. The best options would be a saw with small teeth or a grinder with an angular design. Scissors designed for cutting metal will not be desirable.
- It is recommended to remember the tolerance that affects the compression - expansion of the material. The optimal tolerance is eight to ten millimeters.
Window finishing with siding with slopes
The method of finishing slopes depends on their depth. To design slopes up to 20 cm deep, a near-window strip is used.
The installation method is similar to the installation of platbands, but there are also slight differences:
- A finishing strip is installed around the perimeter of the window frame.
- Window trims are cut to length. The top and bottom parts are installed first, but the trimming of the inside is different.
- The upper part of the near-window strip is cut from the inside so that the side slopes do not intersect with the internal end elements of the profile. From the outside, it seems to rest on the side slats. Trimming at 45° is not required in this case .
- The lower part rests against the side slats from the outside. At the same time, parts of the slope sides are not cut off from the inside, but are folded upward under the side planks. Actually, you can do the same with the upper bars.
- Installation of near-window profiles is carried out by attaching the slopes to the finishing strip and fixing the other edge to the wall sheathing with self-tapping screws.
- The side strips are installed after installing the horizontal parts.
IMPORTANT!
To design slopes more than 20 cm deep, a set of sections of siding panels is used. In this case, the installation of each slope can be considered as covering narrow partitions or soffits.
- A finishing strip is installed around the perimeter of the window frame.
- An external corner is installed along the outer perimeter of the sheathing.
- Siding sections are installed between the corner and finishing profiles. When cutting, you should take into account the size of the temperature gap .
- The corners of the slopes are formed using simple corners (simply covered over), or double j-bars are used, as is sometimes done for internal corners. They are installed at an angle to each other end to end, one bar fixes the vertical slope, the second - the adjacent horizontal one .
- With wide slopes, there must be a low tide along the lower part. It is installed before attaching the vertical sides; its side parts are folded up and placed under the vertical elements of the siding. This allows for high-quality drainage of water and prevents runoff from penetrating under the casing . The depth of the ebb is 4 cm greater than the slope (3 cm protrude forward for water drainage, and 1 cm is bent for installation to the window frame).
Accessories used
Before covering the windows with siding with your own hands, you need to select profile parts and hardware. It is recommended to choose fittings manufactured by the same manufacturer that produces the finishing panels used. However, there is a practice when installing vinyl siding to use metal profiles, because they allow for easier installation.
On a note! When purchasing finishing materials, experienced specialists select all parts exclusively from one batch. They are purchased with a small reserve. This allows you to use elements with the same shade. If there are not enough parts and you have to buy more, then there is a high probability that the elements will have a different tone.
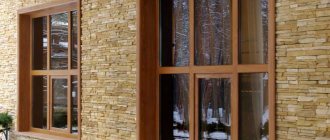
Siding and profiles must be chosen in the same shade Source housefasad.ru
To calculate the required number of profiles and fasteners, specialists perform the following steps:
- Measure the distance under the window frame and the free outer part of the wall, if installation of a drip lining is provided.
- Measure other external parts of the window opening intended for installing slopes. In other words, their required width and height or length are measured depending on the position of the part in space.
- Add up the measured lengths of all slopes. Adds 15% to the final result. The stock is needed to make cuts and bends of parts. In this case, the ebb is measured separately.
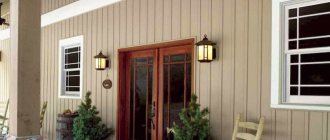
Covering a window with siding can be done without using ebb. This cladding option is implemented before installing the façade panels. After all, this installation method allows you to cover all the fasteners with siding.
Window trim without using drip tide Source trulogsiding.com
See also: Catalog of companies that specialize in finishing materials and related work
During the installation of window slopes, a number of additional parts are used to refine the joints of finishing materials:
- finishing strip, which gives the finish a finished look;
- metal casting is a practical detail;
- a window strip that allows you to make a beautiful connection to the frame;
- plastic molding, often used together with vinyl siding and often supplied with PVC windows;
- corners used for joining two finishing materials;
- H-bar, allowing you to connect two finishing panels;
- J-profile made of plastic.
Additional details for hiding joints when covering windows Source zelenodol-krovla.ru