Self-installation of the ceiling
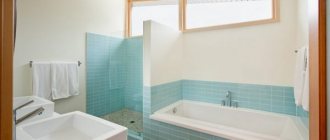
Having weighed all the pros and cons, we come to the conclusion that you can only make bathroom ceilings with your own hands using plastic panels. The photo shows that its design is quite elementary, and consists only of a frame and the panels themselves.
Suspended and suspended ceilings require not only specific equipment and materials, but also special skills. Therefore, let us first consider the issue of a ceiling made of plastic profile panels.
Read more about installation of this type in the instruction article: Do-it-yourself slatted ceiling.
In principle, its installation is elementary:
We fix guide rails (plastic or special metal) on the walls
It is important to align them at the same level. Often, home craftsmen attach slats along the perimeter of the walls directly below the ceiling
This technique allows you to quickly adjust the levels, but it is worth remembering the need to fit lighting elements under the ceiling.
After securing the slats around the perimeter, you also need to attach intermediate guides (stringers) to these slats, on which the panels will be attached. The distance between these guides is usually made from 70 to 100 centimeters.
When the stringer sheathing is ready, take care of the electrical wires for lighting in advance.
Start of construction of our ceiling in the bathroom - we begin to attach the panels to the sheathing. This is done quite simply: either by simply screwing the edges (at the attachment point) onto self-tapping screws, or using special metal brackets specifically designed for this purpose
It is important that the panel that falls on the stringer mount is attached last, because in this case we will have the opportunity to “level” the ceiling in height
When installing panels with your own hands, do not forget about lighting and wires. It is better to make holes for recessed lamps as you install the panels and route the wires into them. Holes in PVC panels can be made either with a sharp knife or with a special drill attachment
To cut the panels, you can use a regular hacksaw.
How to install plastic panels
When all the panels are installed, it is advisable to glue and seal the plastic corners at the corners. This will hide the gaps between the walls and ceiling in the bathroom, and also prevent moisture from entering.
Following this step-by-step sequence will allow you to sheathe the surface with the highest quality possible.
For more details, see photo and video materials on our website, which will help you not only choose the material that is suitable for you, but also install it yourself.
https://youtube.com/watch?v=Pw0ghJE6QdM
finishing bathroom walls with tiles and plastic panels
Modern bathroom design
Types of snow guards and do-it-yourself installation
A plastic ceiling in the bathroom will probably be the most practical way of finishing. And today it is also the most popular type. What are plastic panels? This is a material that is not at all afraid of moisture. And even if water falls directly on it, nothing will happen to it. They are used both on the ceiling and on the walls.
The ceiling panels are attached to the assembled box, so the ceiling is suspended. And this is currently fashionable. Get to know this species better. Moreover, there is a huge variety of design solutions. Such panels can be chosen to suit absolutely any style and interior, since plastic truly knows no boundaries.
Pros and cons of plastic panels
Each material has its own advantages and disadvantages. Same with this material. What are they? Positive aspects of finishing with plastic panels:
- if you have a crooked ceiling, then this material will hide it;
- thanks to the frame, it will be possible to hide wires, communications and more;
- you can easily install lamps and lighting;
- The installation process, unlike other materials, is quite simple;
- installation is done using ordinary tools;
- as already mentioned, good moisture resistance;
- if something breaks somewhere, the panels can be installed again;
- inexpensive cost of this material.
There are also some downsides. Here they are:
- plastic panels are plain, and therefore if you want to see something with a colorful pattern on the ceiling, then they will not suit you;
- it is impossible to build with several levels;
- if the bathroom is small, then with them it will become even smaller, since they cut off the height of this room;
- After installation, you can see the seams between the panels.
Preparing for work
Well, if you still decide to install a plastic ceiling in the bathroom, then use this article. The first thing you need to get started is to carry out the preparatory work:
- if you still have old coating on the ceiling in the room, then it needs to be removed;
- An uneven ceiling should not be leveled;
- Be sure to treat the ceiling slab with an antifungal agent:
- draw a line for finding the future ceiling on the walls using a building level.
Creating a box for panels
Along the drawn line, you need to attach a UD profile (2.5 * 2.5) to the walls. For these purposes, take a dowel. Advice. Before you start making holes, check your bathroom walls and ceiling to make sure there are no hidden wires. It often happens that wires are hidden in the walls, so to avoid electric shock, be sure to check this.
Next, insert the ceiling profile into the guide and tighten it with self-tapping screws. The profiles should be attached to the ceiling with hangers so that the frame does not sag. Be careful that the horizontal of the ceiling must be level.
When the box assembly is completed, begin installing hidden wiring (as mentioned earlier, it can be hidden in the walls). It is better to deal with built-in lamps along with the installation of panels. The slots for them are made in the panels themselves using a drill with a crown.
The final stage of installation
A plastic plinth should be screwed onto the main profile. The panels will be attached to it. The very first one should be inserted with a shelf into the groove of the baseboard and secured with a self-tapping screw with press washers. The following panels are made using the same method, only their shelves are inserted into the slot of the previous panel. To prevent seams from being visible between them, you should press them tightly together. If the last panel does not fit, then it should be cut to width.
Advice. The final panel can also be inserted in this way: the panel footage should be two millimeters less from the wall interval to the beginning of the opposite profile. Insert one side into the corner of the wall, and the other will need to be moved a little. To connect the final panel, place tape on it and move the groove into the middle.
If there are small gaps, seal them with sealant. You can make a plastic ceiling in the bathroom yourself. To do this, you will only need your initiative and attentiveness. If you doubt yourself, trust the experts.
What is sheathing or frame?
The sheathing is the basis of the structure. It implies the ability to mount panels on the ceiling and walls of rooms. Frames are made from various materials, including plastic.
Among the advantages of this option are the following:
- Resistant to temperature changes.
- Easy to install on any surface, including walls.
- Resistance to moisture.
- Possibility to use repeatedly, saving money.
- Resistant to deformation.
Frames are also made from other materials. Among them are metal profiles or wooden slats. Wood is not resistant to moisture and temperature changes, which will negatively affect the operation of the sheathing for walls and ceilings. The result is visible deformation. A metal structure is not always suitable for PVC, as it becomes too heavy an option.
Appearance of plastic sheathing during installation
When compared to these materials, PVC frame has advantages. Among them are the simplicity and efficiency of installation, including for wall surfaces. The panels are easily attached to each other, eliminating the formation of gaps or cracks. Additionally, clips are used to ensure a secure fit to the wall or surface.
Another positive feature is resistance to mold and mildew. Plastic structures are fireproof and easily tolerate moisture and dampness, which cannot be said about their wooden or metal counterparts. If required, a plastic frame is used as a cable for organizing wiring.
Bathroom ceiling installation
Facade panels. Types of facade panels
In order to make your own ceiling in the bathroom we will need:
- Drill or hammer drill
- Hacksaw for metal
- Sharp knife
- Dowels, self-tapping screws with press washer
- Metal profile for suspended flows 2.5 cm by 2.5 cm (UD profile) and 2.5 cm by 6 cm (CD profile)
- Plastic panels
- Starter strip or ceiling plinth
- Level
- Suspensions
Installing a ceiling made of plastic panels is a fairly simple process and does not require any special practical construction skills. Here we will tell you step by step about the installation technology, and you will see that doing it yourself is not only possible, but also quite easy (see Plastic lining for the ceiling: installation features)
Frame installation
- Finishing the ceiling in the bathroom with plastic panels, like any work, begins with preparing the room and marking the future ceiling. It is advisable to remove everything unnecessary from the room - it can interfere with work. To mark the frame, you need to measure the level around the perimeter and draw lines on the wall where the new ceiling will begin (see Frame for a plasterboard ceiling: design features)
- Cut the UD profile to the length of the walls, having previously measured the required length with a tape measure, drill holes in it in increments of 50 cm for the dowels.
- Having placed the profile against the wall according to the marks made, drill holes in the wall at the fastening points. Securely fix the profile to the wall with dowels.
Fastening the guide profile
- We cut the CD profile to the required length or width of the room. It is necessary to take into account that plastic panels for the bathroom are attached perpendicular to the direction of the profile. Then insert it into the guide profile, the distance between the supporting profiles should be at least 40cm.
Support profile
- If the profile is more than 1.5 meters long, to add rigidity to the structure, fix it to the ceiling using metal hangers. Also, the profiles at the insertion points should be screwed together with self-tapping screws
Suspension mount
- When the frame is ready, you can proceed directly to installing the plastic panels.
Panel installation
- Before installing the panels themselves, it is necessary to install a starting strip around the perimeter with screws to the guide profile.
Installation of the starting rail
Instead of a starting rail, you can attach a ceiling plinth
Ceiling plinth and self-tapping screw with press washer
Ceiling plinth and self-tapping screw with press washer
- Plastic panels (see DIY plastic ceiling in the kitchen) for the bathroom ceiling should be cut to the required size, insert one end into the starting rail and, bending it slightly, install the other end. Lightly press it against the wall and fasten it with screws and a press washer.
Installing the first panel
- Subsequent panels are mounted in the same way, pressing against the previous one. It is necessary to ensure that the panel fits equally along its entire length. Do not overdo it with the pressing force, because the material is quite fragile and can easily be broken.
Panels are mounted end-to-end
- The last panel is cut to length with a knife and fixed by inserting into the starting strip. It is not necessary to screw it.
Last panel
- All that remains is to remove traces of our work process, and the room is ready for use.
Installation of lamps
- Before installing plastic panels on the bathroom ceiling, take care of the future brightening of the room (see Ceiling lights for the bathroom: types and installation). After installing the frame, run the wiring to all proposed fixtures. It’s better not to spare the wire and leave the “tails” longer; the excess can always be cut off. The wiring should preferably be double insulated and additionally protected with a plastic corrugated hose. Immediately check its functionality.
- Having reached the place where the lamps should be, mark and make a hole of the required size
Can be cut with a regular knife
- You can immediately install the lamp and screw the plastic panel into place
Lamp installed in a hole
- Pull all the wires through the holes and finish installing the ceiling
Finished ceiling
- Connect power to the lamps using terminal blocks and install the light bulbs
Variety of plastic panels: how to make the right choice?
It is no secret that the construction market is rapidly moving towards more and more practical and modern materials. But, given such diversity, it is extremely difficult for the average consumer to make a choice.
Increasingly, bathrooms have suspended ceilings made of plastic panels. It’s easy and quick to implement it with your own hands: the time spent on installation is no more than 24 hours. And the result of the work done will please household members for decades.
Plastic panels, although durable, are vulnerable to mechanical damage. Point loads are contraindicated for this material.
During installation, not only plastic panels of various lengths are used, but also special PVC profiles, which are needed to hide unsightly connections and give the ceiling a presentable appearance.
Profiles have the following varieties:
- starting profile;
- outer corner;
- baseboard;
- internal corner;
- H-profile;
- universal angle;
- F-profile.
When installing a single-level ceiling yourself, you will first need a starting profile. It is mounted along the entire length of the room and is needed to hide the joints of the end and outer parts of the panels.
For a multi-level ceiling, other PVC profiles are needed. With this finishing method, external and internal corners are suitable, which allow you to carefully design the steps and projections of the structure.
The plinth is the same starting profile, only supplemented with decorative decoration in the form of stucco molding. It gives the room a finished look, masking unsightly joints.
The H-profile is needed to hide the holes between the panels in a large room, when it is necessary to extend standard panels by 3 m.
Also interesting: Installation features of types of recessed bathroom fixtures
F-profile is a standard plinth with a smooth strip instead of a decorative finish.
The thickness of quality panels must be at least 8 mm. If the indicator is lower, then the built-in lamps will show through the communications located behind the thin surface and the false ceiling will look unsightly.
Installation of PVC panels on the bathroom ceiling
Installation of plastic panels in the bathroom from A to Z
PVC ceiling panels for the bathroom have a tongue on one side and a groove on the other. This is done to ensure reliable pairing of adjacent plates with each other. There are two types of ceiling panels for the bathroom:
- Suture
- Seamless
They differ in the structure of the panels. The first ones repeat the relief of a wooden lining or a house block. Seams or profile bends are preserved between the panels at the joints. In the second option, the joints are practically invisible, thanks to the precise fit of the tenons into the grooves of adjacent panels.
Direct hanger for plasterboard ceiling
Bathroom ceiling panels are mounted on a frame installed on the existing ceiling. At the same time, if the use of built-in spotlights is intended, then the height of the frame is lowered by at least 10-12 cm from the ceiling.
PVC panels for bathroom ceiling
After priming, the lighting wiring is installed and the places for attaching spotlights or a closed lampshade are marked.
Rules for installing PVC panels on the ceiling in the bathroom
The installation technology involves performing strictly defined actions:
- Marking the level of the future ceiling and frame elements
- Installation of frame on walls and existing ceiling
- Installation of the guide angle.
- Installation of PVC ceiling panels
Installing ceiling panels in a bathroom will require the bare minimum of tools. Probably everyone has an electric impact drill or a hammer drill with a 6 mm drill bit for concrete. Hammer, screwdriver or Phillips screwdriver, sharp knife and hacksaw, meter ruler and pencil with tape measure.
Attaching the guide angle to the profile
To more accurately mark the horizontal plane under the ceiling panels in the bathroom, it is recommended to use a laser level and painting thread (cord with blue in a box). Having such tools (you can rent a level) you will mark without errors.
A bathroom is a room with a high moisture content, so it is not recommended to use wooden beams for a frame under the ceiling in a paneled bathroom. A galvanized metal profile and U-shaped hangers for plasterboard ceilings are ideal for these purposes.
A PVC ceiling panel is placed in this place
The frame elements are fastened to the walls and ceiling using dowels and self-tapping screws (recommended size 6 x 40 mm). The frame profiles and hangers are connected to each other using galvanized 12 mm self-tapping screws.
To mark with a laser level, the device must be secured to the wall using a dowel, leaving the required distance from the ceiling. The horizon is established using a bubble level built into the device.
Once turned on, the laser beam will draw a horizontal line along the perimeter of the room on the bathroom walls. They mark it with a pencil and connect them with painting thread. On the ceiling, using a tape measure and a 1 m ruler (a short aluminum level is recommended), lines parallel to two long walls are drawn at intervals of 600 mm.
The wall profile UD-27 is fastened along the line on the walls. Along the lines on the ceiling with a pitch of 600 mm, U-shaped suspensions are attached to the ceiling. The ceiling profile TsD-60 is mounted to them with self-tapping screws to the required height.
A PVC guide corner is attached to the wall profile along the perimeter with self-tapping screws. It has a groove into which the ceiling panels are inserted. In turn, PVC panels have a tongue and groove for tight joining with each other.
Attaching the plinth to the guide angle
For a paneled ceiling in a bathroom, the panel is cut to size using a hacksaw. The plinth is inserted into the groove of the guide plastic corner with the tenon facing the wall. Through the tenon and the wall of the groove, the panel is secured to the metal frame with a self-tapping screw and a press washer.
The second panel is inserted into the groove of the first and pressed tightly until the gap between them is eliminated. The operation is repeated until the last panel is installed. Usually it has to be cut to width. When the ceiling panels are installed in the bathroom, the ceiling plinth is attached. To do this, there is a tenon on the PVC wall corner and a groove on the baseboard. It must be pressed tightly until the gap between the ceiling plate and the baseboard is eliminated.
Stages of installation of the structure
To ensure successful installation of PVC lathing, follow the recommendations of professionals. The first thing people pay attention to is the distance between the slats. This is true for both ceilings and walls. The optimal distance is a step of 30 cm. The PVC slats themselves are placed in a perpendicular position to the panels. In other words, if the panels are mounted in a vertical position, the slats are fastened horizontally and in the reverse order.
Features of marking the ceiling and walls for PVC sheathing
An important point is the marking. It is carried out at the initial stage. Without this, it will not be possible to create a high-quality frame for the ceiling or walls. If you find it difficult to mark yourself, watch the video. It will introduce you to the details of the marking process for the ceiling and walls.
The frame is fastened along the perimeter of the room; to do this, measure the length of the walls, finding the lowest angle, draw a horizontal line from it, along which they begin to mount the frame. Panels made of PVC material are joined together using a hacksaw and a miter box. These tools will allow you to get a good cut on the panels with minimal dimensions. The material is fastened every 25-30 cm.
If desired, you can make this process easier. To do this, pull the fishing line along the marking line. This makes installation easier and reduces the likelihood of errors.
Installation of PVC panels on plastic sheathing
If you have been able to appreciate the advantages of PVC lathing and cladding the ceiling and walls with plastic panels, carefully prepare for the installation process. To perform the steps correctly, watch the video. It will allow you to understand the intricacies of the ceiling creation process and avoid common mistakes. Video is the best assistant that guarantees that the cladding is done correctly.
How to install a ceiling from panels
Let's look at how to make a plastic ceiling in the bathroom with your own hands, without the help of professional installers.
Preparatory activities
Before you begin installing a plastic ceiling in the bathroom, you need to carry out preparatory work:
- If there is an old coating on the ceiling in the bathroom, it must be removed.
- There is no need to level the crushed slab, but if there are layers of crumbling plaster on it, they should be removed.
- It is recommended to treat the cleaned ceiling slab with deep penetration primer, which has an antifungal effect. The primer is applied with a roller in two layers.
Marking
It is necessary to outline a line on which the new plastic ceiling will be located. The amount of indentation from the ceiling slab depends on how the under-ceiling space will be used. If you don’t plan to install anything there, then you can step back by 4-5 cm. When installing lamps and laying communications under PVC panels on the ceiling in the bathroom, you should make an indent of such a size that you can arrange everything you need without any problems.
Frame construction
- A UD profile measuring 2.5 by 2.5 cm is attached to the walls along the intended line. Dowels are used for fastening.
- Now you need to take the ceiling profile, insert it into the guide and secure it with self-tapping screws and press washers.
- Ceiling profiles should be attached to the ceiling using hangers. While performing this work, you must constantly ensure that the horizontal level of the ceiling is ideal.
- After assembling the frame, you can begin constructing hidden wiring and laying pipes. It is more convenient to install built-in lamps in parallel with the installation of panels. The lamps are installed in accordance with a pre-developed diagram, holes for them are cut in the panels using a special attachment for a drill - a crown.
Installation of panels
Once the frame is assembled, finishing the ceiling in the bathroom can begin. Let's figure out how to make a bathroom ceiling using plastic panels:
A plastic plinth is screwed onto the guide profile to install the panels. Fastening is carried out with self-tapping screws, which are screwed into the mounting strip. When joining in corners, the plinth is sawn at an angle of 45 degrees.
The first panel is inserted with a shelf into the groove of the plinth and secured to the ceiling profile using self-tapping screws with press washers.
- Subsequent panels are mounted according to the same principle, only their shelves are inserted not into the baseboard, but into the groove of the previous panel.
- To form a seamless ceiling, the panels need to be pressed against each other as tightly as possible.
- It happens quite often that the last panel does not fit into the remaining space. It should be cut to width, making it 5-6 mm narrower than the installation site. First, the finishing panel is inserted all the way into the groove of the plinth, and then moved towards the penultimate panel so that it is pressed tightly against it.
So, it is quite possible to decorate the ceiling in the bathroom with PVC panels yourself. This is not a difficult job, but requires care and precision.
It is especially important to correctly mark and assemble the frame, since this determines how even the assembled ceiling will be
How to make a bathroom ceiling from plastic (PVC) panels with your own hands
Plastic panels are very often used to decorate the ceiling, they are especially relevant in the bathroom. This material is not afraid of high humidity, is easy to care for, and is lightweight and beautiful in appearance.
All these properties of plastic boards explain their great popularity when choosing a ceiling covering in a bathroom.
Advantages
One of the main advantages of plastic is that it is not afraid of moisture, so it is the best material for finishing the ceiling in the bathroom, where there is almost always high humidity. Due to high humidity and poor ventilation, mold or mildew may develop in the bathroom, but plastic panels do not multiply or damage them. There is a wide selection of this material, so it can always be matched to the interior of the bathroom. With the help of panels, you can hide all the unevenness and unevenness of the surface, making the suspended plastic ceiling even and smooth. In addition, in the space between the ceilings you can hide not only electrical wiring, but also other communication elements.
It is worth noting that such panels are lightweight, easy to install, have a long service life, and the cost of this material is low.
Preparatory work
Before installing plastic panels in the bathroom, you must first prepare the surface. To do this, if there was another suspended ceiling on it, it is removed, the existing gaps should be sealed with putty.
In this case, there is no need to level the surface, as this is done when assembling the sheathing.
To cover the ceiling with plastic panels, you will need the following materials and tools:
- metallic profile; plastic plates; fasteners; perforator; screwdriver or screwdriver; water and spirit level; measuring instruments; knife; Hacksaw; tool for creating holes for recessed lights.
Creating a wireframe
First, using a water level on the wall around the perimeter of the room, draw a line for the future ceiling. If you have tiles on your walls and they're level, it makes the job easier because you can follow the grout lines.
Metal carcass
Before you begin, you need to decide what type of lighting fixtures this room will have. If they are placed overhead, the distance between the ceiling and the main surface can be minimal.
If recessed lamps are used, this distance should be approximately 10 cm. A UD profile is installed along the perimeter of the room along the intended line, dowels are installed at intervals of 40-60 cm.
The next step is to cut the CD profile to the required length; you need to consider how you plan to install the plastic panels, since they are mounted perpendicular to the profile. Elements of the CD profile are mounted in the UD profile, the distance between them should be approximately 40-60 cm.
If the length of the profile exceeds 150 cm, hangers are used for additional fastening; if it is shorter, it is enough to screw it to the starting strips. If you plan to install a chandelier or pendant lamp, additional profiles are mounted here.
Wood
The plastic ceiling in the bathroom can be installed on a wooden frame made of wooden beams and slats.
And also in a frameless system, when a wooden box is attached directly to the suspended ceiling, provided that it is flat and there are no (spot) lighting fixtures installed on it.
For frameless construction you will need:
- hammer saw lamellas dowel nails 60 x 6 mm fishing line
Step-by-step instruction:
First you need to secure two edge strips with dowels to a concrete slab or screws to a rough wooden ceiling (the distance between the drilling points is 30 cm). 2 cm from the edges); Thread a fishing line crosswise between them; we mount the remaining slats at a distance of 40-60 cm from each other
If the ceiling level needs to be lowered to hide unevenness by arranging communications or installing spotlights, it is necessary to use a wooden frame.
For this you will need:
- wooden blocks 4 X 2.5 cm patches pegs screws thread hammer saw building level
Sequence of work:
Make markings on all walls at the required height; The beam should be located at a distance of no more than 80 cm; At the top, screw the mounting strips perpendicularly onto which the PVC panels will be attached.
Installation of PVC panels
First, a starting strip is attached to the guide profile around the perimeter of the bathroom. Now cut the board to the required length, insert one end into the starting strip, then bend the board slightly and insert the other end into the opposite strip. Then, using self-tapping screws, the panel is pressed against the sheathing. Place the starter strip and the next panel, first on one side and then on the other, press it against the first panel, remove the gap between them and secure with screws. This work must be carried out carefully, as it can damage the panel. The last strip is cut to the required length and then trimmed to the width using a knife. It is then inserted into the starter strips and this panel no longer needs to be attached.
Material calculation
Dimensions of plastic (PVC) ceiling panels: width 25 cm, but can be up to 50 cm, thickness is usually 5-10 mm, standard length 2.7 m, but can be up to 6 m. 3 m.
To determine the number of panels, you need to calculate the area of the bathroom and divide it by the area of one panel (indicated on the package). Be sure to add 15% to the result obtained, this is necessary for cutting the panels.
To calculate the number of CD profiles, draw up a lathing diagram on paper, taking into account the distance between the profiles. The number of screws and dowels is calculated taking into account the step of their installation and a small reserve is required.
Installation of lamps
The lamps in the bathroom are installed in the ceiling; before installing the panels, the electrical wiring is installed; leave large tails; it is better to cut them off later, before you run out of wires. The wire must be taken with double braid and placed in corrugated hoses. After installing the wiring, check its operation.
In the places where the spotlight is installed, make holes in the plastic panels; it is best to do this with a special drill, but you can also use a knife, but be careful.
The lights can be installed immediately after the panels are installed, or you can take the wires and install the lights after all the panels are installed.
Diagram of parallel connection of headlights via a transformer:
Connection diagram for 220V spotlight:
Conclusion
A wide range of plastic panels are used to decorate the ceiling, so they can be used to implement a variety of designs.
They allow you to visually change the size of the room; in some cases, the panels are even mounted diagonally, but this greatly complicates installation and increases material consumption, so this option is rarely used.
This solution can be implemented by any craftsman with his own hands, and not only get a functional, beautiful and durable ceiling in the bathroom, but also save a lot of money by making a ceiling from PVC panels with your own hands, which is important in our time.
Useful video
DIY panel ceiling pvc video:
Features of choosing panels
A correctly assembled structure ideally covers the uneven surface of the base, main ceiling. It will have the advantage of being able to reflect light, so a bathroom decorated in this way will seem much more spacious and, accordingly, cozier and more comfortable for bathing procedures.
The main material for the manufacture of this type of panels is polyvinyl chloride, which is abbreviated as “PVC”. This building material is an absolutely safe polymer, which differs from other similar ones in its characteristics in terms of operation and cost.
The ceiling in the bathroom is finished using a complete panel, which is mounted using strips 2.6 - 3.0 meters long.
Building materials are divided into:
- wall finishing material;
- material for finishing the ceiling surface.
The difference between the above species is only in weight. Heavier panels are made for wall decoration, and lighter panels for the ceiling surface. Thus, it is much easier to install a ceiling structure than a wall structure.
Depending on the design, panels are divided into:
- Wide seamless panels with no lock.
- Long 10cm stripes with a narrow lock. The name of such panels is “polka”.
- Panels similar in length, but with a wide lock. This type is the most popular. These panels are called “eurolining”.
The width of the first type of stripes varies from 24.0 to 37.5 centimeters. The thickness of the above types of products is 0.5-1.0 centimeters. The variety of color palettes on the building materials market allows the consumer to choose the color scheme that will best fit into the intended interior. For example, a consumer can purchase a product that is plain in color or decorated with textured designs.
Note that many people prefer to buy seamless strips, with which they can create an even, monotonous coating.
How to choose the right plastic panels for bathroom ceiling renovation:
- firstly, you need to choose a product whose thickness is more than 0.8 centimeters, because material that is not coarse enough can transmit the rays of light from a spotlight. Thus, the design will be transparent, and the base surface can be seen with the naked eye;
- It is always worth buying products produced in the same batch. Such products have the same batch number on the labels. Building materials produced in different batches may differ in shade;
- purchase material in a neutral color, such as white panels. The main advantage of this type is the ability to visually increase the space in the room, especially if it is a bathroom in a low-rise apartment in a multi-storey building.
A number of advantages of this building material also include:
- the ability to hide the wires that run to the lamps;
- environmental friendliness of this building material;
- the material is incredibly easy to care for; just wipe them with a cloth from time to time;
- Mold or mildew never forms on the surface, which often forms in rooms with high air humidity.
Finishing the ceiling in the bathroom with plastic panels is possible for absolutely everyone, even the owner of a house or apartment who is inexperienced in such types of work.
Types of ceiling panels
Ceiling panels are made from different materials, because... polystyrene, mdf, plastic, foam and so on.
To visually enlarge the bathroom, choose ceiling panels in light and warm colors
To create space in the bathroom, lighting plays an important role. The ceiling in the bathroom, made of plastic panels, makes it possible to install any lighting, it all depends on your imagination. And also ceiling panels can be made not only across, but along the length of the bathroom, and also diagonally. They make it possible to create all kinds of designs (see Ceiling lights for the bathroom: types and installation).
All this can be well used to adjust the space in your bathroom.
You can also choose glossy panels, thanks to which the light reflection effect will make your bathroom much more spacious.
It is also important that if your ceiling has flaws, hanging panels for the ceiling in the bathroom will hide the unevenness
Now let’s look at what types of ceiling panels there are, because choosing among the many options is not so easy.
PVC ceiling panels
A common material for making ceiling panels is polyvinyl chloride, also known as PVC. PVC panel ceilings are one of the most durable finishing materials, because they can withstand the loads in the bathroom and do not deform. The service life of the panels is about 20-40 years.
The plastic from which the products are made is environmentally friendly and does not harm human health. The material can withstand temperatures from -15 to 60°C without damage (see Plastic ceiling in the bathroom: advantages and installation).
MDF ceiling panels
Another type of MDF ceiling panels is Medium Density Fiberboard (MDF). MDF ceiling panels can be installed yourself; they do not require preparation of the surface to be finished.
Laminated panels have a number of advantages: with their help you can make your bathroom interior original.
You can choose MDF ceiling panels of various shapes, sizes, and shades to create unique designs or patterns on the ceiling surface.
Pay attention also to the color - high-quality ceiling panels should be evenly colored
Perforated ceiling panels
Perforated panels provide good ventilation of the room. And different types of perforation patterns will give an unusual look to the bathroom. A suspended ceiling made from perforated MDF panels can create a unique look for your bathroom.
Slatted ceiling panels
Slatted ceilings are an excellent option for decorating various types of rooms, especially bathrooms. Unusual finishes that imitate wood, fabric, stone or leather allow you to create an original surface.
Different colors and textures make it possible to choose ceilings in any style.
Foam ceiling panels
There are also foam ceiling panels. These panels are very lightweight and can be a great option for DIY installation. The main advantage of polystyrene foam is its water resistance, even if you water it from the shower onto the ceiling every day, you will not see any changes. They also have high waterproofing and soundproofing properties.
Foam panels can also be resistant to sudden temperature changes.
Frame for plastic panels
The suspended ceiling structure consists of a frame onto which plastic panels are attached.
Materials for mounting the supporting structure can be:
- tree;
- metal;
- plastic.
It is irrational to use wooden blocks and metal profiles for a suspended ceiling made of plastic panels. In conditions of high humidity, wood can swell and become an optimal environment for the development of fungus, and metal can become rusty and release toxins.
It is better to give preference to plastic slats. Leading construction experts have been recommending this material for a long time.
The ideal distance that should be between the ceiling and the panels is 15 cm. This is quite enough to locate communications and, if something happens, to have quick access to them.
Also interesting: How to inexpensively decorate a bathroom with plastic panels with your own hands?
If the tiles are located too close to the ceiling, you will have to install a frame on it. Initially, you need to make markings using a building level, and only after that begin finishing work.
To prevent the tiles from crumbling, you need to drill a hole in the center of the seam.
The materials chosen for the frame, be it plastic slats, metal profiles or plastic, are installed perpendicular to each other at a distance of 55-65 cm. This arrangement increases the rigidity of the structure.
Panels ranging from 2.7 to 3 m in length, if secured incorrectly, may sag over time. The frame must be erected very carefully and using a building level.