Home/Leisure and recreation/Finishing a bathroom in 1 day with plastic panels using the frameless method. Inexpensive DIY bathroom renovation
Plastic panels are an excellent method of finishing a bathroom space. This material is available to almost everyone, as it is cheap.
The best option for renovation is to decorate the room using a frameless method using plastic panels.
Installation methods
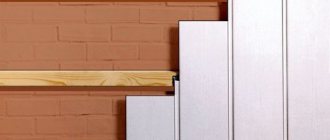
Before you go to the store for finishing materials, you need to take measurements. Calculate the total surface area that will be decorated with plastic. Its width is multiplied by its height. From the resulting number, subtract the area of doorways and windows, if any in the room. The latter are certainly rare for rooms in Khrushchev-era buildings, but in a private house the bathroom may even have several of them. It is also worth removing the bathtub area from the general meaning if it is adjacent to the wall and the repair does not involve its dismantling. After the calculations are completed, they go for the material. There are two ways to install PVC panels:
| Adhesive (frameless) | The panels are attached directly to the wall. |
| Frame | A special sheathing is installed under the material. |
In addition to a set of tools for work, you will also need:
- Floor and ceiling skirting boards;
- Corners.
These materials perform a decorative function, but without them the interior design will seem unfinished.
Required Tools
The list of tools for finishing a bathroom with polyvinyl chloride panels includes:
- Drill, hacksaw, screwdriver;
- Construction level, tape measure, pencil, square;
- Screws and dowels;
- Construction adhesive, screws or clamps;
- Wooden bars or metal sheathing;
- Sealant for processing joints.
The list may be expanded. The set of tools depends on the method of attaching the panels to the wall surface.
Frame method
This type of installation is not suitable for small rooms. The frame will inevitably “eat up” valuable centimeters. Typically, this method is chosen for finishing the ceiling. As mentioned above, the material has a special structure (no pores), so it will not become a breeding ground for harmful organisms. But, if there are voids under the panels, then entire colonies of bacteria and mold can settle in them over time. In addition, in the presence of a frame, the risk of damage to the material increases significantly; it becomes more fragile, without having a solid surface underneath it. One of the obvious advantages is the ability of the lathing to hide obvious defects in the wall: it can mask their unevenness or curvature.
Finishing work is divided into several stages:
- Applying markings and installing the first slats. The future sheathing is constructed from wooden or metal bars. For a bathroom, it is better to choose the latter, since wood is less durable and susceptible to rotting. The main line is drawn horizontally along the entire perimeter of the room. Focusing on it, attach the first rail using dowels. A second one is installed at the bottom near the floor in a similar way. They will be used as a basis for further work.
- Fastening additional rails. The optimal distance between them is considered to be 50 cm. Before installing additional slats, check their “horizontalness” using a level.
- Fastening moldings. They are necessary for masking joints in the corners.
Bathroom design 2 by 2 meters: interior design tips +75 photos
After work on the frame is completed, installation of plastic panels begins. The process begins with the wall that is always visible (far). The material is attached to the sheathing with self-tapping screws using a screwdriver. The panels are inserted into the corners (moldings) and screwed to the frame. There are special grooves on the sides of each that allow you to connect them together. To ensure better adhesion, they are lightly tapped with a hammer.
Adhesive cladding method
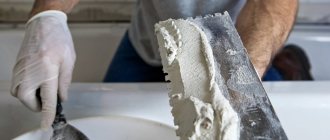
The adhesive method does not have all the disadvantages of the frame method, but is associated with additional finishing work: putty and primer of the surface. The first is carried out only if necessary, it does not belong to the mandatory preparatory stages. If the walls have obvious unevenness, chips or damage, then applying putty is indispensable. Defects are smoothed out and the surface is leveled. After the putty has dried, the wall is primed to ensure good adhesion to the glue. Panels are cut if necessary before installation.
A layer of glue is applied pointwise to the surface of the wall (so-called “liquid nails”). At the same time, try not to cover up the places where the panel seams will be located, since the substance may leak through them. As in the glue method, it is necessary to monitor how smoothly the material lies on the surface. The process is completed by installing the framing profile.
Features of the frameless method
Even a beginner can handle installing plastic panels using the adhesive method. But before starting repairs, you need to thoroughly familiarize yourself with the peculiarities of the frameless method.
- A frameless finishing method is suitable for a small bathroom. The area will remain untouched.
- Installation is simple due to the fact that fastening to the wall surface is carried out using an adhesive composition. There is no need to use slats or worry about attaching them.
- Difficulties may arise when dismantling the structure, since it will be tightly attached to the wall surface.
- To attach the material, a special adhesive composition is used.
- The wall surface must be carefully prepared. To do this, it is leveled and treated with a primer. If this condition is neglected, installation problems will arise.
- You need to know exactly how to use the adhesive. It is applied pointwise to the surface of the panels. In this case, the distance between the points should not be more than 30 centimeters. If the panels weigh more, the distance between the glue points should be smaller.
- In order for good adhesion between the wall and the panel to occur, it is necessary to apply force and fix the material in this position. Otherwise, it will simply move away from the wall surface.
Bathroom finishing with PVC panels
Of the two methods of attaching PVC wall panels, it is best to use the frameless method with adhesive fixation. For work you will need:
- Roulette.
- The rule is 1 m long.
- A hacksaw with a fine tooth (a hacksaw for metal will do).
- Construction knife.
- Pencil/marker.
- Plumb.
- Hammer and brush attachment for cleaning walls.
- Primer.
- Glue.
- Transparent silicone sealant.
- PVC wall panels.
- Plastic corner.
- Dust mask.
Some tips for choosing.
A primer is necessary for better adhesion between the finishing material and the wall. And you need to choose it depending on the wall material.
You can use specialized glue from the panel manufacturer. But the finishing elements will also be firmly fixed with Bustilat and even liquid nails. From personal experience: we recommend using “Bustilat-D” or “Bustilat-Lux”. The only disadvantage of this glue is the drying speed. Under normal conditions, it hardens within 24 hours, and gains full strength within a week.
The corners in the room can be covered with specialized corners, but they are unreasonably expensive, and working with them without proper skill is very inconvenient. And if you purchase ordinary plastic corners, they can be installed directly on top of the PVC panels. They will fulfill their function 100%, while making the work easier and costing much less.
Secrets of the masters.
- Preparing the walls.
Before laying down the panels, clean the walls of anything left on them. Ideally, there should be a bare concrete (brick or wood) surface
Pay attention to the horizontal corners of the room. If there are roundings, they must be removed using a hammer drill.
Because they really interfere with installation. When applying the rule, identify all the protrusions, mark them with a marker, and then knock them down.
The last stage of preparation is to prime the walls. After the primer has dried, you can begin installation.
- Installation of PVC wall panels.
Fastening must begin from the most visible corner. The first panel is cut to size, the back side is wiped of dust and glue is applied. Depending on the glue used, the gluing technology changes. If you listened to the advice and purchased Bustilat, then you need to apply it in an even layer 1-1.5 mm thick and press it against the wall. The peculiarity of fixing the first panel is that it sets the verticality of all other slats. Therefore, it must be installed using a plumb line and then be fixed at the bottom and top using self-tapping screws. Screw the self-tapping screw into the corner between the wall and the floor (ceiling) at an angle of 45°. By doing this, you get caught in a joint between the slabs and you can do without dowels.
Then, the remaining sheet panels are glued. The very last panel on each wall requires adjustment in width. To do this, you need to take a measurement and put it on the panel. Cut it along its entire length, most conveniently with a construction knife, along the attached ruler (rules).
After adjustment, this lamella is glued into place.
The first panel on the next wall must be installed plumb and fixed with self-tapping screws at the top and bottom. Then, the work algorithm is repeated.
After completing the installation, carefully inspect the work done and, if necessary, remove excess glue that may appear at the joints between the panels.
If there are guide rails on the walls, the plastic can also be attached with self-tapping screws
Leave the bathroom for a day, and preferably limit access to it. Let the glue gain its stated strength.
- Finishing work.
After a day, you can remove the fixing screws and glue the plastic corners. But, before that, treat the corner joints between the slats along the entire length with silicone sealant. By the way, you can also glue the corners with the same silicone sealant.
Watch the video for a visual representation of how to cover walls with PVC material:
Generalization
In general, if the house is new, it will shrink within 2-3 years. Therefore, in a new house, it is more advisable to install plain and simple PVC wall panels. Numerous reviews testify to this. Even if they are deformed, this will not be noticeable.
And one more nuance, in a new house, no matter how carefully and precisely you fit the plastic panels (or other finishing material) to each other, they will definitely come apart or become deformed. It is impossible to eliminate the influence of shrinkage of the structure.
Do-it-yourself installation of plastic panels on the sheathing
Plastic strips are usually placed vertically, so the profile is placed horizontally (and vice versa). The step between the slats at the bottom is 30 cm, and at the top it can be increased to 40 - 45 cm.
Cladding profile:
- CD-60 - galvanized guides for fastening plastic;
- UD-25 - strips for fixing starting elements, external corners, strengthening the perimeter;
- ES bracket (suspension), the length is chosen depending on the curvature of the walls - 90, 120, 150 mm when folded.
Wooden slats are impregnated with drying oil 3 times. If this is not done, they will tend to deform due to humidity and may pull the plastic with them.
The staples are fixed to the wall with dowels with a diameter of 6–8 mm and a length of 45–50 mm. The profiles are fastened with a flea screw , and they are used to secure the finish to the base. The slats are fastened with wood screws .
The lower profile is installed 2 cm above the floor, and the upper one is mounted under the ceiling. A perimeter frame is made from a profile around the protruding sewer outlets and ventilation ducts.
Set of tools
The markings are made with a tape measure; for convenience, its length should not be less than three meters. Horizontal fastening lines are marked on the wall using a construction bubble level; you can use a laser tool.
Other tools for installing plastic:
- electric tools: drill, hammer drill, screwdriver, grinder;
- hammer, construction knife, metal saw (fine teeth);
- Phillips and flathead screwdrivers, pencil;
- sealant gun, miter box;
- cord or thread for easy alignment of slats.
Material calculation
The number of plastic panels can be counted by area, but this will not take into account scraps that no longer fit anywhere in length. Dimensions for installation are measured using the already installed frame. It is better to count the number of supposed stripes on each wall, and see how many of them will come out of one 6-meter strip, taking into account the length of the elements. Often, when transporting from a store, six-meter plastic is cut into 3-meter sections, which is also taken into account in the calculation.
In addition to the PVC material, additional elements, fasteners, and sealant are calculated.
Galvanized profiles are counted at the selected interval, do not forget additional places of reinforcement, then all dimensions are multiplied by the number of elements of the same type. They calculate cutting on the basis that CD profiles are sold in 3 and 4 m, and UD - in 3 m. Staples are placed every 70 cm along the length of the rail, always at the edges, the number of hangers and dowels depends on this. Fleas are counted in 50 pieces. per square of wall.
Sequence of work
A correctly aligned frame allows you to cut several strips of plastic at the same time. If there is a protective film , it is not removed until installation. Before installing the material, additional elements are installed. This can be a starting strip, corners, profile F. They have longitudinal niches into which the ends of the PVC elements are inserted. The start must be provided along the perimeter of the protruding parts on the wall. The ends of the additional planks are cut at an angle of 45° using a miter box.
Sequence of processes:
- the ends of the first strip are brought into the start , checked for verticality, and fixed with self-tapping screws into the shelf;
- the second is inserted into the first , pressed a little, but not so that the second strip bends; if you purchased cheap plastic, then a 1 mm gap will still remain;
- subsequent panels are fixed in the same way , the last strip is cut to width, it is the most difficult to attach.
To drive the last part into the finish, you need a straight screwdriver. Use it to carefully pry up the finish shelf, retracting it for installing the strip.
Another fastening option involves fixing the panels without starting or corners. All decorative elements are installed after installing the plastic.
Screen under the bottom of the bath
UD-UD-25 profiles are attached to the floor and under the edge of the bathtub ; the upper strip must be secured to the nearby wall, forming a rectangular screen. The CD profile is started and secured with self-tapping screws. Usually the screen under the bathtub has a stationary and movable part . For a moving sash, runners are screwed at the bottom with self-tapping screws; this can be the same UD profile.
Sequence of work:
- strips are cut according to the height of the gap between the start and finish minus 1 cm for free movement, while distinguishing between stationary elements and parts for the movable part;
- They are leveled according to the type of fastening of the strips to the wall, without pinching, so that each panel is in a free state.
Some users leave a niche like an open opening. This lightweight option will not require runners to move the improvised door.
Plastic on the ceiling
Before finishing the ceiling, you need to choose a pattern, take measurements, and determine the type of material.
Covering the top slab is much easier than covering the walls. Step by step process:
- Additional slats are installed to fix the lamps
- a UD profile is attached along the perimeter of the walls , onto which a PVC starting strip is mounted;
- plastic is cut to size between the internal surfaces of the start minus 1.5 cm, so that it is convenient to insert;
- The strips are assembled in order and secured with flea screws to the shelf.
Valera
The voice of the construction guru
Ask a Question
When the coating fits the place where the lamp is attached, a hole is made with a special crown through which the wires are brought out. If you forget about this, you will have to disassemble the panels from the end to pull out the wiring.
Methods of fastening to the sheathing
Usually plastic panels are fixed to the slats with self-tapping screws, but this is not the only way. Plastic has been installed in the bathroom for a long time, so different fixing options have been developed.
For fastening to the rail, in addition to self-tapping screws or self-tapping screws, use:
- staples , for this you need a stapler (for wooden slats);
- glue (liquid nails).
Fastening with staples is quite similar in quality to fixing with self-tapping screws. It is necessary to take staples no smaller than size No. 8 to ensure reliability. The working plane of the stapler is placed parallel to the plane of the river so that the spikes enter perpendicularly.
should not contain . The seller will tell you the type of glue for plastic.
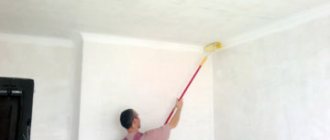
Finishing touches: completion of renovation
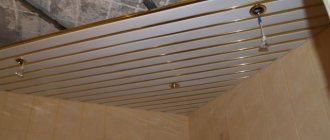
Today I will mention ceiling installation in passing, so as not to overload readers with unnecessary information. Let me just say that I made the ceiling slatted, for which I secured 3 combs along the bathroom with dowel nails. Further assembly is completely elementary. Aluminum slats are inserted into the grooves and snapped into place, and holes are cut for spotlights (I got four of them). This can be done with simple scissors - aluminum is very thin and soft.
After all the work done, the garbage was removed from the bathroom, which turned out to be negligible. All that remained was to bring in and put the sink in place, connect both faucets and hang a shelf with a mirror. But these were already trifles; the bathroom had already acquired its appearance.
Top view - looks good
Shelves are hung, mirror and sink are installed, faucets are connected
Preparation of tools, raw materials
If the initial finishing material has already been purchased, then all that remains is to prepare the necessary tools.
To carry out this type of work you will need:
- Hammer or electric drill;
- Screwdriver;
- Construction stapler;
- Level;
- Roulette;
- Electric jigsaw;
- Liquid nails or adhesive mixture.
Before proceeding with installation, it is necessary to calculate the required amount of starting materials. Calculations are carried out taking into account the area of the bathroom and the area of one panel.
The area of one element is equal to width × length (for example, width 0.35 m, length – 2.5 m, area – 0.87 sq.m.). The amount of material can be determined by simply dividing the area of the room by the area of one panel (for example, (4.5 / 0.87) sq.m. = 5.1 units). In this case, we need 5 units.
Surface preparation
In order to decorate the walls in the bathroom with plastic panels, they should be properly prepared in advance. To do this, you should perform the following manipulations:
- All furnishings should be removed from the room.
- The old finishing material is removed and removed from the room.
- Holes that are present in the wall must be sealed with cement mortar.
- After this, using putty, it is necessary to level the surface.
- The top of the wall is covered with a composition against fungus and mold, as well as other bacteria.
- The surface is lubricated with a primer to ensure strong adhesion between the material and the wall.
Recommendations for selection
When choosing wall panels for a bathroom, it is necessary to take into account not only the size and external design, but also the quality characteristics, the main one of which is hygroscopicity.
Quality
Before purchasing finishing material, it is necessary to carry out a thorough visual inspection of the wall panels. High-quality panels are characterized by uniform coloring and also do not have external defects such as cracks, chips, scratches and any abrasions.
Option for wall cladding with panels
The panels to be installed must have the tightest possible connection between each other, forming an inconspicuous seam.
It is optimal to purchase wall panels whose surface is covered with a special protective film, which is removed immediately after installation.
Dimensions
Modern wall panels can differ not only in appearance and design, but also in size:
- Sheet models are fairly large elements that are easy to install and most often have a pattern or image already applied. This option is in great demand for decorating the most difficult areas from the point of view of operation, including the bathroom. The length of the element is no more than 2.4 m with a thickness of 3-6 mm.
- Slatted models, thanks to their convenient sizes, can visually slightly enlarge a small bathroom area. The visual effect also makes it quite easy to increase the height of the ceilings. The length of the element is no more than 3.7 m with a width of 12.5-30.0 cm and a thickness of 8-12 mm.
- Tile-type models are ideal for creating mosaic-style wall decoration. This type of cladding panels can easily replace coatings based on natural stone and wood, decorative plaster, as well as other modern or traditional materials. The length of the side of the element is within 30-100 cm.
The variety of parameters of wall finishing panels allows you to install such elements in bathrooms that differ in height, length and width.
Sheet panels for bathroom
As a rule, fiberboard materials are used as the main raw material for finishing wall boards, which are most often supplemented with eucalyptus additives, oils and other natural components, which has a positive effect on their strength, stability and durability.
Most often, so-called “seamless” panels with dimensions of 25-37x260-300x1.0 cm are used to decorate the surface of walls in rooms with high humidity.
Types and features of plastic panels
Polyvinyl chloride is justifiably conquering the building materials market. Due to their cost, lightness, and temperature resistance, PVC products are especially popular when creating budget but stylish renovations. It is quite possible to use plastic panels to decorate a bathroom: in this room such material looks appropriate and organic.
Manufacturers offer panels with different textures, which can imitate both natural materials, such as wood, and artificial ones, repeating the tile pattern. A rich color palette makes it possible to choose the optimal shade for interior decoration, and thanks to printing, even from PVC panels you can create a spectacular panel.
But in addition to the aesthetic component, when choosing panels for finishing a bathroom, you should pay more attention to the types of lamellas. Conventionally, they are divided into two broad subcategories: sheet and sectional.
Sheet panels for decorative wall finishing are good for working with perfectly smooth walls, as they are often mounted in a frameless manner. The minimum thickness of such a panel can be only 0.4 mm, so the material is convenient for finishing surfaces with a complex configuration, for example, arches or doorways.
The main advantage of decorating walls with this type of panel is the possibility of seamless fastening of sheets .
Sectional plastic panels are used much more often due to their lower cost and ease of assembly - the cladding is mounted on a pre-created frame.
There are two types of products.
- Lining is the most inexpensive type of plastic panels, which are secured to each other with a European locking connection. The presence of a groove and a tongue contributes to maximum seam density, but the junction of the lamellas remains very noticeable. Therefore, lining is used less often in the interior, as it looks less aesthetically pleasing.
- wall panels are a better option for interior decoration and are often used for bathroom renovations. If the installation technology is strictly followed, the joint remains almost invisible.
The shade, various patterns and surface texture depend on the type of panels. Thus, laminated panels receive color and texture thanks to pasting with thick PVC film. And offset ones are colored using a printer, after which the design is covered with a layer of special varnish. Like laminated slats, offset slats can also replicate the texture of wood or stone.
Thermal transfer PVC panels are processed using film. Thermal transfer material is pressed to the surface of the lamella using a heated drum, after which the design is transferred to the product. Film and varnish act as image protection.
Thanks to the variety of shades and patterns, plastic panels practically do not limit owners in creating a modern and attractive bathroom design.
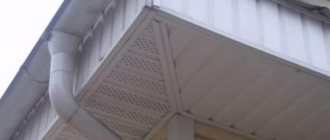
In addition to the walls, you can also decorate the ceiling with plastic panels. This solution will help hide the wires of lighting fixtures.
Facing a bathroom with PVC panels: what will you need?
To cover a bathroom with PVC panels, no special preparation is required.
To renovate a bathroom with plastic panels yourself, you need the following materials:
- plastic panels;
- PVC moldings;
- metal profiles or wooden strips for sheathing;
- holders (metal or plastic);
- dowels, screws or liquid nails;
- impregnation for wooden sheathing against mold;
- insulation.
All materials must be purchased based on the area of the room. In addition, you need tools such as:
- metal hacksaw (can be replaced with a jigsaw);
- screwdriver or drill with low speed;
- level for leveling;
- tape measure for measurements.
Now you can begin installing the panels, having first cleaned the walls of the old cladding.
Interesting design ideas
Every owner of an apartment or country house wants his home to have a unique design that will attract attention and surprise guests. To do this, you can familiarize yourself with design examples or seek help from a professional designer who will offer different options.
Before choosing a design, you should study its features:
Most people think that plastic panels are a cheap option that only comes in one color and looks boring. However, manufacturers offer original decorative options that are ready to diversify the interior of the room.
You can often find a bathroom lined with plastic panels in a minimalist style. This interior implies a minimum number of items along with free space. It should contain clear lines and restrained shades. To make the interior look complete, it is recommended to add metal and glass accessories.
The rustic style and country style look beautiful. The interior suggests that it will use natural elements, but plastic allows you to imitate a similar atmosphere. When using PVC panels with wood imitation, you should take a responsible approach to the choice of other elements. Designers recommend choosing simple pieces of furniture made of wood. Spotlights should be replaced with a chandelier that matches the style.
Provence is considered the spirit of simplicity and comfort. Such an interior is easily created by covering it with plastic panels. The interior should be created in light pastel colors, the furniture should be simple. You can complement your bathroom with ceramic and porcelain decor, as well as floral-themed patterns.
Many owners of houses and apartments decide to combine a variety of color options. This solution allows you to decorate the room in an unusual design. A combination of red and black, blue and pink, white and light green will look original. A Khrushchev building decorated in this style will look creative and modern.
Since the bathroom is a room in which a person takes water treatments and relaxes, decorating in a marine style will be relevant. For sale there are panels with drawings on similar topics (ocean, sea inhabitants, vegetation, etc.). It is also recommended to decorate the floors in a marine style.
Modern style involves choosing glossy white products. An interior decorated in this style makes it possible to refresh the bathroom and make it modern. Due to the shiny surface, you can visually enlarge the room and make it lighter. In a large room, you can use glossy panels of other shades. Red, blue or yellow products will look beautiful.
The panels can also be combined with different finishing materials. You can often find a bathroom where the lower part of the walls is covered with clapboard along with a plastered upper part.
You can line the walls with plastic panels with patterns, which should be combined in a certain order. Such products have an increased cost, but this is justified by the result obtained after covering. The room takes on a stylish and modern look. You can use panels with a pattern next to mirrors or in the shower. The remaining walls should have a uniform surface.
It is allowed to use panels with different textures. They should be arranged in stripes, due to which the room acquires an original play of surfaces. Such techniques are relevant for large rooms with low ceilings. Due to this kind of play, the walls become visually higher, and the proportions of the room look organic.
Some buyers purchase PVC panels with a 3D pattern
The image will attract attention and transform the room. Due to the “volumetric” panel, you can visually increase the area of the room, adding an additional dimension
However, 3D panels can only be used in spacious bathrooms, since adequate perception of the picture occurs from a certain distance.
To learn how to decorate a bathroom with plastic panels, see the following video.
Fastening external water pipes
During the preliminary stage of renovation work in the bathroom, all plumbing and lines were replaced. The water pipes were not made exactly according to my mind - straight, but without fixation. Therefore, I had to purchase clips for fastening them, which were installed after finishing with plastic panels. Having marked in the right places using a hammer drill, I drilled holes and secured the fastening clips to the dowel nails. And here you need to be more careful if the house is panel. The walls of the bathroom boxes are quite thin, and the concrete is durable. If you drill incorrectly, a fairly large piece of the wall may fall out from the back side.
We fasten plastic pipes to the wall with special clips
Lining the bottom of the bathtub along the frame
All work at this stage is carried out identically, but here you can add additional strength to the fixation of panel sections if you use self-tapping screws. The first section from the wall must be glued with liquid nails, as well as the strips on which the inspection hatch will be located. It also needs to be glued.
The bottom of the bathtub is almost ready, only little things remainPros and cons of using plastic panels
The main advantage of plastic, in addition to its low cost, is practicality:
- The material is moisture-resistant and does not become stained if drops of water fall on it.
- High-quality plastic does not absorb or emit odors.
- The panels are undemanding in maintenance.
- Repairs in a bathroom with PVC panels are carried out literally in a day, after which the room can be used immediately.
- The installation features of plastic wall structures make it possible to hide utility lines behind them.
- Plastic has a variety of designs and looks impressive in modern-style interiors; it is suitable for the design of a small bathroom.
The disadvantages include:
- Fragility. A strong blow or impact with a sharp object threatens the appearance of cracks or through holes, and when pressed with a finger, dents are easily formed.
- PVC products can hardly be called environmentally friendly, although high-quality plastic does not emit toxins.
- Condensation is inevitable if you use plastic panels in the bathroom. Good ventilation is necessary to prevent mold from appearing on the walls.
How to choose high-quality PVC panels
The first thing you should pay attention to when buying plastic panels is their price. Products that are truly strong, durable and do not pose a health hazard cannot be cheap.
The panels must be smooth - without waves or bends, with intact, undamaged edges, otherwise a perfect joint will not work and water will seep into the cracks. It’s not hard to guess what this means in the bathroom.
Products with good strength characteristics should have a thickness of 1 cm or more, as well as the maximum number of stiffeners.
To make the bathroom decoration with plastic panels pleasing to the eye, you also need to evaluate the design of the material. The profiles must be from the same batch, otherwise some copies will differ in color or pattern.
For a small room, it is better to choose light panels without relief or texture. Glossy types of plastic are preferable to matte ones.
When decorating a spacious bathroom with PVC panels, plastic profiles with a pattern or ornament are suitable.
Three ways to install plastic panels
Plastic finishing of a bathroom can be done in three ways:
- Fastening to the sheathing. In this case, the panels are fixed to a wooden or metal frame using a stapler or ordinary nails. A convenient option that allows you to hide uneven walls and water pipes, which are sewn into a separate box. Bathroom design benefits significantly from the absence of visible communications.
- Fastening with mounting clamps. In this case, the panels are “fastened” to the sheathing of plastic slats with special “locks”, which significantly speed up installation. It is also much easier to disassemble such a structure if necessary. The use of a frame when decorating a bathroom with PVC panels is justified if the room has a large area. A few extra centimeters “eaten up” by the overhead strips will not be noticeable.
- Glue method. The panels are attached directly to the wall using liquid nails, and are additionally secured with dowels along the top and bottom edges. Other types of adhesive solutions are also used. The instructions usually indicate whether a particular mixture is suitable for plastic. The gluing method is energy-intensive, but quite justified when it comes to small spaces.
Video: Finishing bathroom walls with plastic panels in 1 day
Advantages of PVC panels and determining their quality
Of course, PVC panels have a number of advantages over other materials that are used for finishing.
So, the advantages of PVC panels include:
+ Existing large selection of colors and shades
+ Moisture resistance. Water does not have any harmful effects on such panels, so mold does not form on PVC panels.
+ Availability and speed of installation. All work on wall cladding can be easily done independently. Moreover, even without having relevant experience in this matter.
+ Bathroom communications are perfectly hidden under PVC panels
+ If necessary, you can additionally insulate the bathroom or apply sound insulation to its walls.
+ Easy to use
+ Relatively low cost
+ Replacing a damaged panel is done in a matter of minutes.
As for the range of plastic panels, now there is really a very large selection of them.
But, on what basis should you choose PVC panels so that they are truly of high quality? When choosing panels, you should definitely pay attention to the following:. 1
On the number of stiffeners in the panel. Those. the more such ribs there are, the stronger the material will be
1. The number of stiffeners in the panel. Those. The more such ribs there are, the stronger the material will be.
2. Stiffening ribs must not be deformed or damaged. If this occurs, it means that the panels were not stored correctly.
3. The front part of the panel should be evenly colored. The drawing should be clear and have no blurred edges.
4. The dimensions of the panel along the entire length and width must be the same
When purchasing a panel, it is strongly recommended to purchase panels that belong to the same batch.
How to choose plastic panels
When purchasing plastic panels, pay attention to the following aspects:
- Mechanical strength. Squeeze the panels with your fingers: they should not wrinkle easily.
- The plastic must be soft, but resilient and elastic, otherwise it will crack and break during installation.
- Another important nuance is the coincidence of the pattern. You can clearly check this by placing several panels in one row.
- Joint quality. When connecting panels, the joint must be tight, without gaps or cracks.
Design ideas
In modern bathroom design, finishing options using PVC panels are extremely popular. A room decorated in this way takes on a stylish and beautiful look. Decoration is most often done with slatted or panel plastic, samples of which are presented in a wide range of colors and textures. Slatted PVC is well suited for covering ceilings in a small bathroom; thanks to them, the interiors turn out to be original, and even a nondescript “Khrushchev” can be transformed into a cozy and spacious room. For bathroom design, it is recommended to create unique compositions by combining bright colors. An unusual solution is considered to be finishing with panels imitating leather, granite or wood; it will be interestingly complemented by edging with ornaments.
For lovers of the classic style, despite the wide range of colors, it is best to give preference to warm-colored materials and avoid large patterns. This cladding will be ideally combined with shades of gold on the doors and decorative elements in the room. You can also select a separate area in the bathroom and cover it with plastic to resemble natural stone. If the PVC finish serves as the basis for the design in the bathroom, then in order to emphasize the style and chic of the room, it is advisable to carefully consider all the details. For example, in a spacious room, it is recommended to completely replace ceramic tiles and install glossy panels of deep color on the walls and ceiling. They will harmonize well with the set of appliances and fill the bathroom with light, visually expanding the space.
The refined taste of homeowners will be indicated by PVC panels with glitter, which are usually used for wall decoration
Therefore, in some cases it is best to choose plain panels and complement them with beautiful accessories.
If the home is decorated in Art Nouveau style, then the right solution for finishing the bathroom would be to cover it with red and black plastic. This unusual color combination looks impressive and modern. In addition, not only alternating contrast, but also panels of different widths will help to dilute the atmosphere in the room.
For rooms in which ethnic style predominates, finishing should be done with wood imitation material. Against their background, wooden furniture and cotton curtains with small flowers create a cozy atmosphere. But such decor is not recommended for a shower stall, as it will look inappropriate. Lining the bathroom with plastic imitation marble is also considered a bold idea. It will ideally replace ceramics, and its beautiful texture will additionally emphasize the naturalness of the interior.
Thanks to modern photo printing methods, it is also possible to place in the bathroom not only landscapes of your favorite places, but also family photographs. To emphasize this design, it is necessary to decorate the room with metal and glass elements. If, on the contrary, you want to get a comfortable but modest bathroom, then you need to choose pastel-colored plastic for the cladding; you won’t need to buy expensive furniture for it, and the interior will be interestingly decorated with ceramic jugs and flower patterns. A ceiling covered with similar panels will also add attractiveness to such a room; it is advisable to make the installation from slatted panels with mirror inserts.
Is it possible to install PVC panels without lathing on the ceiling?
Before you start attaching plastic panels to the ceiling without lathing, you should first determine the distance between the panels and the ceiling. The mentioned interval depends on the type of lighting used or planned.
In the case when lighting is provided by built-in lamps, the gap should be at least ten to fifteen centimeters. This is necessary in order to completely and completely hide the wiring. It is recommended to outline the locations of the lamps in advance, cut holes for them and install the bases of the lighting fixtures.
In addition to the above preliminary steps, in the case of the ceiling, as well as with the walls, it is necessary to level it and clean it. In most cases, you can do without lathing, and the stages of work will coincide with the installation of panels on the walls. The only difference is that before attaching the fragments to the ceiling, you must immediately install ceiling plinths on three walls. During the work process, it is recommended to regularly use a building level.
If installation work is carried out in a bathroom or other room with high humidity, the resulting cracks in the wall finishing should be filled with silicone sealant. This will ensure the waterproofness and durability of the ceiling finish.
The article examined the features and varieties of such a process as attaching PVC panels to a surface without sheathing. Overall, this is an unusual but common method of installation, which in many ways is not inferior to the process using frames.
How to properly care for PVC panels
In addition to the obvious advantages, plastic panels have some additional advantages. They are easy to care for and easy to wash. To do this, you only need warm water, a dry cloth and the simplest detergent. Do not use abrasive substances or brushes to wash plastic. This method of care will cause cracks and other damage to appear on the surface of the finish, after which dirt will begin to accumulate in them. The most common problem in a toilet or bathroom can be black mold. Only a special antifungal agent can cope with it. Dirt between individual planks is best removed with a rubber spatula.
An additional advantage of using such a coating is the absence of dust on the panels. Plastic is highly antistatic and therefore, even after a few years, the bathroom will be clean and tidy.
Sheathing using frame technology
A more familiar and common option is finishing the bathroom with plastic panels and constructing a frame. This allows you to fix the cladding without first leveling the walls, and also to hide all communications behind the cladding.
Required tools and materials
To carry out the work you will need:
- perforator;
- dowels and screws;
- wooden beam for mortgages;
- guide and rack metal profile;
- straight hangers;
- polyurethane foam;
- corrugation for electrical wiring.
Preparing the walls
Wall preparation involves dismantling the old finish and sealing large defects that affect the load-bearing characteristics of the partitions. Additionally, the walls are treated with a deep-penetrating primer for mineral surfaces with antiseptic additives. Also at this stage, water and sewer pipes are laid out, electrical wiring is laid to sources of consumption.
Note! The electrical wire is laid in a corrugated tube, which is attached to the base (wall or ceiling) with special clamps
Frame installation
To construct the sheathing, a galvanized profile for plasterboard is used, since wooden blocks are susceptible to rotting and warping when used in wet conditions. The frame posts are mounted in the corners of the room and secured to the wall using direct hangers.
Vertical posts are attached to the base with direct hangers.
Horizontal jumpers are attached to the vertical posts in increments of 40–60 cm, to which the plastic trim will subsequently be attached. To connect profiles at an angle of 90°, the edge of the profile is cut and placed on the top shelf of the guide and attached to it with self-tapping screws.
In places where attachments are installed: cabinets, shelves, heated towel rail attachments, and so on, additional jumpers (mortgages) are provided. To ensure that the fastening of the equipment is as reliable as possible, it is recommended to reinforce the profile with a wooden insert, which is fixed with self-tapping screws.
Reinforcement of the frame in places where attachments are attached.
A frame for the box is also assembled around the riser.
Advice! To give additional rigidity to the frame in places where any elements are attached, it is recommended to foam the space between the mortgage and the wall. You can also foam the corners: this will make the frame less noisy.
A similar frame structure is assembled on the ceiling base for its cladding.
Installation of PVC cladding
The bathroom trim starts from the ceiling. Along the perimeter, a starting profile is attached to the metal guides, into which the edges of the panels are inserted. The strips are attached to the cross members of the frame with self-tapping screws and a press washer. To ensure that the junction of the panels is minimally noticeable, they are tightly connected to each other. But there are models with a selected edge, which, after joining two strips, forms a V-shaped seam
Therefore, when choosing a material, you need to pay attention to this nuance.
After covering the ceiling, they begin to install the plastic on the wall frame:
- The starting strip is fixed at the bottom and top. It can be glued to the floor covering with silicone to create a sealed joint.
- The panels are inserted into the grooves of the starting profile and fixed to the frame with self-tapping screws.
- When connecting two panels in the corner of a room, use a corner profile.
To make the finish look cohesive, the outer stripes of one row must have the same width. This is calculated before the first strip is attached. Another option to decorate a corner beautifully is to bend the panel and attach it without using additional corners. To do this, 2-3 cm is cut out from the back side of the plastic (the front part should remain intact). After this, the panel can be easily bent in the desired direction to form an outer or inner corner.
Panel installation
This procedure is carried out according to the following scheme:
- The glue must be applied from the reverse side. The dots are placed in a zigzag pattern. There is no need to place them close to the edge, since when pressed it will leak out.
- After this, wait until the mass thickens and install the corner joint.
- Installation begins from a blind corner. The trim must be installed level and a level must be used to check.
- The same manipulations must be carried out with all panels up to the corner.
- If it is necessary to reduce the width of the plastic, use a knife.
- Finish the entire room in this manner, installing corner joints in each corner.
Corner joints must be chosen correctly. they can be both external and internal.
AllaAuthor of the article
Did you like the article?
Share with your friends: