Interior ceiling decoration with plastic panels is deservedly popular due to the high performance characteristics of polyvinyl chloride (PVC). The material significantly simplifies the design of both the ceiling surface and the walls, without leveling the base base. With the help of panels you can cover any room, even with a high level of humidity.
A large selection of colors, textures and shapes allows you to create an original and harmonious room design. You can decorate ceilings with plastic panels yourself, following the recommendations of professionals.
What are plastic panels for walls and ceilings, their advantages
To understand how to repair a ceiling made of plastic panels, it is recommended that you familiarize yourself with the strengths and weaknesses of this finishing material.
The composition of polymer products includes polyvinyl chloride, which is characterized by sufficient lightness, hardness and strength, which makes it possible to sheathe walls and ceilings in residential spaces, shopping centers, and offices.
A decorative image or design is placed on the outside of the panels using offset printing, thermal printing or lamination. To give a higher degree of strength, wear resistance, antistatic effect and resistance to sunlight, the surface is coated with matte or glossy varnish.
Manufacturers in the process of manufacturing finishing materials from polyvinyl chloride do not use phenol-formaldehyde resins, which have a negative impact on human health. For painting PVC panels, water-based paints are selected.
A variety of plastic finishes makes it possible to decorate bathrooms, toilets, bedrooms, hallways, and living rooms.
The positive characteristics of plastic products include:
- Simplicity and speed of installation of PVC panels. Even an untrained person can install the sheathing and finish the room, especially if the base base does not have serious irregularities or cracks. Often installation work is carried out using liquid nails. If the surface needs to be leveled, then a metal or wooden structure is mounted - a frame, where the panels are fastened with self-tapping screws
- During operation, the coating does not cause any particular difficulties, washes well, and is not afraid of wet cleaning. But in order not to spoil the appearance of the plastic panels, it is not recommended to use household chemicals; just prepare a soap solution
- Environmentally safe for humans, do not emit toxic substances or harmful fumes
- Good degree of durability. Here it is important to make the right choice, use a denser coating for wall cladding, and a lightweight version is quite suitable for the ceiling surface
- Sufficient level of heat and sound insulation. When decorating a room in this way, you can improve sound insulation parameters and retain heat.
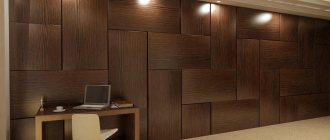
- Extensive range of color solutions. The traditional option is white panels, but there is also plastic with imitation of natural stone, wood or with patterns
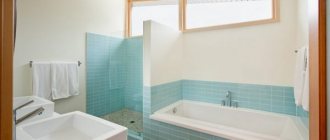
- Moisture resistant. Thanks to the smooth surface, the plastic does not retain moisture, and the absence of pores in the coating structure prevents pathogenic microorganisms from spreading. This quality of the panels determines its use in bathrooms
- Resistance to changes in room temperature
- Long service life of the coating, subject to proper installation and selection of quality material
- Relatively low price compared to metal panels
Among the negative characteristics are:
- Low level of resistance to ultraviolet rays, especially for white plastic, which over time loses its original appearance and turns yellow
- Low degree of impact resistance. With a slight load, traces of dents or deformation may remain on the coating. It is recommended to purchase panels from reputable manufacturers
- The presence of a specific odor. This drawback is felt during the first time after finishing the room. But after a few days it completely disappears
- In terms of environmental friendliness, plastic is inferior to natural materials, so it is not advisable to use it for decorating children's rooms.
Advantages of design
Wall panels have a number of advantages that will make the interior attractive:
- there is no need to prepare the wall and make it smooth, they will hide irregularities and defects;
- additionally create sound insulation and heat retention in the house;
- wires and cables can be hidden in the panel cavity;
- if one element is damaged, it can be easily replaced without damaging the structure;
- easy to use and have a long service life.
The photo shows a bedroom decorated with white panels, where decorative lighting emphasizes the volume of plaster waves.
There are many types of panels, from textile to gypsum, so it is important to choose the appropriate material and wall design for the interior.
Plastic
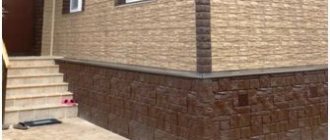
Due to their moisture resistance, plastic wall panels are used in showers, they are fireproof and have a long service life.
3-d panels
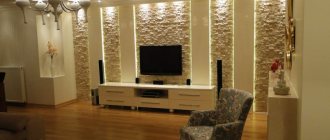
They create a unique interior due to volume and 3-D effect on the walls. The texture is painted in different shades (glossy or matte) with acrylic paints, or covered with veneer.
Plaster
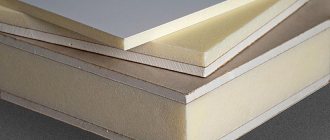
Gypsum wall panels are very durable and provide sound insulation. They are light in weight, but look monumental in the interior. They come with imitation stone, wood, volume and high relief.
Wooden
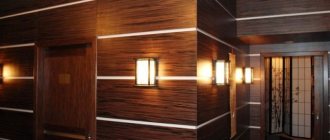
Wooden ones are the best option for a house or apartment due to the environmental friendliness of the material. To protect them, they are impregnated with wax.
The photo shows a large living room with wooden wall paneling and a classic English-style interior.
Bamboo
Bamboo retains heat and is not so susceptible to change under the influence of moisture.
Veneered
Veneered ones look like they are made of solid wood; they are a thin section of wood glued onto an MDF or chipboard board. It is often used in interiors and is an affordable option for wall decoration.
Cork
Cork has a characteristic texture and a unique pattern that is suitable for the interior of the house. Cork retains heat, allows air to pass through, and creates sound insulation.
The photo shows tiled cork cladding, which creates additional sound insulation for the living room.
Fibreboard, MDF, chipboard
Fiberboard, MDF, chipboard are sheet and tile. This saves time on assembly, it is convenient to lay out the pattern and combine colors. Attached with glue or clamps.
- MDF panels are pressed and glued with natural resins, retain heat and create sound insulation.
- Fiberboard fiberboards are not suitable for the bathroom, but are resistant to changes in humidity levels in the room.
- Chipboard chipboards are less durable and are susceptible to deformation under the influence of changes in humidity or temperature in the room.
- Slat panels are connected by grooves and attached to the sheathing; they are made of chipboard, MDF and other materials.
The photo shows the slatted wall cladding in the interior of a modern kitchen, which coincides with the design of the apron above the work table.
Soft
Soft ones are made of fabric, leather, felt, felt and are filled with soft filler (sintepon, foam rubber). Suitable for a living room with a karaoke system, or a children's room. You can decorate one wall or part of it.
Mirror
Mirrored ones are suitable for ceilings and walls; they will increase the space and reflect light. There are glass and mirror-coated panels. The panels are more flexible and weigh less than glass.
Leather
Leather panels do not accumulate dust like other soft panels, the wall is protected, and the room is insulated. They are easy to keep clean.
Vinyl
Vinyl ones retain the pattern and are suitable for the interior of a loggia or balcony. They tolerate moisture, are made in different colors and patterns of wood, stone, and are attached to the sheathing.
Polyurethane
Polyurethane ones can be smooth, embossed, or combine 2-3 colors or composition. Elastic, hold their shape well, porous and weigh little.
The photo shows the decoration of the wall at the headboard with soft polyurethane in the interior of a white and blue bedroom, where color balance is maintained.
Types of PVC panels
To decide on the choice of polyvinyl chloride coating, you need to familiarize yourself with the types of material.
According to the type of connection, panels are:
- Seamless
Most often used for ceiling decoration. The joining seam after installation is almost invisible.
- Embossed
More rigid, similar to lining. They can be used to decorate wooden walls.
- Panels with rustication (chamfer)
These are seamless panels with decorative bevels at the ends.
Plastic can be classified according to its shape as follows:
- Slatted panels
They have a strong resemblance to wooden lining. The slats are installed horizontally or vertically using special brackets. The length of the panels is 90 cm - 3 m, width 13.5-30 cm, thickness 8-12 mm. To fasten the slats, use the tongue-and-groove method.
- Tile panels
They can be rectangular or square in shape, sizes from 30 to 98 cm. Installation is similar to the previous option, but the effect of the design is completely different. It can be especially interesting to decorate the ceiling with square plastic panels if you alternate tiles of different colors in a checkerboard pattern.
- Sheet panels
They look like plywood and have a pattern. Sheathing is done with liquid nails or using an adhesive composition. It is better to seal the joints with sealant, transparent or white, in accordance with the design. They range in size from 1.22 to 2.44 m, thickness 3-6 mm.
Preparation stage
Before installation, you will need to prepare the following material and tools
- the slabs themselves, profiles for the frame - guides, ceiling;
- connecting elements for the frame, hangers, stringers;
- fasteners: dowels, metal screws, “liquid nails”;
- ceiling plinth or molding;
- acrylic sealant for sealing seams;
- deep penetration antiseptic primer;
- laser level or with an alcohol capsule, beating, nylon thread;
- square, tape measure, construction ruler no less than 1 m (metal);
- a hacksaw with a blade for metal or an angle grinder;
- impact drill, set of drills;
- metal scissors, wire cutters, pliers, hammer;
- construction knife with break-off blades;
- a screwdriver for self-tapping screws and dowels that will be used during installation.
Advice Additionally, you will need protective equipment and clothing, including a respirator and plastic goggles.
It will be necessary to prepare the ceiling surface. Under the starting profile, markings will be made along the perimeter of the room under the ceiling.
How to install the frame yourself?
- plastic profile of the "economy" category;
- wooden beam with a section of 2x4 or 3x3 cm;
- metal profile.
The choice of wooden beams is unacceptable for rooms with high humidity and temperature fluctuations
How to attach the sheathing?
PVC frame
- starting profile, which should be fixed on the walls of the room and act as a load-bearing structural element;
- ceiling for fastening between starting elements inside the ceiling area;
- H-shaped, with which the ends of different panels are joined;
- ceiling plinth made of plastic, which, after installing all the ceiling elements from PVC panels, closes the gaps between the wall and the ceiling;
- universal corner - for creating multi-level ceilings and masking structural joints.
Wooden sheathing
Advice: In rooms with high humidity, it is better to abandon such a frame, since wood does not tolerate high humidity and significant frequent changes in microclimate.
covering living room ceilings with plastic sheets. To fix the timber, dowels are used that are drilled into the surface of the walls
How to install a metal profile?
Often a metal profile is chosen when organizing a plastic ceiling; make a two-level ceiling with your own hands; Procedure for installing parts
- The guide profile is fixed according to the marking level on the walls of the room along the perimeter.
- Suspensions, stringers under intersecting ceiling profiles and spotlights are attached.
- A structure is assembled from ceiling profiles, which are fixed together with a “crab” element.
Important It is necessary to use only suitable structural elements when using a metal profile, which will ensure the reliability and strength of the connection of all parts. https://www.youtube.com/embed/ehIZxlyG7iA
How to cover a frame with PVC panels?
The panels are installed on the frame according to the following principle
- Measurements are taken between opposite walls along the direction of fastening the panels, and strips of the required length are cut from the material.
- The first panel is installed with the groove outward, fixed with screws and press washers to the frame with a clear location relative to the window, if the area of the room allows (width no more than 6 m).
- All subsequent planks are fixed in the lock-groove fastening until the last one according to a similar scheme.
- The last plank should be cut to the required length and reduced to approximately 1 cm so that it can be easily inserted into the structure. “Liquid nails” are used for fastening.
- The last stage is attaching the ceiling plinth around the perimeter of the room to the wall with “liquid nails”.
- All joints between the planks are sealed with acrylic sealant, which is inserted with a tube into the mounting gun. It is necessary to immediately wipe off excess composition so that it does not harden and spoil the decorative coating.
the planks should be cut 5 mm less on each side of the measurements taken for ceilings in bathrooms and kitchens
Criteria for choosing plastic panels
Covering the ceiling with plastic panels will have the desired result only if the finishing material is chosen correctly. To do this, it is recommended to adhere to the following tips:
- stiffeners must be free of visible damage and deformation
- the design on the façade should be distinct, with clear lines, without blurred areas
- the coating of all selected panels must have the same tone, for this the panels must be from the same batch
- there should be no dents or scratches on the plastic
- do not buy panels of different sizes
What you need
So, now we will consider the option of installing a suspended ceiling using PVC panels as a finishing material. To do this, you will need the required minimum of tools, PVC panels and the required mounting elements. More precisely, you will need the following tools:
- screwdriver or low-speed drill;
- tape measure, bubble level, water level;
- hammer;
- miter box, hacksaw, construction knife.
The material used is PVC panels. According to generally accepted standards, panels can be 25 and 50 cm wide. The main parameter when purchasing is the area of all elements in the package. When calculating the required quantity, you should calculate the area of the room in which the suspended ceiling will be installed, and increase the resulting quantity by 10-15%, taking into account the trimming of the material.
To secure the panels to the ceiling, use special fasteners and form a frame. The PVC panels themselves are quite fragile and soft, so for reliable fastening you will need a strong frame with frequent lathing.
Along the perimeter of the room, a U-shaped plastic profile is used, into which the edges of the panels will be inserted. As an alternative, you can choose a matching ceiling plinth for PVC panels, which is already equipped with a U-shaped groove. In high-quality design, such a plinth is a prefabricated structure in which the U-shaped groove is assembled in two parts to facilitate installation.
For the sheathing, you can use a wooden beam measuring 20x40 mm or a metal profile like for plasterboard. In the bathroom or kitchen, wooden beams are not suitable due to high humidity. However, thanks to the simpler installation of wooden beams and the fastening of the panels themselves to it, it can be used in the bedroom or living room. The second parameter for selection is the price of the material; in this matter, you only need to check the availability and price in your region. When using wood in any form in construction, it must be treated with antiseptic impregnations and fire retardants before installation. The latter is necessary to increase the fire-resistant properties of wood.
PVC panels of various standards
In addition, there are plastic or aluminum profiles specifically for PVC panels. If the cladding is carried out along the ceiling with small differences of up to 4-5 mm and with minimal lowering of the suspended ceiling, installation of PVC panels on the ceiling may be completely simple. The profiles are made with a special groove in the center for fastening to the base and for fastening the clips that will hold the sheathing panels.
For hardware, you will definitely need plastic dowels and nails-screws for them (another alternative would be anchors with a wedge for driving). They will attach frame elements and profiles along the perimeter to the walls and ceiling. The frame itself is assembled using screws with a drill tip for the metal profile and wood screws for the timber. PVC panels can be fastened either with screws with a press washer or with special metal clips. The approximate quantity of all hardware can be calculated after choosing the method of fixing the ceiling and after reading the installation instructions.
Calculation of the required number of panels
It is more advisable to finish the ceiling with plastic using panels with a thickness of 5-10 mm and a width of 250-500 mm. Most often, models with a length of 2.7-3 m are on sale, but there are also samples of 4 m.
The area of each option is indicated on the packaging. To make the calculation, you need to divide the area of the ceiling surface by the area of one panel.
For information! When making calculations, it is recommended to add another 15% of the material to the final quantity, as a reserve.
To calculate the required amount of profile, you need to divide the ceiling plane into strips, the distance between which should be 60 cm. Mounting guides will be installed along the strips.
You will need a rigid profile around the perimeter. It can be metal or wood, although the service life of the latter will be much shorter. It can be extended by applying special impregnations and primer emulsions.
You can decorate the ceiling with skirting boards; their size is 3 m in length. You can calculate the required quantity by dividing the length along the perimeter by 3, rounding the resulting figure up.
Varieties
- matte - look better with good lighting, since the surface partially absorbs light, so the rated power should be higher than that of glossy counterparts;
- glossy - suitable for low rooms, since the mirror surface creates the illusion of no ceiling boundary and makes it a little visually higher.
PVC ceiling panels come in different shapes:
- sheet - most often produced square with a side of 0.3 or 0.5 m, rectangular ones are less common;
- seamless - equipped with special grooves that allow you to create a monolithic surface without visible gaps or seams between individual slabs;
- slatted - in appearance they are very reminiscent of plastic or wooden lining, and are fastened in the same way and are produced in the form of long strips.
By color of decorative coating
- Solid colors with higher UV resistance.
- Laminated with an imitation of the texture of natural materials - over time, the sun's rays that fall on the surface of the boards contribute to the peeling of the laminated coating.
- Mirror - consist of a PVC base and a reflective film, which reflects up to 90% of the rays falling on the surface. You can find such coatings in public institutions, for example, swimming pools, shopping centers, restaurants.
- Varnished - consist of a plastic base and a thin varnish layer, which is very sensitive to mechanical damage.
- With printed design.
- With thermal printing.
By mounting method
- seamless;
- with a seam that is visible.
By size
- thickness – 1 cm;
- width – 0.1 m, 0.2 m, 0.25 m;
- length - 2.7 m, 3 m, 4 m, 6 m (slat), 0.3 and 0.5 m - on the side of the square (sheet).
Required tools and materials
To decorate walls and ceilings with plastic panels, you cannot do without the following materials and devices:
- building level
- marker, pencil
- roulette
- staples or dowels-screws
- metal scissors
- metal profiles or wooden slats
- hammer drill
- hacksaws
- screwdriver
- special hangers for arranging the frame
- plastic and baseboards
When carrying out installation work, it is recommended to take care of protective equipment. These include gloves, goggles, and a suit with protective sleeves.
Necessary tools for installation work
In order to attach this type of finishing material, you do not need to have sophisticated tools. To begin and complete the work you will need the following construction tools:
- Hammer with impact attachment. Such a tool has a high degree of versatility and therefore it will not be superfluous in every home.
- If the hammer drill does not have a switch to turn on the spindle rotation, then you need a screwdriver. If it is possible to use a special tool for tightening screws or self-tapping screws, then you need to use it, since the hammer drill is heavy and is inconvenient to handle at height when carrying out work.
- Attaching PVC panels to the ceiling must occur exactly on a horizontal plane. It is to check this indicator that the building level is used.
- Molar cord for marking.
- Metal corner, as well as other measuring tools.
- After finding all the necessary tools and materials, you can move on to the next stage of work - preparing the foundation.
Stages of installation work
The process of installing plastic panels on walls and ceilings on a frame
The process of finishing walls and ceilings with plastic is quite simple; the main thing is to adhere to the cladding technology with this material.
Preparing walls and ceilings
When finishing walls and ceilings with plastic, the first thing that needs to be done is to thoroughly clean the base of the old coating (ceramic tiles, wallpaper, paint), dismantle the lamps and electrical wires. There should be no dirt or dust particles on the surface.
The next step is to inspect the surface to identify weak spots. To do this, you can use a hammer to tap the work surface. It is better to start from weak points where cracks and crevices are visible.
Defects identified in this way must be eliminated. They are sealed with cement-sand mortar or plaster. After the treated areas have dried, the base should be primed, which will provide a strong and reliable surface.
Frame installation
Metal or plastic profiles are used to finish ceiling and wall panels. You can use wooden slats, but not in rooms with high humidity levels.
For information! Depending on the final result, profiles can be installed either horizontally or vertically.
Using a building level, it is necessary to draw horizontal lines in increments of 0.5 m. Fastening elements (brackets) must be installed along each strip; the distance between them should be 60-70 cm. It is recommended to secure the brackets with screws.
The staples installed at the lower and upper points must be bent in the shape of the letter “P”. Metal profiles or wooden slats with dimensions of 2x5 cm are mounted in them. It is better to fix them with 25 mm self-tapping screws. It is imperative to monitor the plane of the structure, checking it with a building level.
Wall paneling
After checking the reliability of the installed sheathing, you can begin covering it with plastic panels.
An L-shaped profile is installed along the entire perimeter of the sheathing, and corner profiles are installed at the wall joints. Then you need to measure the distance between the outer sides of the guides and subtract 5 mm from the result obtained.
It is better to mount the panels from the corner of the room, which will reduce the consumption of finishing material. Plastic should be fastened to metal profiles with screws, and to wooden slats - with a mounting stapler and small nails.
Each subsequent panel must be installed in the groove of the previous one. Installation of the last panel is the most difficult; it will need to be adjusted to size and cut. The cut plastic is first installed in the profile, and then in the groove of the previous plastic.
If the installation work is carried out correctly, there will be no cracks or gaps on the tiled wall.
Ceiling paneling
When repairing a ceiling with PVC panels, a plastic baguette prepared in advance to size is first installed. In the corners, its segments must be fastened at an angle of 45 degrees. Attaching the plastic to the frame is done in the same way as when finishing the walls.
The first panel, bending in the middle, is installed with its end parts into the grooves of the baguette. Pressing it against the frame, it is advanced until its shelf is parallel to the baguette. After which the panel must be secured with a mounting shelf. The second and subsequent ones are installed in the same way, only the narrow mounting shelf must be inserted into the groove of the previous one. The last panel will also have to be cut. It is quite possible to make ceiling cladding with plastic panels yourself. Finishing ceilings with plastic panels - photo:
Installation of lighting fixtures is carried out at the stage of installing the frame, even before attaching the plastic. To do this, mark where the lamps will be installed and carry out installation work on the electrical wiring. The final installation of the lamps must be done upon completion of the finishing of the ceiling surface.
Panels in the kitchen
Moisture-resistant PVC panels are used in kitchen interiors due to their fire resistance and environmental friendliness. Also, when properly lined, they do not allow moisture to pass through and are easy to wipe clean. Kitchen thermo-panels made of polystyrene foam insulate corner apartments and cold rooms. Internal insulation does not allow cold air to pass through and does not deform in a humid environment such as a kitchen.
Glass panels are designed to print and preserve images in their original form. Durable protection and tempered glass are suitable for an apron in the kitchen interior.
The photo shows a glass kitchen splashback with a green backing that will always look bright. Glass is easy to clean and, due to its smoothness, does not accumulate dirt.
Installation without frame
You can decorate the ceiling with plastic with your own hands without assembling metal or wooden sheathing. In such cases, tile adhesive and liquid nails are used. It is important to prepare the most even base here. Be sure to clean it of foreign particles and prime it.
To finish the ceiling with panels, the adhesive solution must be prepared in accordance with the attached instructions.
Using a spatula, apply a thin layer of glue to the back of the plastic and attach it to the corner with a spike. Subsequent finishing elements are glued according to a similar principle, tongue and groove. The last panel is trimmed if necessary. At the end of the plastic ceiling covering, a ceiling plinth is installed.
Plastic panels can be effectively used for both wall cladding and ceiling surfaces. The main thing is to make the calculations correctly, choose a high-quality coating and follow the recommendations regarding the installation of plastic.
Plastic finishing of walls and ceilings - photo:
Ceiling finishing with plastic panels (design) – photo:
Finishing the ceiling with plastic with your own hands - video:
Liked? Share on social media networks!
Many people prefer to choose plastic for finishing walls and ceilings because it is a practical and inexpensive material.
The most affordable and versatile finishing material today is plastic panels. Plastic finishing can be used in almost any room: be it a residential building or an office. No climatic conditions, such as dampness, humidity, drafts and even low temperatures, can cause significant harm to it. These products are available in almost any hardware store and are therefore one of the most popular finishing materials. When installing, it does not have any particular complexity of fasteners and allows you to choose different colors and shades. Both a specialist and an ordinary householder can assemble a plastic ceiling.
Photo gallery
You can select the material based on personal preferences in any price category. The choice of decorative designs and combinations will help create a unique interior using wall decoration. Below are photo examples of the use of panels on walls in rooms for various functional purposes.
One of the most budget-friendly finishing materials is PVC panels. But they are in demand not only due to their low cost. Plastic panels for the kitchen are also one of the most practical, quick ways to cover walls: they are not afraid of humidity, high-quality plastic can withstand temperature changes, and does not deform even when heated.
Walls and ceilings made of plastic: features of panels
PVC panels for finishing ceilings and walls are leaders in the finishing materials market due to their low cost and huge range. Depending on the size, purpose and shape, PVC panels can have several varieties.
And the name day:
- Sheet panels. They are used for finishing large-sized premises; when fastened, they form the smallest number of joints.
- The stacked tile panels are square, thanks to which you can create a completely unique room design.
- Stacked slatted panels are rectangular with a length of up to 6 m and a width of 20 cm.
Plastic panels have many colors, patterns and textures. According to the technology of applying the ornament, they are divided into laminated and varnished products. A film on which a pattern has already been applied is glued to the laminated panels.
PVC panels can have different textures and images. This can be an imitation of natural materials (marble, wood, stone, etc.), as well as complex artistic ornaments.
Varnished PVC panels involve printing a design onto the plastic itself. This type is more durable.
Design ideas
Cheap plastic is an excellent option for decorating walls in a country house. But there are also options in the middle and high price categories that look no worse than ceramic tiles or the same wallpaper, and will last much longer.
We have collected for you some interesting ideas for decorating walls in the kitchen with budget and expensive plastic panels, which you can take note of.
- Matte and glossy.
- With an image.
- With imitation of natural materials.
- Plain and monochrome.
- With horizontal and vertical mounting.
Finishing the ceiling with plastic: choosing a material
An easy way to install plastic panels on the ceiling is to use a metal profile that is accessible to everyone. The design is not expensive and quite economical. The metal frame strongly affects the humidity of rooms, which are higher than normal. The profile does not rot, deteriorate or deform. Thanks to these qualities, this type of installation is very popular and widely used.
Modern production of plastic panels has achieved great results. The size of the panels has different thickness and width. It is this fact that should be taken into account when choosing panels.
When using thin plastic on the ceiling, recessed lights will illuminate not only the room, but also all the fasteners inside the frame. The transparency of the design will not cause delight.
Advantages of the material:
- Durability. PVC panels can last more than 20 years if they are not subjected to mechanical damage.
- Practicality. The panels are not picky and are very easy to maintain. They do not require special detergents and can be cleaned using conventional methods.
- Moisture resistance. The panels do not deform or rot from excess humidity in the room, so they can be safely used when decorating kitchens, balconies and bathrooms.
Among the disadvantages of the material, one can highlight the low level of strength. However, if you do not expose the surface to damage, the finish will last quite a long time.
Workflow: step-by-step instructions
The first stage is preparation
After purchasing the material (PVC panels), you should stock up on the necessary tools:
- A jigsaw or hacksaw is a must-have tool. Without them, it is impossible to install the panels, since the products will have to be cut/shortened in some places. For greater effect, it is better to have both tools.
- Hammer or drill - the choice depends on what the ceiling is made of: reinforced concrete slabs can only be drilled with a hammer, a drill is suitable for wooden floors.
- A set of screwdrivers or a screwdriver - to make the work process go faster, use everything.
- Hammer and mallet - since the ceiling panels are a rather “delicate” material, a mallet will be more handy, although a hammer is necessary for working with the frame.
- Level - it is better to use a meter and half meter, this will make it easier to measure in hard-to-reach places. You will also need a tape measure and painter's cord.
- Stapler, countersunk screws or nails - for attaching PVC panels to the frame.
- Stepladder or scaffolding.
As soon as all the tools are available and the material has been delivered, surface treatment can begin, followed by the installation of ceiling panels.
Cleaning the ceiling is necessary only if it is covered with fungus and rust: otherwise this will soon lead to a violation of the integrity of the structure. It is better to treat the surface with special means, or completely hollow out the “painful” places.
The preparatory stage before installing a suspended ceiling includes marking the surface: a straight line is drawn along the perimeter of the room, which should be 5-10 cm below the ceiling (for wiring). To make it easier, a level is used to mark a line in the corners, after which a paint cord is pulled between the corners.
Second stage - installation
So we come to the answer to the question - how to repair the ceiling using plastic panels with your own hands?
The entire process follows sequential instructions, compliance with which allows you to reduce the installation time of a suspended ceiling several times.
Installation of a guide for PVC panels - it is mounted exactly along the line that was obtained using a rope. The ease of fastening lies in the existing technological holes located on the U-shaped profile.
U-shaped profile
Installation of suspensions - a suspension profile is attached to them. Since the maximum width of plastic panels is 25 centimeters, it is better to mount the profile for a suspended ceiling at this distance. To maintain the level, you need to check it from time to time by pulling the rope from one wall to another: if somewhere the fasteners are lower or higher, you need to eliminate this at this stage, otherwise the unevenness will be noticeable visually.
This completes the process of installing the profiles; now we move on to installing PVC panels; their direction is first selected: across or along the room. Afterwards, the plastic products are attached to the profiles using self-tapping screws (or using nails and a stapler if the frame is wooden).
Wooden frame
All wiring is prepared in advance and installed in those places where there will be lamps or a chandelier (see mounting ceiling lamps): holes are drilled with special crowns and the lighting fixtures are installed.
Cutout for lighting fixture
The installation of plastic panels on the ceiling ends only when a border is glued along the perimeter of the ceiling, which hides the joints of plastic and walls, irregularities and raw edges.
Installation of a plastic ceiling: where to start
When starting installation, it is initially necessary to carefully measure the area on which the panels will be laid. Further actions will help you make an accurate selection of the required fasteners, as well as the material for assembling the frame and sewing panels. Before sewing on the frame, it is necessary to remove the old finish and treat the surface with an antiseptic. This will allow you to see irregularities and make it possible to eliminate them if necessary.
Recommended Tool:
- Construction pencil, tape measure and painting cord;
- Hydraulic level, square and fasteners (clasps, screws, dowel-nails and hangers);
- Drilling tool (drill or hammer drill), screwdriver and hammer;
- Cutting tool and miter box.
Frame assembly begins with precise markings. This is one of the most important details in installation. The frame is sewn on in stages. Using a marking tool, the sheathing is sewn on, followed by fastening the remaining planks. Next comes installation of the profile and cutting of plastic panels. Laying the panels will not take much time if the frame and sheathing are marked accurately.
Bedroom
Fabric mirror panels, which will become an accent or serve as a headboard, will be suitable for the bedroom to increase the space of a narrow bedroom. Options made of wood or MDF would also be appropriate. Combined with wallpaper, paint, photo wallpaper.
Assembling a plastic ceiling with your own hands: installation stages
The process of covering walls and ceilings with plastic is almost identical. The only difference is in the complexity of installation and the number of fasteners: the lathing on the ceiling should be more frequent and more clamps will be required.
The process of cladding walls and ceilings with plastic involves 4 stages:
- Surface preparation. The ceiling must be cleaned of old finishing. Then the entire area is treated with an antiseptic composition. This will prevent the possible occurrence of mold or mildew.
- Measuring and marking. An accurate measurement of the area of the surface to be finished will allow you to determine the required amount of materials, and the markings will help at the next stage of work.
- Installation of sheathing. According to the markings, holes are drilled for the dowels with which the profile is attached. The profile is attached around the perimeter of the room on the wall with a 5 cm indentation from the lowest corner of the ceiling. The sheathing is attached to the ceiling using hangers. To maintain the same height as the profile attached to the wall, a stretched line is used. Also at this stage of work the necessary communications are carried out.
- Fastening PVC panels. Before you begin installing plastic panels, you should pay attention to the perimeter of the room. If it is uneven, the first panel will need to be cut accordingly so that all subsequent panels are attached at a clear right angle to the profile. If this is not done, the fastening of each panel will involve cutting it at the end. The plastic is attached to the sheathing with self-tapping screws. Be careful when handling the panels as the material is quite fragile.
If you plan to install recessed lamps, it is better to make holes for them immediately when attaching the corresponding panels: this will be most convenient. Attach the eyes to the plastic with the same care, so as not to break the material.
Combination
Panels and painting
The panels and paint are combined in the same color, creating a single composition. They also come in one tone, in a contrasting combination. Acrylic and latex paints, which are odorless and dry quickly, are suitable for indoor work.
Panels and wallpaper
This combination is often combined in bedrooms and children's room interiors. Wallpaper can be decorated in panels or occupy the upper part of the wall. Also, plain wallpaper will be the background for embossed, colored, soft panels.
Panels and plaster
Suitable for the interior of a hallway, balcony, toilet in a single-color or single-color combination, when the bottom is covered with panels, and communications and wires are hidden inside.
Installation of plastic on walls and ceilings (video)
Plastic ceilings have a lot of advantages. Without complex plastering work, you will get a perfectly flat surface; if the apartment is flooded by neighbors from above, such repairs will not have to be redone. PVC panels are easy to attach, are inexpensive and are sold at any hardware store. The textures and colors of this finishing material allow you to realize the most daring design ideas.
- Author: admin
Rate this article:
(0 votes, average: 0 out of 5)
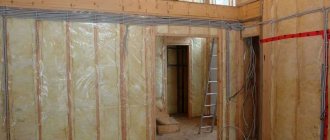
How to make a sheathing from bars
It is advisable to install wooden sheathing at a certain distance (3-5 cm) from the main ceiling.
Lathing made of bars on hangers
This will make the skin as smooth as possible, as well as avoid difficulties with laying communications and installing lighting fixtures. The manufacture of such a frame involves the use of brackets, which you can make yourself or purchase galvanized U-shaped hangers (used to construct a frame from a profile).
The most suitable cross-section of the batten for wooden sheathing on the ceiling is 20x40 mm; 15x40 mm is less commonly used. It is not advisable to use material thicker than 20 mm, since the mass of panels, even wall panels, is relatively small.
Planed dry lath 20x40mm 3 m long will cost 50 rubles.
An important factor is the moisture content of the wooden blocks. It will not be possible to accurately determine it without the use of special equipment; in such cases, they are guided by the weight of the product; in addition, moisture that is excessive for the frame will be noticeable to the touch.
In addition to humidity, you should pay attention to the color of the wood. There should be no bluish or brown stains on the rail - this indicates the presence of fungal formations and the initial stage of rotting, which can significantly reduce the service life of the structure
The construction of timber sheathing includes the following steps:
- Marking. Using a water level on the walls along the perimeter of the room, the location of the frame in height is marked. You can also use a regular bubble level for this procedure, but the accuracy will be less.
- Installation of beams (guides) around the perimeter of the ceiling. According to the markings made at the first stage, the rail is attached along all the walls (with the wide side parallel to the ceiling). During installation, it is advisable to double-check the accuracy of the level, and also use the rule to control the evenness of the fastening of the guides. The timber is fixed either to hangers or directly to the rough ceiling. The method of fastening depends on the material from which the base is made: if it is a concrete slab, you will have to drill it, hammer in the dowel and only then fasten the suspension with self-tapping screws; Self-tapping screws can be screwed into a wooden floor without prior preparation. The distance between the fastenings depends on the thickness of the timber used, but should not exceed 60 cm.
- Installation of transverse elements of the sheathing. The ends of the transverse bars are aligned flush with the front side of the guides. Fixation is performed in the manner described in the second paragraph. During the installation process, it is necessary to ensure that the front side of the entire rail is located in the same plane, for which it is convenient to use the rule. They apply it to a pre-fixed beam and see if there are any gaps. If there are irregularities, the position of the beam is adjusted by suspensions (if any were used) or spacers (wooden wedges, pieces of fiberboard, MDF or thick plastic). The distance between the centers of the transverse elements should be no more than 50 cm.
Ceiling diagram - bottom view
It should be remembered that the plastic panels are located perpendicular to the transverse rail. This must be taken into account during the initial design of the sheathing and calculation of the material, in particular the consumption of the PVC profile. It is more rational to sheathe the balcony ceiling (4x1.2 m) crosswise, since the length of the plastic panels is 2.4 m, 3 m or 6 m.