Instructions for the calculator for calculating the amount of self-leveling floor materials
Enter dimensions in millimeters:
X – This is the width of the room.
Y – Room length.
The X and Y values are fairly easy to measure using a tape measure. It is recommended to prepare the room in advance (remove the old baseboard, knock off the mortar tubercles with a hammer and remove construction waste).
The consumption of material for a self-leveling floor depends on the curvature of the base; the greater it is, the more mortar is needed for leveling. Therefore, for greater accuracy of calculation, it is necessary to find the highest point of the base of the floor in the room (this is the so-called zero mark, from which the distance to the base = 0), for which using a laser axis builder - a level (such a tool can be rented) or water level, create a horizontal line passing through the zero point along the entire perimeter of the room and measure the distance from it to the base in the other three corners of the room. Enter the resulting distances in angles A (=0), B, C and D into the corresponding cells of the calculator. If you have a flat base, then the values in all corners will be the same.
F – minimum thickness of self-leveling floor. This is the size from the highest point of the base (or zero mark) to the plane of the finished floor (i.e. the thickness of the self-leveling floor at the highest point of the room).
For each composition of a self-leveling self-leveling floor, there is its own optimal thickness (usually indicated by the manufacturer on the packaging), increasing which does not change the performance characteristics of the floor, but makes it much more expensive. Mineral floors 10-80 mm, polymer 2.5-5 mm, epoxy 2.5-5 mm, methyl methacrylate 1-3 mm.
О You will receive a drawing close to GOST requirements and will be able to print it without wasting color paint or toner.
Click "Calculate".
The calculator will be able to calculate the consumption of materials (mixture) for a self-leveling self-leveling floor, taking into account the height difference in the corners per 1 m2. This will allow you to purchase the floor mixture in the required quantity without overpaying for extra bags. You will also find out the floor area of the room, which is useful for ordering finishing (mainly relevant for mineral floors), for example, tiles, the required volume of which you can calculate using our calculator.
It is important that pouring the self-leveling floor is recommended to be done together with an assistant, since the solution hardens quickly. It is necessary to use edge foam tape and apply a binder composition (primer) that increases the adhesion of the mixture to the base
Technology and features of work
When using two-component epoxy self-leveling floors, it is important to mix them well. The dishes are selected in such a volume that at least half is free. The mixing container must be absolutely clean and dry. If you will not mix the entire volume, but only a part, it is better to measure it by weight. Place the dishes on the scale, reset the container to zero and pour in the main component. Then zero again and add hardener. You need to pour it in a thin stream. As soon as the weight reaches the desired value, we stop.
If you need a single-color composition, tinting takes place in the store. And you add hardener and all sorts of “decorations” at home
How to mix epoxy self-leveling floor components
The mixing area must be removed from the room where you will be pouring the floor. It is best to spread double film over a large area. It is necessary to ensure that unmixed components do not fall into the pouring area, otherwise blisters and delaminations will appear in these places. The compositions can be on clothing or shoes. Therefore, it is advisable that two people work - one stirs the mixtures, the other pours/levels.
When mixing components, you must follow certain rules
When the compounds are poured into a container, try to keep the walls clean. First, pour component A. If it contains glitter or other filler, mix it for a couple of minutes until the inclusions are evenly distributed. Then the second component (B) is poured in and mixed for another 3-4 minutes. If you need to introduce some other filler (quartz sand, for example), add it all at once and mix until smooth.
When mixing, make sure that there are no unmixed areas. The walls of the dish, the edges, the bottom. Everything needs to be carefully processed. When stirring, you need to select the speed so that the entire composition moves. This creates a funnel. Its depth should be approximately 1/4 of the total thickness of the material in the container. When the composition becomes homogeneous, leave it for 2-3 minutes to allow the air to escape. Then they pour it all out and distribute it all at once.
Primer Features
The primer for epoxy self-leveling flooring is applied to a clean open-pore concrete floor - without a top film. The film is removed using grinders. At home, use a grinder with a disc. The garbage is removed, the dust is swept away, and the remains are collected with a vacuum cleaner. Moreover, there is a recommendation - press the nozzle tightly to the floor to remove all the dust. It is important.
The sequence and number of layers may differ from some manufacturers
The primer is applied no later than 2 hours after dust removal. It is stirred as described above. It is poured from the container onto the surface in the form of a snake. Make the snake span wider, it will be easier to distribute. The composition is spread with a roller or spatula in an even layer over the entire floor. The soil dries at temperatures above 18°C for about a day. If it’s warmer, it dries faster; if it’s cooler, you have to wait up to two days. After drying, inspect the surface. All concrete pores must be closed and the floor must have a glossy finish. If there are bald spots, prime a second time. The second layer will require less composition, since some of the pores are already closed and it is not absorbed to the same extent.
Self-leveling layer and protective
The mixed self-leveling epoxy compound is poured onto the primed floor. Do not scrape off the walls, only pour in what is pouring out. Unmixed components remain on the walls. If they get into the composition, there will be defects.
It’s better to pour it with a snake too. If the entire area is filled at once, then we draw a “snake” over the entire area. If the composition is poured only onto part of the floor, then pour it only in this part. The polymer is then spread over the surface with a notched trowel. The next part should be poured quickly. There cannot be a break of more than 20-30 minutes between pours (depending on the manufacturer). If you need to take a long break, the zones are separated in advance with thick masking tape. It is then removed before pouring the second half.
The main task is to quickly disperse the composition over the floor in an even layer.
So, we distributed the composition over the surface using a notched trowel. When the marks from the “teeth” have healed (about 10 minutes pass), take a needle roller and roll over the entire surface. The marks from the roller will disperse approximately 15 minutes after application. When the surface becomes smooth, either wait for it to dry, or add glitter and phlox.
The decor can be applied using a machine or manually. If you make an epoxy self-leveling floor yourself, you need to practice applying the decor. Spread a clean piece of film on the floor and scatter glitter and phlox. Then reassemble and try again. Having filled your hand, you can start pouring the polymer floor.
Rolling with a spiked roller is a mandatory technological step.
After the resin with glitter scattered on top has dried, the floor is covered with the first layer of varnish. The varnish usually takes 6-8 hours to dry. Then the protruding fragments of decor are removed and a second layer of varnish is poured.
Drying and commissioning
How long does it take for epoxy self-leveling floor to dry? Depends on the floor temperature. Please note - not on the air temperature, but on the floor temperature. For domestic premises you will have to wait 3 days at a temperature of 20°C and 6 days if only +10°C. But you cannot turn on the floor heating.
Epoxy resin scratches quite easily. Protect it with polyurethane varnish
When drying, the polymer coating cannot be covered with anything - it must be open. But you also need to make sure that pollutants do not come into contact with it. If repairs are underway, it is better to postpone dirty and dusty work to another time.
The “normal” sheen of an epoxy coating—glossy or semi-gloss—depends on the formulation. If you don't like it, you can change the gloss level by using the desired type of varnish. It is applied as usual, in two layers. The varnish simultaneously protects the surface from scratches. So it is always recommended to apply it.
The appearance of epoxy floor coating may vary
Flow calculation
How to calculate self-leveling floor? Initially, the volume is determined in cubic meters. The fact is that indicators expressed in m² are not very suitable for obtaining data on coatings, which also include thickness.
- It is necessary to calculate the area of the room in which the coating will be poured. This show is obtained by multiplying the length by the width. If the room has complex geometry, then you can divide it into sections and calculate the total area in parts. But it is much better to use a technical house plan.
- Using a level, the required thickness is determined. When performing work on surfaces with severe curvature, a water level is used. To clarify minor deviations, a standard or laser level is used.
- The resulting parameters are written down on a piece of paper. It is advisable to check them.
Self-leveling mixtures are divided into two types - leveling agent and leveling mass
The work of the self-leveling floor calculator is based on data provided by official manufacturers of mixtures, which are indicated in the instructions for use and application attached to the product.
If such data is missing or the solution has not yet been purchased, then you can use the universal value for all self-leveling floors - this is 2 kg of solution per 1 m2 with a layer thickness of 1 mm.
Epoxy and polyurethane floors are available in several varieties, but the main type is a two-component solution
This value includes the parameters and technical features of the base on which the pouring is performed, but still gives an approximate result suitable for estimating possible costs.
In the “Fill thickness” field, indicate the required value in millimeters. Although the average consumption is indicated in relation to a layer of 1 mm, the recommended minimum thickness of the self-leveling floor should be at least 2 mm.
How to reduce the consumption of levelers
The consumption of the building mixture directly depends on the total area of the uneven surfaces and the absorbency of the base itself. It is better to level overly porous and damaged surfaces using a regular cement or dry screed, since filling with a leveling solution will be too expensive. But if the base is dense and the uneven area is small, proper preparation of the floor will help reduce the consumption of the mixture without reducing the quality of the pour.
Elimination of irregularities
The smaller the number of recesses and cracks, the less mortar will be needed for filling. The main defects can be eliminated using available tools and putty.
Putty for concrete floors
To work you will need:
- grinding attachment;
- perforator;
- putty knife;
- primer;
- putty solution.
Concrete floor repair
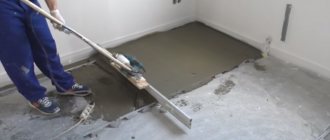
In order not to miss a single crack, the base must not only be swept, but also vacuumed. The exfoliated concrete is cleaned off, and the tubercles protruding above the floor are knocked down with a hammer drill. Cracks with a width of more than 2 mm should be expanded along their length and removed from dust; on long cracks, perpendicular notches should be made with a grinder. It is convenient to remove roughness and small irregularities using a grinding wheel. After this, the floor is vacuumed again, all recesses and cracks are treated with a primer, dried and filled with polymer putty. When the putty areas have dried, their surface must be sanded.
| Name and packaging | Application base | Consumption kg/m2 | Maximum layer thickness | Drying time | Price RUR/pack |
| PVA-based putty, 4 kg | Plaster, concrete | 0,450 | 3 mm | 5 minutes | 154 |
| Putty stone flower, 25 kg | Concrete, wood, plaster, drywall | 1,4 | 10 mm | 24 hours | 138 |
| Ready putty Sheetrock, 3.5 l | Any | 0,67 | 2 mm | 5 o'clock | 350 |
Padding
Padding
Primers impregnate the top layer of concrete or screed, filling pores and microscopic cracks. Thanks to this, the leveler spreads better over the base and is consumed less. But keep in mind that the primer must match the surface to which it is applied and have high penetrating properties. For porous substrates there is a special strengthening primer, which is not suitable for ordinary floors. Before applying the primer, the floor must be cleaned of dust and oil stains must be removed. As a rule, the base under the self-leveling floor is primed twice; Until the first layer has dried, the surface cannot be treated again.
| Name, weight | Description | Drying time | Consumption kg/m2 | Price |
| Acrylic universal primer, 10 l | Suitable for concrete, cement-sand and gypsum bases; strengthens the surface layer, reduces diffusion capacity | 1 hour | 10 | 151 rub. |
| Soil BOLARS Betonkontakt, 12 kg | Suitable for concrete, stone, plastered surfaces, increases adhesion | 15 o'clock | 0,3 | 712 rub. |
| Primer for absorbent substrates CT17, 5 kg | Suitable for concrete and cement-sand screeds, has antifungal properties and elasticity | 4 hours | 0,2 | 251 rub. |
| Axton concrete contact, 18 kg | For treating smooth concrete substrates, increases adhesion | 2 hours | 0,25-0,3 | 788 rub. |
| Adhesive primer GLIMS BetoContact, 4 kg | For processing smooth concrete substrates, floor tiles | 24 hours | 0,3 | 272 rub. |
Self-leveling floors for high loads
In industrial workshops, warehouses, hangars and other facilities, floors experience increased loads. When designing, the requirements for coatings are taken into account:
- mechanical, dynamic, static strength;
- resistance to water and aggressive chemicals;
resistance to abrasion and contamination; antistatic, anti-slip properties; environmental Safety; decorativeness.
When selecting the optimal technology and thickness of the self-leveling floor, specialists study the characteristics of the existing base and operating conditions, and calculate the loads.
Industrial floors are laid on concrete bases with a load-bearing capacity that meets the operating loads. The surface is first ground to remove cement laitance and improve the adhesion of materials.
To strengthen and remove dust, impregnation with one-component polyurethane varnish in 1-2 layers is used. It penetrates to a depth of 3 mm. If the load on the floors is not higher than average, nano-topping is used. A thin-layer coating of special sealing mixtures is applied to the wet concrete base.
For medium and high loads, thin-layer polymer coatings are used to protect industrial floors. They are applied in several layers after impregnation and priming. And finally, under very heavy loads, self-leveling polymer floors with the addition of quartz and marshalite are installed. Minerals impart high strength, wear resistance, and damage resistance.
Advantages and disadvantages
Polyurethane belongs to the class of elastic polymers. This material, depending on the additives it contains, can be either hard or soft, similar in its physical properties to rubber. The main characteristics of self-leveling floors are determined precisely by the type of polymer used.
The advantages of polyurethane floors include:
- elasticity combined with surface strength;
- resistance to abrasion and scratches;
- long period of operation, amounting to more than 10 years for industrial premises, about 50 years for residential premises;
- resistance to direct exposure to moisture;
- biological and chemical inertness;
- low maintenance, easy to clean;
- surface safety;
- resistance to aggressive substances - oils, petroleum products, solvents;
- Possibility of operation in different temperature conditions, in the open air, in unheated rooms.
Polyurethane does not generate dust, and thanks to antistatic additives it does not attract it. The surface looks impressive; it can be made transparent by filling it over the pattern (3D effect), or giving the coating any color. The material is resistant to UV rays, does not fade, and the color remains saturated for a long time.
Floor with 3D effect
Despite the impressive list of advantages, polyurethane-based self-leveling floors have a number of specific features that can be classified as disadvantages:
- the applied solution has an unpleasant, pungent odor of resin, which disappears after curing;
- the need to perform work in well-ventilated areas;
- impossibility of application on a wet surface;
- use of protective equipment (workwear, gloves, goggles) during the installation of flooring.
What affects the consumption of self-leveling floors?
There are several factors that influence the expected mixture consumption. The composition, which is prepared in the factory, of course, has its original shelf life. This is the first one. The second point is that it’s very disappointing when the solution is diluted, the floor is poured, and you realize that the materials have already run out, you need to go to the store for the mixture. That is, it is easier to calculate the number of bags of the mixture in advance.
How is the mixture consumption determined? This is the total area of the room and the quality of the rough base, which is prepared in advance. That is, if the rough base has complaints, it is uneven, more filling will definitely be needed. But if, for example, the functions of a leveling material are performed by a cement or polyurethane screed, then the leveler is removed from the list of materials. And this is also an economic effect.
The consumption of self-leveling floor is affected by the total area of the room and the quality of the rough base.
Working with two-component coatings
It must be taken into account that a two-component polymer self-leveling polyurethane floor has a rather complex structure. At the final stage of pouring, if all technological procedures are correctly performed, the coating must have a certain multi-layer structure, namely, consist of three layers arranged in a strict sequence:
- Impregnation. It is a special liquid, homogeneous and slightly viscous. Used for application to surfaces made of wood, concrete or brick. It serves as the basis for subsequent pouring of the polymer; one might say, it plays the role of primer.
- Polymer layer based on a two-component composition. The main part of the coating is applied in a certain order, the thickness is selected depending on the specific situation. When accurately preparing and mixing the components, it has excellent adhesion, ensuring maximum reliability.
- Finishing layer. Used to improve the performance of the surface. After application, the coating acquires resistance to mechanical stress and the necessary strength.
Before starting work, you should make sure that the room meets the conditions imposed by the application technology.
Optimal parameters:
Self-leveling polyurethane floors must be poured at a temperature of 10 to 25 degrees. Much attention should be paid to air humidity; the working indicator should not exceed 75–80%. Although these types of flooring are less draft resistant than cement or gypsum based materials, it is advisable to avoid them. Heaters or air conditioners should also not be used. The temperature of the base, regardless of its type, should not differ significantly from room temperature
The fact is that with lower values, the compositions will not be able to reveal their properties and provide the necessary fixation.
Therefore, all conditions should be provided in advance. To make the process easier, manufacturers place these indicators on the label.
How to apply correctly
Correct application of the self-leveling floor will allow you to control the consumption of the solution. The technological process of filling occurs as follows:
- thoroughly clean the surface to be treated;
- prime the rough base;
- degrease the base, this will ensure good adhesion to the bulk composition;
- carefully pour the solution. Using a squeegee, spread it evenly over the base;
- using a special roller equipped with needles, remove bubbles that appear on the floor;
- wait until the solution has completely hardened, apply the finishing layer.
In order not to spend extra money, before starting work, carefully prepare the rough base, carefully calculate the required amount of self-leveling floor, purchase only high-quality compounds, and apply the solution using a certain technology. This will allow you to fill the flooring at the proper level, without wasting materials.
There are different types of polyurethane floors
Knauf self-leveling floor
There is a qualification that helps divide flooring into two huge groups.
1. One-component system. One-component mixtures of self-leveling floors are considered the most popular today. Working with them takes much less time and gives good results.
True, professionals prefer to abandon them, since their use does not always ensure a long service life.
2. Two-component system. Experts suggest thinking about using two-component mixtures, which were previously used during repairs.
Working with them is not as difficult as some beginners think. But, after installation, their service life reaches a colossal duration, which pleasantly pleases every person.
It turns out that polyurethane coatings are easily divided into two types, each of which has its own qualities. Because of this, the public has to make difficult purchasing choices. However, there are also common characteristics that make you reject all other flooring options.
Types of self-leveling floor
There are two types of self-leveling floors - polymer and mineral. Depending on the type of polymer present in the coating, they can be divided into several types:
- Epoxy. They are hard floor coverings. They can withstand high temperatures, are not afraid of aggressive chemicals, and can withstand long-term and considerable loads. However, such a coating is fragile.
- Methyl methacrylate. Unlike other polymer coatings, this type is less resistant to chemical influences and mechanical loads. During the installation process, it is necessary to follow the technology. This polymer mixture has a pungent and strong odor; for this reason, the room in which the pouring is carried out must be well ventilated.
- However, after complete drying, the smell disappears. One of the special characteristics of methyl methacrylate flooring is that it can withstand low temperatures. It is mainly used for this quality.
- Polyurethane. These are the most elastic coatings, characterized by impact resistance and resistance to high mechanical loads. This material is not afraid of temperature changes, which is why it is often used in unheated industrial premises.
- Epoxy-urethane. The material, made on the basis of epoxy resins, inherited from this component the ability to be rigid and at the same time elastic, which gives it special strength and at the same time elasticity. Such coverings are common in garages and ramps.
In addition, polymer coatings come in different thicknesses, densities and differ in the type of solvent used. There are different coatings:
- thin-layer (0.2-0.5 mm), they can withstand extremely light pressure;
- self-leveling (from 0.8 to 1.5 mm), resistant to moderate pressure;
- polymer filled with quartz sand (2-4 mm), very durable, able to withstand strong impacts;
- polymer ties (from 6 mm), the most durable of all, designed for the maximum;
- depending on the proportions of sand in the composition, the surface of the flooring will be more or less rough.
Based on the type of solvent, such floors are divided into:
- Water-dispersed. In this case, water acts as a solvent, so it is not necessary to apply such a solvent to dry concrete. As a rule, such a solvent has no odor.
- Solvent-free resins. Their difference is low viscosity, they are easy to install. Sometimes they may have a smell, but it is very slight.
- Resins based on organic solvents. These are the most toxic substances, characterized by a strong odor, and therefore less environmentally friendly. Today, many manufacturers have discontinued them.
A few simple tips
It is important not to forget that within half an hour after preparing the composition in air, polymerization processes will begin. Therefore, it is advisable to prepare the mixture in portions in order to apply the self-leveling floor before it hardens.
To get the perfect surface quickly and efficiently, it is recommended to work in a team of three people. One will do the pouring, the second will level the already poured solution, and the third will prepare the composition.
Many people think that self-leveling floors are too expensive, but this is not so. When filling according to technology, the consumption of the composition will be minimal. It's better to calculate everything in advance. Unlike other types of coatings, self-leveling floors have a very long service life - it is more than 50 years. This is a significant advantage. You can effectively reduce consumption with the help of an underlying layer, and if the screed is carefully sanded, there are no cracks or cavities in it, then consumption will be completely minimal. No other modern coatings have or will provide the efficiency inherent in self-leveling floors.
Self-leveling floor calculator
The installation of most types of floor cladding strongly depends on the technical side of the load-bearing base - the surface must be flat, without significant blockages in level and damage.
The use of self-leveling and polymer filler mixtures allows, in the shortest possible time, to prepare a perfectly flat surface for laying any coating. The calculator below for calculating the consumption of self-leveling floors will help you quickly navigate the amount of material required for finishing work.
Calculations can be made for most types of self-leveling floors, represented by self-leveling, epoxy and polyurethane mixtures. In the “Name of mixture” form, you can select only the finishing self-leveling mixture.
To calculate epoxy and polyurethane solutions, you will need to select “Other mixture” in the “Name of mixture” form, and then in the “Mixture consumption” field enter the floor consumption indicated on the packaging or in the instructions for the product.
Self-leveling mixtures are divided into two types - leveling agent and leveling mass
The work of the self-leveling floor calculator is based on data provided by official manufacturers of mixtures, which are indicated in the instructions for use and application attached to the product.
If such data is missing or the solution has not yet been purchased, then you can use the universal value for all self-leveling floors - this is 2 kg of solution per 1 m2 with a layer thickness of 1 mm.
Epoxy and polyurethane floors are available in several varieties, but the main type is a two-component solution
This value includes the parameters and technical features of the base on which the pouring is performed, but still gives an approximate result suitable for estimating possible costs.
In the “Fill thickness” field, indicate the required value in millimeters. Although the average consumption is indicated in relation to a layer of 1 mm, the recommended minimum thickness of the self-leveling floor should be at least 2 mm.
Calculation features
- The surface area to be filled. It is not difficult to calculate it. It is enough to measure the sides of the room and multiply the resulting data among themselves.
- The thickness of the poured layer significantly affects the calculation of the self-leveling floor. It is necessary to take into account that the floors must be poured in the same plane in all rooms of the house. To determine the thickness of the material, you need to measure the distance from the rough subfloor to the finished one. The subfloor is usually a concrete slab or a durable previous floor covering. And the finishing surface is the final front finish.
- The area and quality of preparation of the subfloor base significantly affects the consumption of the mixture. The more uneven the floor is and the worse its condition, the greater the amount of mixture needed. In this case, the best option would be a cement or polyurethane screed, which will both help leveling and create an overlap.
Calculation for dry building mixtures
When using a method using dry materials, it must be taken into account that pouring should be done in one step.
Initial rough uneven filling and subsequent leveling with a thicker layer are not allowed. Such delamination of the floor will lead to deterioration in quality and loss of its strength and durability properties. The main point when calculating a self-leveling floor of this type is taking into account the density of materials. Different mixtures have their own density - gypsum, for example, is about 150 kg/m³, and cement - 220 kg/m³. The consumption of gypsum mixture will ultimately be less than cement.
Sometimes you can find calculations for self-leveling floors using calculations of the required materials in liters. One liter of mixture is enough to fill 1 m2 of floor, with a thickness of 1 mm. Using this method is not very convenient, since the mixtures are sold in kilograms.
Carrying out calculations for polymer mixtures
It is necessary to calculate the material consumption for a polymer self-leveling floor taking into account the technology that will be used during installation. The single-layer option involves one fill, and its thickness must be taken into account. Multilayer technology provides from 2 to 5 layers. Most often, two layers are poured - one of them is leveling, and the second is the front layer. Adding layers is provided for the installation of 3D self-leveling floors. They require the use of priming, protective and decorative layers.
Also, when making calculations, it is necessary to take into account several factors:
- If the base of the poured floor is too porous, it will require an additional self-leveling layer.
- Evenness and differences in surface level. If the base is too uneven, additional materials will be required to create a leveling base.
- The quality of the base and the presence of damage, chips and cracks also affects the amount of materials required.
- Different amounts of material will be required to create an absolutely ideal mirror floor surface, or just a flat one.
When taking into account the thickness, it is necessary to take into account the type of room in which the floors will be poured. For a living room, it is enough to use a maximum of 7 mm of self-leveling texture, but not less than 1.5 mm. At production and industrial facilities, floors are subject to greater loads, which affects the increase in the self-leveling layer to 100 mm.
It is important to note that when using polyurethane mixtures. the floor can be 2 mm thick, polymer - at least 8 mm, and epoxy - at least 5 mm
Example on certain brands
The building materials market is full of manufacturers and various brands of cement mortars and self-leveling floors. Today the brands “Horizon” and “Osnovit” have become popular. Using simple examples you can figure out how many mixtures will be needed to complete the installation.
Calculation of self-leveling floor "Horizon"
The Horizont brand self-leveling floor is used for manual or machine leveling on concrete bases and cement screeds. In this case, the surfaces may have significant unevenness, up to 10 cm inclusive.
The Horizon self-leveling floor can be used to level the base for the finishing floor covering. In particular, mixtures of this brand are used to create thin layers of self-leveling floors, starting from 2 mm. This option is suitable in cases where the surface is without visible defects. This will also save on the primer layer.
Any plastic container of 70 liters or more is suitable for preparing the solution. The volume of the container is selected depending on the scale of the work. The capacity can reach 100 or 125 liters. One 25 kg bag uses 4.25 liters of water. At the same time, stir the composition, gradually adding a third of the total liquid. Having added the entire mass and brought the composition to a homogeneous consistency, it is used in any room.
After the solution is mixed, it is left for 2 minutes, after which it is stirred again. To do this, it is recommended to use a construction mixer or an electric drill with a special attachment. If you stir by hand, there is a high probability of air bubbles appearing.
Attention! Manual stirring is allowed only in cases where it is necessary to prepare a solution of less than 1 kg. If after stirring the solution turns out to be too dry, you can add a little water
In this case, you need to be careful, because too liquid a solution will turn out to be fragile.
If after stirring the solution turns out to be too dry, you can add a little water. In this case, you need to be careful, because too liquid a solution will turn out to be fragile.
The prepared solution must be used within 30 minutes, after which it will begin to lose its working properties and harden. The frozen solution cannot be diluted with water.
As already noted, if you need to apply a layer of 3 mm, you will have to multiply the consumption of self-leveling self-leveling floors per mm (1.3 kg) by 3. It turns out that you will need to use 3.9 kg per 3 mm layer per 1 square meter.
Calculation of the volume of Osnovit self-leveling floor
Self-leveling floors "Osnovit" are used for arranging floors. The solution is applied mechanically or manually. The solution can be used in all types of premises (from residential to warehouse) and at different humidity levels.
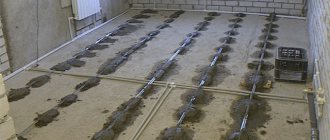
It is worth noting the possibility of using the solution outdoors without the risk of loss of quality. So, they are allowed to fill areas and platforms. Some varieties of mixtures are combined with a heated floor system.
Osnovit mixtures are made on a polymer basis; they are used to pour self-leveling floors with a thickness of 1-100 mm. Typically, these compositions are used to solve complex problems of installing final finishing coatings.
To prepare a 3 mm layer on 2 m. you will need 4.5 kilograms of the mixture. Unlike Horizon, Osnovit brand mixtures are used to create thicker layers of self-leveling flooring. At the same time, the technology for stirring the solution is the same as that of “Horizon”.
Self-leveling self-leveling floors are convenient and excellent for creating a flat surface for laying finished floor coverings made of various materials.
How to calculate a self-leveling floor to make a 5 mm layer or even the entire 18 mm - watch the video:
Types of mixture
The self-leveling coating consists of a self-leveling mixture, which, spreading over the surface, fills all voids .
If there are uneven surfaces, the diluted mixture will make the surface horizontal and eliminate all differences in height. All mixtures differ in the type of binders: polymer, cement or gypsum based .
- Cement-polymer is more expensive and is used to work with any surface; height differences subject to it are from 2 mm to 5 cm. Suitable for rooms with high humidity . Ideal for installing heated floors.
- Gypsum-based ones are suitable for drier rooms; they produce less dust during operation. It dries faster, so the work will progress much faster. After completing the work, you will have a very durable, smooth and even surface . But we do not recommend using it in the bathroom, since this mixture has low moisture resistance.
How to calculate the mixture consumption to fill a self-leveling floor?
How to calculate the amount of mixture using a laser level
To calculate the required amount of dry mixture, first of all, determine the minimum thickness of the self-leveling floor. After which you can already find m 3 of the floor to be poured. For this:
- The slope of the room is determined using a laser level. Draw horizontal lines along the entire perimeter of the wall. The height difference is then calculated by measurements from different angles.
- The resulting difference is divided by 2. This gives the average height.
- To determine the minimum thickness, add the manufacturer's recommended minimum layer thickness to the resulting value.
- On the packaging, the manufacturer indicates the consumption per 1 square meter with a thickness of 1 millimeter.
- Using your calculated values and substituting the manufacturer’s recommendations, calculate the required mass of the dry mixture.
How to calculate the number of bags
You need to buy bags for the entire volume in order to reduce the price and fill the floors in one step.
If you need to calculate the number of bags, consider a simple example. You are given a room with an area of 25 square meters. It is planned to make an epoxy self-leveling floor 20 mm thick. According to the manufacturer, 1.5 kg of mixture is consumed per millimeter layer with an area of 1 m2. It turns out:
- 20 mm is multiplied by 1.5 kg and it turns out 30 kg to form a layer of 1 square. m;
- 30 kg multiplied by 25 sq. m, it turns out 700 kg of mixture for the whole room;
- The bags are packed in 25 kg packs, so it turns out that you need 30 bags. 700_25=30. For reliability, you can purchase material with a reserve.
How to find out the norm?
The consumption rate for self-leveling floor is 1.3-1.8 kg. This is the weight of the mixture that is necessary to form a millimeter layer on 1 square meter. The exact weight varies depending on the type of mixture and the presence of special additives.
In practice, additives only worsen the situation: the consumption of self-leveling floor per 1 m2 increases, and this increases the cost. Therefore, it is recommended to buy mixtures without additives, this will also improve strength.
How does density affect flow?
Affects the amount of solution and its density. The average value is indicated on the packaging. Why average? Because due to the different water content and dry mixture, it will vary, but within the average value.
Polyurethane self-leveling self-leveling floor is consumed in the amount of 1.3 kg per liter of liquid. This way you can calculate the required amount of mixture.
What Tools Are Needed to Apply Epoxy Coating to Concrete Floors?
To pour an epoxy floor, you need tools. Not to say that something special is needed, but the list is solid. It won't be possible to do without them.
- Wet feet. These are boots with soles on rods. They leave no traces. You need to step in them, not slide or shuffle. If you pull them across the surface, stripes remain.
- Rollers for priming. The pile should be made of polyamide or nylon with a length of 10-12 mm. You can apply the primer with a flat spatula, but this requires some skill.
It is better to distribute the composition using a notched spatula. To make it easier to work, tie it to a holder - Stainless steel notched spatula. To evenly distribute the epoxy self-leveling floor, use a notched trowel. “Liquid” does not mean that they do not need to be distributed. This means that the composition spreads on its own, but you still need to help it. The use of a spatula allows you to quickly and evenly “disperse” the composition. The lifespan of two-component epoxy floors is not that long, so you have to work quickly. To do this, the height of the “tooth” must be equal or approximately equal to the thickness of the layer. Please note: new spatulas are coated with a layer of lubricant. If it gets into the epoxy composition of the self-leveling floor, there will be defects in the surface. Therefore, before use, soak the spatulas in a solvent (solvent or xylene). After four hours, remove and wipe dry.
- A needle-shaped metal or polymer roller with a long handle. When the resin is poured onto the floor, air bubbles appear in the resin. To remove them you need a needle roller. After the composition has been distributed over the floor surface, it is rolled. The needles remove air bubbles and at the same time distribute the polymer more evenly. The roller must also be clean. No traces of old paint, oils or other contaminants. The roller itself should rotate easily around its axis.
What tools and supplies are needed for the job? - Mixer with adjustable speed. You will also need a mixer with attachments for mixing. The recommended minimum power is 1 kW, and it should also be possible to change the speed. They will need to be selected in order to mix the composition well.
To mix the composition, you will need clean and dry plastic containers with high sides. Metal (old buckets) is not suitable. If you need to divide the composition into portions (fill two rooms or do a batch filling), you will need electronic scales. In principle, you can use kitchen ones. If only the measurement limit was sufficient.
Brands of self-leveling floors
Manufacturers today supply the construction market with dry mixtures for self-leveling floors in a wide range. It should be noted that these mixtures differ in their characteristics.
Let's look at the most popular mixtures for self-leveling floors:
Hercules. The basis of this mixture is quartz sand. The mixture is used to construct a self-leveling floor. The allowed thickness of the solution is from 20 to 100 mm. The specific consumption of this mixture is about 1.5 kg for every square meter of floor 1 mm thick.
In the photo the floor is in the form of a dry substance in a paper bag
- Ivsil. The thickness of the floor filled with a mixture of this brand can be up to 10 cm, and the specific consumption is about 1.2 - 1.4 kg/m2.
- Bergauf. The layer thickness for this brand is approximately 5-7 mm. And UR is equal to 1 – 1.2 kg/m2.
- Vetonit 3000. Can be used both for repairing the floor and for creating a self-leveling layer. The thickness of the solution layer should be from 3 to 5 mm. A coating less than 3 mm thick will not last long. The specific consumption is approximately 5 kg per square meter with a layer of 1 mm.
Vetonit 3000 in a paper bag (25 kg)
The cost of mixtures varies significantly, so it is important to choose the right one. Before purchasing, you need to evaluate your own floor in terms of height differences and required layer thickness
It is on the basis of these parameters established by the manufacturer that the choice is made.
It should also be taken into account that the price of different brands of self-leveling mixtures for self-leveling floors differs significantly. Therefore, if you want to save money, you need to conduct a comparative analysis of the offered materials in terms of properties and price.
After carrying out all the calculations and performing a comparative analysis, you will get a clear idea of the upcoming costs and decide whether this mixture is right for you.
A video will tell you how to fill a self-leveling self-leveling floor.
Installation of self-leveling coating
Do-it-yourself self-leveling polyurethane floors are poured according to a certain pattern, which implies dividing the entire event into ordered actions.
Preparation
It is this stage that must be performed with special care. It must be taken into account that the coating plays a more decorative role, and therefore cannot cope with significant unevenness.
The principle of preparation is as follows:
- The surface is cleaned of dirt. If work is carried out on an old screed or concrete base, then it is necessary to assess their condition. Any irregularities and defects are eliminated. To seal cracks, a solution of cement or gypsum is used.
- To level out small irregularities, grinding is carried out. It can be done in two ways: sandblasting or grinding machine. The last option is the most preferable for home use. The coating is processed until completely leveled.
- Application of polyurethane primer. This is done using a prepared two- or one-component composition. The components are mixed in the proportion specified by the manufacturer. It should be taken into account that each manufacturer determines the required number of layers and their drying time. The application process practically repeats the work with standard mixtures.
It is advisable to choose the primer for the self-leveling coating from the same manufacturer as the floor itself
All further activities can be carried out only after the coating has completely dried.
Mixing the base composition
Although manufacturers provide different types of material, all polyurethane-based compositions are made according to a similar scheme.
Prepare a container suitable for use. Due to the fact that the mixture is two-component, the mixing technology involves the sequential addition of components, that is, a modifier (hardener) is included in the base. The proportions depend on the manufacturer, but most often they are 1:3. For this procedure, it is recommended to use a special mixer or drill attachment. But an electric tool must have great power, otherwise it will not be able to overcome the viscosity of the product.
Two-component compositions are mixed in limited quantities, as they harden quickly
Fill
Filling is carried out in the following sequence:
- The composition is poured onto the prepared and dried base.
- The mixture is spread using a squeegee or spatula. To simplify the work, start from the far corner of the room.
- For better distribution of the solution, a needle roller is used, which is quickly rolled over the surface.
In a small room you can install a polyurethane floor alone
If it is necessary to fill another layer, this stage is carried out after the previous one has completely dried. This will require at least 20–24 hours.
In order for floor coverings to acquire a better visual appearance, the composition or base is painted in one color or the formation of patterns, as well as the laying of various decorative elements.
Primer and putty
A separate container is needed for diluting the primer. All components are kneaded at a speed of 500 rpm clockwise, and then back. Stir until a lump-free mixture is obtained. To allow the air to escape, do not touch the primer for 3 minutes.
You can only work with the prepared primer solution for 40 minutes, after which it loses its qualities.
The primer is poured onto the base and leveled using a padding polyester roller. If the floor absorbs moisture strongly, then the primer needs to be added. The drying process occurs within 24 hours.
Next, all the recesses that exist are puttied. For putty, use a special composition and quartz mixture in a ratio of 1:3. After the putty has dried, another primer coat is applied. All other work begins after 24 hours.