The best option is a steam room in a bathhouse, decorated with your own hands. Simply put, it is the owner of the building who is obliged to plan the entire steam area for convenience and safety. He needs to think through many subtleties in advance for a pleasant and healthy holiday.
At first glance, decorating a steam room in a bathhouse with your own hands is not difficult. But in fact, this is a complex process that must be performed not only correctly and beautifully, but also with high quality. You will learn how to do this in this article. I will tell you about the materials that are more suitable for such a task, as well as about their pros and cons.
The sequence of finishing the steam room
Let's start with the main thing, the size of the steam room in the bathhouse, and how to choose it correctly. Some tips on how not to make a mistake with the parameters of a steam room when building it.
- First, take into account a certain number of people who will all be together and at the same time not cause discomfort to others, in other words, not interfere with each other.
- The second thing we pay attention to is the height of the ceiling, usually it reaches a height of 2.2 m to 2.4 m. This indicator depends on the height of the tallest person who will visit this steam room. From a person standing up to his full height, there should be at least 20 cm to the ceiling. Adhere to the same principle if the steam room seats are made to be seated, so that the tallest member of the family does not touch his head while sitting on the upper tier. Calculate in advance how many centimeters the ceiling insulation will take up, and only then take into account a reserve of 20 cm.
- Third, What you should pay attention to is choosing a stove based on size and power. According to fire safety, the stove in the bathhouse must be located at a distance of at least 32 cm from wooden structures, and if the tree is sheathed with special fire-resistant material, then this distance can be 29 cm. But these distances are sometimes not enough, and a person located close to the stove may get burned from careless movement. You can find out how to cover a stove in a bathhouse here. In order to save energy, you should not build a large room for electric furnaces.
A stove lined with brick, or made entirely of brick, takes longer to heat up, but also retains heat much longer than one made of iron. Burns from such a stove may not be as serious as, for example, from hot iron. The next step of decorating the steam room in the bathhouse with your own hands will be no less important.
Preparing tools
The process of preparing tools depends on the material chosen for the interior decoration of a bathhouse made of timber with your own hands. For working with wood it is used:
- Miter saw;
- set of chisels;
- Sander;
- hand saw;
- hammer, finishing nails.
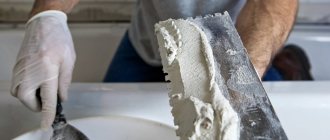
To work with natural stone and ceramic tiles you need to prepare:
- a grinder with a stone disc or a tile cutter;
- spatula, comb;
- container for mixing mortar, tile adhesive;
- drill with whisk attachment.
You will also need:
- marking tool;
- building level;
- roulette;
- sharp stationery knife.
Selection of finishing material
It is best to finish it from wood, because it smells very nice, but there are some species that are not suitable.
You can finish it with clapboard made of hardwood. Lining made from such types of wood is excellent for lining a steam room in a bathhouse; it can withstand high temperatures, and thanks to the low heat capacity of the lining, the room warms up faster, and the walls will not heat up too much.
Advantages and disadvantages of each material
Linden , which has a snow-white color, does not deform when temperatures change, and is moisture resistant. Such clapboard can be sheathed near the stove, as well as the ceiling, since it takes longer to heat up than other types. When heated, it releases a subtle, non-intrusive aroma. And to prevent it from darkening in the future, it is treated with a special substance.
The disadvantages are that it is subject to rotting and perhaps insects will live in it. So when choosing it, keep in mind that such material will have to be changed often.
Larch tolerates both temperature changes and humidity well. This type of wood is considered durable. Well suited for covering a steam room.
The downside is that it is difficult to cut on it, since the structure is very dense. Therefore, you need to work with it carefully and only with high-quality tools.
Birch , due to its loose structure, dries out a lot. This is noticeable when preparing it, so it’s worth preparing with a reserve. But this drying contributes to excellent absorption of the special protective substance during processing.
The downside is that it begins to decompose when wet and even a protective agent cannot save it. In addition, it has a lot of knots.
Aspen , a very strong species, has high strength, is resistant to moisture and does not have cracks, these qualities are an indicator of wood on the good side. Aspen is the most suitable for covering a steam room.
The disadvantages are that it still rots, of course much less than linden. And when choosing such a lining, you should pay attention to resin pebbles and knots, because in a hot steam room you can get burned if the resin comes into contact with the skin.
Cedar , when heated, releases a pleasant and beneficial aroma of essential oils. It is easy to process and cut. Cedar is durable and not afraid of moisture.
The downside is that not everyone can afford such a lining.
Lining is...
Lining as a product was first used for covering the walls of carriages. This is where its name comes from. The difference from simple edged boards was the presence of grooves along the long sides of the lining, which ensured maximum contact between adjacent panels. The sheathed wall was without cracks or gaps, smooth and quite beautiful in appearance.
Wooden lining
Lining calm
Along with technical progress, the production of different types of lining has also stepped forward. Today it is produced in several versions of the profiles themselves, which differ in size, quality, and material of manufacture.
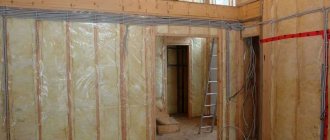
Thermal insulation of the steam room
Everyone knows that before covering a steam room, the room must be insulated and a vapor barrier installed.
The choice of material for decorating a steam room in a bathhouse with your own hands is great. Today, there are several types specifically for the steam room. Such materials that tolerate temperature changes well and do not emit harmful substances when heated do not rot and do not contribute to the appearance of fungus. They are also fire resistant and will last for many years.
Basalt and mineral wool are the most popular cladding materials. And foil film is excellent for vapor barrier. The foil material is sheathed on the walls and ceiling and used for waterproofing them. It looks like a roll of basalt wool only with a layer of foil.
Ceiling insulation
We attach the foil material to the ceiling using a stapler, with the reflective side facing the room. We overlap the joints and seal them with aluminum tape.
We fasten the sheathing for the future ceiling (for cladding to hide the foil layer) using screws across the beams. You can read about how to vent a chimney through the ceiling here.
Also, do not forget in the attic, before filling the ceiling with insulation (earth, expanded clay), put a film on it so that dust does not get inside the room, or cover all the cracks between the boards.
Thermal insulation of walls
The technology for covering the walls in the steam room is the same as for the ceiling. Just before insulating the walls in the bathhouse, you need to smooth out all the cracks and joints. The insulation is attached parallel to the floor, from top to bottom. Laying is done in three layers: hydro-, heat-, and vapor barrier.
The first layer of waterproofing is needed to prevent condensation from settling on the walls. The second layer is for insulation; it is laid in a timber sheathing. The third layer is needed to protect the insulation from moisture.
Floor insulation
A floor made of concrete is certainly more durable than wood, but such floors are cold, so people still give their preference to wood.
For a wooden floor, the foundation is poured, beams are laid, and logs are placed on them. The voids formed between the joists and beams are filled with insulating material, most often expanded clay or sand. Next, a vapor barrier and the “first floor” are laid, and insulation material and waterproofing are placed on it, and only then we make the finishing floor.
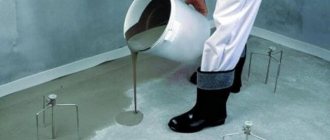
For a concrete floor, a base is made of concrete and crushed stone, 12-15 cm thick. Waterproofing can be installed after the concrete mixture has completely dried. It can be roofing felt or bitumen mastics. The concrete is coated several times with bitumen mastic, and only then we apply waterproofing. The insulation can be mineral wool, perlite or expanded clay with a layer of 10-15 cm. The next layer of the floor is made on the heat-insulating surface.
The primary task is to insulate the walls
If the building is based on untreated logs, you need to caulk the cracks by going through the joints with a sealant. A hut made of timber will require the following actions:
- The wall is sheathed with lathing.
- Insulation is laid between the beams.
- A vapor barrier layer, represented by oilcloth or foil waterproofing, is placed on top.
- The final stage is upholstery with clapboard or natural boards.
The following is used as an insulating element:
- mineral wool;
- peat slabs;
- chipboard;
- Styrofoam;
- traffic jam
Organic variations are suitable for the dressing room, rest room, synthetic ones to avoid the appearance of mold - in the washing department, steam room. Polystyrene foam can ignite and, when heated, becomes a source of release of hazardous chemicals.
Treating wood with antiseptics
In order for the wooden cladding to last for a long time and not become covered with fungus. It must be treated with an antiseptic, since the tree absorbs moisture well, and the loose environment is favorable for microbes, they will soon colonize the entire wooden area and destroy it, and later pest beetles will colonize it and completely destroy it. To avoid such a problem, it is necessary to carry out a hygienic procedure for the tree before using it.
The impregnation should have protective properties, but not prevent the wood from “breathing.” Wood impregnation treatment indoors must be environmentally friendly and not emit hazardous substances when heated. Floor impregnation should not form a slippery film on the surface after drying. Treat shelves, benches and tabletops only with impregnation that can withstand frequent wet cleaning. The shelves are treated with a special agent with deep absorption; it should not form a film on the surface. Impregnations for wood come in both aerosol and in the form of gels and solutions.
All antiseptic impregnations must be applied in a protective respirator to avoid poisoning.
Wood is also protected from fire with a substance such as a fire retardant. Of course, this substance will only resist fire for a while, since it is impossible to completely ensure wood is non-flammable.
Before applying the product, clean the surface from contamination; if necessary, sand the surface. The composition is applied with a roller or brush, of course, if it is not an aerosol. We pay special attention to painting the ends. You can use the room only after the protective coating has completely dried.
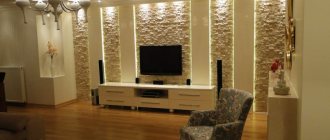
Locker room
The materials for decorating this room can be very different. But it’s hard to come up with anything better than a tree. However, it can be supplemented with other types of finishing: decorative plaster, artificial stone tiles, various wall panels, etc.
It all depends on the size and purpose:
If this is a small dressing room in a free-standing bathhouse, intended only for undressing and dressing, it is better to limit yourself to moisture-resistant wooden finishing. Especially if the bathhouse is heated once a week, and the rest of the time it is not heated.
Finishing the dressing room with a blockhouse with tinting
If this is a spacious recreation room with a heating system from the house, then your desires are unlimited. Even wallpaper and painting on the walls - as long as you like it.
Wood finishing
Plaster, tiles and painted wood panels
Decorative plaster and stone
Blockhouse and brick
As for how to decorate the outside of the bathhouse, any façade materials can be used here. Most often, a beautiful log house is left without cladding, limited to caulking the joints, sanding and treating with decorative and protective agents.
Sanding the log house
Exterior decoration with blockhouse
The process of finishing a steam room in a bathhouse with your own hands
The easiest way to decorate a steam room in a bathhouse with your own hands is to show it in a photo, but I will try to explain it clearly, and of course I will also provide the necessary photos.
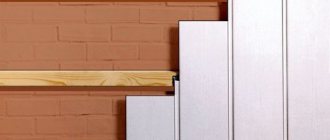
The best material for finishing is lining; it looks good in the interior. In addition, if you wish, you can make it yourself, and there is a huge selection of it on store shelves. This material allows the wall to breathe and is easy to install. It can be secured using clamps or nails without heads.
Let's break down the finishing of a steam room in a bathhouse with our own hands step by step, the first thing we'll look at is the ceiling, then the walls and floor.
Ceiling finishing
The decoration of the room is done all in one style; if the ceiling is covered with clapboard, then it is better to finish the walls as well. If you want natural wood, then you should take care of its quality; it must be treated with special means. These products will ensure many years of service to her and will preserve her appearance much longer. They are also carried out to ensure that the wood is not subject to fire for some time.
The choice of lining is very large, so you will find for yourself the type of wood from which the lining will be made. You can also choose for yourself according to your financial means.
The ceilings are also finished with cork, which is an environmentally friendly material. It does not emit hazardous substances when heated, just like lining. It is very easy to install and is not difficult to operate. But its disadvantage is its high price.
Wall decoration
They also prefer to cover the walls with clapboards made of wood. In this case, it is better to fasten it with a gap to avoid deformation of the wood due to swelling. This gap will save you from redoing the entire finish; it will allow it to move if necessary.
Think over the design in advance, you will always have time to buy, take a closer look at different types of finishes, and choose the one you like best.
Floor finishing
The floor can be made of wood or laid with tiles. The tile is not afraid of moisture, but it is not very pleasant to step on it after a steam room, moreover, you can slip, so most often it is covered with wooden flooring in the form of lathing or a covering that is easy to care for, such as cork.
If you want to lay tiles, first screed and level the surface. It is laid on a special glue, and the seams are treated with moisture-resistant grout.
Wooden floors can leak or not. Leaky floors are when the boards are laid on joists with a gap of 5-30mm, while floors that are not leaking are laid close to each other and tongue and groove boards are chosen for them.
I provide a photo of finishing the steam room in the bathhouse with my own hands.
Recommendations
Durable, environmentally friendly and affordable - a warm foundation.
Recommendations for interior finishing of a bathhouse made of timber from experienced builders:
- If liquid waterproofing is used for the floor, the product must be coated not only with the floors, but also with the walls to a height of 15 cm.
- Pine lining is a cheap finishing material on which you can save money when arranging recreation areas.
- At the thermal insulation stage, you need to think about the location of lighting points, switches, and sockets. After this, holes should be cut in the bars for electrical cables.
- The wires must be covered with corrugation.
- Sockets and switches must be moved to the dressing room.
- The light should not be too bright or dim. In the steam room and washing room, it is better to make several lighting points around the perimeter of the room rather than one large one in the center.
- In the shower and steam room, the bottom of the doors should be 10 cm above the floor level. It should open towards the washing area.
When carrying out bath procedures, the surfaces of bath rooms are affected by temperature, hot steam, and humidity. To maintain the integrity of the decorative coating, you need to choose the right finishing material and prepare it for installation. The finishing of each room must be carried out taking into account certain features.
Types of shelves and their installation
Bath shelves are divided into several types:
- Coupe - lying seats are located one above the other;
- Complex shelves are when retractable structures of the lower shelf or folding upper shelves are used;
- In the form of the letter “G” - this is when seats and benches are placed along two adjacent walls, thereby forming the letter “G”.
- Stepped shelves - in fairly large steam rooms, there are two or even three rows of steps that can accommodate several people.
Examples of steam room schemes