To level the ceiling surface and prepare it for finishing, traditional plastering is still used. Plastering a wooden ceiling is relevant in private buildings made of wood materials. Compared to other methods of leveling the ceiling surface, plastering offers many advantages. The cost of the plaster mixture is much lower than the price of drywall and materials for making the frame. The main advantage of leveling with plaster is maintaining the height of the room.
Features of applying plaster to a wooden ceiling
Since any wooden surface consisting of piece materials (boards, beams, dies) cannot boast of solidity, the plaster solution will not adhere well to the base without additional preparation. For better adhesion of the plaster to the wooden base and to reduce the number of cracks and holes, the ceiling is hemmed with plywood and reinforced with chain-link mesh or wooden shingles. Only after this do they begin to apply the solution.
The plaster mixture must be thick and flexible enough to adhere well to the base. To do this, plasticizers and other additives are added to it.
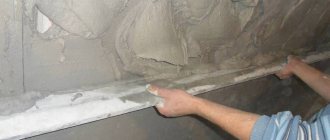
Plastering work is carried out in 3 stages:
- the mixture is scooped onto a spatula and thrown onto the ceiling surface, after which it is leveled with a spatula;
- to eliminate significant unevenness, the surface is leveled with a rule or a spatula with a wide working plane;
- Using finishing grouts, minor irregularities are eliminated.
The best conditions, betting odds for sporting events and this is all in one application, you can follow the phone link absolutely free and receive a bonus using the MyAndroid promotional code.
During work, the joints of walls and ceilings are treated especially carefully. The angle of mating surfaces must be perfectly even. For this purpose, perforated corners are used. They are quite light and hold their shape well.
Important! There are 3 methods of applying plaster - manual, machine and combined. Manual plastering is used in private houses and apartments because the work area is small.
How to plaster a ceiling: main stages of work
If we talk about the mixture with which the question of how to plaster the ceiling is solved, then it is better to refuse the usual cement-sand mortar - it is heavy and the likelihood that it will fall off during the work is very high. In this regard, it is better to give preference to gypsum-based mixtures; this could be, for example, Rotband or other compositions that are specially designed for similar purposes.
How to prepare a plaster mixture photo
You can apply plaster to the ceiling in different ways - some craftsmen apply it the old fashioned way using a ladle, others gradually spread it with a spatula, and still others, without any ceremony, load it up with it and immediately drag it along the beacons. In principle, if we consider this issue from the point of view of technology, then it would be more correct to throw it on - in this way grains of plaster are driven into even the smallest holes, thus ensuring high-quality, reliable and long-term adhesion of the plaster to the ceiling. In this regard, the machine method of applying the solution looks more correct.
Level the plaster mixture on the ceiling using a rule, which must be periodically moistened with water - if you do not do this, the mixture will crack after running the rule over it. Having tightened the entire ceiling in this way, it is left to dry. Only after the plaster has completely dried can further work on finishing the ceiling be continued - as a rule, the plastered surface is subsequently puttied and painted.
How to properly plaster a ceiling with your own hands photo
Well, in conclusion, a couple of small tips that will make plastering the ceiling with your own hands a little easier for you.
- Firstly, if you are a beginner painter-plasterer, then when working on the ceiling it is better to choose a small size rule - a maximum of 1 m long. It is quite difficult to work with a large tool and not very convenient.
- Secondly, when installing beacons, it is better to fasten them more often, then they will not sag during plastering, and, accordingly, the ceiling plane will be smoother.
- Well, thirdly, this is the plaster mixture itself - you will have to experiment with its thickness. The plaster should not be thick or sparse - a certain middle ground is needed, which will have to be determined experimentally.
Leveling the ceiling with plaster photo
As you already understand, plastering the ceiling is a rather complex process that will require certain skills and dexterity from you. If this is your first time deciding to do this kind of work, then it is better to approach it with all responsibility - you need to study all the intricacies and slowly get to work.
Alexander Kulikov
Choosing plaster for wood
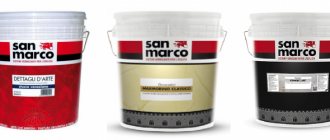
There are ready-made plaster compositions on sale that are diluted with water before use. You can also prepare the solution yourself.
The following types of plaster mixtures are suitable for plastering wooden surfaces:
- Clay-based solutions are environmentally friendly and inexpensive. They are suitable for different premises. There will be no problems with preparing and applying the solution, but you will have to wait a long time for complete drying. Moreover, it is important that the surface dries in a room with normal humidity and above-zero temperatures. Fan heaters and other devices should not be used to speed up drying.
- In most cases, cement and sand based solutions are used. Sometimes lime is added. Such compositions are used indoors and outdoors.
- Gypsum mortar is also used in rooms for various purposes. It is easy to apply and smooth out, as well as good adhesion to the wooden base.
Technique for insulating a wooden ceiling with clay and reeds
Ready-made dry compositions for plastering wooden bases are made on the basis of gypsum. All of them are divided into mixtures for outdoor and indoor use. In addition to them, there are universal solutions that are used in any conditions.
Preparatory work
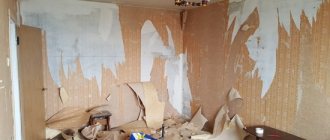
Before starting all other work, you need to prepare the base surface. Used plaster is completely removed using a chisel, hammer and other available tools. If the wooden dies have retained a light shade and there are no signs of rot or mold on them, then all that remains is to remove dust from the surface and you can continue working. If the black slats are visible and there is mold, more work will be required.
All parts affected by mold and rot must be removed. In their place, new dies are nailed, which can be purchased at hardware stores. The condition of the nails in the remaining slats also needs to be checked - over time they could have rusted or come out, and in this case, you need to knock out the nails that have come out with a hammer, and drive new ones in place of the rusty ones.
There are two types of crap: farewell and weekend. The first is intended to create a base and is laid as the first layer. The second is laid on top of the first, creating an outer layer of sheathing. The layers are packed at an angle of 45 degrees in relation to the wall and at 90 degrees in relation to each other.
Once the shingles have been inspected and replaced if necessary, the ceiling is primed to help the plaster adhere better. This treatment should under no circumstances be neglected - in addition to better adhesion of the plaster mixture, this will ensure greater safety of the wooden base and protect you from harmful mold or mildew.
If there is another residential floor or any used room above the room in which the work will be carried out, it is imperative to reinforce the surface with a painting stack. Depending on the condition of the floor, more than one layer of such mesh may be required. Each of them is laid after the solution on the first one has dried.
Preparing the surface for work
First, check the evenness of the ceiling and its horizontalness. The base is cleaned of old finishing and carefully leveled. If there are protruding bars or boards on a wooden surface, they are cut off. Significant voids are filled with scraps of boards.
Next, the base is impregnated with an antiseptic primer. A deep penetration antifungal composition for working on wooden surfaces is suitable for this. You can use a universal mixture instead. We apply the primer in several layers, and each layer must dry before applying the next.
Application of decorative plaster
The ceiling can be covered with decorative plaster. It helps to get an original texture. The combination of different techniques looks especially impressive.
Varieties
Today there are many interesting options for applying plaster, each of which is characterized by certain features.
Textured
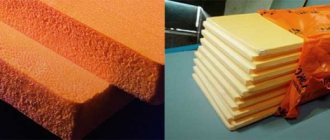
Textured plaster looks very impressive. However, it is not suitable for all rooms. This surface is not used for the kitchen, since removing dust from uneven areas will be very problematic. To decorate a textured ceiling, it is recommended to use polymer-based plaster. It is not afraid of moisture and is durable.
Structural
This term refers to a granular mass in which small stones or quartz elements are present. Structural plaster is divided into several categories. Experts distinguish mineral and silicate varieties. The composition is also made on the basis of synthetic latex.
Venetian
This type of plaster is rarely used for ceilings. Usually it is used to decorate walls. Initially, the composition was made on the basis of wax and marble chips. Today, the binding component is usually acrylic resin.
Flock
This plaster contains many small elements of acrylic paint. They are thrown onto an adhesive base and distributed. Colors may vary. Before starting the procedure, the surface should be primed.
How to do it
To carry out the procedure, it is necessary to carry out a number of sequential actions. This will help you get even coverage.
Base
To begin with, the ceiling surface is cleaned of old finishes. This is done using a scraper. If the surface was previously covered with putty, it should first be moistened with water. It is recommended to knock down all protruding areas and seal the cracks. The base is treated with a special antiseptic composition, which helps prevent the formation of mold.
Leveling layer
If there are strong differences in the ceiling, it needs to be leveled. To do this, use a starting putty made of gypsum. Before applying the composition, beacons are placed on the alabaster. The first plank is installed 20 centimeters from the wall. The distance between the remaining elements is determined taking into account the length of the rule.
Then you should make a solution using a construction mixer and screed the ceiling. To do this, it is recommended to throw the mixture into the spaces between the planks with a spatula and tighten it with a rule. To speed up the process, it is permissible to use drywall. In this case, it will be enough to apply a primer.
Finishing
Depending on the type of decorative plaster, painting or waxing is used for finishing. It is worth painting the ceiling if the material does not contain colored components. The paint should be applied in 2 layers
It is important to wait until the first one dries. Waxing is performed a week after completion of plastering work.
Wax will add shine and protection to the finish. For textured surfaces it is better to use varnish.
Thus, decorative plaster on the ceiling is installed in approximately the same way as on the walls. The key difference is the faster application speed and compliance with safety regulations when working at height.
Tools and materials
Stock up on the necessary materials and tools:
- rule;
- ladder;
- bucket for mixing the solution;
- ready-made dry plaster or all the necessary ingredients for preparing the mixture yourself;
- spatulas (wide and narrow);
- pure water;
- drill and mixing attachment for it;
- construction trowel;
- brushes and rollers for working with primer;
- grater;
- antiseptic primer;
- perforated corner;
- building level;
- paint beacons;
- deep penetration primer;
- grout mesh.
Plastering technology
Now let's talk about how to plaster a wooden ceiling. To begin with, the base wooden ceiling is wetted with water or impregnated with a primer to ensure better adhesion to the applied solution.
All wooden bases cannot boast of evenness and smoothness, so plastering will be carried out in three stages:
- First, using plaster mortar, fill all the voids, irregularities, cracks and holes in the ceiling. This is essentially a rough leveling, so there is no need to carefully level the mixture. Use a spatula to remove only significant deposits.
- Without waiting for the first layer to dry, the next stage of work begins. The second layer of plaster is applied by machine or manually. In the first case, a construction gun or machine is used, and in the second, spreading or throwing. This layer is also called the primer layer. It is carefully leveled and tried to be applied with the same thickness, using beacons or a building level. If necessary, apply a second primer layer, but its thickness should be less.
Attention! The result of the work depends on how even the second layer is.
- When the previous layer has set, they begin to make the covering layer. The requirements for its implementation are as follows:
- When making relief plaster, the top layer will be the finishing layer. The surface relief is formed during the plastering process.
- If, after plastering, the ceiling is planned to be covered with tiles, stone or panels, then a covering layer is not needed. It is enough to make an even primer layer.
- A high-quality covering layer is needed for painting the ceiling or covering it with wallpaper. The plaster is well leveled, smoothed, and sanded after drying.
Methods and quality of surface leveling
There are two technologies for leveling surfaces using plaster.
- On a plane, using a rule, without using beacons. In this case, the ceiling only visually becomes smooth. This method is used when there is no need to align it perfectly along all planes.
- Plastering according to control beacons. It is used if the base has significant unevenness and deviations and it is necessary to create an absolutely even rough finish.
Ready-made beacons for plaster are metal profiles with perforations. Based on the rules, you can remove excess mortar mixture. Their usual length is 2.5 or 3 m, height is 1 or 0.6 cm.
Note ! Beacons allow you to correct significant surface unevenness, as they are set exactly to the level. With their help, you can lay plaster with deviations of only 0.1 cm per 1 square meter.
Finishing the ceiling
The plastered surface is most often whitewashed. But with the advent of new materials, this traditional finishing option is losing its popularity. A bleached ceiling is not as attractive in appearance as a painted or wallpapered one, but the price of such a finish is the lowest.
A flat ceiling can be decorated with Venetian plaster, wallpapered or painted. For the last two finishing options, the ceiling surface must be carefully leveled and sanded. Before wallpapering or painting, the ceiling is impregnated with a deep penetration primer.
Design of drawings and technique of painting on the ceiling
Plaster on shingles
Despite the abundance of new technologies in construction and repair and construction work, time-tested methods also do not lose their relevance. In particular, the use of shingles for plaster when performing finishing work in wooden houses.
Some time ago, with the advent of plasterboard sheets, plaster shingles faded into the background. However, due to some of the disadvantages of drywall, an increasing number of developers are returning to the old method. By the way, shingles for plaster are much cheaper than gypsum sheets and reinforcing mesh, which are used for plastering various surfaces.
When is puttying needed?
Ceiling putty has a different composition than plaster mortar. The putty mixture is fine-grained, and the plaster has large grains in its structure, therefore, using putty, a smoother and more uniform surface is achieved.
Important! Putty mixtures are used for fine leveling of walls and ceilings. After the putty has dried, the surface is sanded, making it perfectly smooth and even.
Puttying a ceiling that was previously plastered is necessary before pasting it with thin paper wallpaper or painting it with interior paints. The putty is applied in 2 layers, but before that the surface is primed. After puttying, the ceiling surface needs another grinding and primer treatment.
Conclusion
Using wooden shingles for plastering work reduces costs. It is not difficult to work with it, the main thing is to choose the right strips and fill them onto the surface. When applying the solution, its maximum thickness must be observed, otherwise it will cause rotting of the load-bearing structures.
The video in this article will provide an opportunity to expand your knowledge on this topic. If you have any questions while reading the publication and after it, please ask them in the comments, we will be happy to answer them.
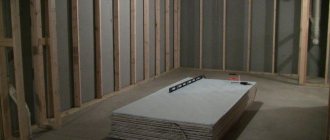
One of the cheapest and easiest ways to change the layout of an apartment is to erect wooden partitions. Before decorative finishing begins, such wooden surfaces require preparation and protection by plastering. When doing plastering work with your own hands, a novice master may encounter difficulties, since wood, despite its porosity, does not adhere to the building mixture. Therefore, plastering on wood requires special preparation of the walls and careful adherence to all stages of the work. If you do everything correctly, you will get a smooth and durable surface that will not be inferior in quality to a plastered concrete wall.
Choosing putty for wood
There are the following types of ceiling putties:
- Gypsum putty is characterized by plasticity, good adhesion to a wooden surface and an affordable price. Due to their many advantages, these compositions are used most often.
- Acrylic composition has the same properties as gypsum, but its cost is higher. Such mixtures are allowed to be applied only in a thin layer.
- The peculiarity of adhesive putty is that it comes in different colors.
- Latex mixtures are very similar to acrylic and gypsum, but in terms of price they are much superior. Only thin-layer application is permissible.
- Oil putties are used in places with high humidity.
All putty compositions are divided into finishing and starting. In addition to them, there are universal dry mixtures on sale, intended for both initial leveling and finishing application.
When choosing putty, take into account its durability. The better the adhesion of the solution to the base, the longer the coating will last. Give preference to plastic solutions, which are much more convenient to apply and distribute evenly. Consider drying speed. High-quality mixtures dry quite quickly.
Advice! Putty for residential premises should not contain toxic components. When diluting the dry mixture, follow the instructions on the package.
How exactly to plaster a ceiling
The starting plaster layer is applied when the beacons are dry.
When the beacons have dried (if you installed them), you can begin applying the starting layer. If there were cracks at the joints, they must be sealed in advance - tile adhesive is ideal for such work.
The solution should be mixed exactly in the proportions that appear on the packaging - it is made by the manufacturer, so all conditions must be met exactly.
Plastered ceiling and original lighting
These five minutes are required so that all the lumps that did not have time to dissolve during kneading are saturated with moisture. After this, you need to mix the solution again - then they are guaranteed to dissolve.
You should mix exactly as much plaster at a time as you can use for half an hour. If you beat the solution after it has set, nothing good will come of it, the molecular structure will be destroyed - because of this, the putty will harden for a long time, and then there is a high probability that it will simply crumble.
In this situation, the vortex flow will not spin clockwise, but counterclockwise - that is, it will be directed not from the bucket, but directly into it.
If you doubt that you will be able to plaster the ceiling with your own hands, just relax and watch a video about this work. In fact, if you want, you can easily do everything that is required. Plastering the ceiling - video:
Since we will be plastering the ceiling along the beacons, this should be done in stages, that is, along the spans (from one profile to another).
- First, the mixture is applied with a spatula;
- Afterwards, all excess is cut off using the rule;
- If shells have formed somewhere, seal them up additionally and apply the rule again;
- This is done exactly until a completely flat plane is obtained.
The initial layer must dry
To determine whether it has dried, you should pay attention to the dark spots - as soon as they disappear, then you have completely dry plaster. Next, apply a layer of primer and wait again - from two to four hours, so that it also dries
Then you can mix the finishing putty (this is done in the same way as when preparing the starting putty).
The ceiling plaster is almost ready
Sand the ceiling only when it is completely dry. For such work, various means are used, including: diamond mesh, sandpaper, etc.
As a conclusion, another important tip should be noted, which concerns the thickness of the finishing layer. If your starting layer of ceiling plaster is even and smooth, then it is better to make the finishing layer as thin as possible. To obtain ideal results, the thickness of the spatula should be carefully adjusted. The rule applies here: the lower the inclination of the spatula, the thinner the layer that is applied with its help will be.
Application technology
We putty the wooden ceiling in the following sequence:
- Treat the base ceiling with deep penetration primer. Use a roller or brush to apply.
- Mix the dry putty mixture with water, following the instructions. Apply the solution to the work surface with a wide spatula and treat the ceiling surface with it. Level the putty well with a spatula. Hold the tool to the ceiling surface at an acute angle.
- If the ceiling needs additional leveling, you can apply another layer of starting putty. To remove significant unevenness, go over the surface with a scraper or large spatula.
- Let's start applying the finishing putty. If the ceiling is planned to be covered with wallpaper, then only one layer of finishing solution can be applied. Before painting, the surface is coated with finish twice.
When the putty ceiling has dried, it is sanded well with fine-grain sandpaper. After this, dust is removed from the surface and treated with a primer. After the first layer of primer has dried, another layer is applied. When it dries, the ceiling is ready to be painted or wallpapered.
What is shingles and what are the reasons for its sagging?
The ceiling structure in the form of shingles is a mesh ceiling made of wooden slats and attached to wooden ceiling beams. The shingles are the basis for further finishing of the ceiling, onto which a thick layer of plaster is applied. After complete installation and finishing, the shingled ceiling looks great and performs its functions reliably.
But over time, the shingles may begin to sag; the reasons for this are most often exposure to moisture and strong mechanical loads. Simply put, due to leaks, the wooden mesh begins to rot, the shingles slats sag, and under the weight of a thick layer of plaster, they sag to the bottom and become unusable. To save the ceiling and put the ceiling in order, you need to begin immediate repair work at the first sign of surface deformation.