You are your own master, or how to quickly remove plaster from walls at home
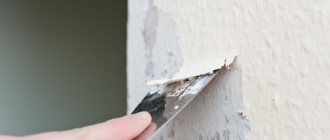
When renovating, it often becomes necessary to remove the old layer of plaster.
It is impossible to do this by hand, without a special tool. You need to carefully prepare for work, stock up on personal protective equipment, cover all objects and more. To learn how to quickly and independently remove plaster from walls at home, read the article.
Preparing the premises
It’s worth noting right away that no matter what method of removing plaster you choose, you are guaranteed a large amount of dirt and sometimes dust. Lime or gypsum plasters are susceptible to moisture. You can take advantage of this fact to make your work easier. Many experts recommend generously moistening the wall with hot water 15-20 minutes before starting work before dismantling. This will worsen the adhesion of the solution to the base and make it more loose. A thin layer can be moistened using a spray bottle, and more than 6 mm thick will have to be well soaked using a roller, sponge or rag. Just imagine the puddles that will form on the floor. Take care in advance not to damage other surfaces, especially if the apartment is already partially livable:
- Be sure to cover the floor with thick oilcloth so that its edges touch the walls;
- If somehow you already have a finishing coating on the floor, and now you decide to knock off layers of plaster from the wall, take care that when they fall, they do not damage the floor. You may have to lay thick cardboard or an old droshky under the oilcloth;
- If there are sockets on the walls, they must be plugged and protected from moisture. Seal them with masking tape and oilcloth;
- Cover the window sills with newspapers or cloth;
- If the interior doors have already been replaced, do not be lazy to wrap them with a special stretch film;
- It is also worth closing the lighting fixtures;
- De-energize the room in which the work is planned to be carried out;
- Try not to pollute adjacent rooms. To do this, close the doors, tape them around the perimeter with masking tape, and lay a damp rag on the floor in front of the door, which will close the gap and minimize the ingress of dust;
- Leave free access to the window to ventilate the room;
- Take out all equipment such as radio, telephone, etc. from the room. Dust can affect their performance.
All this must be done, even if you decide to slowly remove the plaster with a hammer and do not plan to raise dust. During the work, using a drill or hammer drill may simply become a necessity, but you will already be ready for it, and then you won’t have to spend a painfully long time cleaning absolutely everything around from the corrosive dust.
In what cases may such an operation be required?
When carrying out a major renovation, we evaluate the condition of the finish on the walls and make a decision on whether to preserve, repair, or remove it. If the layer of plaster is severely damaged, then sometimes the ideal solution is to break it completely, reaching the brick or concrete wall, since repairs will become too labor-intensive.
Sometimes, as part of a major renovation, we want to implement a radically different concept for decorating a room, and then the only option is to completely clean the walls, gaining access to them, then carry out insulation and finish everything again in accordance with the plan. For example, old plaster must be removed when installing heavy elements such as tiles and natural stone, since the base for them must be as strong and reliable as possible.
Important! Sometimes it may be necessary to remove not all the plaster, but to clear part of the wall from it. This happens when the wallpaper is unsuccessfully dismantled, the coating is otherwise damaged, or when greasy stains form that cannot be removed in any other way.
Removing plaster from the ceiling
The process of removing old plaster from the ceiling is considered a particularly difficult process. This is due to the fact that you will have to work in a position where your arms are constantly raised up. They quickly get tired and numb, requiring more rest breaks.
It is impossible to say unequivocally which method is best to choose for removing mortar from the ceiling. First, it is necessary to evaluate each specific situation separately. Somewhere you just can’t do without a grinding machine or a hammer drill. Somewhere a simple spatula and your patience will be enough. But there is one little trick that can make your job easier. We will prepare a special softening composition, which, by the way, can also be used for walls:
- Everything ingenious is simple, and in this case it can also be found in every home. We need to dissolve 2 tablespoons of potato or corn starch in one liter of water. The resulting mixture should be generously treated with the required surface. The action of starch is aimed at destroying the adhesion of the plaster to the base material and loosening it;
- After 10-15 minutes, try removing the plaster in different ways, starting, of course, with the simplest ones.
If the layer of mortar is very thick and only its surface layer is chipped, remove it, then re-soak the ceiling with starch mortar and remove the remaining mixture.
How to remove old plaster without much difficulty
Not in all cases the coating needs to be completely removed. Cracking is not always evidence that the finish has become weakened. Taking this into account, each individual case must be considered individually, but the general rules are still inherent in them, and they remain unchanged. The main thing is the finishing, which is one of the unnecessarily restraining factors, so it is necessary to get rid of it. This can be either wallpaper or paint. Removing the finish may also remove a significant portion of the plaster mixture. Paint, unlike wallpaper, which can be wetted to make removal easier, can be removed using a spatula. Next, the remnants of the leveling mixture are eliminated using the method described above.
Identified cracks must be tested for strength by tapping. If the blows do not cause dull sounds, and the plaster does not crumble, holding on quite firmly, then this place only needs to be strengthened. Using an ax or other tool with a sharp edge of increased strength, it is necessary to widen the cracks so that their cut looks like the Latin letter “V”.
In the future, when performing surface treatment, the holes are primed and filled 2/3 with solution. Next, they are covered with primer for final leveling, and after rubbing, not the slightest sign of recent cracks will remain.
Sometimes even fairly stable areas of the coating have to be removed. The reason mainly lies in the thickness of the old layer, which is several times greater than necessary, and the presence of modern materials completely prevents the need for maintaining it. Before removing the old plaster, it is necessary to wet the entire surface with warm water, since finishing saturated with moisture is much easier to remove. During removal, this procedure must be constantly repeated, wetting the walls to prevent the appearance and reduce the amount of existing dust.
Features of removal depending on the type of building material
Depending on the type of plaster, the features of its removal from the wall differ:
- The cement coating adheres firmly to the surface and is difficult to knock off, even if the material was applied a long time ago. Its removal is started only when there are no other finishing options. For removal, use a breaking tool, for example, a hammer drill. The layer of cement plaster is most often thick.
Gypsum coating holds strong, but it is prone to cracking when impacted.
Therefore, a breaker tool is used to remove it. If the layer is thick, use a puncher, and if it is thin, use a spatula or chisel.- Decorative coating is most often applied in a thin layer. It does not hold as firmly as a cement-based mixture. Therefore, a grinding or vibrating machine is used to remove it.
- The clay coating must be removed. If you leave it on the wall, then the new decor, for example, wallpaper, will not stick firmly. This type of plaster is prone to breaking and peeling. Therefore, cleaning it will not be difficult. If the area is small, then you can use a roughing spatula or chisel for the work.
- The polymer coating holds firmly due to special additives in the composition. It is difficult to remove it by hand; it is better to use a grinding machine.
Adviсe
- Never apply gypsum plaster over cement-sand mortar. The different composition of these materials causes a chemical reaction and their subsequent separation from each other.
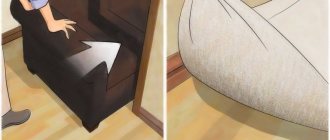
- Before starting dusty work, cover furniture and other objects with cellophane film - you won’t have to clean them for a long time later.
- To quickly remove debris after dismantling the outer covering, lay a 1.5 meter wide cellophane film on the floor. After completion of work, the film is disposed of along with the garbage. We recommend that you periodically remove the generated waste into bags or bags.
- If you decide to carry out cosmetic repairs, it is not necessary to completely clean the wall of old plaster. It is necessary to leave areas that are difficult to clean. In place of the removed coating, you can safely apply a fresh composition of the same material.
- Crumbs from old gypsum plaster can be used to create walkways.
High-quality preparation of walls for finishing becomes the key to many years of operation of any room.
How to use waste after dismantling the solution
Disposing of dismantled plaster is always a problem, especially when it comes to a city apartment. It can only be taken to a landfill, which is expensive and labor-intensive. If you decide to get rid of the plaster, you should completely clean the room, distribute the garbage into bags and pay for its removal once. In private homes there is a chance to reuse plaster in the following ways:
- a solution based on cement and sand is suitable for sprinkling areas, sidewalks, paths, as well as for filling the floor in an outdoor shower, toilet, or at the base of a terrace;
- clay plaster can be reused - just soak it, so it makes sense to store waste (if there is space);
- crumbs from gypsum plaster are suitable for constructing floors in outbuildings - they will serve as bulk insulation;
- Lime plaster can be used to treat areas around trees to repel pests and stop the growth of weeds.
Dismantled plaster is stored only under a roof or a canopy, otherwise it will get wet in the rain and turn into a heavy mass. Clay waste does not need to be stored in a large pile, since it also becomes a monolith. Loose plaster is stored in bags in dry sheds, preventing it from getting wet. With the right approach, it is quite possible to dismantle plaster yourself, saving a decent amount of money and gaining valuable experience for future work.
How to quickly remove paint?
If you plan to cover the walls with plaster, the paint must be removed.
This is not always appropriate for re-painting or gluing wallpaper, but the plaster will not adhere to the paint: if the paint begins to crack over time, the work will be in vain, and the wet composition simply will not lie on a smooth surface. There are also several ways to remove paint from a wall :
- Gradually clean the surface with a spatula . The advantage of the method is high-quality removal of coating even in hard-to-reach places. Disadvantages: slow speed, a lot of construction dust, small particles may get into your eyes.
- Remove paint in the same way using a chisel and hammer . The method allows you to remove more durable coatings, but the chisel will have to be sharpened periodically.
- With an ax or pickaxe. A very labor-intensive, lengthy and risky process.
- Firstly, the base can be damaged.
- Secondly, the neighbors will not be happy with so much knocking.
- Thirdly, the instrument itself is heavy, so after just an hour you may feel the urge to throw everything away.
Personal protective equipment and safety precautions
Mandatory equipment includes respirators and safety glasses, closed clothing and hard shoes. It is necessary to determine in advance the places where hidden wiring runs. This helps to properly de-energize the equipment before plastering.
Mandatory equipment includes respirators and safety glasses, closed clothing and hard shoes.
Categories
- Apartment design
- All about repairs
- Doors
- Window
- Ceiling
- Walls
- Plaster and putty
- Drywall
- Furniture
- Other about repairs
- Floor
- Leveling the floor
- Cement strainer
- Dry floor screed
- Semi-dry screed
- Self-leveling floor
- Flooring
- Warm floor
- Electric floor
- Water heated floor
- Floor coverings
- Tile
- Laminate
- Everything about plumbing
- Water pipes
- Bath, shower
- Faucets
- Toilet
- Heating
- Everything is electrical
- Wiring
- LED in everyday life
- Ventilation
- Construction materials
- Tools
- Materials
- Construction calculators
- Repair of a country house
- Miscellaneous articles
- Top review
- Question answer
- News
- Repair video
Articles on the topic
Cladding a house made of aerated concrete with bricks - masonry, disadvantages, instructions, advice from masons
Expansion joint in a brick multi-storey building, instructions, advice from masons
Wooden floors in a brick house - types, how to install, instructions, advice from masons
Brick cornice - how the masonry is made, varieties, instructions, advice from masons
Insulating a house made of sand-lime brick - stages of work, instructions, advice from masons
Heating in a brick house - air, radiator, instructions, advice from masons
Service life of a brick house and how it can be increased?, instructions, advice from masons
How to put a zero on a foundation with a brick - methods, instructions, advice from masons
Reviews ()
How to remove decorative plaster from a wall with your own hands
Of the most popular tools, users will need:
- Special types of machines that remove plaster layers;
- Hammers;
- Metal brushes;
- cycle;
- Scrapers with spatulas;
- Hammers;
- Chisels. It is recommended to choose options with the longest handles. Then the process will be quick.
There are additional devices without which work is impossible:
- Spray;
- Damp cloth;
- Bucket with water;
- Film.
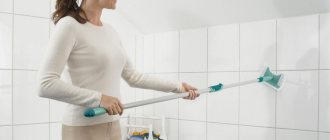
The walls must be constantly wetted, and in the final stages they are simply cleaned of accumulated dust. The bathroom excludes such requirements.
Methods for removing plaster using hand tools
These methods compare favorably with others due to the small amount of noise. There isn't much dust either. And no expensive tools are required.
The recommendations will look like this:
- First, you can tap the plaster layers with a hammer, which have begun to fall off in whole layers. Gypsum material is no exception.
- At the next stage, the edges are pryed up using a spatula. To drive it deeper under the plaster, they also go over the tool with a hammer. Then there are fewer problems with large layers breaking off. It is recommended to periodically moisten the surface with water so that not so much dust is formed. If something does not lend itself to a spatula, such areas are left for later, for other methods. Decorative material often requires that dismantling be carried out with special tools.
Old plasters come off with the same quality from concrete and brick bases. But what to do if drywall is used for the base function? The main thing is not to violate the overall integrity of the material and the paper layer. Then the hammer doesn't help. It’s better to start from some corner and pick out part of the coating with a knife. Then they move on to using cycles. The tool differs from a regular hammer only in its pointed end. So the putty is gradually lifted out, driving deeper and deeper under the solution. A chisel is also acceptable, but it is important for it to maintain an acute angle.
Chisels and hammers are needed if sufficiently large forces are applied. This option is suitable for materials that hold quite tightly. The surface is divided into small fragments to simplify the work. You have to knock while continuing to move in one direction.
The use of special hatchets when removing materials is one of the oldest methods. A wooden house is processed according to the same rules.
Dismantling methods using power tools
The issue is solved with the following devices:
- Bulgarian. Electric drill with chiselling mode;
Hammer drill
It is acceptable when layers of old mortar that are not capable of boasting high power are removed. The blows of this instrument are characterized by frequent blows with low power and amplitude. Such drills can even pierce bricks with the right approach.
The layered layers are removed completely or cut into fragments using various nozzles. The work is performed with metal bristles or cup attachments. The use of drills with a brush helps to completely clean the surface and get rid of the thin old layer. The same rules apply if loft is being processed, square meter and area do not matter.
Brickwork
Before removing facing material from brickwork, you need to evaluate the old coating. To do this, tap all areas with a hammer. If the sound is dull, then the plaster has already peeled off; if the sound is ringing, then the adhesion of the old coating is still strong.
Exfoliated areas can be easily removed with a spatula. Where the grip is still strong, use a chisel. It is applied between the brick wall and the plaster, and the broken pieces of the old layer are carefully knocked off with hammer blows.
If the material turns out to be durable, then hand tools are powerless; you will have to resort to using power tools. In this case, you can quickly remove the old cladding using a hammer drill with a spatula-shaped attachment.
The power tool must be set to chiselling mode, then with a spatula placed at an angle of 80° to the wall, punching through the layer of plaster to the very base. Then tilt the tool up to 30° and drive the blade under the material being dismantled.
If the old coating is not so strong, then you can use an impact drill. Using different attachments, you can beat off flaky areas or use a disk attachment to cut the surface into fragments.
Advice! As soon as the brickwork is completely freed from the old coating, it must be treated with a primer and left for a day.
Tips and tricks
To ensure that the removal of plaster is carried out correctly, you should follow these tips:
- It is necessary to inspect the layout of the electrical wiring in the house in advance. It is better to turn off the electricity at the panel.
- Don't forget to take personal protective equipment.
- It is important to be extremely careful when handling the hammer drill. Since there is a risk of destroying a brick wall or ceiling, avoid haste. It is better to remove it carefully and for longer, but without subsequent repair of the base.
- If the thickness of the plaster layer is small, it is better to save energy and use a sander. For a layer of more than 3 mm, you need a sander with the ability to vibrate.
- If the solution was applied to shingles or drywall, it is recommended to dismantle it manually, without using power tools. Avoid sharp blows, use a scraper and spatula.
- When dismantling the ceiling, it is better to use a scraper or spatula, working with both hands.
If you follow all the rules and take into account the recommendations, the process of dismantling the finishing material will not cause difficulties. You need to choose a tool, take care of your own safety and gradually remove the old coating.
Drywall
Removing the old coating from drywall is not so easy, because this material is very fragile. If the integrity of the layer that covers the drywall is compromised, it will lose its protection. Therefore, power tools and even chisels and hammers cannot be used for dismantling. It will not be possible to diagnose walls by tapping.
In order not to damage the material, you need to take a knife or screwdriver and pick out a layer of plaster in one of the corners to the very base. Having exposed a small area, then do all the work of dismantling the cycles. To do this, carefully push the tool under the finish and pick out piece by piece.