Sealing the bathtub: execution sequence
Sealing joints and seams of all surfaces is an important stage in bathroom renovation. If moisture constantly seeps into the walls and onto the floor, this will lead to the appearance of harmful microorganisms on them. In addition, leaks to the lower floors will become possible.
In our article we will look at all the methods by which you can seal a bathtub with your own hands.
Note! First of all, the sealing method depends on the distance between the wall and the bathtub, as well as on what finishing coating you used on a particular surface.
Methods for carrying out sealing work
This procedure is not very difficult, so you can do it yourself without involving specialists. Before properly sealing the bathtub, it should be noted that the choice of method is determined by the type of decorative finish, as well as the size of the gap between the wall and the bathtub.
Application of sealant
It is worth saying that this is a simple method used in cases where it is necessary to seal small gaps about 1.5 cm in size. For sealing in this case, a sanitary sealant with increased water resistance is used. This sealant is also used for sealing seams when using other finishing materials. It is best and most optimal to use a sealant whose composition is either acrylic-silicone or ordinary silicone. By color it is distinguished as transparent, white or some other color. Manufacturers package sealant in tubes or cylinders. Packed in a cylinder (used with a gun) it is much more convenient to use.
Sealant is most often used to seal small cracks.
The downside is that over time it can change color (yellow or darken) and, accordingly, does not look aesthetically pleasing.
Using a ceramic corner
This option is more presentable and lasts a long time. The corner is placed on the gap
For high-quality sealing of the gap with a ceramic corner, it is very important to install the bathtub before starting to cover the walls with ceramics, and already while gluing the tiles to the wall, glue the ceramic corners as well.
Ceramic corner is reliable and presentable
The advantage of this method is its beauty and long service life.
The downside is that it is not always possible to find ceramic corners in the right color to match the color of the tiles glued to the walls.
We use a plastic corner
This corner is purchased in specialized building materials stores. It is convenient in that it can be used both when covering the surface of walls and during future repairs or replacement of plumbing fixtures, and it is glued to “liquid nails.”
The use of a plastic corner is a practical and aesthetic option for sealing seams
The advantage of using this method is that the corner is elastic and smoothes out small surface bends that cannot be avoided.
Application of plastic adhesive tape
This tape can also be found in construction centers. This is a thick tape that is very easy to use. It has the same advantages as a plastic corner.
Plastic adhesive tape is a modern method of sealing seams
If the gap is too large, before sealing the bathroom, you can install a shelf in this place from waterproof plasterboard, on top of which you can glue a tile or plastic panel. In this case, it would be optimal to seal the joints using sealant.
Choosing a bathtub sealing method
It should be noted that in the bathroom, sealing seams can be done in different ways. The choice of the most successful one is carried out taking into account the following points:
- The size of the gap between the side of the bathtub and the wall.
- Wall finishing material.
- Financial considerations, since different methods of sealing the gap require different investments.
Let's look at the most commonly used methods of seam sealing.
Peculiarities
The gap between the wall and the bathtub occurs due to a mismatch between the dimensions of the bathtub and the room, uneven walls or due to missing corners.
The size of the gap depends on the specific situation. At the moment, quite a lot of solutions to this problem have already been invented, and we will talk about them. How to close large gaps (more than 5 cm), small gaps, the best ways to resolve these situations depending on the input conditions - we will consider all this later in the article.
Grouting using tile grout
Builders call fugues dry mixtures based on white cement, intended for filling various joints. Modern compounds have good adhesion and extremely low water resistance.
How is the work carried out?
- When choosing a dry mixture, you should pay attention to ensure that it is moisture resistant.
- This sealing option is only suitable if the joints between the wall and the side of the hot tub do not exceed 5 mm in width.
- Before starting work, you need to cover the surface of the wall and the side of the bathtub with masking tape so as not to stain them with grout.
- Apply the composition carefully, using a small rubber spatula.
- After applying the grout, you should not use the bathroom for 24 hours.
Sealing seams with silicone sealant
To achieve the desired effect, it is more convenient to use not a solution or foam, but a sealant for seams in the bathroom. These are polymer compounds created specifically for waterproofing seams; they are excellent for sealing the gap between the wall and the side of the bathtub.
How to choose a sealant?
There are many different types of sealants available in hardware stores, so making a choice can be difficult. What material is best for a bathroom?
- It is better to purchase silicone or silicone-acrylic sealant.
- It’s good if the tube has the inscription: “Sanitary.” This means that the sealant contains antibacterial additives.
If you will be sealing the gap between the wall and the side of the acrylic bathtub, then you should choose a neutral silicone sealant
When purchasing another type of material, you should choose the one marked “for acrylic.” When choosing a sealant, you should pay attention to its color. The composition can be completely transparent, white or colored.
How to apply sealant?
Let's look at how to seal the seam between the side of an acrylic or metal bathtub and a wall covered with tiles:
- First you need to thoroughly clean the surfaces and wipe them with alcohol or acetone. Dry well.
- Insert the tube of sealant into the mounting gun, cut off the plastic spout on the tube.
- The sealant is applied in a continuous line along the edges adjacent to the walls.
- Now the sealant needs to be smoothed. The easiest way to do this is with your finger. And in order not to get your hands dirty, your finger should be moistened in a soap solution.
- The sealant must be given time to dry. Drying time depends on the type of sealant and ranges from 8 to 24 hours.
How to avoid a gap near a wall
The bathroom is a room with high humidity, so it is necessary by all means to prevent water from getting on the surface. Installing an exhaust device helps with this. The correct connection of the bathtub to the wall is also of great importance. The outside of this plumbing fixture is covered with a screen, limiting access to the surfaces behind and under the bathtub. If there are cracks left, water will get in. It is difficult to remove, because mold often grows behind the screen.
It is impossible to avoid the formation of gaps between the bathtub and the wall. But you can choose a method of installing it in which the gaps are minimal. They can be easily eliminated using silicone moisture-resistant sealant, since the distance between the bathtub and the wall is small.
Craftsmen disagree on when to install plumbing fixtures: before or after laying the tiles. Experienced people advise doing this last, but they recommend preparing the walls in advance for installing a bathtub: making grooves in them for the sides. Thus, they (the sides) can be “embedded” directly under the first row of tiles. This method of installing plumbing equipment has its advantages:
- The sides of cast iron and steel bathtubs are rarely even. With acrylics in this regard, things are much better. By sliding the bathtub into the grooves, you get minimal gaps between it and the walls.
- To design such joints, no finishing materials are required. The method is beneficial in terms of saving money and labor costs.
How to close a large gap between the wall and the bathroom
The voids must be carefully filled so that the indentations of the edge of the font from the wall become airtight. The most suitable material for the junction of the bathtub and the wall is selected and the option of how to seal the through hole and cracks is selected. For large distances from the wall to the edge of the font, building materials are used: brick, curb edging, gypsum board sheet, ceramic and tiles, sealant, adhesive tape, adhesive tape. Leaks are sealed, areas where the vertical partition adjoins the edge of the font are sealed.
Sealing is done on top of the building material to prevent cement, bricks, and plasterboard from getting wet. Tiles, natural stone, granite, marble, substitutes, and sealing tape are laid. The joints are carefully closed and filled with sealants, mastics, putty, and painted.
For large distances from the wall to the edge of the bathtub, building materials are used.
How can you seal the seam between the bathtub and the tiles, the main methods
A bathroom remodel requires work to be done to ensure there are no water leaks at the tile-to-tub junction. An effective method is not to wall the bathtub into the wall; on the contrary, use modern building materials. This will better hide and embellish the sealing of the joint.
The most popular methods are:
- Tile grout;
- Lime or cement mortar;
- Finishing the joint with mounting foams;
- Passing joints with silicone sealants;
- Installation of beautiful, comfortable ceramic borders.
Each option is reliable, good in its own way, and has advantages and disadvantages. The best means of sealing a joint is a simultaneous combination of two or three methods and materials.
The best means of sealing a joint is a simultaneous combination of two or three methods and materials.
Matching the sealing material to the style of the bathroom
Do not think that to eliminate the gap between the wall and the bathtub, you can take any material and cover the gap. Don’t do everything hastily, everything should be combined: high-quality material + ease of use + harmony with the interior. For styles such as hi-tech or minimalism, the latest, frequently used materials are suitable; a plastic border will look good.
If the renovation is done in an eco-style or an ordinary classic, you cannot do without stone or ceramics. A marble edge will suit the classic design. This element will add elegance and splendor. Eco-style is simpler, so limit yourself to regular white ceramics or simple grout. Those who are limited in finances can use plastic skirting boards and border tape.
The material for sealing joints must be chosen so that it does not differ in color and style of the room
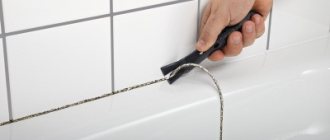
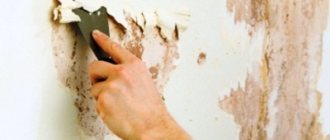
Removing old seams
Manufacturers of sealants advise using special knives to quickly remove old silicone, but if you want to make repairs as cost-effectively as possible, you can get by with an ordinary narrow utility knife. It will cope with this work no worse than famous tools from Bosch or Wolfcraft. If the old sealant or grout refuses to give up without a fight, you will have to use a special product to remove the old silicone or grout joints.
Don't miss: How to cut tiles with a manual tile cutter: secrets on how to use a manual tile cutter
Causes of a gap at the wall
The main reason for the appearance of space is the imperfection of the geometry of the room
Most often, cracks in joints appear as a result of:
- poorly poured screed on the floor;
- curvature of walls caused by errors in brick laying or non-standard room configuration;
- non-compliance of corners with established standards (may be due to poor-quality wall plaster);
- defects in plumbing elements (for example, an uneven side).
The main reason for gaps is crooked floors or walls.
Closing large gaps
Owners of apartments in new buildings often face a problem such as a discrepancy between the size of the room and the bathtub itself. In such situations, it is necessary to use an integrated approach to resolve the problem.
In this case, cement mortar is often used as a rough finish. For additional fixation, a lining made of a wooden block is installed. But cement finishes cannot be cleaned and can quickly deteriorate when exposed to water.
For this reason, this method uses a fine finish. The simplest and most accessible method for most citizens is painting the cement base with enamel or acrylic. Installing plastic panels also serves as an alternative option. For a harmonious combination of finishing elements, experts advise using the same materials as on the walls.
If the gap between the wall and the bathroom is about 10-15 centimeters, then it is recommended to make an additional shelf. For this purpose, a metal frame is installed, lined with moisture-resistant types of raw materials. The ideal material in this case would be tiles.
Professionals recommend using masking tape to protect the adjacent surface when working with polyurethane foam and silicone sealant. When sealing the gap between the wall and the bathtub with a mixture of cement and sand, it is recommended to remove the raw material with a dry rag if it gets on the bathtub or tiles.
Foam or cement mortar should not be used when installing an acrylic or metal bathtub. Steel can change in size with changes in temperature, and the acrylic base is very flexible. For this reason, both methods are more suitable for cast iron options. Taking these recommendations into account, everyone will be able to choose the best option for eliminating gaps.
Preparatory stage
A large gap between the side of the bathtub and the wall occurs if a plumbing fixture of standard dimensions does not fit the size of the room. Problems can also arise if the room has uneven corners and this could not be fully compensated for in the process of finishing the walls.
It is important to properly waterproof the gaps, since water will flow down the wall and get under the bathtub, resulting in:
- there will be a danger of leakage to the lower floors;
- High indoor humidity provokes the development of mold, which is harmful to human health.
Important! Before sealing the seams, make sure that the acrylic bathtub is securely fastened to the wall using special hooks that are installed on the lower edge of the side. Otherwise, over time, the acrylic will bend and the tightness of the seams will be compromised.
Before you start sealing the gaps, fill the acrylic bath with water and do not drain it until the work is completed, until the silicone has completely dried!
For sealing wide gaps (15-30 mm), a combined method is best suited - a combination of polyurethane foam and bathtub sealant. Using polyurethane foam, a support is formed for the sealant layer, which itself also serves as a waterproofing agent and is durable.
How to seal the gap between the wall and the bathtub - basic options
This article will look at how and with what to seal the gap between the wall and the bathtub, as well as the main methods for sealing this gap.
Causes of the gap
Most often, a gap that appears between the bathtub and the wall is a sign of the following situations:
- The dimensions of the installed bathtub do not fit the dimensions of the bathroom;
- The geometry of the bathroom does not meet the standards, that is, the walls intersect at an angle other than 90;
- The technology for renovating a bathroom, small or large, was not followed correctly.
If the bathtub was installed after laying the tiles in the bathroom, then this gap appears quite logically, and the issue of its elimination must be somehow resolved.
If you are installing a bathtub, you should proceed in a slightly different sequence:
- The first step is to lay the bathroom floor;
- Install the bathtub;
- Only after installing the bathtub should you begin laying tiles on the walls.
In this case, the tile will rest on the edges of the bathtub, which avoids the formation of this gap and the question of how to cover the gap between the wall and the bathtub will not arise.
When considering this problem, first of all you should understand the various methods of eliminating the resulting gap - there are different ways to eliminate free space of certain sizes
In addition, you should take into account what material the bathtub is made of.
In this case, you should fasten the acrylic bathtub to the walls efficiently and reliably using ordinary hooks screwed into the walls: two hooks are screwed along the long side of the bathtub, and one at its ends. This fastening is sufficient to ensure that the sealing of cracks between the bathtub and the wall is sufficiently reliable.
Three ways to close the gap
As already mentioned, the method of connecting the bathtub and the wall depends primarily on the size of the existing gap; it is by this criterion that it is determined how to close the gap between the wall and the bathtub.
Sealed gap
- Sealing small gaps less than 10 mm in size:
- To do this, you will need an external white corner for the tiles and sanitary white silicone;
- The ends of the corner are measured strictly to the size of the bathtub and cut at an angle of 45 degrees;
- Next, tightly fill the gap between the bathtub and the wall with silicone and cover it with a plastic corner. In this case, you should pump up such an amount of silicone that pressing the corner causes it to come out both near the wall and near the bathtub. Excess silicone is then removed using a damp cotton rag.
Skirting
- Eliminating a gap of 10-30 mm:
- To eliminate such gaps, ordinary tile corners are not suitable, since their maximum width dimensions are 12 mm. In this case, a self-adhesive border or a special plastic plinth should be used;
- The installation of skirting boards is carried out similarly to the installation of a corner, the main difference is that a gap more than 1 cm wide cannot be completely filled with silicone - this is not necessary, the main thing is to reliably and efficiently glue this skirting board to the wall and bathtub;
- Before gluing the plinth, you should thoroughly degrease and dry the surfaces that will be glued;
- Closing the gap is carried out taking into account the same rule in the case of a self-adhesive border, which is sold in the form of rolls by linear meters. Gluing the border is a more complex procedure than it might seem; to make the process easier, it is recommended to glue one side first (for example, to a bathtub), and only then another.
Sealed gap
- Sealing large cracks. The first two methods are not suitable when the gap size exceeds 30 mm. In this case, you will have to use another method that requires certain concreting skills:
- A kind of formwork is installed underneath the bathtub in order to prevent the solution from getting under the bathtub;
- The resulting depression is filled with solution;
- After the solution has dried, ceramic tiles (white or matching the tiles on the bathroom walls) are laid on top of it.
When solving the issue of sealing the gap between the bathtub and the wall, other methods and materials that differ from those described in this article can be used. With imagination and the ability to use tools, you can come up with your own way to solve this problem.
At the same time, the main thing is to remember that regardless of the chosen method of eliminating the gap, tightness and aesthetics should come first.
Required tools and materials
To apply the sealant, you will need the following set of materials:
- Tube with sealant
- Construction pistol
- Masking tape
- Polyethylene foam cord
- Putty knife
- Construction hair dryer for drying the gap before applying sealant
- Degreaser (alcohol, white spirit, etc.)
You may also need material to decorate the seam (decorative tape, plastic or ceramic plinth). Having prepared everything you need, you can get to work.
Sealing the joint
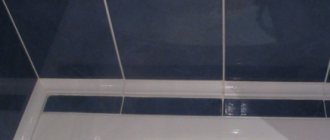
What is the cheapest way to seal the gaps between the bathtub and the tiles? — Regular waterproof sealant. Silicone sealant is sold in special tubes. To use it, you need a mounting gun. This material is ideal for sealing seams whose width is 3-4 mm (see photo).
Before using the sealant, you need to clean the junction area from any dirt, wipe it dry and degrease it. Next, the joint space is carefully filled and sealed with sealant using a mounting gun, after which the resulting seam is smoothed with a spatula or plastic spatula, and excess sealant is removed with a damp cloth. To prevent it from getting on the glossy surfaces of the wall and bathtub, it is better to apply masking tape.
Watch the video to see how this is easiest to do:
Application of polyurethane foam
If the gap between the bathtub and the tile is wide enough (the joint is 1-3 cm), then this distance can be filled with waterproof polyurethane foam
A special feature of the work on applying foam is extreme caution, this is due to the great difficulty of removing its traces from glossy surfaces
Those places on the wall that may be accidentally exposed to foam should be covered with masking tape, newspapers or oilcloth. After the foam has dried, its excess is removed with a wallpaper knife, and the resulting seam is covered from above with a plastic or ceramic plinth.
Often, in large gaps at the end of the bathtub, you also have to deal with pipes that supply water to the mixer. The easiest way to get around them is to use polyurethane foam or cut holes in a plastic corner. In some cases, you can install a small wooden or plastic shelf. Gaps of 10-20 cm will have to be reinforced with additional brackets securing the shelf to the wall.
If the surface of the bathtub or tiles is contaminated with foam, you must either immediately wipe it with a dry cloth before it dries, or wait until it hardens and carefully remove it with a knife, white spirit and a rag.
Using tile grout
Another way to eliminate cracks in joints using sealing materials is to use tile grout. Its advantages include high moisture resistance and durability of the resulting tile joints. In addition, there is a wide selection of different colors of grout for the gaps between the tiles, which allows you to choose it in accordance with the color of the interior in the bathroom. The disadvantages of this method include the possibility of its use to eliminate only the narrowest cracks. How to cover wider gaps, read in other paragraphs of the article.
Some experts use cement mortar to seal particularly wide gaps at the junctions between the bathtub and the wall. Before applying it, the joint area is wetted with water. To prevent the solution from falling out during its installation, the compaction area can be pre-filled with any synthetic material, for example, thick rope. Due to the need to give the resulting seam an aesthetic appearance, cement mortar is used only if a plastic or ceramic bath skirting board is installed on top of it.
It must be said that after acrylic bathtubs became especially popular, using grout or cement mortar to seal joints is not suitable. This is due to the ability of such bathtubs to sag under the influence of water collected in it, and such subsidence can lead to cracking of the seam. A similar problem arises when using steel baths, the walls of which expand and contract with temperature changes.
The disadvantage of all methods using sealing solutions is the impossibility of obtaining perfect seams in cases where the joints between the tiles are not even. To achieve the most attractive appearance in such a situation, use one of the materials discussed below.
How to seal the joint between the bathtub and the wall
Moisture constantly collects in the bathroom, and it is extremely undesirable there. In places where it is constantly humid, mold forms, which is very harmful to human health. The place where the bathtub meets the wall is especially vulnerable to water, which is why poor sealing of the bathtub will lead to constant accumulation of water and serious problems, both in your apartment and in the neighboring one, which is located under yours. Water from under your bathtub may seep into them. In order to avoid unexpected repairs in both apartments, you need a bathroom sealant to properly connect the bathroom to the wall surface.
Sealants
When renovating a bathroom, special attention should be paid to sealing the joint between the plumbing and the wall. It is into the gap along the perimeter of the font that splashes fall. The area under the bathroom is practically not ventilated, so puddles do not dry out well, high humidity and mold appear. High-quality sealing of cracks avoids these problems and extends the service life of the facing material.
What problems does bathroom sealing solve?
Installing a bathroom close to the wall is impossible for a number of reasons: the curvature of the floor or the walls themselves, the plumbing does not match the dimensions of the bathroom. As a result, cracks appear through which water will leak during bathing. Lack of tightness of joints can lead to negative consequences:
- During active bathing or showering, splashes fall through the cracks onto the floor. If the puddles that have formed are not wiped dry in a timely manner, the water will begin to seep into the lower floors and flood the neighbors.
- Regular “flooding” of the bathroom significantly increases air humidity, which provokes the appearance of mold on the walls, ceiling and floor, as well as the development of pathogens.
- High humidity negatively affects the decoration of the room - the seams between the tiles lose their aesthetics and darken. Even high-quality repairs will not withstand the fatal effects of moisture and will become unusable within two to three years.
High-quality sealing of seams between the bathtub, shower stall, sink and wall is an important stage of repair that cannot be neglected. Even an amateur construction worker can handle the job.
Methods for sealing the joint between the wall and the bathtub
Before sealing a bathroom, you need to assess the condition, size of the gap, and the material of the adjacent surfaces. An important factor when choosing a method is the price of the issue. The main thing is that the selected material meets the requirements of water and heat resistance.
Let us examine in detail how to seal the joint between the bathtub and the wall using the most common and effective methods.
Cementing the gap is an outdated method of processing joints
The “old-fashioned way” of sealing is the use of a cement mixture. With the advent of modern building materials, its popularity has decreased, but this has not made the method any less effective.
To work you need to prepare:
- container for mixing the solution;
- sand;
- cement grade 400 or 500;
- plasticizer (clay or lime);
- water;
- plaster spatula;
- foam sponge or pieces of rags.
Procedure for mixing the solution:
- Combine sand with plasticizer in a ratio of 4:0.8 if lime is used, 4:0.5 if clay is used.
- Add cement to the dry mixture of sand and plasticizer. Proportions of the constituent components: 4:0.5 (sand/cement M400), 5:1 (sand/cement M500).
- Stir the mixture until smooth.
- Gradually, adding water in small doses, knead the solution to the desired consistency.
- Clean the sides of the bathtub, removing all construction debris, dirt or remnants of previous grout.
- Place a container under the gap so that the cement mortar does not flood the floor.
- Cut the fabric into long pieces, soak them in the mixture and fill the cracks with them.
- Using a spatula, apply the solution around the perimeter of the connection between the plumbing fixtures and the wall.
- Remove excess cement mixture with a damp sponge.
Sealing with self-adhesive tape
One of the easiest ways to seal seams is to use self-adhesive curb tape. The tape is self-adhesive, that is, one of its sides is already coated with a waterproof adhesive compound, protected by a strip of paper.
The manufacturer offers the material in various widths, which allows this method to be used at the joints between a wall and a bathtub of different sizes. To make the finishing of the joint look harmonious, it is produced in different colors.
How is the work done?
- It is recommended to use self-adhesive curb tape after sealing with silicone seam sealant.
- Surface preparation consists of cleaning and degreasing.
- The tape is measured along the length of the bathtub, and a two-centimeter allowance must be added
- The sticker is applied to the perimeter, starting from the corner of the long side of the bathroom.
- In the corner, both tapes are glued overlapping and then cut at an angle of 45 degrees.
- To fix the tape well, you need to press it tightly to the surface to be pasted. To make a clear right angle, you should use a plastic spatula (this part often comes with tape).
- After gluing the tape, it is left to dry the glue for a day. During this time, it is necessary to prevent water from getting on the tape, that is, it is not advisable to use the bathtub.
Sealing seams in the bathroom: modern methods
There are several effective methods to make the joints between the bathtub and the wall airtight. There are materials for temporary and permanent joint closure. Their selection in each case is carried out individually, based on the size of the gap, skills in carrying out installation and repair work and cost.
Polyurethane foam
Polyurethane foam is a universal material that comes in several types. It has found application in various areas of construction and repair work. You can close joints and openings in the bathroom with one-component polyurethane foam, which has a high moisture resistance.
You can start foaming immediately, since special preparation is not needed when performing this work.
To carefully seal the gap, you need to wash and dry the work area, and cover it with masking tape.
After the gap is filled and the foam has hardened, the excess is cut off with a sharp knife flush with the bathtub. It is important to take into account that the volume of foam increases, so it needs to be applied in smaller quantities. Masking tape is removed from surfaces. The method is suitable for any bathtub - acrylic, cast iron, steel.
It is not recommended to leave the polyurethane foam seam open. Firstly, it is unsightly, and secondly, the seam needs additional measures to protect it, since the foam has a porous structure, inside which moisture and dirt settle, creating conditions for mold to appear. You can decorate the joint, for example, with border tape, PVC or ceramic plinth.
Don't miss: Interior doors: how to choose the right color?
When working, you need to take into account that dried foam is difficult to remove from ceramics and bathtubs. But if such a need arises, special softening solutions are suitable. The foam easily sticks to the skin, and it is also not easy to remove it from your hands, so you need to work with gloves.
Using curb tape
Elastic self-adhesive curb tape is made of durable synthetic material. The glue applied on one side has water-repellent properties, so it is not afraid of prolonged exposure to water. Some types of seals are coated with antibacterial impregnation, which prevents bacteria and fungus from multiplying.
To ensure an angular bend along the entire length of the tape there is a special vein. After eliminating the gap, the corners are decorated with short pieces of tape.
The algorithm for working with the tape looks like this:
- Before gluing the tape, clean the joining surfaces.
- Remove the paper strip from it and lightly heat the adhesive surface with a hairdryer.
- Press the edge of the tape to the junction of the bathtub with the wall so that an angle of 90 degrees is formed along its fold line.
Border tape has the following advantages:
- low price;
- simplicity and short installation time;
- types of tapes of different widths;
- neatness of finishing.
It should be remembered that this solution is rather temporary or auxiliary. It is recommended to combine it with other finishing methods - polyurethane foam, silicone sealants or cement mortar. After applying only these sealants, the joints will look unfinished, and the tape will give them a decorative and finished look. If you use tape as an independent finishing material, the seams will need to be renewed once every 2-3 years.
Sealing with cement mortar
The method of treating the gap between the bathtub and the tiles using a cement-sand mortar is already outdated, although it is effective provided that additional seam protection is used.
A joint that is not protected from moisture will crack over time because it has a porous structure. It is best to use this method when filling wide cracks followed by a protective coating.
A solution of cement, sand and water is prepared in a ratio of 3:1:1. Preparatory work includes cleaning the joining surfaces. A container is placed on the floor under the bathroom into which excess solution will drain. The drain pipe is dismantled to prevent solution from getting into it.
Large cracks (5 centimeters or more) are filled with scraps of old rags soaked in cement mortar. For better adhesion of cement to the surface, it is recommended to moisten it with water. The gap is filled with mortar in such a way that a smooth surface of the seam is obtained.
Decorative treatment of the cement joint can be done using tape, plastic, ceramic tiles or borders.
Application of silicone sealant
You can seal cracks up to 5 mm wide with silicone-based sealant, packaged in a special tube. It is applied through the conical nozzle included in the kit, or squeezed out through a special gun for working with liquid silicone, which is sold separately.
When choosing a sealant, you need to pay attention to the information on the packaging about its moisture resistance and antifungal properties. They have sanitary silicone sealant, the range of which includes both colored silicone (it can be matched to the color of the cladding) and transparent universal one.
To prepare the tiles and sides of the bathtub, you will need white spirit, which will degrease them.
How to apply silicone correctly:
- The walls and sides of the bathroom near the joint are cleaned and degreased with white spirit.
- The tip of the silicone tube is cut off. The lower the cut, the thicker the layer.
- The sealant is slowly applied around the perimeter of the bathtub.
- The silicone seam is carefully pressed into the gap and aligned.
Other options
Other ways to seal the joint between the bathtub and the walls include decorative finishes such as plastic baseboards and ceramic borders.
Plastic skirting boards are sold in two types: with adhesive and with a simple inner surface.
To protect the joint in the bathroom, it is recommended to choose the second type of plinth due to the fact that the glue applied to the plastic in the factory will not ensure a tight fit to the rounded shapes of the bathtub and the buried seams between the tiles. The glue must be moisture resistant, and already applied to plastic is no different. When replacing the trim, it leaves hard-to-remove marks on the tiles and bathtub, which will require a solvent to remove.
You can buy additional elements for the baseboard - connectors and corners, which allow you to carefully and completely seal the joint.
For a plastic skirting board, you will need a moisture-resistant transparent glue, preferably with a quick setting, so that it does not require prolonged effort to fix it.
Installation of the plinth is carried out only after sealing the hole with sealant, cement mortar or polyurethane foam.
Stages of work:
- Cleaning and degreasing the surface.
- Preparing the baseboard of the required length.
- Applying glue to the walls and sides of the bathtub (as close to the seam as possible) and laying the baseboard.
- Apply a thin strip of silicone along the edges of the baseboard, where its upper edge adjoins the tile.
Ceramic borders allow you to create the most beautiful and reliable frame around the bathtub. But at the same time, such finishing is the most expensive and labor-intensive; it requires special tools for tiling work.
For ceramic cladding, as well as for PVC skirting boards, components are supplied - connectors, external and internal corners. Due to the fact that there is no need to make complex trimmings of products, the work on decorating the joint is simplified.
Ceramic edgings are laid using a mortar of cement and sand or tile adhesive. The work is done with metal and rubber spatulas. The seams between the border elements can be sealed with a mortar for laying tiles or with a special grout (fuge). Cleaning the cladding from mortar and fugue is done with a sponge and water.
Stages of work:
- Cleaning work surfaces.
- Primer of ceramics.
- Apply a layer of 2-3 mm of glue to the skirting boards.
- Laying with leveling and removal of excess glue.
- Jointing seams after the glue has set.
- Cleaning and smoothing seams with a sponge.
The most common joint materials
Each of the above list works in its own “niche” and in its own way. For example, pure acrylic substances have no place in the gap when sealing against water. But modern suspensions of fillers in acrylic water dispersion give excellent results thanks to excipients.
Silicone ones have a full range of performance indicators and meet all the requirements for sealing materials. They easily tolerate moisture, household chemicals and shampoos. Even without primer, the walls demonstrate excellent adhesion (international requirements ISO 10590, ISO 9047), i.e. the ability to bind materials together. Their elastic properties are not affected by temperatures up to + 200 ºС.
Even in the summer heat, when the room is more than +30 ºС, it is possible to seal the bathtub using silicones.
Sealing
In all of the methods described above for sealing a gap, there was advice to cover the gap with sealant. This is almost always special silicone or similar materials.
Narrow gaps can be sealed with silicone without additional measures to eliminate the gap; if there is a large free space, it will only be an addition to the main measures to eliminate the problem.
Important: before filling the seam with sealant, it is necessary to protect the surfaces from contamination, since it can be difficult to wash off silicone even from enamel and glazed ceramics.
A strip of silicone inserted into the seam is smeared, rubbing into the gap so that water has no opportunity to penetrate where it is not supposed to.
The excess is cut off with a knife or a special tool.
The sealant is selected to match the color of the facing tile or bathtub; most often a white or transparent version is used.
The main rules for closing the gap with Ruslux
- putty knife;
- manual or pneumatic pressure gun.
- – cover your respiratory system with a respirator;
- – protect your eyes with glasses;
- – use rubber gloves for your hands.
- Work algorithm:
- – remove crumbling and fragile old coatings;
- – assess the room climate (temperature should be higher than +8 ºС, relative humidity below 75%);
- – make sure that the abutment surface is clean and dry;
- – apply sealant with a spatula or gun;
- – after 12-15 minutes, level the seams with a spatula dipped in a soap solution.
The most reliable methods of waterproofing seams
Tiling with grouting
It should be borne in mind that sometimes you have to combine several methods - it all depends on the configuration of the bathroom itself and the design of the tiles. For example, the joint between an acrylic bathtub and tiles cannot be sealed with aggressive compounds, as the sides can be damaged .
Method 1 – polyurethane foam
You can also cover the tiles with masking tape.
This is the simplest and most effective method, but it does not always look aesthetically pleasing. The price of the foam is pennies, and you can simply paint the seam with oil paint. But it requires accuracy, precision and patience.
Suitable only for sealing the seam between a cast iron or metal bathtub and tiles. This technique should not be used for acrylic and plastic panels.
How to seal a gap with your own hands:
- First, we clean this area, wash it, apply a layer of antiseptic, and let it dry. To ensure better grip, you can sand the side edge with sandpaper.
- The surfaces must be additionally degreased. Any solvent will do for this.
- Then we begin to seal the seam with foam, slowly and carefully. It must be taken into account that the foam will increase in size, so we squeeze it out little by little, filling the entire joint space.
- After drying, trim off excess foam with a wallpaper knife or blade.
Additionally, after drying, you can paint the seam with nitro oil paint to match the tile or just white.
Method 2 - cement mortar
Metal corners are durable and reliable
If the tiling was done by a professional, then the joint between the bathtub and the tiles should be filled with cement mortar. But not everyone is lucky with the masters.
I always have time trouble with them. First one flaw, then another. It is extremely difficult to find a professional.
If you need to putty yourself, then choose tile adhesive; it has water-repellent properties. For the seam, we make a thick solution so that it tightly fills all the voids. Before making the solution, you should prepare everything you need: the mixture hardens quickly.
As an alternative, a simple cement-sand mortar or a thick plaster mixture will do. For strength, you can putty on sickle tape, especially if the gap is wide.
We clean the seams and attach the mesh between the side, going a little onto the tile. Then we tightly fill the gap with the solution. But this method does not guarantee 100% waterproofing. The cement gets wet. To avoid this, you can add latex or a polymer additive to the solution, which are sold at any hardware store.
To make the seam easy to clean, you can additionally apply epoxy resin or water-repellent impregnation instead of paint.
Method 3 – sealants
A convenient and quick way to seal joints
This method is the simplest, in my opinion. However, it is only suitable for small crevices. How to seal the joint between a bathtub and a wall?
- We clean and degrease the work area. Sealants can only be applied to completely clean and dry surfaces.
- We fill the gap with sealant, trying not to stain the bathroom and tiles, since it is very difficult to wash off the composition. How to seal carefully - you need a special gun and patience, fill the gap slowly and little by little. It is better to treat the joint with polyurethane foam before this, as it is more reliable and convenient to apply silicone.
- It is convenient to level the mixture with a small rubber spatula.
- Let the material dry and the work is ready.
For bathrooms, it is better to use white sealant with antibacterial and water-repellent properties. Transparent looks unsightly, and simple mixtures quickly crack. The instructions on the bottle clearly indicate where this mixture is used.
In addition to such a tool, you will need to purchase a special pistol. Otherwise, you won’t be able to squeeze the solution out of the bottle.
Method 4 – plastic skirting board
Plastic border with cap
Skirting is a simple modern solution to seal the joint between the bathtub and the wall. Suitable for all types of finishes and any bathtubs (acrylic, metal, cast iron).
In order for such a side to hold tightly, it is additionally worth treating the fastening points with a transparent sealant; liquid nails or Dragon are also suitable. And although all bathroom skirting boards have a self-adhesive base, additional fastening will not hurt.
You can also use plastic corners for lining, but only with small gaps.
Method 5 – tiled border
The mosaic ribbon looks beautiful
The most reliable option is a tile border, but it requires a certain distance between the border and the tile. Special borders with unusual patterns look beautiful.
It is not easy to seal a joint with tiles yourself, since you need to maintain a certain angle of inclination. Therefore, you will need to think about this at the stage of laying all the tiles, and not after that.
Method 6 – Tape
In the photo - the most inexpensive option for border tape
Convenient, but not cheap. Self-adhesive tape will not guarantee high-quality waterproofing, but as a finishing decorative element it looks quite decent. The pre-cemented joint between the bathtub and the tiles does not need to be painted, but can be decorated with an adhesive-backed rubber tape.
Both narrow and wide ribbons are available for sale. The price is approximately from 600 to 1200 rubles - depending on the width and length.
In order for the tape to hold more tightly, we apply a layer of liquid nails or any transparent sealant on top of the adhesive base. We glue only on dry and clean sides and walls.
Such water-repellent fittings can be glued both on top of the mounting foam and on top of the sealant.
Method 7 – grout for tiles
Grout for tiles
If the side is located almost flush against the wall, then you can use tile grout. These modern methods are simple and look neat and beautiful.
Having secured the bathroom, we cover the small gap with a thick mixture of tile grout, white, but preferably to match the tile. The colors of the grout are varied, you can always choose the desired shade.
The most important thing is that this composition is sealed and resistant to prolonged exposure to moisture. Plus, antifungal additives have been added to the mixture.
Additionally, you can coat the seam with a special fugue gloss. Its composition is developed with the addition of water-repellent additives, and yellow stains from rust will never appear on such a coating.
But this method is only suitable for small narrow gaps. For wider cracks, it is better to use polyurethane foam in combination with tape or plastic baseboard.
Silicone sealant
How to seal a bathtub with a wall using silicone sealant? Tools you will need for work:
- alcohol or solvent;
- scissors or sharp knife;
- tube with silicone sealant (transparent or matching the color of the bathroom walls);
- assembly (construction) gun;
- plastic or ceramic baseboard.
Sealing a bathtub with a wall with silicone involves the following procedure:
- Thoroughly clean the joint and adjacent surfaces from dirt, construction debris, etc.
- Degrease the joint with solvent or alcohol. Dry.
- Cut off the tip on the tube with sealant. It should be taken into account that the sharper the cutting angle, the thinner the line will be.
- Apply the sealant using a mounting gun in a continuous line as carefully as possible.
- Wet the applied silicone with soapy water and smooth the line with your finger.
- If desired, a plastic or ceramic border can be glued over the sealant.
Sealing the joints of the bathtub with the wall with a border (plinth) made of plastic or tiles
Finishing joints with plastic borders is a common solution if the gap width exceeds 2-3 cm. To attach PVC skirting boards, acrylic adhesives are most often used to ensure rigidity and water resistance. At the same time, the plastic itself, due to its elasticity, compensates for small movements of the bathtub.
Ceramic borders are more aesthetically pleasing and suitable for finishing rooms with designer interiors. In addition to ceramics, natural stone - granite or marble - can be used for these purposes. Moisture-resistant acrylic or polyurethane glue is suitable for gluing.
Joint with acrylic bath tiles
As a rule, acrylic bathtubs weigh little, so when you use it, it can move and the seal of the gap can break. Making a recess in the wall to mount an acrylic bathtub does not make sense, since its back walls are flat. To ensure that the seam is sealed efficiently, thoroughly secure the bathtub in place - fix it to the floor using silicone sealant. Then the joint is sealed with sealant and finishing.
To ensure a good sealing of the bathtub, secure the bathtub
Plastic borders (corners)
Plastic corners can be attached both to and under tiles and are used to bridge gaps of up to 2.5 - 3 cm.
- Overhead products are installed on silicone. The width and length of the bathtub are first measured. The border is cut according to the obtained dimensions. The edges are sawed off at an angle of 450. The decorative effect is enhanced by plastic elements installed at the ends of the borders and corner joints. This sealing method is economical, easy to implement and aesthetically pleasing.
- The size of the internal tile corner is selected in accordance with the thickness of the tile. The installation of the plastic plinth begins after the bathtub is installed near the wall according to the level.
The joint between the bathtub and the wall with a plastic plinth
A corner of the required length is simultaneously pressed against the wall, where tile adhesive has previously been applied, and the edge of the bathtub. Excess glue is squeezed out through the perforated part of the baseboard. To install the tiles, a special corner groove is used.
The surface of ceramics is not always smooth (there is curvature, deep relief stripes, etc.). Since it is impossible to make a perfect connection of the bathtub to the wall in this case, the lower inner corner of the tile has to be ground down and the seam adjusted.
Despite the labor-intensive installation and adjustment, the method is ideal for creating a sealed and neat baseboard.
Sealing methods, pros and cons of each option
The choice of method for closing the gap depends on its width. A gap of several millimeters does not need to be masked.
The following materials are used for sealing:
- CPS mortar or ceresite;
- silicone sealant;
- polyurethane foam.
and for decoration:
- border tape;
- ceramic tile;
- ceramic border;
- PVC plinth/cornice.
- Mortar is the cheapest way to seal a narrow gap. The task becomes more complicated if the gap is more than 1 cm. You will have to first stuff rags into it, and if the gap is more than 3 cm, use concreting with formwork.
- Silicone sealant is the best option. After hardening, it turns into an elastic strip that does not allow water to pass through and is not damaged by temperature and physical deformations of the seam. But one sealant is only enough for gaps up to 1 cm. If the gap is larger, the semi-liquid substance will simply fall behind the bathtub.
- Polyurethane foam can be used to fill gaps up to 5 cm. It is lightweight, “grabs” onto any surface, and fills the entire space. But you can’t count on its waterproofing abilities for long. Over time, the foam ages, crumbles, and water seeps through the pores. The foam will have to be covered with silicone sealant and masked with a decorative strip.
- Border tape is the easiest way to beautifully decorate a gap. It is made of elastic polymer, covers gaps of several centimeters, and is attached with self-adhesive butyl strips to the side of the bathroom and wall trim. Even a woman can easily and quickly cope with such work.
- But, according to user reviews, problems arise with the tape. It lasts for about two years, and with active use of the bath – only a year. To activate the glue, the manufacturer recommends heating it with a hairdryer. At the same time, “forgetting” to mention that the hot tape stretches, and when it cools down, it shrinks, tearing away from the base. This means that the tape will have to be applied cold and using moisture-resistant glue.
- The remains of ceramic wall tiles are used to close the wide gap. Such a border serves as a natural continuation of the overall design. The problem is that the tile can only be used on a gap of more than 4 cm. It is impossible to cut a smaller strip from it. And in wide cracks, you need to create a base for the tiles by pouring concreting or installing a wooden block with antiseptic impregnation.
- Ceramic corner border for the bathroom, convex or concave, has a width of 20-55 mm. It is combined with ceramic tiles and comes with a star corner element. The border is glued with the same adhesive solution as the tiles. A problem may arise when finding material of a suitable color.
- Plastic skirting boards for decorating floors and ceilings cover gaps up to 5 cm. You will need to first “plant” the skirting board with moisture-resistant glue, and then seal the gaps along the edges. The choice of cornices on sale is small: white and wood-look.
And one more point should be taken into account when choosing materials. Acrylic bathtubs are lightweight and tend to change linear dimensions with temperature, so rigid mortar is not suitable for sealing cracks around them. To prevent a light acrylic bathtub from “walking” around the room, it must be secured to the wall with special hooks.