Types of kitchen aprons
Protective screens are made from a variety of materials. Accordingly, how it is attached and which apron to choose for the kitchen depends on the characteristics of the material. The most common options are:
- An apron in the kitchen can be made of plastic - this is the most affordable and budget option, although not very durable. The materials are quite sensitive to heat and only polycarbonate models are allowed to be installed near a gas stove, since its temperature resistance is slightly higher - +120° C versus +80° C.
They are used as opaque plastic - PVC panels, as a rule, and transparent - acrylic or polycarbonate glass. Imitates any natural or artificial material: stone, wood, tile, leather. The materials are lightweight, easy to cut and fastened with both self-tapping screws and glue.
- A kitchen apron made of chipboard is also a very budget option, but is just as short-lived as plastic. The material swells quite quickly when exposed to moisture and does not tolerate temperature changes. It cannot be used as a protective screen around the stove.
- MDF is a chipboard of high strength and density. Unlike chipboard, the material tolerates moisture well and does not change shape under the influence of temperatures. Its durability is higher, but inferior to both glass and ceramics. Attaching MDF panels is quite simple: the boards are lightweight and easy to cut. This material allows additional design - photo printing, for example.
- Glass – glass panels or sheets. Resistant to temperature and moisture in any form, does not accumulate dirt, is easy to clean, and is one of the most hygienic models. Disadvantage: installing an apron with your own hands is very difficult. In principle, you cannot install the skins yourself, since the weight of the product is very large. In addition, the cost of the material is quite significant.
- Ceramic tiles are an option that is both affordable and has all the necessary qualities. Ceramics are insensitive to steam, water, and even the highest temperatures. Even a beginner knows how to install a tile backsplash. In addition, it is a very decorative material.
Types of panels
Plastic panels in the kitchen are easy to clean and can withstand moisture.
Today there is a large amount of material that can quickly and efficiently cover the walls of almost any room. This material has a different appearance, resistance to moisture and temperature, wear resistance and service life.
Modern technologies suggest the ability to install the following types of panels in the kitchen:
- Made of plastic. These products come in a wide variety of sizes and colors. Their advantages include such qualities as ease of installation and maintenance, moisture resistance and good insulating qualities. A definite disadvantage is the soft surface of the plastic, which is easily scratched, broken and deformed from high temperatures. It is not advisable to mount them above the countertop or next to the stove.
- Made from laminated MDF. This is a fairly cheap and practical option. MDF has a presentable appearance. For the kitchen it is better to use material laminated on both sides. Such protection will protect products from dampness and mold. Grease does not stick to such surfaces, they are durable, easy to maintain, and do not react to changes in humidity. A definite disadvantage is the instability of these products to strong heat.
- Made of tempered glass. This material is the most expensive. But the area of its application is limited only to the apron. Tempered glass has quite a lot of advantages - it is resistant to mechanical stress, moisture and mold, and has an impressive appearance. Its scratch-resistant surface is environmentally friendly and easy to clean.
- Made from laminated plywood. Waterproof plywood coated with a protective layer of plastic is an excellent solution for finishing a kitchen. The material is environmentally friendly, well protected from moisture, durable and easy to clean. Does not tolerate open fire.
- Made from artificial stone. Artificial stone is very durable and is not afraid of fire and water. Its service life is several decades. It is environmentally friendly and does not react to chemically active substances and acids. The stone is easy to care for. Some disadvantages are the high cost and difficulty in processing.
The construction industry is constantly expanding its range of finishing materials. Its characteristics and installation methods are being improved.
Features and functions of a kitchen apron
An apron protecting the area above the work surface must be organically integrated into the interior. It should be in harmony with the rest of the decor, maintaining the style and mood of the room. An apron can become the main accent against the background of a seasoned set.
First of all, this element is introduced to protect the wall. However, the aesthetic component is not alien to him, so every now and then new original ideas are born regarding the design of this wall. But creativity has the right to exist only if it does not contradict the basic requirements. He must have:
- resistance to heat - if there is a built-in stove. Despite the fact that induction cookers do not heat up, the surface of the wall next to them may suffer from proximity to boiling pots and hot frying pans, and be attacked by grease and hot steam;
- moisture resistance - there is plenty of dampness in the kitchen, and especially in this area. This includes splashes of water from the sink and steam from cooking food;
- environmental friendliness - in case of possible contact with products, it should not saturate them with toxic emissions;
- hygienic - the surface absorbs moisture, grease and dirt - a favorable environment for the development of bacteria and fungus. Therefore, the finish must have a dense structure and a moisture-resistant coating;
- maximum fire resistance - this is especially important in close proximity to open fires of gas burners;
- be easy to clean - the surface texture should not create obstacles during cleaning. This also applies to resistance to household chemicals and mold resistance;
- aesthetic appeal - the finish should match the set and emphasize the advantages of the design.
What requirements must a kitchen apron meet?
A kitchen apron is an integral part of the interior of the kitchen. This part of the design must have several basic qualities:
- Practicality.
- Resistant to chemicals and any cleaning agents. When washing dishes, a cleaning solution gets onto the surface of the kitchen unit. If the apron is not protected, it will lose its attractive appearance after just a few months of use.
- Resistance to humidity and temperature changes. Furniture and accessories without a protective coating will deteriorate in a short time.
- Long service life. Since the apron is mounted to the wall, it is inconvenient to often change the structure to a new one, especially if holes for fastening are drilled in the wall.
The requirements are due to the fact that the element is located in the working part of the kitchen - near the stove, sink and countertop. Food is prepared in this area, so the main task of the apron is to protect against all kinds of splashes, food particles and any kind of contamination.
Application of ceramic and mosaic tiles
When wondering how to install a ceramic apron in a kitchen, you should remember that careful preliminary preparation of the surface is required. Concrete contact is considered a good way to treat a wall. It provides the surface with a certain roughness, thereby increasing the quality of adhesion between the tile and the wall.
This composition helps out if there is a painted surface using oil or alkyd enamel. Before attaching a ceramic apron to the wall, you need to carefully check the availability of sockets and install them before installing the apron. Correct calculation of the amount of materials required is the key to success in any job. To do this, the entire wall is measured, this is done very carefully, it is better to measure it several times than not to buy more material.
Advice
Before installation, please note that it is possible to trim the tiles. Therefore, it is pre-positioned in such a way that it requires cutting off a minimum amount of tiles. To begin work, you need to secure a horizontal strip, which will become a support for the bottom row of tiles. This stage allows you to lay out the tiles level.
After laying the first row, special crosses are inserted between the tiles, which help to create an even seam. Borders are used as decoration, laid between rows of tile trim. If there are unevenness on the surface, provided that they are small, the tiles are laid on a thick layer of glue; you can increase the layer to 10 mm; this option will help bypass the plastering stage.
You will have to work a little longer with mosaics; the process here is more complicated than with tiles. There is an option to make mosaic laying easier; this requires connecting several elements on a flexible base, which is attached to the wall. A special requirement is the choice of adhesive composition. It must be white tile adhesive, which is applied strictly with a notched trowel. The seams are rubbed down only after the adhesive solution has completely dried.
Fastening wall panels to the frame
Most panels require mounting on a frame that is rigidly fixed to the wall.
Fastening wall panels to a wooden frame.
But such a construction technique is only appropriate for spacious kitchens. For small rooms, a frame structure is not acceptable; it can take up quite a lot of usable space.
If the area allows, then you can safely mount the frame.
The following material is used to make the frame:
- Wooden slats 20 × 30 mm. Wood must be treated against mold before use. A certain disadvantage of wood is its instability to changes in humidity. This factor can lead to deformation of the frame and the finishing surface.
- Steel profiles CD and UD. The steel grating is very durable; it does not react to extreme heat and high humidity. The service life of metal sheathing can be several decades.
In order to mount the sheathing, you will need the following equipment:
- perforator;
- hacksaw for metal;
- hammer;
- screwdriver;
- building level;
- pencil;
- plastic dowels;
- screws for wood and metal;
- safety glasses and gloves.
Accessories for fastening plastic wall panels.
After drawing up the project, the necessary material is purchased. Next, markings are applied to the wall. After this, the sheathing is installed.
This is done in this order:
- Guide products are screwed along the perimeter of the walls, which limit the size of the frame.
- If necessary, vertical hangers are attached to the walls. These products serve to level and stiffen the sheathing lintels.
- Jumpers are installed between guide profiles or slats. Depending on the project, they can be installed vertically or horizontally at intervals of 40-50 cm.
- The jumpers are leveled and fixed with self-tapping screws on vertical plumbs.
The sheathing is ready. You can proceed to attaching the panels. You can attach individual fragments using a special lock, self-tapping screws or staples (clasps).
Kitchen apron
A decade ago, it was impossible to use MDF panels for kitchen splashbacks due to the large thickness of the sheets and their unesthetic appearance. But now, thanks to new technological processes in the production of moisture-resistant MDF, the opportunity to implement different design solutions has become real.
If previously the main material used for the apron was tile, now owners have the opportunity to purchase a cheaper and easier-to-install finishing building material, MDF panels.
The kitchen is very capricious in terms of materials used for finishing, especially the area where the apron is located. It is this part that is exposed to external stimuli every day:
- humidity;
- heat.
So you should pay more attention to the characteristics of the finishing material you choose.
Kitchen apron
Those who want to decorate their kitchen do not always have the opportunity, in addition to purchasing all the necessary building materials, to also pay for the services of builders. And let's face it, hired workers often suck. Therefore, more and more people decide to do their own repairs.
This also raises a number of questions:
- how to install a kitchen apron made of MDF sheets?
- what materials are needed for installing MDF?
- What is better and how to attach a kitchen apron made of MDF?
- Is it possible to install a kitchen apron from MDF with your own hands?
- How to install an MDF apron in a kitchen, step-by-step instructions.
You will find answers to each of these questions here.
Methods for attaching an apron
To install a kitchen apron, it is not necessary to contact professional craftsmen. It is not difficult to install it yourself if you do everything correctly and in strict order. Various methods are used to install the apron. The technology and complexity of all stages of work depend on the material used.
Mounting on a slatted frame
This option is suitable for walls that are very difficult to make even. For installation, wooden slats with a cross section of 10 by 40 mm are required. They make lathing from them. The slats need to be installed every 40 cm. Using a building level, you need to check that parts of the sheathing do not protrude and that the entire frame lies in the same plane. The apron is attached to the frame using self-tapping screws and dowels. This method can be used to install aprons made of different materials:
- MDF or chipboard;
- plastic sheets;
- stainless steel;
- Instead of wooden slats, a metal profile is suitable.
How to fix it on the baseboard
The easiest installation method. Skirting boards are installed between the backsplash and the countertop, as well as between the upper limit and wall cabinets. The entire structure forms a single whole, and the baseboards additionally protect against dirt and moisture.
At the junction of the table top and the future apron, a plinth made of plastic or aluminum is fixed, onto which a decorative casing is then placed. The plinth is screwed to the wall with self-tapping screws.
Place the rake here
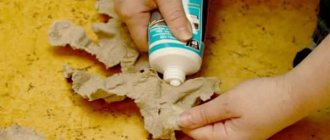
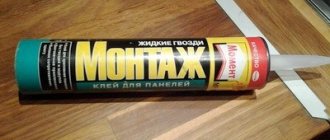
Fastening with liquid nails
Unlike the slatted frame technology, this requires an absolutely flat wall, as well as light weight and dimensions of the apron. Materials – MDF, chipboard, plastic. Liquid nails are applied to the pre-treated, primed wall, and then the finishing material is attached to the adhesive: press and hold for several seconds. The gluing stage with liquid nails is shown in the photo:
If the dimensions of the panel exceed the approximate distance between the countertop and the wall cabinets, it should be installed before installing the kitchen unit. Otherwise, the cabinets are installed first, and only then the paneling.
Important! To prevent the apron from slipping, its lower edge must be supported with a wooden strip or metal profile. After installation, the joint between the wall and the countertop is covered with a plinth.
Installation on aluminum guides
If the thickness of the cladding panel is within 4-10 mm, it can be mounted on aluminum profile guides. For this, the perfect flatness of the surface is not so important, and there is no need to drill holes in the panel. To correctly lay the panel on the guides, you should follow the step-by-step instructions:
- Attach the lower profile to the tabletop.
- Place a sealant inside it.
- A panel is inserted into the bottom profile and then covered with two side and one top profile.
- A plug is placed on the fixed panel.
A square profile is required for facing corners.
Mounting on guides
Disadvantages of MDF
Before you start purchasing and installing an MDF apron in the kitchen, you should consider its shortcomings.
Perhaps they will become an obstacle to purchase. So:
- Negligence in care will affect the MDF board. She will be led or bent. The same applies to high humidity - you cannot mount MDF panels directly near the sink - it is better to install tiles there. The stoves must be equipped with hoods to prevent drops of condensation from settling on the surface of the apron.
- Material is flammable. This is important if the owners are planning to completely cover the wall from the edge of the set to the edge. Mandatory external control is required if a heat supply source is mounted on the wall - a gas boiler, for example.
The disadvantages are serious and should not be neglected. If, nevertheless, there are no prerequisites for future damage, then it is worth trying to create something new in the interior.
Dark furniture with an original pattern on the apron looks beautiful
Selecting material for countertops
The kitchen work surface is more often than other surfaces exposed to stress and damaged during use. Each material for making countertops has its own advantages and disadvantages. We will consider the most popular types of materials.
Chipboard is easy to install , has a high level of strength, a rich color palette, which makes the material very advantageous compared to others.
Artificial stone - it will cost much more than chipboard, but will look creative and more aesthetically pleasing. It can harmoniously complement any interior and look stylish. Easy to care for, resistant to shock, moisture, and high temperatures.
Natural wood - this material always goes perfectly with stone, glass, metal and many modern materials. The material has a lot of advantages - environmental friendliness, aesthetics, it will harmoniously fit into the interior of any kitchen. The only drawback is the too high price.
Natural stone is a very beautiful and natural texture; each product will have its own special and unique pattern. Disadvantages include very high cost, heavy weight and high maintenance requirements. Cannot be replaced if damaged.
Stainless steel - fiberboard slabs are covered with this material. During operation, it is almost not damaged; small scratches may appear if the surface is used too intensively. The disadvantages include the opinion that such a surface contributes to the destruction of useful substances in products when they are on it.
Solid wood - despite its environmental friendliness, beautiful appearance, good quality, natural wood is characterized by low wear resistance. The material requires maintenance and is very expensive.
Impact-resistant tempered glass - ideal for creating the most modern designs. A kitchen set with such a countertop will look weightless, light, and impressive. No marks remain on the surface, it does not absorb odors. This material is expensive and requires special care during operation.
Countertop installation cost
Specialists from many companies who replace kitchen furniture facades, countertops, splashbacks, and fittings will be able to quickly accept and fulfill your order.
A partial replacement of budget options will cost from 3,000 rubles, a complete replacement of a countertop will cost from 7,000 rubles and above . If we talk about installing an integrated corner countertop made of artificial stone, then all turnkey work will cost around 20,000 rubles.
If we talk about cost, then you need to take into account the size, shape, and material from which you plan to install the countertop. The more expensive the material, the more expensive the product will be. Specialists provide the necessary advice about their services and answer all customer questions.
“>
Advantages and disadvantages
The advantages of this method include:
- there is no need to strip the wallpaper down to the plaster, clean the putty (the tiles don’t stick to it), or prime;
- With high-quality liquid nails, the apron holds very tightly;
- as mentioned above, the method is quite convenient, fast and clean.
Flaws:
- difficulties when dismantling such an apron. The glue penetrates deeply into the structure of the surface, and is often removed directly from the putty, plaster, or pieces of chipboard;
- high price of high-quality liquid nails (150-250 rubles for 1 bottle). Tile adhesive, for example, is cheaper;
- The glue is not applied to the entire surface, and voids remain in the apron. Therefore, it is better not to glue tiles in this way on surfaces that come into contact with water (in the bathroom, swimming pool, shower). Even if you cover all the seams with silicone grout, moisture will accumulate in the voids due to condensation, which can lead to mold. Due to the voids, this method is also not recommended when laying tiles on the floor (they may burst).
Preparatory stage
Attaching the apron necessarily includes preparatory work. Their nature is to some extent determined by the method of fixation. However, the general recommendations are the same for any type of installation.
- The walls are cleaned of old coating , deep cracks and potholes are sealed with plaster. The surface is well leveled. If installation is planned with glue, then the walls are also covered with putty.
- Treat the surface with a primer. The nature of the latter is also determined by the type of work. When installed on the sheathing, the walls are treated with an antiseptic primer to prevent the appearance of mold. If the material needs to be attached to the wall, the surface is primed with a composition corresponding to the type of facing material.
- Installation of sockets is carried out after installing the apron. However, the area for the device must be properly prepared, and holes for sockets and switches must be made in the finishing material. The number of outlets in the kitchen is determined by the amount of equipment.
How to install glass wall panel
The advantages of a glass splashback are that it is already made according to individual sizes and samples are delivered ready for installation. It is impossible to cut the product at home, so manufacturers agree in advance on the locations for sockets and roof rails.
The process of installing a glass splashback is simple. It is placed on the countertop, pressed tightly from below with furniture plinths, and from above with wall cabinets. If there are no drawers on the wall or you need to cover part of the module or refrigerator located close to the stove with a panel, use silicone glue. It will securely fix the structure.
You can install a kitchen panel not only on the wall, but also protect appliances or the walls of cabinets adjacent to the countertop from contamination. This makes cleaning much easier and gives the kitchen a neat look. And with our recommendations, you will cope with this task quickly and efficiently, without resorting to the help of specialists.
Calculation of the width and height of the apron
The width of the apron depends on the size of the kitchen space. With height the situation is somewhat more complicated. This parameter is influenced by the following factors:
- the distance between the lower and upper tier of the headset. The height of this gap is most often no more than 112 cm;
- the presence of a domed independent hood - in this place the apron is laid out at a higher height, and if a skinali is used, the hood itself should be placed at a lower height;
- design features of the upper cabinets - if the facades are equipped with lifting mechanisms, a low apron with dimensions of 45-55 cm looks great.
Advantages and disadvantages
Plastic aprons are one of the most popular because they have a number of important advantages over other options for such finishing.
- Plastic aprons are inexpensive. This feature is especially important when it comes to decorating a large kitchen, where a fairly large apron is needed to cover a spacious work area. If desired, such material can be replaced with a new one without serious financial losses. Such finishing with the installation of tiles can cost a tidy sum, and installation work in this case will become much more complicated.
- When working with such material, the area around the master will be relatively clean. There will be no dirt or clouds of construction dust. As a result, there will be almost no construction waste left.
- Installing a plastic apron will not take much free time. Usually this takes no more than one day, especially if you do everything correctly according to the instructions.
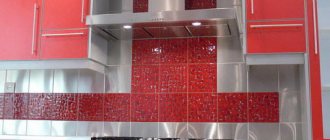
- This finish looks attractive. Moreover, in stores you can find plastic aprons made in a wide variety of colors and shades. Instances with images are also popular. For example, these could be cute floral motifs, soothing landscapes, animals or kitchen-themed designs.
- A minimum of dirt and grease sticks to plastic aprons. If this happens, they can be easily washed without spending a lot of time and effort. To do this, you will need to stock up on a regular damp sponge. Plastic bases can be washed using household chemicals. This will not harm the material in any way. Just don’t use abrasive products – they can scratch the plastic.
- The plastic apron does not have a large number of joints in which dirt, grease and dust accumulate. The seams in such options are barely noticeable, and dirt does not get clogged in them.
- The weight of the plastic apron is quite insignificant, which simplifies working with it. And such a detail will not create serious loads on the wall.
- Plastic is not afraid of harsh operating conditions. This material cannot be harmed by high humidity or temperature changes. When exposed to aggressive sunlight, the plastic apron will not lose its color saturation.
- A high-quality plastic apron will not emit a strong chemical odor, indicating its toxicity.
- Installation of such materials is not difficult. Even an inexperienced home craftsman can easily cope with such work.
- Plastic panels installed in the appropriate way can be easily replaced as soon as you get tired of them and want something new.
However, a plastic apron is not flawless. And such finishing materials have their own weaknesses, which also need to be taken into account. Let's take a look at the disadvantages of such instances.
- If the slab is located too close to the plastic apron, it may become deformed. That is why professionals advise using such materials if the house has not a gas, but an electric or induction stove.
- Plastic panels do not tolerate cleaning with abrasive agents. Of course, they are more effective, but they cannot be used to clean such an apron. Otherwise, the finish will simply quickly lose its presentation. It will be impossible to correct the situation - you will have to change the apron to a new one.
- In many cases, such a part can be installed in the kitchen only if the wall surface is perfectly flat. Since in modern homes there are big problems with the evenness of walls, it is necessary to prepare the bases in advance for the installation of plastic panels. This can take a lot of time, effort and materials, especially if the walls have significant damage.
Advantages of wall panels
Compared to other methods of wall finishing, wall paneling has a number of very tangible advantages. Due to their characteristics and ease of installation, they are becoming increasingly popular.
The advantages of these products are as follows:
There is a wide variety of options for MDF wall panels for the kitchen.
- Fast installation. One panel covers a fairly large area of the surface to be finished. In this case, much less effort is expended than when working with tiles or paint.
- Significant time savings. This is quite a relevant factor, since kitchens are the room without which normal life in an apartment is impossible.
- No need to repair or level the main walls. Overlay panels allow you to quickly and reliably mask all defects of the old surface.
- The products have a very affordable price. In addition, the components are much cheaper than expensive tile adhesive.
- Easy to install. In order to secure the products, you do not need a set of special equipment or professional skills. This work can be done even by a novice home handyman.
Installing a wall panel in the kitchen is possible in various ways. It depends on the model, type and material from which the panel is made.
How to properly install a plastic screen
Its installation is possible in two ways: with glue and with lathing. In the first case, the walls must be perfectly smooth, in the second, their condition is much less important. However, in the first case, the appearance of fungi or mold is excluded, and in the second, this possibility remains, since free space is maintained between the screen and the wall.
Installation with glue takes from 20 to 60 minutes.
- Measure the size of the future apron and cut the panels to size. If the material includes a pattern or image, this should be taken into account.
- Mounting adhesive is applied to the inside of the panel - preferably in strips at a distance of 15 cm from each other
- We press the plastic against the wall and secure it with heavy spacers. After the glue has dried, remove the spacers.
Installation on the sheathing is somewhat more complicated and takes more time.
- To begin with, a wooden beam 20–30 mm wide or a metal profile is fixed around the perimeter of the future screen. The second is preferable. Holes for fasteners are drilled, and the material itself is secured with self-tapping screws.
- If the dimensions of the apron are large enough, then intermediate apron elements are installed - either in the center or at a distance of 30–40 cm from each other.
- Mark places for sockets on the apron, switches, roof rails and other things. In such areas additional transverse bars are fixed.
- Plastic panels are cut to size and mounted on the sheathing. They are fastened with self-tapping screws and a press washer. Start from the bottom or from the corner that first catches your eye.
- The seams between the sheets can be masked with strips matched to the color of the product or a contrasting shade.
Installation technology
It is much easier to properly fasten slatted or sheet panels than those made in the form of tiles - the latter either require a complex frame, or the material is simply glued to a flat wall surface. The technology for constructing the sheathing is generally the same.
For the kitchen, wooden blocks with a cross section of 20*30 mm are often chosen. Wood must be treated with antiseptic compounds before installation.
- The sheathing slats are fixed perpendicular to the direction of the lamellas. The distance between the bars is determined by the material used. For lining, it is recommended to fasten the slats in increments of 60 cm; for sheet material, the distance between the slats can be greater - 80 cm. For tiles, it is determined by the size of the panel - from 30 cm, and if the material is thin, for example, laminated fiberboard, then the distance is needed do as little as possible. For tiles with an HPL layer, you will also need crossbars. In the following video you can see how the sheathing for this covering is made.
- Plastic panels require the installation of a starting profile if installation is from bottom to top, or a corner element if vertical installation is intended. Lining or wall panels do not need such tricks: here the joints between the floor and the finishing are covered with a plinth.
- The lamella is inserted into the groove of the starting profile and attached to the sheathing. The MDF board is simply installed in place.
- The next lamella is inserted into the previous one and secured. Tiles or seamless panels are fixed joint to joint. The latter elements usually need trimming. This must be done especially carefully with a plastic lamella, since it requires strong fastening to the finishing profile.
- The joints are covered with plinths.
The fastening of panels to the wall is covered in detail in our article Finishing the kitchen with plastic panels and in the following video.
Panels as a method of finishing a kitchen - wooden, plastic or a combination - remain popular. Affordable cost, extremely wide choice of colors and ease of installation are highly valued by consumers.
Useful tips
- To make the cladding look neat, cover the edge of the kitchen apron with special slatted plugs or corners.
- You can close the gaps between the working surface of the table top and the adjacent wall with decorative skirting boards.
- After securing all the screen parts, treat the joints and corners with transparent sealant.
- Start laying elements from the corner.
- Sockets and switches are installed after all installation work is completed.
- When cleaning your kitchen apron daily, avoid using powders or hard sponges. Abrasive materials scratch and damage plastic panels.
We recommend watching the video instructions:
Installation
The best installation method is to use a special frame that will securely hold the material. The disadvantage of this option is that after finishing the kitchen area is reduced, so it should not be used in small rooms.
How to install a wall panel in the kitchen using a frame:
Installation starts from the bottom left corner horizontally, going up. This will allow you to hide the cut panels behind the kitchen unit. During the installation process, it is advisable to move from the corner to the door or window.
For small kitchens, it would be better to glue plastic without a frame. This method saves free space and simplifies work. But this method has its disadvantages :
How to stick plastic panels on the wall in the kitchen:
The installation method is selected taking into account the size of the kitchen. If it is large, then it is best to install it using a frame. In a small kitchen, the panels are glued to the wall.
Reference ! When installing for an apron, plastic boards can be secured by resting on the countertop and pressing with the kitchen set. This method is reliable and easy to implement.
Specifics of fixing an MDF apron in the kitchen
The installation technologies for plastic and MDF panels are the same. But fibreboard has a peculiarity - its non-laminated parts become deformed and swell when exposed to water. When adjusting the apron to the size of the room, it will have to be cut in any case. To protect joints from water, corner, end and butt aluminum strips are used. They reliably protect the slats from moisture.
If the kitchen design does not include wall cabinets, the end strips are fixed not only on the sides, but also on the top edge.
Do-it-yourself preparation for installation of MDF and PVC wall panels
First you need to choose the material. Let's talk a little about the capabilities of each of them. You already know about the advantages: moisture resistance, cost-effectiveness, lightness, simple installation. But cheap types of plastic may not withstand temperature changes and may melt or be scratched by an abrasive sponge or cleaning agent. It is not recommended to install them above the stove.
The same applies to MDF, but to a lesser extent. There are improved models that do not have these shortcomings. For example, postforming products. This is a more durable type of chipboard with increased moisture resistance and heat resistance. As for decorative items, the choice in stores is quite large. Everyone will find a pattern and texture to their liking.
Source
Replacing an old apron
If there is a need to replace the old apron without redoing the entire repair, it is quite possible to do this. To do this, you will need to temporarily remove the kitchen unit.
If the new apron is made of MDF panels or polymer materials, then the material can be installed using the adhesive method directly on the old finish. This technique is suitable if the old apron was made of tiles.
For other materials, dismantling the old apron is necessary. Otherwise, the new finish will either look sloppy or simply fall off.
DIY installation of a wall panel (apron) in the kitchen
Kitchen wall panels (apron or screen) protect walls from splashes, steam, grease and other contaminants that form during the cooking process. Usually they are installed together with the assembly of the entire set, but they can also be installed separately when the old ones have become unusable or there is a desire to update the interior.
Read more about how to choose a wall panel for the kitchen in the article of the same name.
In this publication we will tell you how to install a kitchen splashback made of plastic, MDF (fibreboard) and glass yourself, but we will not touch on models made of natural or artificial stone. The technical differences between the installation of stone panels are insignificant. But the material is heavy and requires repair skills to cut. If you plan to install them, contact a specialist.
Despite the fact that laminated MDF is also covered with plastic and is called plastic, we distinguish between these two types of screen. Their installation is insignificant, but still differs.
What is an ABS plastic apron?
Due to the soft structure characteristic of polymers, this material is flexible, which avoids deformation during operation. When installation is carried out, the sheet is equally successfully cut with a table knife and a jigsaw. ABS panels in stores are presented in two standard formats: 601x3001 and 601x2001 mm with a thickness of 1.6 mm.
Opaque ABS plastic and similar products are decorated with a special film or using photo printing. Family photos and unique travel snapshots are displayed on the surface, and an exclusive gallery adorns the perimeter of the kitchen. Compositions of flora and fauna, motifs on the theme of nature are considered a priority. First, a design is selected from a photo from the catalog, then the membrane is applied to the skins.
Decor
Manufacturers produce wall panels with decor. The design is applied to plastic using offset printing, thermal printing or lamination.
Thermal printing.
The design is applied using a hot silicone roller. The design is not secured with varnish and is therefore susceptible to damage. Thermally printed panels are recommended for use in rooms and corridors.
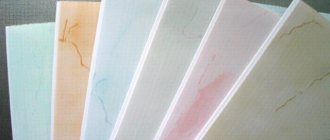
The stability of the pattern depends on the method of its application (photo No. 4)
Offset printing.
More stable compared to thermal printing. Ultraviolet paints are used to apply the design. The top of the drawing is covered with several layers of protective varnish. Offset printed panels are resistant to mechanical damage and detergents. Suitable for finishing bathrooms and kitchens.
Lamination.
A painted PVC film is applied to the base. The surface of the panel is embossed. It reliably imitates the surface and texture of wood. The surface is resistant to moisture and detergents. Suitable for finishing bathrooms, kitchens and living rooms.
Advice:
It is better not to use laminated panels for finishing the apron, as they have an uneven texture. They are harder to wash.
The wood texture is clearly visible on laminated panels (photo No. 5)