Today, many users try to do all the work in the house with their own hands. And this desire makes sense if you know how to tile a bathtub, you can acquire new skills, do all the repair work on time and save a lot of money. Advice from professionals, educational video lessons and the photos below allow you to find answers to any and all questions and solve difficulties that may arise at different stages of work.
It is ceramics that is considered the best cladding for walls and floors in the bathroom: high performance, resistance to water, steam and temperature changes - these are exactly the characteristics that are needed. So all that remains is to know how to tile the bathtub and get to work. The strength, reliability and aesthetics of the tiles will allow you to forget about repairs for a long time and save your finances, but you need to take into account: installation for the first time will seem quite difficult.
Measurements, work planning
Preparation and planning of work
It all starts with a clear knowledge of the parameters and scope of work. Taking measurements and drawing up a layout plan will tell you how to cover the bathtub with tiles with the least amount of time and money. Using a tape measure, you need to measure all the surfaces that are supposed to be covered. Calculating the area determines the amount of tiles required.
Planning begins immediately after measurement. Developing a project design is an important and necessary activity. Today, manufacturers offer a huge number of collections of various formats, colors, textures and shades, so choosing the desired finish after measurements and calculations is not difficult. It is important to consider that manufacturers produce kits that include:
- basic wall tiles;
- basic floor tiles;
- decorative elements and inserts: friezes, borders, panels.
Tiling a bathtub will be easier if you plan the design in advance by laying out the design on the floor or drawing it on the wall. By creating a combination of certain details, you can find your own style, design solution and bring individuality to the room. But in order for a tiled bath to bring only pleasant emotions, you need to look at all the layout options for the collection, but for this there are special computer programs that store managers are happy to provide.
How to tile a bathtub - rectangular, round
One of the important points when tiling a bathroom is how to decorate the front of the bathtub. Most often, it is also covered with tiles (another option is to cover it with plastic panels). But you can’t just hang it up; you need a foundation. It is made either from brick (preferably ceramic rather than silicate, although it is cheaper) or from moisture-resistant plasterboard.
Both materials can be used to lay out a flat or rounded wall. With bricks everything is more or less clear, you just set and steal along the drawn arc, creating a slightly broken line. It is then covered with plaster.
To bend drywall, it is cut from the inside into strips 3-5 cm wide, depending on the bending radius, the plaster is broken along the floor lines and bent as necessary. Having laid out the base of a suitable shape, it is primed and you can now lay the tiles using glue in the standard way.
This is how a brick base is laid out
There is one more subtlety when decorating a bathroom: there can be a decent distance between the side of the bathtub and one of the walls - from 5 to 15 cm. This distance must be covered with something, otherwise water will flow down and the greater the distance, the more problematic it is to close it. The solution is to make a shelf out of plasterboard, onto which you then stick tiles. The operating procedure is as follows:
- place the bath strictly horizontally;
- transfer the line of the upper edge of the bathtub onto the wall (with a square or ruler);
- from the resulting line, step down by the thickness of the planned materials (thickness of the tiles + thickness of the drywall + thickness of the board on which all this will rest);
- along the resulting line, attach a beam or profile (the upper edge coincides with the drawn line);
- a wide board (treated with antiseptics) is attached to the profile, which reaches the side of the bathroom;
- the gap between the board and the bathtub is filled with sealant;
- a cut-to-size piece of moisture-resistant drywall is placed on top;
- prime;
- Later, when finishing the walls, we lay out this shelf with tiles cut to size.
Related article: Durable balcony: metal frame and its characteristics
If you decide to install a shower stall in your bathroom, you can read about the assembly process here.
Calculation of facing material
Calculation of the required amount of material
Knowing the area of the cladding and the parameters of the tiles, it is easy to calculate the required amount of material, and this will allow you to understand how much it costs to cover the bathtub with tiles. What should be done:
Tile texture - wallpaper, brick, what to choose?
- divide the surface area by the area of the proposed tile;
- It is better to increase the number obtained after calculations slightly and add approximately 3-10% of the required amount of tiles. It all depends on the layout option and the fragility of the material.
Right now you will have to plan and decide how the finishing will be placed: over the entire surface of the wall or just tiling the cast-iron bathtub. If funds are limited, then reducing the material by abandoning expensive panels or mosaic fragments would be the right decision.
Important! Even if you refuse to cover the wall and floor under the bathroom, you need to carefully waterproof the surfaces. Sealing is a prerequisite for finishing.
We also recommend using our tile calculator.
Screen made of plasterboard - easy to build and at a minimum cost
The base for the tile is made from different materials. Most often used:
- tongue-and-groove slabs;
- brick;
- moisture-resistant plywood or plasterboard sheets (gypsum plasterboard).
The design of the screen necessarily provides for the presence of a small opening - an inspection hatch. It allows, if necessary, to replace pipes under the bathtub.
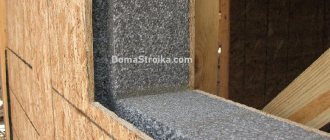
The cheapest base for installing tiles is made from gypsum boards, which have increased resistance to moisture (green products). With their help, it is easy to make a lightweight but fairly strong frame of any configuration, which is important if you need to line a font of an unusual shape. Do-it-yourself plasterboard construction is done like this:
- Markings are made on the floor and walls around the perimeter of the bath, flush with its sides.
- On all sides from which ceramic tiles are planned to be installed, a frame of wooden blocks is built. Their cross section is 4x4 cm.
- The resulting base is carefully leveled and attached to the floor and wall surfaces with dowels.
- Cutting of moisture-resistant gypsum boards is carried out. Their dimensions are taken to be 20 mm less than the height of the bathtub (when installing sheets, 10 mm gaps are left at the edge of the font and the floor).
- The drywall is fixed to the made skeleton with self-tapping screws. They are screwed in every 12–15 cm.
- In the designated area, an opening is cut for a plastic inspection hatch.
The joints between the gypsum board and the walls are glued with sickle tape. The seams around the perimeter of the frame and any gaps left are filled with sealant. The constructed screen is treated with a primer acrylic composition.
Laying tiles: description of the process
All work should be divided into three stages:
- preparing surfaces for installation;
- installation of tiles;
- grouting and finishing.
Surface preparation
Preparing the surface of the room before installation
In order for the installation of tiles around the bath to go quickly and efficiently, it is important to carefully prepare all surfaces. 80% of the quality and simplicity of the installation process depends on the evenness and smoothness of the areas. The preparation proceeds as follows:
- removal of old coating from the surface: paint, plaster, tiles;
- surface cleaning;
- leveling the area using starting putty, plaster and floor mixtures;
- subsequent priming and drying until completely dry;
- waterproofing.
This is the only way a tiled bathroom will last a long time and delight you with its strength and aesthetic qualities. In addition, the liquid waterproofing mixture, applied with a soft roller or brush, provides better adhesion of the adhesive composition for the tile and the base. Compounds protecting the wall from water should be applied in two layers. The tiles around the bathtub can now be laid.
Tiles for children's bathroom. Recommendations for choosing tiles and an overview of design ideas
Laying
Laying tiles in the bathroom
How to properly tile a bath:
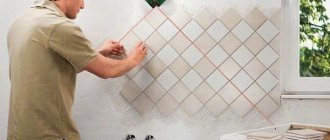
- check all layout diagrams, especially if there is a picture;
- place the cut and sawn pieces of tile in inconspicuous places;
- use plastic crosses to align tile joints;
- When cutting elements, you should not bite off too small and narrow pieces - this may result in the strip splitting.
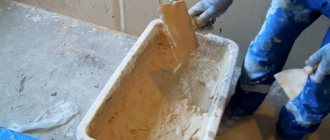
The preparatory work is not completed here: laying the tiles is impossible without an adhesive solution. As a rule, any tiles around the bathroom are sold in a package that contains a recommended product for better adhesion. The dry mixture is poured into the water in proportions according to the instructions, after which the composition is thoroughly mixed and then installation can begin.
How to tile a bathtub:
- The glue is spread over the wall using a spatula. It is recommended not to smear too large areas of the wall so that the composition does not dry out;
- When laying the element, you need to press it a little into the glue, but not squeeze out a drop of the composition;
- Check the verticality and horizontality of the seam and make immediate adjustments if the tiles are not laid quite level.
It’s up to you to decide how to lay the tiles: from which corner, bottom or top. But you need to take into account the pattern and additional decorative elements. All the nuances influence how to lay the tiles and decorations. The evenness of the row can be achieved very simply: the level will show how correct the hand was, and if the tiles between the bathroom and the wall were installed in small portions, then correcting the row will not be difficult. By the way, for lining a narrow space it is better to choose rectangular elements. If the collection does not contain a sufficient number of standard tiles, you can purchase more. It is only important to maintain the similarity of tone or pattern. And then the question of how to lay tiles in a narrow place will be resolved quickly enough.
Characteristics of ceramic tiles
Ceramic tiles for the bathroom have the following characteristics:
- Has a high wear resistance. This means that if you cover surfaces with it using all technologies, you can get repairs that won’t have to be redone for decades. At the same time, bathroom tiles do not fade or lose their pattern.
- It is resistant to water and moisture. It will not suffer from drops of water falling on it or from the vapors that are inherent in bathrooms.
- Ceramic tiles can always be washed or wiped down. If you do not use harsh abrasive substances, the risk of damaging it is minimal.
- Ceramic tiles come in a ton of variations in color, pattern, style, size and even shape. Everyone can find a tile for themselves. Creating a unique bathroom decor becomes easier with ceramic tiles.
Grout: final work
Grouting tile joints
Once you learn how to tile a bathroom, you can install tiles on any surface, not just around the bathtub. Do not forget that corner joints will require additional effort and cutting of tiles, so it is extremely important to stock up on enough material. If the corners of the room have a semicircular shape, you need to choose a layout from the corner or diagonally. It is not difficult to tile a bathtub with your own hands; after the installation is completed, you need to wait until the mortar has completely dried. And only then can you apply the grout, preferably with a soft spatula-trowel. Installed plastic crosses will help make the seams even, and therefore the grout will lie evenly and the pattern will not be spoiled. Excess grout mixture can be washed off with a soft sponge. It's very simple.
If you want to know how to lay tiles, just look at the tips and get started. Video lessons posted on portals will also provide excellent assistance. Detailed instructions and tips on how to lay tile around a bathtub will be useful for any novice DIYer.
Other types of tile base - how to make?
Brick screens are built quite rarely. It is difficult to work with such material due to its heavy weight. But it is distinguished by exceptional reliability and durability, and is characterized by the ability to retain heat.
To create such partitions, it is necessary to prepare a solution that consists of 6 parts sand and 1 part cement (use brand M300 or M200). The products are laid on the open sides of the font.
The brick screen should be positioned so that the side of the bath protrudes above it by about 20 mm. These millimeters are needed for high-quality leveling of the resulting surface and reliable installation of the tiles on it.
Products in the top row must be attached to the side of the bathtub. Tile adhesive is used for these purposes. An antifungal compound is applied to the finished partition, primed, and plastered. If, after such processing, small differences in height and defects remain, they are smoothed out during the process of cladding the structure.
Instead of brick, lighter silicate or gypsum tongue-and-groove slabs are used to create the screen. It is convenient to work with products with a width of 8 cm. They allow you to build reliable structures that can easily withstand the weight of the tiles.
The blocks described are cut using a hacksaw. The individual parts of the partition are connected to each other with gypsum plaster or glue. The structure is secured to the walls with dowels and steel brackets.
Stages of making a tile bath screen
First, a frame is made. Special markings are made on the walls and floor. Using a plumb line, a line is drawn from the corner of the bathtub to the floor and point A is placed. Then 2 cm is retreated from this line towards the bathtub, point A1 is placed and another parallel line is made.
In the same way, from the corner of the bathroom that is not adjacent to the wall, use a plumb line to place point B on the floor and place a second point B1 2 cm deep into the bathtub. The points A are connected to B, as well as A1 to B1. This will be the line for installing the frame on the floor. Points C and C1 are placed in a similar way at another corner where the bathtub joins the wall. Points C and C1 are connected by lines to points B and B1.
In the upper profiles, which lie under the edges of the bathtub, 3 mm holes are first made and threads are cut. In a cast iron bath, holes are made with a metal drill no more than 5 mm deep. The upper profiles are attached to the bathtub with M3 bolts 3 mm long, coated with liquid nails, at a distance of 16-18 mm from the edge of the bathtub. Profiles are attached to acrylic bathtubs using liquid nails.
We cover the frame with moisture-resistant (green) plasterboard. We leave only the part where the inspection door will be located.
We make an inspection door. We attach 50/50 cm wooden blocks to the plasterboard sheet along the width of the door using a wood screw. Two furniture roller latches are first cut into the sides of each block, and clamps are installed on opposite sides. They are fastened with screws included in the latches. The removable compartment is inserted into place and held tightly by furniture latches. The inspection door can be opened and closed using a suction cup.
Choosing ceramics for a bathtub panel
Ceramic tiles with glaze are impervious to moisture and durable. It is easy to maintain and install. Its only drawback is the fragility of the glazed layer; it easily cracks when struck. But if you don’t throw heavy objects at the tiles, then this problem is not so relevant and significant.
The markings on the box allow you to quickly navigate the assortment of ceramic tiles; for a screen in the bathroom, a cheap wall-mounted one that is not frost-resistant will suffice
The dimensions of most baths are modest. It is recommended to choose small or medium sized tiles for decorating the space underneath. Large slabs will have to be cut, which means extra residue and potential losses from cracking of the glaze due to inaccurate cutting.
You can also use mosaics to cover the screen. However, laying out a pattern from small elements is time-consuming and labor-intensive. It’s easier to choose ready-made mosaic modules in the form of sheets of fiberglass mesh with ceramics already glued to it. They will simply need to be cut out and fixed to a partition made of plasterboard or brick.
Construction of a removable screen
In addition to rigidly fixed structures, to decorate the space under the bathroom, make a removable panel.
To create a mobile screen you will need:
- OSB;
- tile;
- furniture legs adjustable in height;
- slats 20x40 mm to create a frame for supports.
First, a piece is cut from the OSB sheet with such dimensions as to completely cover the side of the bathtub. Only they make it slightly smaller in height, about five centimeters. The feet should fit freely into this gap from below. After cutting, the frame is stuffed onto the OSB, and the legs are attached to it.
The base of the removable screen for a bathtub with tiled cladding is made of oriented strand boards, which, due to their internal structure, are durable and resistant to moisture
Tile tiles are glued onto a wood base using standard technology using sealants and grout mixtures. After grouting the seams, the resulting screen can be placed against the bathtub and the legs can be adjusted so that it stands level in its place.
By twisting the supports, its upper edge must be pressed against the side of the bath from below, then this decorative panel will stand motionless.