Is it possible to glue wallpaper onto tiles? How to glue wallpaper on ceramic tiles?
The best way since Soviet times was this:
- We apply small notches on the tiles and partially remove the glaze.
- Wash the tiles clean and let them dry thoroughly.
- We paint the entire surface of the tile with paint, enamel or oil paint.
- We glue wallpaper onto the paint.
The thing is that when wallpapering ceramic tiles, a number of inconveniences arise, including the following: uneven joints between ceramic tiles, smoothness of the tile surface, poor adhesion of the adhesive to the glazed ceramic tiles, and therefore poor quality of gluing of the two surfaces. But there is no way out (if you don’t want to tile the walls, prime, putty, prime again and only then glue wallpaper). You can simply plaster the uneven areas between the tiles and cover the top with wallpaper. But you will say that putty will not work, but I will tell you that there are primers that can be used to prime tiles and even glass, and then putty. Such as Dulux Trade Super Grip Primer. After that, prime and glue the wallpaper again. Of course, the methods of the previous author are also suitable.
The surface of a wall with ceramic tiles is smooth and uneven due to the seams between them; the adhesion of wallpaper glue and wallpaper to it will be minimal. If there are no other options, for example, to beat off the tile or cover it with plasterboard, then you need to carry out preliminary work: clean it from dust, dirt, dry it well, then apply a layer of concrete contact and allow time to dry. It is necessary to level the surface with hyposum putty (fugenfüller), when it dries, sand it. If you manage to level the surface in one go, then apply an acrylic primer and let it dry.
5 hours, after which you can glue the wallpaper.
Instead of concrete contact, you can use Otex adhesive primer from Tikkurila.
You can, of course, if you are too lazy to knock down the tiles or are not yet sure that you will return to this option (although after what you do with it for wallpapering, you can’t return it back!)
The first thing is to putty the unevenness; you will have to buy expensive putty, since it needs to stick to both the cement mortar (seams) and the tile itself.
The second thing is to level the whole thing and mat it with sandpaper (preferably with a sander; you just need to spend a lot of effort with your hands to scratch the tile).
Third, wash and wipe off all dirt and dust very thoroughly! Wait until it dries!
The fourth thing is to prime, again you will have to take a primer that is not cheap; it is called a primer for decoupage or adhesive primer , it costs about 10 bucks for 200 ml, calculate how much it will cost you!
Fifth - it is better, but not necessary, to glue the base (newspaper or tissue paper).
Sixth - hang wallpaper! Think about it: wouldn’t it be easier and cheaper to knock down the tiles, plaster, putty and glue them as it should be? Besides, you’ll also save some free space, since the tiles have stolen at least a couple of centimeters.
How to glue wallpaper on tiles
OSB tiles are very popular and in demand today due to the fact that they can be used to glue wallpaper. This building material also boasts an affordable price, so it can be used to decorate any room. Gluing wallpaper onto tiles is quite easy, but to obtain the most effective and attractive result, it is necessary to carry out preparatory work. Of course, you can stick wallpaper onto tiles without preliminary finishing, but in this case the building material may begin to peel off after some time.
OSB tiles are produced by gluing together several layers, which consist of sawdust and include various resins and boric acid. Due to its versatility and ease of use, this material is actively used to create various structures. In addition, it boasts impressive thermal insulation and environmental friendliness, which is essential for modern spaces.
Preliminary wall finishing
Gluing wallpaper onto OSB tiles without preliminary work is quite possible, but it is best not to risk the integrity of the building material and spend some time and money on additional finishing of the wall surface. Otherwise, the slab may actively absorb the glue, causing it to swell and begin to fall off the wall. In order to prevent such a scenario, it is necessary to carry out high-quality priming of the walls.
Using serpyanka mesh
Serpyanka mesh is now actively used to strengthen joint seams. It can only be applied to fresh putty. After it is applied to the surface, it must be further processed using putty. It should be noted that applying such material to a wall surface is a fairly simple process that even beginners can do. Why is it undesirable to glue wallpaper onto tiles without such a grid?
- It allows you to prevent an increase in the size of the seams during shrinkage of the building;
- Protects wallpaper from the appearance of seams, which is extremely important when using thin materials;
- Provides the strongest possible adhesion of the building material to the tiles.
Primer and putty
If you can refuse to apply a network, then you cannot do without priming the surface. Otherwise, it will be simply impossible to stick wallpaper on tiles. Surface priming has a huge number of advantages and allows you to cope with the following tasks:
- Eliminate defects and imperfections in the surface of the wall covering, as well as provide protection from mechanical damage;
- Ensure the strongest and most durable adhesion between the building material and the wall surface;
- Reduce the ability of tiles and walls to absorb moisture.
Regardless of what material is used to finish the wall, it must be primed several times. It is best to give preference to white color solutions, which will not be visible even when using thin and light wallpaper. After the walls have dried, it is recommended to apply putty to them. Thanks to this, it will be possible to eliminate any defects in the wall covering, including unevenness and cracks. Ideal for these cases are compositions that are intended for wood processing. If, after using putty, various irregularities and bumps remain on the wall, then they must be removed using sandpaper or a grinder.
Features of wallpapering
Even a person who has never dealt with finishing work can paste wallpaper onto tiles. However, it is necessary to be extremely careful and careful in order to achieve the highest quality effect and result. One of the most important and responsible moments is the preparation of glue, which should be most suitable for this type of wallpaper. The adhesive solution must be prepared in accordance with the instructions provided by the manufacturer. It is best not to deviate from it, as you may end up with a low-quality solution. When cutting rolls, you need to pay close attention to the presence of patterns that will need to be adjusted to each other. The glue should be applied not only to the wallpaper, but also to the tile itself, which will ensure reliable adhesion. After gluing, it is imperative to remove the resulting bubbles and irregularities, which can be done with a dry cloth.
Thus, gluing wallpaper onto tiles is quite easy and the process takes a minimum amount of time. The most important thing is to pay close attention to the preparatory work, which will ensure the durability of the repair and its attractive appearance.
How to glue non-woven wallpaper
Vinyl wallpaper - rules for gluing, a variety of materials with a textured surface. How to glue non-woven wallpaper so that it lasts a long time without losing its original appearance
Some design decisions
On a note! One of the most common places where a combination of wallpaper and tiles may be present is a kitchen apron.
So, we all have a good idea of what tiles are. Wallpaper is also a material well known to everyone. However, when working with them, you need to understand that the important point is the correct combination of both of these surfaces. Don’t forget about the basic concept of harmony and compatibility of different colors. If we are talking about the beautiful design of joints, then it is advisable to use a decorative threshold, also known as molding, at the transition point.
In conclusion, I would like to say that gluing wallpaper on tiles, just like gluing ceramic tiles on top of wallpaper, is, in general, a useless task. From a purely technical point of view, this is, of course, possible. On the other hand, if we talk about the practicality of such solutions, it is very doubtful.
Is it possible to glue wallpaper onto tiles? How to glue wallpaper on ceramic tiles?
The best way since Soviet times was this:
- We apply small notches on the tiles and partially remove the glaze.
- Wash the tiles clean and let them dry thoroughly.
- We paint the entire surface of the tile with paint, enamel or oil paint.
- We glue wallpaper onto the paint.
The thing is that when wallpapering ceramic tiles, a number of inconveniences arise, including the following: uneven joints between ceramic tiles, smoothness of the tile surface, poor adhesion of the adhesive to the glazed ceramic tiles, and therefore poor quality of gluing of the two surfaces. But there is no way out (if you don’t want to tile the walls, prime, putty, prime again and only then glue wallpaper). You can simply plaster the uneven areas between the tiles and cover the top with wallpaper. But you will say that putty will not work, but I will tell you that there are primers that can be used to prime tiles and even glass, and then putty. Such as Dulux Trade Super Grip Primer. After that, prime and glue the wallpaper again. Of course, the methods of the previous author are also suitable.
The surface of a wall with ceramic tiles is smooth and uneven due to the seams between them; the adhesion of wallpaper glue and wallpaper to it will be minimal. If there are no other options, for example, to beat off the tile or cover it with plasterboard, then you need to carry out preliminary work: clean it from dust, dirt, dry it well, then apply a layer of concrete contact and allow time to dry. It is necessary to level the surface with hyposum putty (fugenfüller), when it dries, sand it. If you manage to level the surface in one go, then apply an acrylic primer and let it dry.
5 hours, after which you can glue the wallpaper.
Instead of concrete contact, you can use Otex adhesive primer from Tikkurila.
You can, of course, if you are too lazy to knock down the tiles or are not yet sure that you will return to this option (although after what you do with it for wallpapering, you can’t return it back!)
The first thing is to putty the unevenness; you will have to buy expensive putty, since it needs to stick to both the cement mortar (seams) and the tile itself.
The second thing is to level the whole thing and mat it with sandpaper (preferably with a sander; you just need to spend a lot of effort with your hands to scratch the tile).
Third, wash and wipe off all dirt and dust very thoroughly! Wait until it dries!
The fourth thing is to prime, again you will have to take a primer that is not cheap; it is called a primer for decoupage or adhesive primer , it costs about 10 bucks for 200 ml, calculate how much it will cost you!
Fifth - it is better, but not necessary, to glue the base (newspaper or tissue paper).
Sixth - hang wallpaper! Think about it: wouldn’t it be easier and cheaper to knock down the tiles, plaster, putty and glue them as it should be? Besides, you’ll also save some free space, since the tiles have stolen at least a couple of centimeters.
If desired or necessary, you can, of course, stick wallpaper on ceramic tiles However, we must immediately make a reservation that this is not the best base for wallpaper, since, firstly, the surface of ceramic tiles, as a rule, is very smooth and is not intended for gluing wallpaper, and secondly, there are joints between ceramic tiles that can be visible through the wallpaper. Ideally, ceramic tiles should be removed, the walls should be puttied, and only then wallpaper should be hung.
But if for some reason there is a need to glue wallpaper specifically to ceramic tiles, then it is recommended to first degrease the tiles, seal the seams with putty, cover the surface with newspapers or paper, and only after that start gluing the wallpaper. It is recommended to add PVA glue to the wallpaper glue, which will allow the surfaces to be glued to be glued together more reliably.
I had experience gluing photo wallpaper onto ceramic tiles, the result was not very good. Firstly, ceramic tiles have recesses that leave small gaps, and wallpaper cannot be glued into these gaps; designer stickers can be used for ceramic tiles. But if you want to glue wallpaper, it is better to remove the ceramic tiles.
Washable wallpaper can easily replace ceramic tiles in the kitchen
The kitchen is considered to be the room in which it should always be fresh and clean, no matter how much frying or steaming there is. Hence the increased demands not only on the appearance of all coatings, but also on their properties. So, washable wallpaper for the kitchen is certainly the best choice - this material meets the main requirement: it is not afraid of moisture. Washable kitchen wall coverings can be a practical replacement for boring tiles or traditional painting. A wide selection of patterns, colors and textures allows you to choose a decent option for any interior.
Properties of washable wallpaper
The demand for washable wallpaper for the kitchen is explained by its attractive properties:
- Practicality. Dirt is easy enough to wash off and return the wallpaper to its original appearance.
- Reliability. Washable wallpaper is resistant not only to moisture and water, but also to mechanical stress.
- Durability. With proper care and gentle operation they can last for decades.
- Wide range and affordable price.
Meanwhile, many potential wallpaper buyers do not have a very good idea of the difference between waterproof and washable wallpaper. And you need to understand this in order to properly wash dirt from wallpaper in the kitchen.
Waterproof ones are simply resistant to moisture and cannot be washed; it is advisable to wipe only fresh stains with a sponge.
Washable ones can easily withstand wet cleaning using special products. One piece of advice: before using any detergent on the entire surface of the walls, you need to test it on a small area.
Vinyl washable wallpaper
Vinyl wallpaper, which has a paper or fabric-based bottom layer, is considered to be the most versatile of all types of washable wallpaper. And the top layer is made of polyvinyl chloride (PVC). Vinyl wallpaper has increased strength and moisture resistance, and does not lose its original appearance from frequent washing. Paints on vinyl wallpaper do not fade when exposed to sunlight for up to two decades. There are several types of vinyl wallpaper: “foamed” vinyl - voluminous and paintable; flat; dense (“embossed”) vinyl.
Foamed vinyl wallpaper
The top vinyl layer of this type of washable wallpaper, as a result of heat treatment, has a clearly defined volumetric texture and may contain various color inclusions. Visually, foamed wallpaper seems heavy, but this feeling is deceptive. Experts do not recommend using wallpaper with a too complex three-dimensional pattern for the kitchen, since kitchen dirt tends to accumulate in those weaves from which it is difficult to remove.
One of the varieties of foam vinyl is washable non-woven wallpaper. This technology is based on replacing the paper base with non-woven material - interlining, a mixture of cellulose and mineral fiber. Washable non-woven wallpaper does not stretch when applied, increases the sound insulation of the room, and is made of a material that can be painted over and over again, up to 15 times. To paint structural washable non-woven wallpaper, it is recommended to use acrylic, latex or water-based paints.
Flat vinyl wallpaper
Flat vinyl wallpaper is a type of washable wallpaper, which is obtained by hot smoothing the “foam” coating. At the same time, flat vinyl wallpaper can imitate various textures: plaster, stone, textiles. Flat vinyl wallpaper has increased strength and resistance to cleaning. Wash such wallpaper with alkaline or alcohol-based detergents and a soft brush.
Correctly selected glue
It is best to use special rather than universal glue. The latter is suitable only for light wallpaper. Special adhesives are designed for different types of fabrics, which will provide increased strength and reliability. There are a lot of options, each of which needs to be considered individually - to do this, just carefully read the description of the glue. So, there are adhesives for paper, vinyl, non-woven, glass wallpaper.
It is also necessary to use additional compounds: joint glue, border glue, etc.
Gluing tiles
The proposed method is suitable both for completely tiling a room, and for decorating details or returning one loose tile to its place.
Scheme for grouting joints between tiles.
First of all, prepare the glue. To do this, pour the dry mixture into a prepared container and add water according to the instructions. Stir the mixture thoroughly until the lumps are completely dissolved; it is most convenient to do this with a drill with a whisk attachment. Let the glue rest for 10 minutes and stir again. A properly prepared composition should be homogeneous, without lumps, clots or separations. You should not immediately prepare the entire required volume of glue, as it quickly loses its properties.
Now you can proceed directly to gluing. Using a notched trowel, apply the adhesive to the wall or tile. In the second case, the tile needs to be moistened so that the porous surface does not “pull” water out of the adhesive. Place each tile according to the markings and press firmly against the wall. To secure the fixation, you can use a rubber hammer, but be careful not to split the coating. It is important to ensure that the corners of the tiles fit snugly against the wall, otherwise, during operation, destruction will begin from this place.
To keep the seams even and symmetrical, use plastic crosses, but be sure to remove them before the glue is finally fixed. Otherwise it will be very difficult to do this. After gluing every 2-3 m² of tiles, remove any exposed adhesive using a sharp object. Periodically check the prepared installation diagram and do not forget about installing a frieze or decorative border. If you also plan to lay the tiles on the floor yourself, you should not lay the last row of wall tiles. This should be done last, as this is the only way to make the seam as invisible as possible.
You may be interested in: Installation of a plasterboard niche with lighting
Wallpapering ceiling tiles
The question often arises whether it is possible to glue wallpaper to the ceiling and how to do it. Let's look at how to properly glue ceiling tiles, which in this case are planned to be used as insulation. For these purposes, tiles, which are used for installing suspended ceilings in organizations and shops, have proven themselves to be the best. This tile has a porous structure, which determines its heat-insulating qualities. The surface of this tile is absolutely flat (Fig. 1).
Before you start gluing wallpaper onto tiles, you need to carry out the following preparatory work:
Figure 1. Wallpaper sticks best to flat tiles without a pattern.
- It is necessary to completely remove all previous finishing and putty.
- At the next stage, it is necessary to treat the surface with a deep penetration primer. This will fix the surface and increase the strength of its adhesion to subsequent layers of applied materials.
- After this, you need to make the surface smooth using gypsum-based putty.
- The dried putty should be primed again.
- Ceiling tiles can be glued onto the dried primer. To do this, you can use special adhesives or so-called liquid nails.
Ceiling tiles should only be made of polystyrene. Otherwise, there may be situations where the adhesive used will react with the material from which the tiles are made. This may lead to its deformation. It will be impossible to glue wallpaper onto it in the future. This material has one more advantage - the mass of polystyrene tiles is very small, as a result of which they can be glued even to not entirely smooth surfaces. This will significantly save material costs and work time.
The pattern of gluing tiles may be different. If the room is large enough, the tiles are glued from the center of the room. The best result is achieved when ceiling tiles are glued diagonally. This technique, when using such tiles as the main finishing material, visually expands the space.
After the tiles are firmly glued to the ceiling, you need to prepare the surface for wallpapering it.
To hang wallpaper you will need a set of tools.
If there are noticeable gaps between the tiles, then the surface will need to be primed, allowed to dry and leveled using acrylic putty. Cover the dried putty again with a layer of acrylic primer. The surface is ready for wallpapering.
Let's start choosing the texture. For obvious reasons, the weight of the material plays a major role, so heavy types are not suitable for ceilings. Ceiling wallpaper is much lighter. Typically, non-woven materials are used for this. They help create an even and smooth surface on the ceiling.
The best way to determine whether this type of material is suitable for gluing the ceiling is to pay attention to the information on the label placed on the rolls: the weight should not exceed 110 g/m²; Light wallpaper for walls that weigh from 110 to 140 g/m² is also suitable.
Before you start gluing the wallpaper, you need to wait until the primer or putty is completely dry. Only after this can you begin the most interesting process. If you start gluing wallpaper onto a primer that has not yet dried, the wallpaper will swell, bubbles will appear, and in the future the wallpaper will begin to peel off.
In what cases is whitewash cleaning required?
If the whitewash is old, applied in several layers, and still does not hold firmly, crumbles or “breathes” in some places, then there is only one way out - you need to get rid of it. To do this, clean the surface with a spatula and warm water slightly acidified with vinegar. A small area (approximately 1 sq.m) is moistened with water, and then the whitewash is cleaned with a spatula - and so on, meter by meter.
After the whitewash has been completely removed from the surface of the walls or ceiling, it is necessary to apply a primer and wait until it dries completely. This will take about a day. Further, if necessary, the surface is puttied, covering cracks and irregularities, and primed again.
OSB tiles are very popular and in demand today due to the fact that they can be used to glue wallpaper. This building material also boasts an affordable price, so it can be used to decorate any room. Gluing wallpaper onto tiles is quite easy, but to obtain the most effective and attractive result, it is necessary to carry out preparatory work. Of course, you can stick wallpaper onto tiles without preliminary finishing, but in this case the building material may begin to peel off after some time.
OSB tiles are produced by gluing together several layers, which consist of sawdust and include various resins and boric acid. Due to its versatility and ease of use, this material is actively used to create various structures. In addition, it boasts impressive thermal insulation and environmental friendliness, which is essential for modern spaces.
How to glue wallpaper to the ceiling
The entire process of gluing wallpaper to the ceiling can be divided into small stages of work:
It is better to glue wallpaper to the ceiling together.
- Take accurate measurements of the ceiling surface and calculate how many strips will be needed to cover it. Important! It is necessary to take into account small allowances so that the strips extend slightly onto the wall when pasting. The excess then needs to be cut off using a stationery knife.
- It is necessary to prepare glue and tools that will be needed during the work process.
- After this, you need to cut the wallpaper into strips according to the measurements taken earlier, taking into account the allowances along the edges.
- Apply glue to strips of material.
- Glue the prepared strips to the ceiling.
- Smooth out the wallpaper. Make sure that no wrinkles form. You need to press the joints especially carefully.
- Allow the wallpaper to dry overnight.
Tools needed for work:
Place the cut piece of wallpaper with the pattern down and carefully coat the entire surface with a brush and glue.
- wide and narrow glue brushes;
- sharp stationery knife;
- container for preparing adhesive solution;
- plastic or rubber spatula;
- a roller made of soft plastic or rubber for better gluing of seams;
- pen, ruler, preferably angular;
- good wallpaper glue that has not expired.
Related article: Features of IKEA countertops
When cutting wallpaper into strips, it is very important to consider the following points: the joints of the strips will be invisible if they are glued in the direction from the window. It is desirable that these joints be as small as possible. To achieve this result, the direction must be chosen along the room. Another trick is the need to create a small reserve. The length of the strips should exceed the dimensions of the ceiling by 4-6 cm, which will need to be cut off.
What are ceiling wallpapers?
Various types of wallpaper can be glued to the ceiling. These can be either special types for the ceiling or other types; non-woven wallpaper is the easiest to use. They have good covering qualities and can make the bulk of surface defects invisible.
Ceiling tile sticker.
Ceiling wallpaper is a fairly durable analogue for walls. They are two layers of paper glued together. Depending on the conditions of use, wallpaper can serve for surface decoration for up to 5 years. Of course, over time, dust and other dirt will certainly settle on them. In this case, the wallpaper will have to be updated.
In order to extend the life of wallpaper glued to the ceiling, you can use special types of material for painting. This type has long won the hearts of consumers with its relative cheapness and the possibility of long-term use, because it can withstand up to 10 layers of paint. Before gluing wallpaper, you need to decide whether it is possible to glue ceiling tiles.
In the process of gluing the surface with both ceiling tiles and wallpaper, a number of different tools are used:
You need to glue the tiles with high-quality glue designed specifically for tiles.
- Plastic pressing spatula (used for pressing various types of strips, on any basis, can also be used as a ruler to remove excess along the edges).
- Wallpaper brushes (used for smoothing and pressing paper wallpaper).
- Stationery knife (for removing excess paper).
- Tape measure (for various types of measurements).
- Construction plumb line (to be able to measure a strict vertical line).
- Tire (used as a ruler).
- Rollers for gluing joints (made of soft plastic, can be used for materials with a thin structure).
Related article: Wall cladding with fiberboard panels - 3 methods
Tiles for wallpaper: combining materials
Wallpaper and tiles are the two most popular materials for wall decoration. Very often they are used together, but in this case the installation rules must be followed, otherwise the final result may seriously disappoint us.
In our article we will tell you which combinations of materials are optimal, whether it is possible to glue wallpaper on ceramic tiles and vice versa, and also provide a number of tips for those who plan to do all the work themselves.
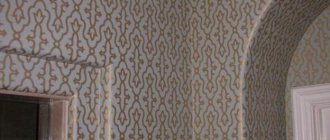
Seamless ceramic finish is virtually indistinguishable from wallpaper
Tiles for wallpaper: ideas for combining coatings
There are quite a few materials available in the renovation and construction industry. However, if we talk about the most common ones, they include wallpaper, as well as tiles. Despite the fact that the composition of the raw materials and the characteristics of these decorative coatings are completely different, they can nevertheless be quite successfully used together, acting as complementary partners.
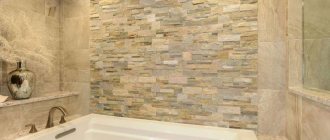
The most common place in an apartment where you can combine tiles and wallpaper is the bathroom (example in the photo)
This article will address issues such as:
- Is it possible to glue wallpaper onto tiles?
- What to glue first, wallpaper or ceiling tiles.
- What are the rules for carrying out work and design features, as well as a number of other topics.
Decor options
Imitation of ceramic wallpaper
One of the innovative solutions that began to be used in interior decoration only recently is the so-called ceramic wallpaper.
This material is characterized by the following:
- Products are available in two forms . Most often these are ordinary ceramic tiles, which require seamless installation. An image is applied to its front side, and after gluing the material, the coating becomes practically indistinguishable from ordinary trellises.
Material in the bathroom interior
- The second type of this finish is much more interesting . It is a polymer fabric onto which multi-colored ceramic chips are applied. Thanks to high-temperature processing, the ceramic layer is sintered with the polymer, and the output is a canvas with unique decorative and performance characteristics.
Note! The domestic market presents mainly materials from European manufacturers. On the one hand, this indicates a fairly high level of quality, and on the other, the price of the products is quite high.
- The main advantage of such ceramics is its high elasticity . Due to the fact that the polymer base bends well, it can be glued to any surface. At the same time, the material retains almost all the advantages of tiles, so bathroom tiles under wallpaper are not afraid of moisture and do not lose strength over time.
- The relatively small thickness and low weight also make this material very attractive : the finishing does not load the load-bearing structures, and therefore even false walls made of thin plasterboard can be covered.
Photo of the finished surface
Advice! These tiles are installed in almost the same way as regular tiles. At the same time, it is characterized by less demands on the base: in some cases, the instructions even recommend gluing it on top of the old cladding in order to reduce labor costs.
Trellis for tiles
The second alternative to traditional materials used for interior decoration is wallpaper that imitates a surface lined with tiles or clinker.
They are characterized by the following:
- Firstly, this material is usually highly resistant to moisture. Since such trellises are usually glued in kitchens or baths, the requirements for durability are put forward accordingly.
Wallpaper for the kitchen under the tiles must be waterproof and withstand regular washing
Note! The most popular trellises are based on foamed vinyl. However, recently, part of this niche in the market has been occupied by acrylic products, which also withstand moisture well.
- Secondly, to improve the quality of the imitation, embossing is usually applied to the surface of the material, repeating the contour of the tile seams. To make this embossing more noticeable, the thickness of the roll is increased to 1.5 - 3 mm.
- As for ease of installation, wallpaper like tiles is no more difficult to glue than regular finishing material. Naturally, to achieve the best result, the wall should be carefully primed and leveled, although a layer of foamed vinyl allows you to mask minor unevenness and defects in the base.
Advice! When gluing, special attention should be paid to the alignment of the pattern. In most cases, a whole number of tiles are depicted on a roll, but you have to work hard when cutting.
Ceramic wallpaper, what is it?
The spread of so-called ceramic wallpaper has become quite a common phenomenon recently. This material is available in two different forms and has certain characteristics that you need to know about the following facts:
- The first type is special sheets that are made from polymer fibers. Ceramic chips of different shades must be applied to this canvas, thus creating certain designs or patterns. The production of this material involves high-temperature processing, due to which the base is sintered with a special polymer coating. As a result, we get a very attractive finishing coating for decorating walls in the bathroom, kitchen and other areas of the apartment.
- The second option is ceramic tiles, the peculiarity of which is an interesting technique for laying it, eliminating tile joints. After you install such tiles on the walls, it will be quite difficult to distinguish them from their classic roll “brothers”. The only difference will be that this type of finish is made of ceramics.
The main advantages of such products include the following factors:
- Light weight and thin products. This, firstly, facilitates and speeds up the installation process, and secondly, it makes it possible to finish fairly light structures, such as, for example, plasterboard arches, walls and partitions.
- In addition, we receive a material that, in essence, combines the advantages of tiles, on the one hand, and ordinary roll wallpaper, on the other. They are not afraid of water and remain durable and reliable, even despite prolonged exposure to moisture.
- Preparing the surface for laying “ceramic wallpaper” is not particularly difficult, since it is possible to have a less ideal wall. By the way, you can learn more about how to prepare walls before finishing a bathroom in the article “Aligning the walls in the bathroom before wallpapering.”
- If you are not familiar with the installation techniques of such coatings, you should not worry or worry. The fact is that the technology of work is very similar to how ordinary tiles are installed.
Of course, all such products have many advantages. However, there are also certain disadvantages. One of the most obvious disadvantages is the fairly high cost. The fact is that in the market of the CIS countries, in this category, as a rule, exclusively foreign manufacturers are represented. This explains the rather high price, which makes “ceramic wallpaper” not entirely affordable for many people. At the same time, this indicates the high quality of such materials, since eminent and reputable manufacturers always care about the reputation of the brands they offer on the international market.
Installation Tips
Technical aspects
When combining tiles and trellises, you often have to solve rather paradoxical issues. And often beginners are interested in whether it is possible to lay tiles on wallpaper?
Let's try to understand the situation in detail:
- As we know, rolled materials are glued to the wall using glue, which penetrates not only into the base, but also into the finish itself (i.e., paper or non-woven fabric).
- When applying tile adhesive, it is very likely that the liquid contained in it will fall on the wallpaper adhesive, and it will partially lose its adhesive properties.
- It is also worth noting that ordinary tiles have significant mass, and therefore will exert a significant “pull-off” force. No wallpaper adhesive is designed for such loads.
It is safest to glue tiles onto a permanent base.
Note! This applies to thin ceramic wallpaper to a lesser extent, but you shouldn’t take risks here either: it’s better to spend a few hours working with a spatula than to “screw up” an expensive material.
The question of whether it is possible to glue wallpaper to tiles is somewhat less popular, but still occurs.
The answer is not so clear:
- From a practical point of view, there are no problems. To ensure adhesion, it is enough to degrease the tile or sand it with an abrasive.
- The appearance of the coating is a completely different matter. The seams between the tiles will appear under the trellises in 9 cases out of 10, so you will have to cover them up first. This process is labor-intensive, so it’s easier to knock down the tiles with your own hands and putty the wall.
Imitation tiles
In addition to the options considered, many manufacturers of finishing materials also offer a solution such as wallpaper for tiles. They can imitate not only such seemingly familiar materials as tiles, but also such still somewhat exotic finishing surfaces as clinker. If we talk about such wallpaper under tiles, we can note the following features:
- Often designers of manufacturing companies use one interesting technique. They involve the application of small longitudinal and transverse lines with embossing, which are designed to imitate seams between rows of masonry. By the way, it is for this reason that such wallpaper is often quite thick. They are usually made on the basis of foamed vinyl. The sufficiently large thickness of the sheets is designed to emphasize the presence of “seams” and make the appearance of such material as realistic as possible.
- You need to understand that since such a coating is intended for use in the interiors of the bathroom, kitchen and other places with high levels of humidity, these trellises are characterized by a high degree of protection from moisture. By the way, products made from acrylic have this quality.
- It is necessary to say a few words about how such wallpaper is glued. Just as tiles are placed on the wall, so too should they have a clear direction. In addition, you will have to combine the design of adjacent paintings. As for the installation process itself, it does not present any particular difficulties: it is quite possible to do it yourself, completing a significant part of the work with your own hands.
Installation features
Many people who are not familiar with the repair and decoration industry due to other professional responsibilities are wondering whether it is possible to lay tiles on wallpaper? As a rule, this applies to those moments when people intend to use both coverings in one place or another of the apartment: both wallpaper and tile. Let's touch on some technical details that relate directly to the installation process in more detail. This is necessary in order to reasonably answer this question. So here's what you need to keep in mind:
- It is well known that when gluing wallpaper, the applied adhesive penetrates not only into the wallpaper, but also into the very base on which the gluing is carried out. Thus, it is necessary for the glue to be slightly absorbed into the work surface. In the case of tiles, this is unlikely to be possible, since the tile adhesive will penetrate the wallpaper, which can soften it and damage it somewhat.
- In addition, if we are talking about places where wallpaper and tiles are combined, it is necessary to avoid getting wallpaper glue on the tile glue, and vice versa. The fact is that when one type of glue gets onto another, and even more so when it penetrates its composition, it may happen that it will to some extent reduce its adhesive characteristics.
If we talk about whether it is possible to glue wallpaper on tiles, then it should be noted that this question is extremely rare. The fact is that the tile is not a perfectly flat surface. In addition, the seams that are always present at the joints of individual tiles will always appear, even if you treat them with putty. And this is an unnecessary waste of time and money.
That is, it turns out that in general there are no technical issues related to gluing. On the other hand, all this can lead to unnecessary loss of time, effort and money. Do you need it? Hardly. Therefore, in the overwhelming majority of cases, people prefer to simply get rid of a layer of old tiles and prepare a clean and more or less flat surface for wallpapering. This will truly be the only sane solution.