Wall tiling is a rather complex undertaking that requires adherence to a certain technology that allows you to create a truly reliable and beautiful coating. Of course, this material is currently used much less than in years past, but its popularity is steadily returning. This is due to the fact that tiles have numerous advantages that cannot be underestimated.
A little about tiles
Some time ago, this material was used exclusively for tiling bathrooms and shower rooms, as well as the kitchen area. The arrival of new materials on the market has pushed tiles from their rightful place. In addition, the product had a rather dull decorative appearance. Now the situation has changed dramatically. What is the reason?
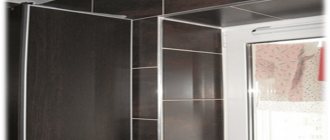
Tile in the bathroom
- Wear resistance. What other material can boast that it can retain its qualities for fifty years?
- Strength. There is a small load on the walls, but it can also ruin any decorative coating. Tiling is an excellent solution that will avoid almost any problems.
- High hygienic indicator. This property goes unnoticed when it comes to other, more expensive materials. But human health depends on it. The tiles do not absorb foreign odors and dirt, which prevents the emergence of pathogenic microbes.
- Excellent moisture resistance. It is not for nothing that it is used in rooms with high humidity.
- Absolutely environmentally friendly. Ceramics do not emit substances harmful to health.
- Fire safety. Due to the manufacturing technology of the material used, the product does not burn and does not contribute to the spread of fire.
- Wide choose. There are different types of wall tiles. But the good news is that a great variety of decorative options have appeared that allow you to create real masterpieces.
Tile
There are some disadvantages:
- Poor sound insulation. Indeed, in order to create reliable sound insulation, you will have to use additional materials that are first laid on the surface.
- Difficulty working with walls. If you need to hang a cabinet or shelf on the wall, you will have to try. After all, the tiles are quite fragile; incorrect drilling will lead to damage.
- High price. Yes, the cost of the product is quite high. Elements with a pattern, which are sold by the piece or by the square meter, are especially expensive. But a tiled area always looks advantageous.
It should be noted that one of the disadvantages is the complexity of the work. It takes some skill to get a truly perfect surface. You shouldn’t expect that everything will work out right the first time. But there is no need to despair; you can do any work yourself. The main thing is to make the necessary efforts and a certain perseverance.
Do-it-yourself tiling of a bathtub - getting acquainted with the material
To decorate the walls, you can use either a soft coating, such as wallpaper, as well as cork panels, or a hard one - decorative plaster and, of course, tiles, which can be ceramic, that is, made from fatty types of clay, and cement. However, artificial stone made from cement is used mainly for paving paths, so we will not consider it. As for ceramics, we can distinguish the following varieties of this material: majolica, terraglia, monocottura, clinker, Cotto tiles and gres, also known as porcelain stoneware. Let's touch on each type in more detail.
Majolica - the most common type of tile, is obtained by pressing clay, onto which a layer of glaze is applied before double firing, which ensures excellent moisture resistance, up to absolute waterproofness
. This type of ceramic is usually used for tiling a bathtub; it is not difficult to lay it yourself. Monocottura is produced in almost the same way, but the heat treatment is performed once. Terraglia is made from expensive types of clay with the inclusion of sand and flux. It is also processed by firing twice, resulting in a beautiful white color, which perfectly adheres to paint and glaze. Looks great on the walls.
Clay for Cotto tiles is obtained only in Central America, as well as on the Mediterranean coast, the main feature is a reddish porous structure after firing, which is why no coating is provided. Clinker tiles are enjoying increasing success today due to the extreme strength achieved by firing at very high temperatures, sintering the clay into a monolithic mass. Porcelain stoneware or, otherwise, gres is a compressed complex mixture of clay, quartz and mica. Due to the fact that the clay is kaolin, the strength of the tiles is not inferior to granite. It performs well both for interior cladding and for exterior decoration.
What is required for quality installation
Naturally, you should prepare the instrument, which should be in perfect order. The required list is standard, but if the need arises, each device can be replaced with a suitable option.
Tile laying tool
For work use:
- Separate container for water. The volume must be more than five liters.
- Container for mixing the solution. It should be convenient for preparing the mixture and for taking it.
- Master OK. This tool can be replaced with a metal spatula.
- Rubber spatula. Needed for grouting joints.
- Notched trowel. The mixture is applied to them.
- Various measuring devices - tape measure, level, cord.
- Mallet. Many people use a wooden hammer, but a rubber one is much better.
- Pliers. Regular wire cutters will also work.
- Spray.
- Tile cutter. The tool must be reliable; some cheap options simply fail.
- Dowel set.
The solution (mastic) for gluing and grout are purchased separately.
Tools and materials
Tools:
To carry out facing work you will need:
- level;
- spatulas of various types (including serrated);
- tape measure, ruler;
- rubber hammer;
- tile cutter or glass cutter;
- wire cutters;
- emery block;
- containers for water, adhesive composition;
- wide brush;
- rag, sponge.
Materials:
- ceramic tile;
- adhesive composition;
- special plastic dividers for tiles (crosses);
- cords;
- grout for seams.
Also in the process of facing work, elements such as ceramic friezes, skirting boards, and cornices can be used.
- Skirting boards are the bottom rows of tiles. They can be the same as the main tiles or figured.
- Frieze – tile of the upper edge of the cladding. Usually differs in patterns, color or relief.
- Cornices - top tiles, can be regular, glazed or patterned.
Self-preparation of the solution
You can prepare the mixture for laying tiles yourself. This doesn't mean you can't trust store-bought options. It just makes it possible to save some money.
Preparation of the solution
The most common composition used for work is cement. It serves as a base to which sand (sifted) and water are added. Their ratio may vary.
There is a standard option that is suitable for almost all types of work with tile material. For the mixture you will need:
- Cement (m400) – one part is required.
- Sand (fine fraction) - take two and a half parts.
- Water – half.
On a note! One part is taken as a conditional indicator, the container in which the set of ingredients is produced. For example, a liter children's bucket.
Preparation of tile adhesive
Mixing begins with dry ingredients. They are poured into one container and mixed. It is necessary to achieve a homogeneous composition. Next, start adding water. It is better to do this in parts, kneading each time.
Checking the quality of the prepared mixture
To make sure that the solution is reliable and of high quality, it is checked. This is done simply:
- a separate ceramic element is moistened with water (it is convenient to use a spray bottle);
- apply the prepared mixture;
- the tiles are turned over and shaken;
- a layer of cement of at least three millimeters should remain on the reverse side.
If such a result cannot be achieved, then re-mix and add the necessary ingredients (cement or sand).
When carrying out tiling work in rooms with high humidity, special tile adhesive is used. This will avoid possible problems, as well as preserve the necessary properties of the material longer.
Kitchen tiling
This area has high humidity, so the finish should have the same moisture absorption class as in the bathroom. Kitchen tiles must have sufficiently high resistance to temperature changes - if there is a possibility of surface contact, for example, with hot pots, it is necessary to choose a material with the appropriate characteristics (minimum 125°C). The surfaces in this room become actively dirty and must be cleaned frequently. Therefore, glazed ceramic wall tiles are more appropriate here, since a matte surface is more difficult to clean - dirt simply eats into it. In the kitchen, the lining must have a stain resistance rating of 1-2, according to GOST 6141-91. Since a textured surface is more difficult to clean from greasy drops and dirt, it is advisable to choose smooth tiles for kitchen walls.
The sizes of ceramic tiles for walls and floors often differ
Advice! If only part of the surface is tiled, for example, an apron, it is advisable to choose small sizes of ceramic tiles - this will hide possible surface defects and its geometric errors.
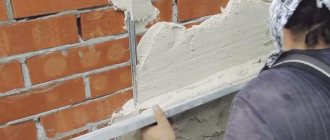
Surface preparation
Preparing the surface for tiling
The correct technology for tiling walls with ceramic tiles requires mandatory preparation. This procedure can only be ignored if the surface has already been subjected to all necessary manipulations.
It is believed that the permissible vertical error is about six millimeters (per two meters of wall). Checking this indicator is quite simple. A two-meter aluminum strip (level) is applied to the surface. Various gaps can form between the two planes. If they are more than six millimeters, notes are made and these areas should be treated with a plaster mixture.
Advice! When laying tiles, you do not need to bring the walls to perfection. The small roughness that remains after applying the plaster will even be useful. This will ensure better adhesion of the material to the surface.
The general preparation procedure is as follows:
- All old coatings are removed. The paint is peeled off and the wallpaper is removed.
- The work area is carefully tapped. A small hammer is used for this. It is necessary to determine whether there are voids. In such areas, the finish will need to be removed and a new layer of gypsum or cement mixture applied.
- Grease stains are removed. Otherwise, nothing will stick. Degreasing is carried out with a special solution of hydrochloric acid (three percent). It is applied and left for three to four minutes. Next, rinse everything well with water and allow to dry.
- Convexities that are larger than three to four millimeters are knocked down with a chisel.
- If possible, it is better to completely plaster the surface by removing the old layer. Of course, it will take longer and be more expensive, but for old houses this is the key to reliable coverage.
- Notches must be made. They are applied in random order to the entire wall. They should be of shallow depth and will serve to secure the solution well.
- When everything is ready, priming is carried out.
On a note! It is not always possible to remove old paint while the base remains strong enough. This area must be covered with many deep scratches. This is the only way to ensure that the mixture sticks.
Alignment of walls
Tiles can only be laid on a previously prepared surface. In this case, special attention is paid to deviations from the plane, that is, various flaws that disrupt the evenness of the walls. To identify irregularities, walls are checked using a plumb line (a cord with a weight at the end) as follows:
- Nails are driven into the wall under the ceiling every 1.5 m.
- A plumb line is tied to the nails one by one and the distance between it and the wall is measured with a tape measure or the evenness is determined visually.
Leveling the wall with plaster
This method allows you to ensure verticality, and it is more convenient to measure horizontality with a bubble level or a perfectly level strip. If you are using a lath, place it against the wall and see what kind of gap is formed between it and the plane. If the gap width is more than 2 mm, the surface must be leveled.
If minor defects are found, they are eliminated by plastering. When covering a wooden surface, a fine metal mesh is stuffed onto the walls before applying the composition. It is not attached directly to the wood, but on pre-fixed bars 2.5 cm thick and 3 cm wide, and a layer of roofing material is also placed under the mesh. A cement mixture with the addition of cellulose fibers is applied on top of the mesh, and a layer of standard plaster (no thinner than 1.5 cm) is applied on top. This significantly reduces the area of the room, but the tiles laid on such a surface last firmly and for a long time.
Drywall makes it easier to level walls
Significant differences in heights are easier to level using sheets of drywall (gypsum plasterboard) laid on glue or a frame. Based on their properties, the material is divided into wall, ceiling, moisture-resistant and fire-resistant. When it comes to tiling a bathroom, then leveling the walls with moisture-resistant plasterboard is the best solution. It does not absorb moisture and allows you to quickly create a surface suitable for laying ceramic tiles. Read a separate article on our website about laying ceramic tiles in the kitchen.
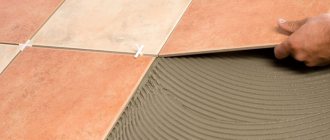
Laying tiles
Marking the surface for tiling Cladding
with ceramic tiles begins with preliminary marking of the surface. This is done using a cord. The height of the floor is immediately determined. It is necessary to calculate this indicator in advance. Having calculated all the values, taking into account the size of the seams (it can be different), install dowels with self-tapping screws along the edges of the wall, and pull the cord between them.
Preliminary marking is done in the case when the laying scheme is quite complex or there are no necessary skills.
The general operating procedure is as follows:
- Before covering the walls with tiles, they need to be laid out. Each element is laid out in the order in which it will be fixed to the surface. You should pay attention to the pictures, their sequence, and location.
Preliminary tile layout - Next, when all the nuances are taken into account, spray the work area with water. The reverse side of the material used is wetted. If a cement mixture is used, then a small part of it is well diluted (the wrong side of the product will be dipped into it).
- Laying begins from the corner, which will be located opposite the entrance to the room. It is better to do this from the second row. To do this, according to the existing markings, along the lower part, a wooden strip or metal profile is installed, which will serve as a support for the row.
- The mixture is taken from the container with a notched spatula and transferred to the surface. You can apply it to the tile itself. And also combine these options. This depends on the quality of the solution used and the type of surface.
- The product is installed on an existing rail and pressed against the wall. To be sure, you can tap it with the handle of a spatula. Everything is immediately checked for level.
Laying tiles on a lath - The second tile is laid in the same way. Special wedges are inserted between adjacent elements; they will maintain a uniform position of the seams. For reliability, apply masking tape to hold both sections together.
- Having completed the first row completely, check it by level. Next, they begin to work with the second row.
Advice! It is better to leave the lower section until the very last moment of the finishing process. That is, they begin to do it after laying the floor. If necessary, the tiles can be quickly cut using a tile cutter.
Expert advice
- The walls in the bathroom must be tiled especially carefully; the back side must be completely covered with the mixture. If this is not done, the material will crack.
Correct application of adhesive to the tile base - For greater convenience, when large-scale work is planned, a template is made. Previously, it was made of steel of different thicknesses. But this is a rather labor-intensive process. It is much easier to make it from a sheet of plastic. To do this, apply a tile and mark its outline. From the resulting size, step back five millimeters towards the middle. Cut out the resulting frame and process the edges. Now the resulting template is attached to any convenient box. The tile is brought to this hole and pressed, the solution is applied and leveled. It turns out that each element will have the same layer.
- When it is necessary to drill a hole for various decorative elements or plumbing fixtures, a special drill is used - a ballerina. It is adjustable, which makes it possible to make different connectors. Drill ballerina
- Moldings are installed last.
How to choose ceramic tiles
I would like to note right away that ceramic tiles are the best material for finishing a bathroom, so it is very important to choose not only a color scheme to increase the visual space, but also a quality product. Initially, experts recommend choosing the tile itself, and only then proceeding with the selection of plumbing fixtures and accessories.
Helpful information:
- Decorative plaster for interior wall decoration
- Secrets of plastic PVC panels for walls
- Wall insulation technology
- Do-it-yourself wall chipping
- The best ways to prepare walls for liquid wallpaper
- Insulating the walls of a house with polystyrene foam: debunking the myths.
Basically, ceramic tiles today are produced in collections that contain both wall and floor tiles, as well as decorative elements. The collection will have one style, range and theme. Now the choice is simply huge, and it will not be difficult for you to make a choice, however, a professional consultant in the salon will always be able to help you and even create a 3D picture of your bathroom in the color scheme of the ceramic tiles you like.
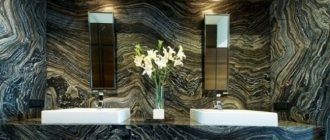
When purchasing, pay special attention to appearance and quality. Basically, choose a classic design as the color schemes are soft and pleasing to the eye. After all, when you go into the bathroom, you want to relax and have fun, and not be in constant tension. You will get tired of bright and colorful ceramic tiles very quickly. The most pleasant tones, as experts say, are: pink, light blue, beige, imitation of natural marble and stone. Don't chase the brand name - these tiles will cost much more.
The final stage is filling the seams
You need to understand that tiling walls is only part of the necessary process. Next comes grouting the joints.
Filling ceramic tile joints
Proceed this way:
- Let the tiles sit for 24 hours. The putty is selected in the required color.
- Using a rubber spatula, the mixture is transferred to the seams. This must be done confidently, carefully filling in all the gaps.
- Immediately pick up the excess and wipe the front side of the material. But you can't touch the seam itself. If this is the final stage, then a beautiful gap should be formed. To do this, you can drag your finger between the elements. Although, when there is a lot of work to do, this is not the best option. There is a special tool that allows you to work faster. On a note! A piece of electrical cable can be used to form seams. It is important to choose the required diameter so that it does not remove excess grout.
- If work is carried out on sites with high humidity, additional sealant is used. It is applied using a pistol. Select a composition that will be suitable for a specific process.
- When the seams are dry, remove the excess. This is done with a damp cloth.
Tiling allows you to get a beautiful and reliable surface. The main thing is that everything is done in compliance with the necessary rules and without undue haste.
Features of finishing premises for various purposes
Ceramic wall tiles are used in various functional areas of the house: bathroom, kitchen, hallway, living room, utility room. Due to the different conditions in these rooms, the requirements for their cladding are also different.
Wood-look ceramic wall tiles are not losing popularity...
When choosing the color and design of products, it is necessary to take into account the size of the room and the fact that wall tiles can look different in natural and artificial light, as shown in the photos. What is also important is the stylistic unity of the design of all surfaces and its correspondence to the overall concept of the home’s interiors.
But floral ceramic wall tiles are the leader for bathroom decoration and renovation. Classic never gets old...
Advice! Large tiles 20x30 are better suited for small rooms - such cladding creates a more seamless wall covering, and small mosaics are well perceived from a certain distance.
Tiling window openings
Window openings are faced in the same sequence as the walls. If it is necessary for rows of entire tiles to run through the center, partial pieces are laid along the edges of the slopes. If this is not necessary, partial tiles are placed along the axis of the window opening.
It is important to maintain symmetry when lining openings.
Sorting tiles by color should be more careful. The window opening is the most illuminated place in the room, which means that the heterogeneity of shades will be especially noticeable here.
Strictly horizontal and vertical lines are drawn on the window opening itself. They will serve as a guide when tiling: the tiles should fit closely to these lines.
Tips for laying tiles
The process of laying tiles on a wall requires the master to have knowledge and adherence to certain technical nuances:
- Before directly laying ceramic tiles on the wall, they should be carefully checked for defects and uneven edges. To obtain smoother seams, it is recommended to pre-sort the existing tiles;
- The surface of the wall before laying is carefully prepared and primed;
- It is recommended to frame all external corners with special plastic or metal corners;
- Each element of ceramic wall covering should be laid only on a dry surface.
If these rules are followed, the laid tiles will remain securely on the wall for many years.
Before laying tiles, it is recommended to study information regarding the quality of the tile adhesive that will be used when finishing the wall.
Results
Among all kinds of wall finishing materials, ceramic tiles stand out separately, which can easily be glued to any wall. In addition, ceramic coating is a durable material.
Due to the wide selection of tiles in modern construction stores, you can choose exactly what the home owner wants. Ceramic wall covering is one of the best facing materials, which has a number of advantages such as: durability, resistance to scratches and damage, and ease of cleaning from dirt.
Hallway tiles
When selecting material for the hallway, you need to take into account that such rooms are the dirtiest and dustiest in the house. For this reason, this finishing material must be washed. At the same time, such a coating is subject to increased demands regarding resistance to wear and dirt absorption.
When decorating the walls with ceramic tiles in the hallway, you need to pay attention to the overall harmony of this finishing material and the style of the interior. In this way, you can create a truly beautiful hallway that will delight the owner of the house.
Types of tiles for wall cladding
For wall cladding, tiles of straight and curved shapes are produced. There are ordinary tiles, a frieze, or rectangular belt, and husk, or corner tiles.
Row tiles are ordinary flat tiles designed for facing a plane from corner to corner and from baseboard to ceiling (eaves).
A frieze, or rectangular belt, is a tile designed to divide the tiled surface into parts (pictures). Typically, friezes are used when covering large surfaces. Standard frieze dimensions are 25 × 150 mm.
Corner tiles are L-shaped tiles that are used for lining corners. The corners can be decorated with two tiles, attaching them end-to-end perpendicular to each other. In this case, the angle will be acute. Its appearance will depend on the skill and accuracy of the tiler.
L-shaped husk tiles allow you to create an oval corner. It looks neater and is easier to wash and clean. The trick when gluing husk tiles is to line them up with the horizontal rows of tiles without crooking.