Building codes
Certification documents are issued for facade insulation systems in Russia - Technical Certificate of Rosstroy of the Russian Federation.
But so far, not a single technical certificate for a facade insulation system with a thin plaster layer specifies penoplex, technoplex or its analogues as the main wall insulation. That is why you will not find the facade of an administrative building insulated with extrusion, because not a single state inspection organization will approve the insulation project for such a facade (and the insulation of the facades of administrative buildings must be approved), unless it is a “squatter construction”.
What materials will be needed
Let's start with the basic materials needed to insulate a house or cottage, regardless of the area of the structure. Initially, of course, you will need the penoplex itself, then when purchasing the finishing material, along with it you need to buy adhesive foam, which will hold your structure in place.
Brackets with metal profiles or even wooden slats cannot be ignored, so do not forget about them. You need low vapor permeability, in which case we purchase a vapor barrier . Mostly houses made of wood are insulated, and if this is your case, then you need a protective wood-like impregnation.
Preparation for installation of penoplex on walls
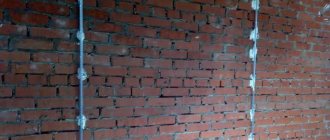
Installation of the base profile
Base profile for penoplex
Immediately before installing the heat-insulating boards, it is recommended to screw the base profile along the lower edge of the first row; this will help protect the penoplex from such troubles as mechanical damage, moisture, and rodents.
Features of installation of the base profile:
- The profile is fastened in steps of every 30 cm; self-tapping screws are used for this on wooden walls, and dowel-nails from 40 mm to 100 mm on brick and concrete walls.
- In those places where the base profile will be attached, it is imperative to ensure that it fits tightly to the base of the wall; for this purpose, it is allowed to use special washers for the lining;
- The connection of the profile is made with special locks at its ends; in no case is this connection made with an overlap.
Installation of thermal insulation boards on walls
Installation of penoplex on a brick wall
- The first row of penoplex is installed directly on the base profile.
- Bend all pre-screwed U-shaped hangers into the working position in advance. In those places of the material that fall on the screwed hanger, slits are made; with their help, the penoplex will subsequently be strung onto the hangers.
- During the installation of the first row of penoplex, it will not be superfluous to ensure that the insulation boards fit tightly to the edge of the profile and do not extend beyond its edges;
- Penoplex is fastened to walls made of brick and concrete using special mushroom anchors with large caps. If the wall is wooden, then use wood screws and washers;
- The second and subsequent rows of heat insulation are mounted on the wall according to the principle of brickwork, so that the vertical seam of the previous row does not fall on the seam of the next row. The discrepancies between the seams must be at least 200 mm;
- After the wall is completely covered with foam boards, it is necessary to carefully inspect all the joints. If leaky joints are found, you need to seal them with penoplex strips cut to fit the wedge.
Installation of penoplex around doorways and window frames
Insulation around windows and doors
- The installation of penoplex slabs in the upper corners of door and window openings should be made only from solid slabs; all unnecessary fragments from the door or window opening are cut out in place.
- The technological cutout in the penoplex must necessarily overlap the line visually running along the corner of the opening by at least 200 mm. The production of a technological cut is made along the cut line.
- If the existing door and window openings are recessed relative to the plane of the facades, then in this case the slopes are also insulated with penoplex. To do this, the material is laid around the window or doorway with a slight overlap, and strips are cut onto the slopes according to the required size of the window slope.
- Before installing penoplex on the door or window frame, a specially designed “adjacent profile” is mounted around the entire perimeter. It is installed so that the size from the junction profile to the window clearance remains uniform.
- The connection profile is mounted in such a way that when installing the thermal insulation slab, it does not protrude beyond the window and door frame. In this case, installation is carried out only on three sides of the door and window openings (on the sides and top).
- And only after this are pre-cut foam boards installed on window and door slopes. They should be pressed tightly against the inside of the profile.
Dimensions and weight, quantity calculation
Penoflex thermal insulation boards can be of different thicknesses, so the packaging can have different sizes and contain a different number of sheets. It is also necessary to take into account that the dimensions of the slabs are indicated without taking into account the tenons/locks.
| Name and thickness | Dimensions (L/W) | Amount in a package | Insulation area per package | Packaging volume |
| Comfort 20 mm | 585*1185 mm | 18 pcs | 12.48 m2 | 0.273 m3 |
| Comfort 30 mm | 585*1185 mm | 12 pcs | 8.32 m2 | 0.2704 m3 |
| Comfort 40 mm | 585*1185 mm | 9 pcs | 6.24 m2 | 0.2493 m3 |
| Comfort 50 mm | 585*1185 mm | 7 pcs | 7.69 m2 | 0.2429 m3 |
| Comfort 100 mm | 585*1185 mm | 4 things | 2.77 m2 | 0.2772 m3 |
| Foundation 50 mm | 585*1185 mm | 7 pcs | 7.69 m2 | 0.2429 m3 |
| Foundation 100 mm | 585*1185 mm | 4 things | 2.77 m2 | 0.2772 m3 |
| Pitched roof 100 mm | 585*1185 mm | 4 things | 2.77 m2 | 0.2772 m3 |
| Wall 50 mm | 585*1185 mm | 8 pcs | 5.55 m2 | 0.2776 m3 |
There are two methods for calculating the number of packages: using the volume or area of the package:
- You know the insulated area, find the area of the insulation of the required thickness in the package and divide the insulated area by this value. For example, you need to insulate 15 squares; you will use slabs 40 mm thick. The insulation area in the package is 6.24 m². We count: 15/6.24 = 2.4 packs.
- To calculate by volume, multiply the insulated area by the thickness to obtain the required volume. Next, by analogy with the example above, we divide the found figure by the volume of one package. We get the number of packages of insulation. Let's calculate for the same case: 15 m² * 0.04 m = 0.6 m³. According to the table, one package of this material has a volume of 0.2493 m³. we find the number of packages: 0.6/0.2493 = 2.4 packages.
Penoplex for blind areas around the house and insulation of the basement is an excellent choice
If the number of packages is not whole (most likely this will be the case), some surplus will be created. If the surplus turns out to be large (as in the example - more than half of the slabs turn out to be unnecessary) and you have nowhere to use it, check to see if the seller sells incomplete packages. In this case, the calculation will be a little more complicated. You should estimate how many slabs you need in addition to the whole packages. For this:
- Find the area covered by entire packages. For example, this is: 2 packs * 6.24 m² = 12.48 m².
- Since we need to insulate 15 squares, we subtract the found one from this figure: 15 m² - 12.48 m² = 2.52 m². This is the area for which additional slabs should be purchased.
- The area of one Penoflex thermal insulation board is 0.6932 m². If we divide the remainder by this figure, we get the required number of additional insulation sheets: 2.52 m² / 0.6932 m² = 3.63 pcs. It turns out that we will need 4 slabs in addition to the two packages.
In a package, depending on the thickness, from 4 to 18 pieces
With such an accurate calculation, it is better to take a small supply - one or two slabs. In case there was a mistake somewhere in measurements or calculations, somewhere the edges became wrinkled and other unforeseen cases.
What is expanded polystyrene?
This is a snow-white foam material in the form of polystyrene balls, consisting of styrene, which forms its cellular structure, and a foaming agent - pentane. Both constituent components are hydrocarbon compounds obtained as by-products in oil and gas production cycles.
Characteristics of expanded polystyrene:
- High heat-protective qualities, since the insulation has low thermal conductivity in the range of 0.029 - 0.037 W/(m•K).
- Mechanical strength is ensured by the flexibility of the technological process, when it is possible to set a given strength for specific applications.
- It has special abilities to maintain stable dimensions at air temperatures up to + 80 C.
- Low water absorption - the insulation is not hygroscopic.
- High chemical resistance to salts and alkalis, but can easily be destroyed when treated with solvents.
- High resistance to atmospheric influences and aging processes.
- Low fire resistance - insulation is highly flammable. Modification of this material with fire retardants significantly reduces its flammability.
Insulation of buried strip foundations
These structures rest on a solid layer of soil that is not subject to seasonal fluctuations. Insulation in this case is necessary to prevent heat loss and freezing of structures. In addition, often with a buried foundation, a basement or cellar is installed in the house, where it is necessary to maintain a certain temperature.
It is necessary to insulate the deep foundation from the outside during the construction stage. If the moment was missed, thermal insulation can be done later. To do this, they tear off a trench around the base all the way to the bottom. If waterproofing was not done in a timely manner, both operations are combined at once.
Technology for insulating the foundation of a house from the outside with penoplex when laid below the freezing level:
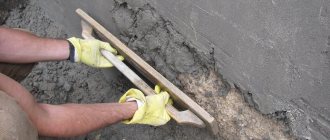
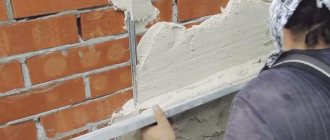
- Clean the surface and level with the solution.
- Perform two-layer waterproofing of the foundation and plinth - first coat with mastic, then glue or fuse the rolled material with an overlap of 10-15 cm. There should be no gaps or leaky joints of the panels.
- Lay Penoplex starting from the bottom row, gluing it to the base. If bitumen-based waterproofing is used, you can install the insulation on preheated mastic without glue.
- Install the second row with offset seams.
- Carefully fill the trench and compact it, avoiding damage to the thermal insulation.
It is advisable to insulate the blind area with a layer of expanded polystyrene 0.7-1 m wide around the perimeter of the house. With high groundwater level (above 3 m) and clayey soils, it is necessary to lay drainage below the level of the base. For backfilling, use non-heaving materials - crushed stone, gravel, sand.
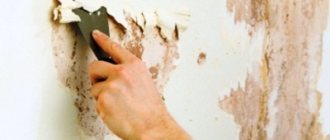
How to care for the coating
In order for the coating to last a long time, some effort in caring for the surface will be required.
Twice a year, the facade of the house should be washed with clean water using a hose with a spray nozzle.
Use synthetic detergents with caution - they can disrupt the composition of the paint pigment, and the house will become stained. Facades that have lost their attractiveness are repainted after washing off the layer of dirt and dust.
Before painting, apply a layer of primer. Paint all sides of the house
Facades that have lost their attractiveness are repainted, after first washing off the layer of dirt and dust. Before painting, apply a layer of primer. Paint all sides of the house.
https://youtube.com/watch?v=hAW59AMw-sM
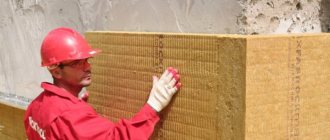
Insulation system “ventilated facade”
The “ventilated façade” system involves constructing a frame made of wood or special galvanized profiles, into which insulation boards are attached, and then the curtained façade is mounted on the wall. Working steps:
- Preparing the base.
- Fastening the frame.
- Installation of insulation with glue, then doweling.
- Installation of a moisture-windproof membrane.
- Fastening the curtain façade.
The system is advantageous in that it limits the number of wet processes, thereby reducing temperature restrictions.
The preparation of the base is carried out by analogy with the wet method. The wood frame is selected with a cross-section corresponding to the thickness of the insulation: with a slab thickness of 100 mm, the cross-section of the frame is 40X100 mm, the timber is secured with dowels in increments of 5 mm less than the width of the foam slab. The insulation is installed directly on the glue, additionally secured with dowels. Then the membrane is attached to the frame with a stapler, securing it on top with a beam with a cross-section of 40x40 mm. A curtain facade made of any slatted or panel material - siding, plank, lining, etc. is mounted on the timber.
The “ventilated facade” insulation system provides enormous opportunities for changing the facade in a variety of styles.
Wet facade
You need to know installation technology. Wet facade is a contradictory and at the same time universal installation. It can really be used for insulating houses and apartments. It is required to obtain permission from the Technical Inventory Bureau.
Application technology "Wet facade"
The use of penoplex using this technology makes the building visually beautiful. It is not advisable to use it to protect against heat loss in wooden houses. Installation of sheets takes place in several stages:
- Preparation of materials.
- Preparing the surface for applying insulation.
- Attaching insulation.
- Preparation for plastering.
- Strengthening.
We will consider each of them separately.