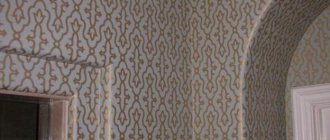
Nowadays, the shelves of construction stores are literally bursting with goods, but the long-known wallpaper still remains one of the most popular types of decoration. These materials have many advantages, and the ever-growing range makes it possible to find the best option for almost any room in a house or apartment. Many owners choose rolls because of the ease of operation. This is true, but since walls and an ideal surface are a rare combination, before starting this stage it is necessary to prepare the walls for wallpapering. This is the only way owners can be sure that the finish will look perfect and that the new coating will “live” for quite a long time.
Surface preparation process
Let's look at step-by-step instructions on how to prepare a wall for wallpaper.
Stages of preparing walls for wallpaper and features of the work
In the process of preparing walls for wallpapering, it is not enough to simply buy high-quality materials. It is important to correctly perform the preparation technology, adhering to the following steps:
- Cleaning the wall of old wall materials;
Old wallpaper or painting must be removed 100%. The wall must be perfectly clean.
- Initial application of primer. The first layer of primer is applied as an impregnation in order to eliminate microcracks and neutralize the surface from moisture. It will give the surface a slight smoothness and will be completely translucent;
- Sealing cracks and defects;
- We carry out the most important stage - finishing and preparing the wall: we fill existing cracks and chips with a gypsum mixture, plaster the surface and putty;
- Leveling the surface using sandpaper or other abrasive material;
- Secondary application of primer. It can act as the best finishing composition for adhesion of the wall to the wallpaper and gluing dust residues.
Stages
The step-by-step process includes:
- Removing boring finishes.
- Cleaning the surface from dust, debris and other contaminants.
- Initial application of the primer layer. This stage involves treatment with a special compound to disinfect and prevent further absorption of moisture.
- Repairing defects. Elimination of visible defects is carried out with a mixture of gypsum, after which the surface is puttied.
- Alignment. To carry out this stage, you will need a special abrasive mesh material. You can level it with sandpaper.
- Final priming. The final stage of preparing the wall for wallpaper. Necessary to ensure good adhesion of the surface to the finishing material. In addition, re-priming will additionally treat the walls with an antiseptic.
Between the main stages of preparing walls for wallpaper with your own hands, there are intermediate ones, such as treating the surface with an antiseptic, wetting, collecting tools, preparing a solution, etc.
Important! The listed steps must be performed strictly in order; the sequence of work cannot be changed!
Leveling the surface
After the walls have dried from the primer, the surface must be leveled (plastered with plaster). Is it necessary to plaster the coating? No, if the walls are dry and smooth, the old plaster does not crumble, and there is not much money in the budget. If the walls are uneven, have many defects and flaws, then they must be plastered for wallpapering. How to level the walls? Using any high-quality gypsum mixture.
All cracks and holes must be filled with the mixture, a layer of maximum 1 cm applied, and the surface leveled with a spatula. Leave the walls until the material is completely dry, then sand with sandpaper or a special mesh.
Let's start puttingty. We spread the putty and use a spatula to level all the surfaces that will be covered with wallpaper. When the procedure is completed, wait for it to dry. The putty surface is sanded until completely smooth. The final stage is re-priming. It must be done before wallpapering, when the walls are already puttied.
Plaster
Plaster is used for brickwork, as well as for walls made of other materials that require significant leveling.
Recently, instead of plaster, interior finishing with plasterboard is increasingly being used, since it allows, at the same time as leveling, to also insulate and soundproof the walls, and does not require continuous putty.
Plastering is done using ready-made dry mixtures, which are diluted with water according to the instructions. To dilute the mixture, it is convenient to use an electric drill with a mixer attachment. For brickwork, cement-sand mixtures are usually used; for concrete walls, cement-gypsum mixtures are more often used.
Before applying plaster, the wall is freed from fragile elements, cleaned and coated with a primer. Apply plaster in 2-3 layers, each previous layer must dry thoroughly before applying the next one.
Often, when finishing work, it is not plastering that is required, but the repair of old plaster. This type of work includes cleaning cracks, removing all weak parts, followed by priming and filling the resulting voids with plaster mortar.
putty
While in many cases you can do without plaster when gluing wallpaper, putty is almost always necessary. The only exception is when finishing walls with plasterboard, where putty is used only at the joints of sheets and in places where they are fastened with self-tapping screws.
Procedure for filling walls:
- Preparing the surface for putty includes clearing cracks and voids, thoroughly cleaning and removing dust from the surface.
- Then the primer is applied using a roller and brush.
- After the primer has dried, you need to dilute the starting putty mixture, rubbing the lumps, until smooth.
- The finished solution is evenly applied to the wall with a spatula, leveled and left for about 12 hours to dry.
- The dried starting layer is primed.
- After the soil has dried, the finishing putty mixture is diluted.
- The finishing layer is applied and leveled.
- After the finishing layer has dried, it is sanded with sandpaper, dusted off and primed.
After these step-by-step instructions have been completed, we can assume that the walls are completely prepared for wallpapering.
Materials and tools
To carry out high-quality repairs, you first need to acquire important tools and various mixtures:
- putty, gypsum mortar to level the wall plane and apply the base layer;
- primer for initial surface treatment;
- finishing putty to complete the preparatory work.
For information! It is better to choose a universal primer that can penetrate deeper into the wall.
A product purchased in a store contains instructions that must be followed unconditionally in order to carry out the repair efficiently.
Surface primer
Primer is a special composition that improves the adhesion of the material to the wall surface and reduces the consumption of adhesive. In addition, there are antiseptic compounds on sale that prevent the appearance of fungus or mold. It doesn’t matter whether the walls are made of concrete, brick, plaster or drywall. Primer is always applied; without it, preparation is not complete. The composition even prevents the formation of cracks.
What composition should I use to treat the walls? There are these types of primers:
- Acrylic primer.
- Alkyd.
- Mineral based.
- Deep penetration compositions.
- Products with coloring powder.
- With antiseptic additives.
A store consultant can advise which option is best to choose for a particular surface. In addition, the manufacturer indicates on the box what the product is intended for.
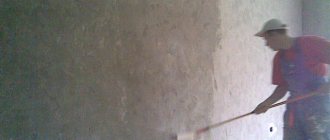
How is preparatory priming carried out? To work, you will need the composition itself, a paintbrush and a roller. It is easy to work with a brush on hard-to-reach areas, and with a roller on open areas. There should be no gaps. Before application, the wall is cleaned and dust and dirt are removed. After the first layer has dried, it is recommended to apply another one.
Tools
You will need to prepare the tools in advance so as not to waste time and simplify the process. The availability of tools depends on the nature of the old finishing layer and the quality of the coating.
Note!
Glass wallpaper - what is it? Pros and cons, types, features, characteristics, photos of design and combinations in the interior
Plain wallpaper - 150 photos of modern design. Rules for choosing and combining wallpaper in the interior: kitchen, bedroom, living room, hallway
- Wallpaper framed on the wall in the interior: photos of original design and beautiful decor
Need to purchase:
- floor protection film;
- knife, it is better to choose a stationery knife, sharp;
- tape to avoid dirt;
- container for diluting mixtures;
- a brush for priming in difficult places;
- roller for applying the mixture to the wall;
- spatulas for leveling and applying the mixture;
- construction drill mixer for kneading.
Surface priming
After the old coating has been removed, it is time to start priming.
There are several types of them:
- Acrylic;
- Alkyd;
- Mineral;
- Deep penetration;
- Coloring.
Everyone decides for themselves which product to choose, because it completely depends on what kind of surface needs to be treated. In order not to make a mistake in your choice, you should consult with specialists or study the material in specialized publications.
Among those that professionals can advise are:
- Universal acrylic based product. It perfectly penetrates into all pores and microcracks, fills them, dries quickly, which allows you to proceed to the next stage in the shortest possible time. Suitable for any type of surface.
- Contact composition. It is widely used not only by professionals, but also by those who are faced with a similar matter for the first time. The characteristics are similar to the first, only there are still quartz particles present here, which increase the degree of penetration of the substance.
- Griftal composition. It is used only in rooms where there is a high level of humidity; a similar composition dries much longer than the first two.
It is worth applying the primer to the entire surface of the walls; for this it is best to use a roller, but you can also use a wide brush. In some cases, walls are primed several times.
Getting rid of old wallpaper layers
Before gluing new material, it is necessary to get rid of outdated finishes, be it paint, decorative plaster or faded wallpaper. Without this process, the preparation of a concrete wall for wallpaper is considered incomplete.
Several arguments why it is necessary to clean the surface and remove the old layer:
- Wallpaper that has been in the house for a certain time has practically no adhesion. If you apply glue to such a layer, it will soften and fall off. Even under slight pressure or weight, old layers cannot withstand the load.
- When gluing wallpaper onto an old coating, you will have to wait a long time for it to dry.
- After waiting for drying, unevenness will be revealed, the appearance will be spoiled and the work will simply go down the drain.
- The clutch will not be of high quality, which means you won’t have to dream of a long service life.
- Under the old layer, dirt, dust, and microbes that have accumulated over the years of operation will remain.
Working with different wall materials
When performing finishing work, be sure to take into account that walls can have different surfaces, each of which has its own characteristics.
Concrete bases
How to properly prepare a concrete wall for wallpapering? It must be remembered that this process is considered the most labor-intensive.
The process of leveling a concrete wall
- The surface is cleaned of dust and dirt. A layer of deep penetration primer is applied. If it is absorbed quickly enough, it is recommended to repeat the process.
- The plaster solution is being prepared; it will serve as a starting solution. The mixture should be applied in compliance with all procedures.
- If a rough compound was used for the work, it is recommended to cover the surface with putty.
On a note! Many craftsmen note that to obtain the desired result, it is enough to sand the plastered coating thoroughly.
- Priming completes the process, it is important to apply at least two coats.
Preparation of concrete walls for wallpapering is considered complete.
Plastered coatings
To begin with, the coverage is assessed; further actions are determined by its condition:
- If the surface after cleaning is sufficiently even, but there are small cracks, then you need to open the cracks and cover them with putty, and then apply priming.
- If there are small gaps in the coating, but there are noticeable curvatures in height, then the work involves covering it with putty. It will level the base and correct minor defects. The result is fixed with soil.
- The most labor-intensive option is considered to be one in which the coating has numerous defects. This means completely removing the plaster layer and applying a new one.
A coating with numerous defects requires removing the old layer of plaster and applying a new one.
On a note! In new buildings, finishing is carried out according to the “screed and plaster” principle, so in such premises it is advisable to check the quality of the work performed. There are situations when everything is done incorrectly, this requires a complete reconstruction.
Plasterboard surfaces
When deciding how to properly prepare plasterboard walls for wallpapering, you need to evaluate the fastening of the gypsum plaster boards. If the installation work was carried out according to all the rules, then further manipulations are carried out according to the following scheme:
- The joints of adjacent slabs are opened. They are covered with putty, over which a reinforcing tape is applied.
Sealing joints of plasterboard boards - The coating is primed.
- The composition for finishing application is prepared and laid in a thin layer.
Plasterboard putty - After drying, the priming process is repeated.
Thus, the surface is completely prepared. Finishing work can be done after the walls have dried.
Removing paint
You will also have to get rid of outdated paint if you need to thoroughly prepare the walls. The process is complex and will take a lot of effort and time.
Important! Painting will not interfere with the installation of the selected wallpaper, without preparation: primer, putty, etc. If the surface requires leveling, i.e. carrying out preparatory work, you will have to remove the paint.
Experts advise using one of 4 methods to thoroughly clean the surface:
- Manual - using available tools.
- Electromechanical - using electrical devices and tools, such as a drill, hammer drill, etc.
- Chemical - using special compounds.
- Thermal - using hot air. This is a burning method.
Preparing walls for wallpapering
What is included in this operation? There are three main stages: complete cleaning and treatment of the surface, its repair or leveling, and priming.
Removing the old type of coating
It is recommended to get rid of the old finish in any case. Even if there are wallpapers on the walls that look quite “decent”. Otherwise, it is possible that after some time the owners who ignored this stage will be forced to redo the work.
Base with glued sheets
It all depends on the type of material. If the finish is simple (paper), then you can handle it by simply prying it off with a spatula. Often, just pulling on the edge is enough to remove the entire strip. However, this option is ideal: often you have to put in much more effort.
What to do if the coating refuses to leave the base? First, the surfaces are generously moistened with water. To make the procedure as easy as possible, use a soap solution, or add table vinegar, fabric softener or wallpaper glue to the liquid. The composition is applied with a brush or roller and left to soak for a short period of time (10-15 minutes). Then the softened coating is removed with a metal spatula.
To speed up the process, cuts are made on the wallpaper along its entire length with a breadboard knife. Such scratches will allow moisture to penetrate. If some areas refuse to obey, then they try to remove the pieces using an iron and a wet cloth. As a rule, the old coating is easily removed after this procedure. Multilayer wallpaper requires a different approach. First, get rid of the outer, decorative layer. Then the paper base is wetted, which is subsequently also scraped off with a spatula.
There is another option: buying a product that is designed specifically for removing wallpaper: for example, Henkel Metylan, Kleo Anti-Wallpaper, Quelyd DISSOUCOL, NEOMID. As a rule, such “helpers” do not require rinsing off. The latter drug, capable of penetrating to a “deep depth” (10 layers), can also be used as an antiseptic primer, since it contains a biocide.
Painted walls
There are several methods for “releasing” painted surfaces. Some of them require a lot of effort, while others make it possible to “deal with” the paint relatively quickly.
- The easiest option is to get rid of the chalk composition. In this case, the owners are faced with a minimum task, because such paint is removed with soapy water and a brush.
- But whitewashing on the walls is rather an exception, so you have to fight with more “insidious” compounds. A thick layer of material is removed with a spatula, or a chisel (chisel) and hammer are used.
- To combat “insidious” paint, power tools with attachments (hard brushes, spatulas) are often used - a hammer drill, an angle grinder, a drill. Working with a grinding machine will be less effective.
- The most “barbaric” way is to use an axe. In this case, not very deep notches are first made on the wall, at a slight angle. Then the surface is wetted. After the liquid is absorbed, the paint is removed with an ax. But during this work it is very important to find the optimal angle of inclination of the tool blade.
- The next option is to use a hair dryer: in this case, the paint quickly softens, so it can be easily removed with the same spatula. Some craftsmen who do not have such a device replace it with a gas torch or blowtorch. This equipment is dangerous and therefore requires very careful handling.
A simple and not at all dusty solution to the problem is to treat the base with special cleaners. They produce liquids, gels, pastes and sprays. Such compositions begin to act after 10-15 minutes. Softened paint can be easily removed with a spatula or wire brush. Potential saviors include the following cleaners: ABRO, DOCKER S4, FEIL-5, KUDO and Antikras.
Any type of work requires maximum protection for the master. To protect yourself from dust or chemicals, you must use gloves, goggles and a respirator. When thermally and chemically treating walls, it is necessary to provide the room with high-quality ventilation.
If the walls have decorative plaster
There are several methods that allow you to get rid of old decorative coating.
- Mechanical method. As in the case of paint, the simplest tools come to the rescue - a hammer, a chisel, or the same “formidable” axe. These options, regardless of the type of coating, require maximum caution, since excessive zeal can cause damage to the wall.
- The cycles work with a manual scraper. Sanding is a method that is used if the base will not tolerate rough handling and the finishing layer is very thin. The first example is plasterboard walls. To simplify the work, the surface (if it allows) is regularly moistened.
- Using a power tool - an angle grinder or a grinder. A disk with an abrasive coating (brush attachments) is usually chosen as an attachment. This work cannot be called very fast - thick plaster is removed gradually, in layers.
The thin coating of decorative Venetian trim requires the use of another tool - a peeling machine. Removing such plaster with this device will not require much effort; cleaning takes a minimum of time. An alternative is to use loops. A combination of methods is also possible.
Methods for removing liquid wallpaper
Since this material is very similar to ordinary wallpaper, this type of finish is removed in almost the same way. First, the walls are generously moistened with the same homemade compounds as the strips. Or special, purchased drugs. If the owners plan to reuse the liquid finish, then this stage is carried out with warm water without other components.
The operation is repeated several times until the coating turns into a thick, “obedient” mass. Then it is removed with a spatula. Unsoaked areas are moistened again, heated with a hairdryer or treated with a steam generator (wet cloth and iron).
Liquid wallpaper protected with varnish requires a different type of treatment. In this case, the coating is “destroyed” with a grinding machine. The disadvantages of the method are the duration of the procedure and a large amount of dust. Therefore, the master needs patience and maximum protection.
Another way is to partially remove the material. The surface is leveled, then puttied and primed. However, this option is not one of the best solutions, since it will not be possible to completely eliminate unpleasant surprises.
Fighting a Potential Threat
Sometimes, after getting rid of the old decorative layer, the owners are presented with a bleak picture - walls covered with mold. If colonies are discovered, the fight against them begins immediately.
The first step is to find out the cause of the mold. It “favors” rooms with high humidity if the ventilation system does not cope with its responsibilities. Colonies on external walls may indicate their defects, insufficient ventilation due to the tightness of plastic windows, etc.
Surfaces affected by fungus are cleaned with a stiff brush. If mold is present on the plaster, then remove it too. Various means are used to combat microorganisms. The most effective drugs are antiseptic primers. As a rule, working with them is simple: some are completely ready, others require dilution with water. Apply the compositions to dry walls with a brush or roller. The minimum number of layers is 2, but it is better to repeat the procedure 5-7 times. Each of them must be absorbed on its own.
Folk remedies often use bleach (with sodium hypochlorite), ammonia, hydrogen peroxide, potassium permanganate, borax, vinegar, etc. However, most of these recipes do not help - mold returns after a while, so it is better to use special preparations. It should be noted that the best option for getting rid of “stubborn” mold is to turn to professionals.
Surface repair
Preparing the walls for wallpapering is almost complete if they look immaculate, but such a “gift” is rare. When there are serious defects on the base, the next step is to eliminate them. Chips and cracks will certainly appear through the wallpaper, so the appearance of the wall will be hopelessly ruined.
Using putty
To repair the surface, several stages are carried out sequentially:
- Narrow cracks are pre-embroidered - widened with a chisel (screwdriver) and a hammer. The reason is the need to ensure better adhesion of materials. The crack is cleaned of small debris with a brush.
- Then it is primed, and after the composition dries, it is filled with putty. Walls made of plasterboard require the participation of another material - reinforcing tape (serpyanka).
- The dried base is sanded. The easiest option is sandpaper (and a grater). An alternative to sandpaper is an abrasive mesh.
The composition is chosen depending on the wall material. Or buy universal putty. Examples - Axton, Danogips SuperFinish, Holzer Feinspachtel, Knauf Multi-finish, Knauf Rotband, Volma Tandem (plaster and, “concurrently,” putty).
Foam Application
Polyurethane foam is often used to repair deep cracks. This material allows you to quickly get rid of defects, as it fills all the voids.
- First, the defective area is cleaned of concrete fragments, debris and dust. Then the surface is moistened with water using a spray bottle.
- The container is shaken, the cracks are filled from bottom to top. If the crack is very large, then the foam is applied in layers. Each of the subsequent layers is applied only after the previous one has hardened.
After completing the work, the foam is allowed to dry on its own. Excess composition is removed with a sharp knife. The surface is “tidyed up” with putty, which is then sanded.
Leveling the surface
First about the use of plaster. This step can be skipped. The reason is its optionality. If the walls do not have a large “range” of defects and serious curvature (over 10 mm), then this operation is not required.
When there are uneven areas and many small imperfections, plastering is necessary. As a rule, a gypsum type of material is used for wallpaper. First, the detected defects are filled with plaster, then it is applied to the entire surface. The maximum layer thickness is 10 mm. After the base has dried, it is also sanded with sandpaper.
Then the surfaces are primed and puttying begins. After this layer has dried, the walls are brought to perfection - to perfect smoothness. Then they move on to the last preparatory stage.
Padding
This type of “pre-finishing” treatment is ignored by some, but this preparation of walls for wallpapering is very important. It allows:
- save adhesive mixture, since primed walls absorb less moisture;
- make the coating reliable - significantly improve the adhesion of materials;
- guarantee additional protection against mold.
For this reason, in any case, it is recommended to use antiseptic compounds. The primer is selected depending on the base material. There are several options:
- Alkyd primers are used for treating wooden and “near-wood” surfaces.
- Use mixtures diluted with water: wallpaper glue or PVA. The first, “native” composition is the favorite.
- Acrylic primers with deep penetration. They are ideal for preparing plastered and puttied substrates.
The choice of material depends on the owners. Homemade glue compositions can guarantee the absence of problems. “Pros” are designed specifically for these tasks, but will require extra expenses.
Primer of walls
Priming before gluing is a process that helps get rid of cracks, pits and other defects. The primer is suitable for all surfaces. It can be used to prepare a wall made of plasterboard, concrete, or other material. The mixture strengthens adhesion, eliminates excess moisture, and gets rid of debris.
There are several types of primer. The choice largely depends on the financial capabilities and requirements of the owners of the premises. When selecting, the characteristics of the surface and its properties are taken into account. Sellers from specialized stores or instructions that come with the product will help you with your choice.
There are many primer compositions on the market, but there are mixtures that have proven themselves and are popular. They are recommended to be used in repairs by professionals:
- Acrylic solution (universal). It tends to penetrate deep into the wall. Dries in 5-6 hours, has no odor, and can be used on any surface.
- Contact composition. It has all the properties described above, but in the contact type they are more pronounced. Thanks to quartz particles, the solution penetrates deeper, and therefore seals unevenness and other defects more efficiently.
- Griftal solution is recommended for treating walls in rooms with high humidity. Drying time is a day.
Regardless of what kind of wallpaper you plan to use on a surface, priming is a mandatory step. It prepares wall surfaces for wallpapering for painting, non-woven, paper and other types.
To apply the mixture you will need a roller. They can easily cover the entire surface, but for the corners it is appropriate to use a brush.
Removing old wallpaper
The initial preparation of walls before gluing begins with the removal of old wallpaper. After all, further work cannot be completed without this stage. There is an opinion that it is enough to stick new wallpaper on old ones, because that’s how they used to do it. However, in today's realities such options are undesirable. Here are some reasons:
- The adhesion (adhesion) of old wallpaper has already weakened over the years. They don’t stick well, and after gluing, the canvas will soften and simply fall off under the weight of the new layer. Previously, single-layer lightweight wallpaper was used, which was firmly glued with homemade glue.
- New wallpaper will take much longer to dry, as the old wallpaper will also become wet from the glue, slowing down the drying process.
- Since the surface is not always smooth or the old wallpaper had a pattern, after it dries, unevenness will form on the new canvases and the appearance will deteriorate.
- Mold and mildew can develop under old wallpaper but are not visible. After gluing new ones, the problem will not be eliminated, but vice versa.
How can you remove old trellises so that the preparation is not in vain? There are several simple ways:
- Manual. This option is suitable for paintings that are already difficult to stick to the wall. Therefore, all that remains is to pry them from above with a spatula and begin to pull them down with your hands, tearing them away from the wall.
- Wet. If the products hold well and do not come off, they can be softened. To do this, notches are made on the surface with a special mole or claws in order to damage the upper protective layer and gain access to the base. After this, use a cloth or spray bottle to soak the surface with warm water. It should not flow down the wall; moderate wetting is important. All you have to do is leave the material to soak in and remove it manually. In this case, use a knife or spatula.
- Chemical method. In the store you can purchase special substances that make wallpaper removal simple. In this case, the wall will not be damaged in any way, and the mixture will not affect the human body. The packaging contains instructions on how to use the product. Usually it is enough to apply it to the trellises, wait and remove the weakened canvases. However, the cost of the substances is not small.
- Steaming. The steam heats up the adhesive layer, softens the wallpaper and makes it easy to tear off. For this method of preparation you need to have a steam generator. If you don’t have one, then a regular or steam iron will do. It is enough to walk a steam generator or a steam iron along the wall. If the iron is not steam, then a simple cloth is moistened in water, applied to the wall and ironed. Afterwards the canvases are easily removed from the walls.
Important! It is better to work with small areas rather than the entire wall at once.
It is rare, but it happens that such preparation methods for removing trellises did not help. In this case, you will have to remove the coating with a grinder or a special cleaning attachment on a drill. But the preparation doesn't end there.
Removing paint material
Painted surfaces are common. And although removing the paint is quite problematic, it takes time and effort, it is important to remove it so that it does not affect the appearance of the trellises and their service life. There are three effective ways to remove paint material so that the preparation is beneficial:
- Mechanical, also known as manual or using power tools.
- Chemical.
- Thermal, through exposure to high temperature.
The cheapest, but most labor-intensive option is mechanical (manual). To work, you will need a chisel and a hammer, or a hand ax. Notches are made on the surface, after which the paint layer is treated with warm water. All that remains is to knock off the paint at a convenient angle. As for the mechanical method using power tools, a grinder or drill is used. Although this is fast, there will be a lot of dust and dirt in the room.
Advice! All preparatory work is carried out wearing a protective respirator or mask.
The chemical method is the easiest to implement. The only negative is the high cost. To complete the preparatory process, you need to put on protective elements and work according to the instructions. The entire wall is treated with the product, and a sufficient amount of time is waited. As a result, the paint and varnish material will soften and can be easily removed with a metal brush. The post-wall is washed several times.
Everyone knows that when exposed to high temperatures, paint begins to move away from the surface and shrink. This fact helps to remove the old coating. To do this, you need to take a hair dryer or a gas lamp. However, there are a number of disadvantages, for example, when heated, harmful substances are released, and some types of paint are resistant to such temperatures.
It is noteworthy that these steps do not concern the preparation of walls for wallpapering in a new building. But the further stages will apply to both new houses and old ones.
Leveling the plane
After the primer has dried, proceed to the leveling stage (plastering). This process is not necessary if, despite its “old age,” the plaster layer lies flat and does not crumble.
When leveling is unavoidable, the walls must be plastered before gluing. This is done with a high-quality gypsum composition. It is used to fill recesses, pits and other surface imperfections. To begin with, apply a centimeter layer with a spatula and level it. You will have to wait until it dries, and then, using sandpaper, sand the surface.
Next comes puttying. The solution is prepared and applied with a spatula. The putty must be given time to dry. It is then carefully sanded to ensure a smooth surface.
Need to know! If you plan to prepare the wall for liquid wallpaper, then puttying can be skipped. They will be able to withstand uneven surfaces, but will definitely brighten up dark spots. Before applying liquid wallpaper, it is better to cover the wall with a light water-based emulsion.
The entire preparatory process completes the stage - re-priming. This is a mandatory intermediate procedure between gluing and puttying.
You should know! One of the important preparatory stages is disinfecting the wall and treating it with an antiseptic. It can be carried out together with priming, which will protect the surface from mold, fungi and other unpleasant formations.
Need for preparation
Several decades ago, it was believed that preparing walls for wallpapering should only be done as a last resort. Covering walls with newspapers was widespread, thereby trying to increase the adhesion of materials to each other. The lack of preparation at that time can be explained quite simply: there were no special products for such work on the construction market or they were very expensive. Today, the situation has changed radically; now there are many products for different stages of wall treatment before wallpapering.
For what purposes is wall preparation necessary?
- Improving the quality of adhesion of canvases to the surface. Walls, regardless of material, have many pores. If they remain open, then numerous voids are formed under the applied coating, amounting to up to 50% of the total area. This is clearly noticeable when dismantling old paper wallpaper - they literally come off in strips. This means that at any moment they could simply fall off. Also, the lack of adhesion leads to the appearance of seam divergences between the strips.
The primer fills wall voids, which increases the adhesion area and improves the quality of wallpaper adhesion - Obtaining smooth surfaces without depressions or bulges. Wallpapering is subjected to various coatings, which do not always have the necessary evenness. But this finishing material is not a means of correcting wall defects. If you leave everything as is, then any flaws will immediately be evident and the visual effect will be ruined.
On a note! Some manufacturers claim that liquid wallpaper can hide many surface problems. In reality, they can only correct minor elevation differences. Vinyl varieties have a similar property.
- Elimination of the occurrence of fungus and mold. This is a perennial problem for plastered walls and can occur on any substrate. The reasons for the appearance of microorganisms are cracks and crevices, as well as increased room humidity.
It is imperative to properly prepare the walls for wallpapering, otherwise the resulting decorative coating will quickly lose its original appearance.
A simple and inexpensive way to prepare walls
To prepare walls, a variety of materials are used - putties, primers, concrete contact, etc. The simplest and most affordable option, which has been used for many years, is covering the walls with newspapers under wallpaper. This option is suitable for those who are limited in budget and time, but want to try to make repairs as high quality and durable as possible.
Before gluing wallpaper on concrete walls, you need to find old unnecessary newspapers and stock up on glue. Everything is extremely simple - ordinary glue is applied to newspapers, then they are glued to the wall.
Main advantages of the method:
- Minimum cost - financial costs are very small.
- The speed and ease of performing all the work - even children can cover walls with newspapers: there is no need to have any special knowledge or skills.
- The ability to qualitatively level the microrelief and grain structure of the wall - and well prepare concrete walls for gluing different types of canvases.
- A guarantee of good adhesion of wallpaper panels to the wall - newspapers adhere well to the surface of concrete, creating an ideal coating due to their thinness and lightness.
Features of preparation of various types of walls
Drywall
- putty with a thin layer, paying special attention to the joints. Puttying is necessary so that in the future there will be no difficulties with replacing wallpaper. It will be extremely difficult to remove wallpaper from an unprepared cardboard surface without damaging it.
Concrete and brick
— the problem of processing such surfaces is the unevenness and dark color of the base. Plastering and applying several layers of putty will help. After this, sand the surface and treat with a primer solution.
OSB and chipboard boards
- preparing this type of base is similar to the method described above. The main difference is that a special type of putty is used to level such walls.
When preparing walls in new buildings, the primer is applied in several layers, and the plaster is applied along with the mesh to prevent the appearance of cracks in the future.
Now you know how to make sure that your new wallpaper stays on well and is pleasing to the eye. Read more about their types, design and selection features in our article - “Types of wallpaper: what are they, how to choose?”
You can see your new interior using 3D visualization on our website.
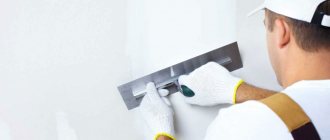
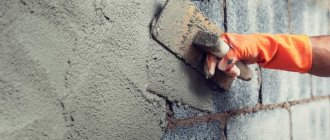
Puttying the surface
After the plaster has dried, prime the walls and start puttingty. This procedure is carried out in one or several stages, depending on what wallpaper is chosen for covering the walls. Thick vinyl wallpaper with a pronounced texture does not require a perfectly smooth surface. To cover walls with thin and smooth wallpaper, you will have to apply both base and finishing putty. The finely dispersed structure of the putty mixture evens out the grain size of the plaster layer.
To work you will need a long and standard spatula.
Scoop the mixture with a short spatula, spread it evenly over the long one, and apply the putty forcefully along the wall using smoothing movements. After the solution has completely dried, sand the surface with 240 or 320 grit sandpaper. During sanding, dust is generated, which must be removed with a vacuum cleaner, and if it is very dusty, wipe the wall with a damp cloth. Be sure to prime the walls after sanding. Wallpaper can be glued to a dry surface.