You can make a beautiful apron in the kitchen with your own hands. Have you decided to put new tiles in the kitchen, but you have no idea where to start this process and how to do it? Below you will receive all the necessary information that will help you lay tiles in the kitchen with your own hands, following all the technologies.
Main types of tiles
Today, tiles on the construction market are presented in a huge variety of styles:
- classical;
- country;
- minimalism and many others.
It is important to choose not only an aesthetic material, but also to choose one that has excellent technical characteristics.
The classic look of the tiles fits harmoniously with any interior design
Country-style tiles are chosen not only for kitchens of country houses
The height of the kitchen apron must meet certain standards
Ceramic tiles are distinguished by the fact that they have a porous structure. Its top is covered with glaze. It is not suitable for the floor, but it can be glued to the walls.
Ceramic tiles are also glazed. The main disadvantage is low resistance to mechanical damage.
The most durable are porcelain stoneware tiles. Porcelain tiles are most suitable for kitchen flooring, as this material is highly wear-resistant. The main disadvantage is that there are very few color shades.
Porcelain tiles are the best quality, practical and durable option for a kitchen backsplash
Forms and types
For covering horizontal surfaces, the choice of tiles is huge. The most important thing is that the tiles match the design and bring you aesthetic pleasure. Depending on the production process, ceramics are divided into 2 classes
- Class A - first-class, without flaws, with clear, even edges. No marriages allowed, therefore more expensive. Mainly produced in Italy and Spain.
- Class B - minor flaws are possible that are not visible to observers and do not affect the appearance of the repair. Cheaper tiles.
Moisture absorption is one of the important indicators when choosing ceramics; it is considered that the lower the indicator, the more tiles can be used in colder rooms: 3%; 3-6%; 6-10%; more than 10%.
The next indicator when choosing a tile is resistance to chemical reagents (cleaning agents) is indicated by the letters AA, A, B, C, D. Where tiles with the letter indicator AA are not susceptible to the effects of chemicals and further down the line.
According to external characteristics, ceramics are divided into
- glossy-smooth, cold, shiny, slippery
- matte-rough, warm, non-slippery
- embossed - has a convex pattern on the surface. A little more difficult to care for
Based on production technology, ceramics are divided into
- Ceramic, the surface is usually filled with a layer of glaze, which gives smoothness and shine
- porcelain ceramics, more delicate and fragile
- Porcelain stoneware, durable, is often used for flooring and imitates stone and granite.
- Clinker tiles are used for cladding buildings, reminiscent of brickwork.
Tiles come in various configurations and sizes, square, rectangular or figured. The size and type of tiles are chosen depending on the size of the surface to be covered, design and economic feasibility.
The tiles are mainly produced in the following sizes:
- from 1*1 to 5*5 cm - mosaic tiles, gluing a mosaic pattern in the kitchen is a delicate and precise job for real professionals.
- 10*10 cm is the optimal size, very often does not require trimming. The best thing is for beginner tilers.
- 15*15 cm average size,
- 20*30 cm 25*30 cm rectangular tiles, used mainly for covering floors and large areas.
Surface preparation for installation, tools and materials
In order to lay tiles in the kitchen with your own hands according to all the rules, you will need:
- tile;
- plaster;
- nails;
- rubber spatula;
- construction level;
- metal spatulas;
- deep fill primer;
- plastic crosses and corners;
- tile powder;
- special machine for cutting tiles;
- roulette;
- aluminum rules;
- Bulgarian;
- drywall profile;
- metal ruler;
- special glue.
When choosing crosses for seams, you need to focus on the structure of the tiles
Related article: Transformer overload protection
Let's start choosing a variety of materials. There are many types of primer, but each of them is practically the same from each other. It must be remembered that you cannot pour the primer back into the canister if you have poured it out of it. In addition to its unsuitability, it will emit a disgusting smell.
Glue on the market is also available in huge varieties. Some recommend using only foreign compounds, others – domestic ones. Experts, for the most part, are of the opinion that domestic ones are no worse than foreign ones. The main advantage is the lower price, since there is no overpayment of extra money for the brand.
Material calculation
The required number of tiles is determined by the area of the wall or its fragment. The number of elements will be calculated by the sales consultant himself after the buyer has decided on the dimensions of the tile.
To avoid making unnecessary purchases, adhere to the following rules when choosing:
- Think about the tile laying scheme in advance by drawing up a drawing on paper. Remember that the diagonal version requires skill in cutting elements; it will be difficult to do without losses. Take this factor into account when choosing the amount of material. If you plan to use decor, then such elements are counted individually.
- If you are on a limited budget, do not plan to lay tiles in places that will be hidden by furniture and appliances. On such wall fragments, cheaper types of finishing are acceptable, for example, wallpaper or paint.
- Buy tiles with a reserve. Add 10% to the total quantity of tiles for possible defects or damage to elements.
If there is any material left after the repair, it may be useful during the operation of the apron to replace damaged fragments.
Leveling the kitchen walls with your own hands
This work is carried out in several stages. In addition, there are several options for carrying it out:
- if the kitchen walls are cracked or uneven, then they are covered with plasterboard and tiled with ceramic tiles;
- when the walls are covered with paint, you will need to remove it and plaster the walls;
- If the walls are smooth, then initially you need to plaster them a little with your own hands.
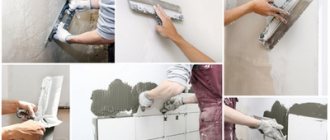
The work begins with filling all the unevenness and cracks with putty. All protruding parts are also removed. Deep cracks and potholes must be covered with cement mortar. After this, apply the plaster and wait until it is completely dry.
To level walls that have large unevenness or displacement, the rule is used
A wide spatula is necessary for applying finishing layers of putty to the walls.
Now you need to apply a deep penetration primer with your own hands. You will also need to wait for it to dry completely. After this, you can begin laying the tiles.
Tile on the floor
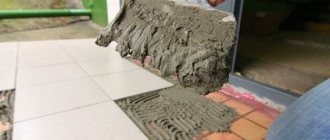
Due to their convenient use, ceramics are often placed on the kitchen floor. The technique is as follows: level the floors with a special screed. We divide the floor into 4 parts and mark the places where the tiles will be laid. We start laying out the tiles from the center of the kitchen.
We laid out the first four elements on the glue, installed plastic crosses, and let out the air. Let's move on to the next fragment. Dries out. We rub the seams. As you can see, using our tips, even a beginner can handle laying tiles.
Having good tools and proven materials will save you time and money. As a result, you will receive an updated kitchen, during the reconstruction of which you were both an artist and a creative performer.
Basic tile laying work
Initially, ceramic tiles are purchased on the construction market. To find out how much it will be needed, you need to measure the area of the kitchen walls and add about 20%, which will be spent on trimming the ceramics. These leftover materials can be placed behind the cabinets, where they will simply be invisible.
Related article: How to sew loops on curtains with a needle or crochet?
There are three ways to lay out tiles correctly with your own hands:
- lay the tiles diagonally. You will have to cut a lot of tiles, so you will need the same amount of material.
- Install tiles along the seams. This method is the most common and simplest.
- Dressing. The upper rows are shifted relative to the lower ones by half the size of the tile.
Once the method has been found, you can begin laying the tiles. It would be best to place one row of tiles along the kitchen walls so as not to make a mistake with the dimensions. First you need to lay the ceramics next to the windows and doors.
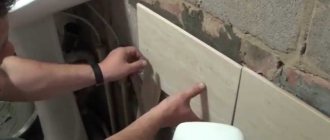
In order for the apron to be level, a metal profile is used, attached to the wall in accordance with the horizontal level
Laying tiles on kitchen walls is not such a labor-intensive process if everything was prepared correctly and in advance
Further work will be performed as follows:
- A horizontal line is drawn at the height of the kitchen table;
- The metal profile from the plasterboard is fixed with nails to the wall at the level at which the line was drawn. You will need to leave about 4 centimeters in reserve and check with a level whether the installation is done correctly.
- The vertical line is drawn in the same way. The tile must be applied to the upper edge of the wall, a plumb line must be attached to it and the places where full-fledged plates of the material will be installed must be marked. Also measure where the tiles will need to be cut.
- Using a tool such as a tile cutter, cutting tiles is much easier. If it is not available, you can use a glass cutter. After this, you can break the ceramic on the corner of the stool or table. Since there is a possibility of cutting yourself on sharp corners, this must be done extremely carefully.
- It is important to choose the right spatula. Its width directly depends on the dimensions of the tile. To prevent the glue from remaining on the spatula, this tool must be constantly immersed in a bucket of water.
- On one of the corners of the tile you can find an image of a special arrow. Therefore, the tiles must be laid out in such a way that this arrow is located on one side of each tile. After this, a mark is made from the end with a pencil. This method marks the top and bottom of the tile.
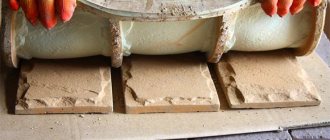
- Now you need to knead the adhesive mass. This can be done by following the instructions on the package. The mixture should be plastic and soft. To carry out this operation, you may need an electric mixer or a drill with a screw attachment. After this, you can apply the glue to the wall yourself using a spatula. You can use aluminum rules to make sure the layer is even.
- Now take a flat spatula and apply glue to the back of the tile. The spatula is held in your hands only perpendicularly.
- The tile is applied to the wall and pressed evenly. Using a building level, you will need to check whether everything is done smoothly.
- The second one is laid next to the first ceramic tile. The aluminum rule checks the laying plane. In the same way, you can lay the rest of the tiles to the end of the wall.
- The glue sets within 10 minutes. This time should be enough for the tile to be adjusted if necessary.
- Using a plastic square, slopes and corners of the walls are formed.
- After all the tiles have been laid, the adhesive should dry completely.
Related article: Gray wallpaper: which curtains are best to choose
Grouting joints
After the ceramic coating has been laid on the walls and base, it is necessary to fill the seams. This procedure begins after the glue under the tile has completely dried. Special grouts are used to fill gaps.
The grout mixture is diluted with water according to the instructions and applied to the space between the tiles with a spatula. Let the seams dry a little and then remove the excess with a wet rag. To make the tile even more resistant to moisture and dirt after the grout has dried, it is recommended to coat it with a special impregnation.
You can add a color to the grout mixture to match the tile if you want to make the seams less noticeable.
Examples of apron design in the kitchen (photo)
Features of a tile apron
First of all, familiarize yourself with the features of this material. Many would not use tiles for a backsplash if they knew all its pros and cons in advance.
A dirty tiled kitchen backsplash cannot be easily washed off
- The tile itself is quite easy to clean from grease using special products. But since after installation, seams of 1.5-2 mm are formed, dirt will constantly get into them, which will be very difficult to get out of there. At the same time, wall tiles cannot be laid without seams, so you are guaranteed to have problems when washing the backsplash. Based on this, the main recommendation is to use only smooth glossy tiles without relief for the apron, and try to make the seams small (the minimum thickness of the crosses that are on sale is 1 mm).
- The next disadvantage is that a tile apron is the most labor-intensive of all other options. You need to have experience in installation and think in advance about how to close the pipes and where to make sockets.
- The main advantage of this option is low price and durability. But if you take into account the cost of work and additional materials for preparation, this is not the most profitable option.