Laying tiles
Ceramic tiles can easily be called one of the best finishing materials for walls. After all, this material has excellent properties, such as environmental friendliness, long service life, low maintenance requirements, etc. But in order to properly decorate the walls with ceramic tiles, you must first prepare them thoroughly. Then you need to adhere to a certain work algorithm. So where to start and how to lay tiles on the wall?
Laying tiles on walls: preparatory stage
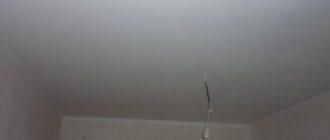
If the tiles will not be laid in a new house, then the first step is to tear off the old tiles, if any. After dismantling the old covering, you should check the curvature of the walls. This is a very important point in preparing the surface for finishing, because if the walls are crooked, then problems (both during and after laying the tiles) cannot be avoided. To accurately measure the curvature of the walls, you should use a level.
In most cases, the walls are curved, so they need to be leveled. But before you start leveling the walls, you will have to set up beacons, to the level of which the plaster is leveled. Without beacons it is difficult to level the surface, so their use is extremely important.
After leveling the walls, they need to be primed. Thanks to the primer, the base is strengthened and better adhesion of the walls and glue is ensured. In principle, the primer is enough to begin laying tiles on the walls, even if the walls are plasterboard.
By the way, plasterboard can be used to level old walls, using it instead of plaster (it’s not for nothing that plasterboard is often called dry plaster). Read in detail about what is better to choose for preparing walls – plaster or plasterboard in our article “Rough finishing of walls: plasterboard or plaster”.
Only after these steps can you begin to decorate the wall. In this case, the correct choice of adhesive compositions is very important.
Features of choosing, applying and working with tile adhesive
Photo from the site: gidpoplitke.ru
Today, the construction market offers such a wide variety of products that it is not at all difficult for even a professional tiler to get confused and confused. Before you go to the store, you should figure out what kind of adhesive can be used to glue ceramic tiles, as well as what advantages and disadvantages this or that composition has. Only after this can you make the final choice, counting on a long-lasting result.
Parameters for selecting adhesive compositions
When starting to figure out how to glue tiles, many factors that need to be taken into account will play a huge role. But in order not to get confused in the variety of modern assortment, it will be enough to understand just three main indicators that will help you make the right decision and never regret it. Moreover, the durability of the repair will almost entirely depend on the correctness of your decision, so you should pay enough attention and not take the first thing that comes to hand.
Photo from website: MoyDomik.net
- The first thing to consider when figuring out how to glue ceramic tiles is the conditions for their subsequent use. In drier rooms, such as a pantry, kitchen or hallway, you can limit yourself to the usual cement composition with sand, as well as a share of plasticizers. You can make such a solution yourself by mixing cement and sand in a ratio of one to five, diluting it with lime milk. For more humid rooms, such as a bathroom or toilet, as well as for outdoor work, it is worth gluing ceramic tiles with acrylic glue, which is sold ready-made in plastic or tin buckets or cans, and also has water-repellent properties.
- You can also use a universal version of glue for interior wet rooms, which is also on sale, but you will have to purchase tile grout with special properties or treat all seams with sealant and antiseptics.
- It is also important to take into account the base material, that is, the wall or floor covering on which the tiles need to be laid. For example, sand-cement compositions are excellent for plaster, concrete bases, and brickwork. However, for fiberboard, boards, parquet, wallpaper and drywall, such a composition containing a lot of water is hardly suitable. Then you will have to look for a replacement, for example, you can take two-component epoxy glue, acrylic mixtures or ordinary liquid nails, which have become so popular among all home craftsmen recently due to their versatility.
- Formally, you should also take into account the size of the tiles in order to choose the right adhesive, which will be used for installation, depending on the ability to withstand loads. However, there are some reservations, because in private houses, and even more so in apartments, tiles larger than 40-60 centimeters in size are extremely rarely used, therefore even a universal composition will hold such cladding.
Photo from the site: litokol.ru
It is worth understanding that the colors of tile adhesive differ from each other. For example, even ordinary cement mortar can be gray or white. The latter option is more often used when laying mosaics, which have become extremely fashionable lately.
How to apply glue to tiles correctly: correct calculation of the amount of glue
Depending on the properties of the adhesive compositions, the humidity of the room, the size and quality of the tiles, as well as the base of the walls, the amount of glue that is necessary to perform a particular job can vary significantly. For example, a wall made of gypsum blocks will definitely “take” much more glue than a concrete monolith, which has practically no pores. Therefore, there are no general recommendations for calculating the amount of glue; this will have to be calculated for each case separately.
Photo from the site: Megabud.com.ua
The easiest way is to consult with a specialist in the store, who should know his business very well. If this option is not available, simply read the instructions on any package of tile bonding compound. Approximate consumption, depending on the circumstances, must be indicated there. It is based on what is written there that the final glue calculation should be made. Multiply the average consumption by the area of the tiles that need to be laid and get the desired figure. It doesn’t hurt to purchase a little more raw material, since sometimes you have to compensate for some small unevenness in walls, ceilings or floors.
Distribution with a suitable tool: how to apply adhesive to tiles
Almost all adhesives sold in hardware stores for laying tiles at home are applied almost identically, so figuring out how to apply tile adhesive won’t be at all difficult. To do this, you will need special tools, which are easy to purchase at any construction store, and the cost of such devices is low.
Photo from the site: torgplit.com.ua
- A special notched spatula, which the pros call a comb. For household needs for laying tiles, one with a tooth height of no more than one centimeter will do. The teeth can be square, U, or V-shaped, everything will depend on your preferences, but it’s easiest to work with the first option.
- A regular spatula for stirring and scooping (selecting) glue from a container.
The whole process is extremely simple and does not require any special professional skills. You need to scoop up the glue from the bucket and place it on the surface of the wall, as well as the back side of the tile. Next, you need to carefully, but persistently and firmly, “comb” the glue with a comb to remove excess composition, which needs to be thrown back into a common container and also distribute it evenly over the surface.
Worth remembering
When combing tile adhesive with a spatula or a special notched grater, you need to know that you need to hold it in a special way. The angle of inclination of the plane relative to the surface can vary from 45 to 75 degrees. Moreover, the greater the angle of inclination of the spatula, the higher the “ridges” of glue you will get in the end. It is extremely important to maintain approximately the same angle throughout the entire installation, this will save you from constant adjustments using a level.
You need to ensure that the glue evenly and efficiently fills all the unevenness in the tiles, potholes, applied ornaments and notches, then when laying on the wall, there will be no voids under the tiles, which can lead to premature damage to the coating. You should not immediately take up a large area to apply tile adhesive, especially if you do not have experience in such work. While you are fiddling with one side, the glue on the opposite side will already dry out, its adhesion will be broken, and then you will have to scrape it off and apply a new one, and this is an extra waste of material, which will not reduce the cost of your repair.
Photo from website: blogspot.com
Be sure to distribute the glue more carefully if you are working with large tiles, from thirty centimeters, since unevenness and voids underneath will definitely lead to cracking over time. Moreover, for large tiles, “combing” should be done only in one direction, this will make it much easier to squeeze out excess air by pressing the tile against the wall or floor. Small ceramic products allow glue to be applied in different directions; there will definitely be no difference. For more information on how to lay tiles in a bathroom, there is an excellent article on our website.
The final stage: cleaning up traces
Once you have finally figured out how to properly glue tiles, all that remains is to correctly mark the walls or floor coverings and lay the tiles on their surface, according to the instructions. However, often after all the work is completed, the tiles do not look ideal at all, as they become dirty with mortar and adhesive, fingerprints from gloved hands, and simply pieces of protruding and half-hardened glue.
Photo from the site: kvarremontnik.ru
It is not recommended to allow such glue to dry completely, since it will be quite difficult to clean it later, but we also need to sand the seams to make the repair harmonious and beautiful. It would be best to use the tips on how to remove marks and wash tiles from glue, also available on the website.
Laying tiles on walls: glue
Adhesive compositions must be fully consistent with the type of room where the repair work is being carried out and the materials. For example, porcelain stoneware is characterized by poor moisture absorption, so the adhesive must have higher adhesion.
All modern adhesive mixtures in their original form are similar to powder. This powder is diluted with water, resulting in a solution with high fixing ability. A very important point when choosing an adhesive is its specification, that is, it should be intended for finishing walls, not floors. Also, we must not forget about the instructions for using the mixture. It should indicate the proportions for mixing and, of course, the time during which the mixture will harden.
General tips and tricks: how to glue tiles with glue
Photo from the site: gidpoplitke.ru
Professional craftsmen believe that you should always act consistently in order to complete all the work quickly and easily. To do this, you need to strictly follow the instructions and technology, otherwise the result may not be what you expected. Tile, despite its long history, is a rather expensive cladding and a fancy material, so no one would want to spoil it. That is why it makes sense to approach the issue thoroughly, and begin the work itself only after you are fully “fully armed.”
Important
When figuring out how to glue tiles, you should remember that you can start work only when you already have everything you need, not earlier. That is, you first need to select and buy ceramic tiles, a special adhesive composition for laying them, the necessary tools and equipment, and only then start gluing them on the floor and walls.
Preparing for work is important
All pieces of furniture, electrical appliances, and other things that are located in the room and cannot be removed from it will have to be covered with thick polyethylene or tarpaulin so that during work you not only do not dirty it, but also do not damage it, for example, with falling tiles.
Photo from the site: gidpoplitke.ru
- Handles, decorative elements and small objects can be wrapped in ordinary foil, which housewives use for baking in the oven; it is convenient, cheap and simple.
- You should always have a bucket of soapy water and rags on hand, as you may need to quickly wash off the tile adhesive during the process.
- Before you start gluing tiles, you need to completely clean all surfaces from dirt, dust and debris, and also prepare them appropriately for installation. It doesn't hurt to use a vacuum cleaner to collect dust, as well as a damp sponge.
Be sure to use special deep-penetration primers on the surfaces that will be covered with ceramics. They will hold the surfaces together and also ensure maximum adhesion of the tiles to the wall.
Basic rules for applying tile adhesive: when and how to work
When figuring out how to glue tiles, you need to remember that all finishing work should be carried out in the summer, or when the ambient temperature inside the room constantly fluctuates between 18-24 degrees Celsius.
Photo from the site: O-vannoy.ru
- Naturally, you can glue the tiles at ten degrees of heat, but in this case you will have to wait much longer for the glue to set.
- At higher temperatures, tile adhesive can “sinter,” as the pros say, that is, it hardens before it sets and it becomes simply impossible to work with them.
- When it is difficult to do anything with temperature conditions, it makes sense to find special heat-resistant compounds and use them.
- Excessive humidity in the room where the tiles will be laid will increase the time it takes for the tile adhesive to harden, but dryness, on the contrary, will shorten the drying time.
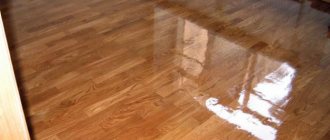
All work must be organized in such a way that in the end, you lay the last tiles at the front door, and not vice versa, especially for floor coverings that are undesirable to walk on immediately after installation. If you cannot avoid this option, prepare several pieces of boards or plywood that can be placed on top of the cladding, and then carefully walk to the exit.
Laying tiles on walls: methods
Before you start laying tiles, you need to calculate the number of tiles that will fit on the wall.
If you don't have to cut the tiles, this would be an ideal option. In this case, you need to start like this: in any of the corners of the room you need to lay out a vertical row, and after that, on the same wall, a lower horizontal row, and only then can you fill the space that remains.
More often than not, the width of the wall does not correspond to the multiple width of the tile. What to do in this case? There are several options for solving the problem here. The first is to start laying from the “red” corner, and end with the one in which the cut tiles will be inconspicuous.
The second option is to start installation from the center of the wall. If all the calculations are done correctly, then the cut tiles should be on both sides, and even the same width. In this case, if the tiles are laid out symmetrically, the result should be a beautiful look.
The second reason
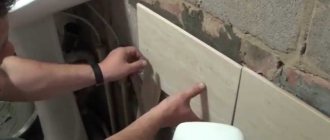
The second reason is adhesion. In this case, the adhesion of tile adhesive to the surface. Touch the plaster wall. There may be some roughness on it, but overall it is quite smooth after alignment with the beacons. Let's look at what experienced craftsmen do when applying glue to a wall. They don’t just throw it on, but try to press it in with a spatula or trowel. And it is precisely this indentation that increases adhesion and reduces the risk that the tile will eventually fall off along with the glue.
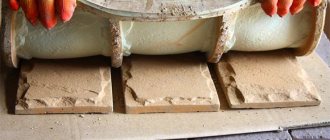
Well, what will happen if there is glue spread on the tiles on a clean wall? The master will simply press such a tile; he will not be able to thoroughly apply glue in this place. As you understand, adhesion in this area will be lower than in the neighboring one. And besides, one more hint. Look closely at the structure of the back of the tile. This is a lattice with a large and fine mesh.
If glue just accidentally gets on such a grill, even without pressing it in, then it will not be possible to remove it completely from here. The manufacturer made sure that the adhesion on the tiles was initially high. For this reason, in most tiling jobs there is no point in applying adhesive to the tiles; it is better to do it on the wall or floor, depending on the location of the work. And be sure to use a notched trowel to create glue grooves of the required thickness. And the tiles are pressed into them, providing good adhesion.
How to lay tiles on a wall?
When laying tiles from the floor, you should start from the second bottom row. A guide/support rail (metal or wood) is placed under it from corner to corner. The tiles are laid from the batten. The rail must be secured strictly horizontally, perfectly level. The first row of tiles is laid along the lath. When the entire surface of the wall is tiled and the glue has dried, the slats are removed and the remaining tiles are placed in their place.
Why is a support rail necessary? Because the floors may not be perfectly level. If you start from the floor, it will be impossible to achieve perfectly even rows. Often a vertical batten is also nailed in if the corners are also not very even.
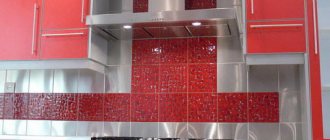
If the apron is tiled in the kitchen , a lath is also installed at the level where the lower border of the apron will be located. The lath is removed only after the glue on which the tiles are laid has dried.
Periodically check with a level the horizontal and vertical evenness of the installation.
Recommendations for laying tiles
It must be remembered that the wall in which the door is located is tiled last. First, the part of the wall that is located above the door is tiled, and then the rest of the area.
In order for the seams to be even, spacer crosses should be used, which in this case act as wedges that do not allow the already glued tiles to move.
When laying tiles, it should be taken into account that the adhesive solution hardens within 30 minutes. As a rule, this time should be indicated on the glue packaging. The hardening time of the glue depends on the type and quality of the base, as well as on the air temperature in the room. You should prepare the amount of glue that will be used in the allotted time, no more and no less.
The glue is placed either on the tile or on the wall. If on a tile, then it must be applied evenly over the entire area of the back side of the tile. If, when gluing and pressing the tile to the wall, a little glue does not appear beyond its borders, then there is too little of it. If too much shows through, then you need to put less glue.
If you choose the “glue on the wall” option , then the mixture is placed on the area where the tiles will be. The glue should be evenly distributed over the area, “combed” with the edge of a spatula and the moistened tile should be glued to the wall.
Which option is better when laying tiles - applying glue to the tiles or to the wall? It is impossible to say for sure: each tiler chooses his own method. It is recommended to try both ways and determine which option is more convenient for you.
Before applying adhesive to a tile or gluing it to a wall treated with adhesive, it must first be moistened, for example, using a damp brush. This washes away dust from the tiles, which can impair adhesion, and the moisture makes the tiles more “adhesive” to the adhesive. However, it is very important to read the instructions for the glue! Perhaps the glue manufacturer's technologists determined that wetting will only worsen adhesion. If there is no special instruction about this on the packaging, lightly moistening the tiles will not harm.
But under no circumstances should you dilute ready-made glue with water! Mix the tile adhesive exactly in the proportions indicated on the package, and under no circumstances dilute it with water or thicken it by adding powder to the finished adhesive! Do not add cement or anything else to the glue!
Ceramic tiles must be glued so that there are no voids between the tiles and the wall! Having placed the tile against the wall, you need to knock on it. You can use a rubber hammer.
Traces of glue on the front side of the tile must be removed immediately using a damp cloth or sponge. You can completely wash the tiled wall only 3-4 days after finishing the work.
The final touch when tiling the walls is to grout the joints. For this, there are special mixtures that also have a powder base.
The grout can be contrasting with the color of the tile or completely merge with it - there is no universal rule here. The result can only be truly appreciated when the seams are worn. You can change the color of the seams by using a different color of grout on top.
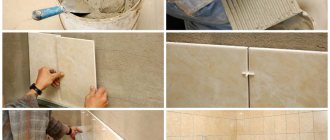
The whole process of laying tiles in pictures:
Author of the article: Sergey Pepchenko Photo sources: Lori photobank (lori.ru), depositphotos photobank, open sources
How to apply adhesive to tiles?
Scheme for applying glue to tiles: 1 – glue distribution angle; 2 – glue combing angle.
All adhesive solutions, no matter whether they are ready-to-use mastics or cement solutions that are prepared on site, can be distributed using approximately the same method. The first step is to apply a certain amount of adhesive solution, using the smooth edge of a comb with V-, U-shaped teeth. Next, the glue is spread with the side of a comb with teeth, which, if set at the right angle, can form ridges of equal height on the surface. For tiles of small thickness, you will need to use combs that have V-shaped teeth. For medium-sized material (15-20 cm), combs with square-shaped teeth are most often used. For large material (30 cm) and tiles that have an irregular shape, combs with teeth that have a U-shape should be used.
You will need to choose the right size of teeth in accordance with the size of the tile. The high-height combs you can get from using a large-tooth comb will cover the back of a large tile well. If small tiles are laid on them, then the excess mixture will seep into the seams between the material. If you use a small-tooth comb, you may end up with ridges that are suitable for small tiles, but they will not be high enough to completely cover the back of a large tile or material that has an overhang.
Select the size of the comb teeth based on the size of the tile.
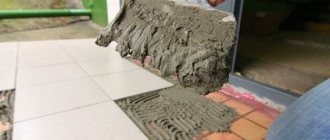
You will need to spread the adhesive solution with the even edge of the trowel, setting it at an angle of 30° to the base, and be sure to press on the edge of the tool. Such actions will help not only to apply the mixture to the surface, but also to fill with it all the pores and small holes that are present on the base. You will need to apply the amount of mixture that is enough to fill the area where the tiles are being laid. The depth should be equal to the height of the trowel teeth. The layer of adhesive solution between the tile and the base must be at least 2.5 mm thick for the adhesive to fully set. If an initially thin layer was applied with the smooth edge of the tool, then there may not be enough material to create identical ridges of the required height.
The size of the base on which all work is planned to be performed may have an area of 1-3 m². Everything will depend on the size of the cladding and the temperature at the masonry site. At high temperatures, the adhesive solution dries quickly. If you want to immediately cover the entire area where you plan to lay tiles with an adhesive solution, it may well be that the glue dries faster than the tiles are laid.
The glue must be applied to a base area of 1 m².
Experts most often apply glue to a base area of 1 m².
To “comb” the glue, you will need to hold the edge of the trowel with teeth at an angle of 40-70° to the base. You should know that the greater the slope, the higher the ridges. During this work you will need to maintain the same angle. If the angle is the same, then the ridges will be the same. The base under the tile will also be level. It makes absolutely no difference whether the “combing” will be done with the same movements or sweeping, it is important to maintain the same angle and make sure that lumps of the adhesive mixture do not appear on the base. The result of careful implementation of this stage of work can be a high-quality, smooth surface for the tiles.