Concrete wall tiles are one of the preferred materials. Due to its properties, tiles are ideal for cladding facades and interior spaces.
It fully complies with sanitary standards, does not require special care and can serve as an excellent home decoration. Laying tiles is not a complicated process, but some features of the work should be taken into account.
Which tile to choose
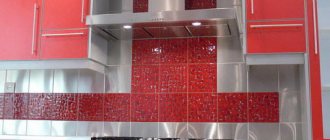
Wall tiles should be combined with floor tiles.
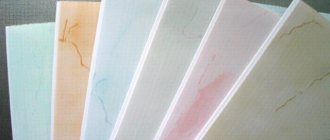
There is a wide range of tiles on store shelves, both budget options and designer versions.
Before choosing a material, you need to pay attention to its properties. What types of ceramic tiles are there? Conventionally, it is divided into:
- wall;
- sexual;
- for indoor work;
- for facade finishing;
- for lining pools.
You need to understand that tiles intended for walls should not be used on the floor or vice versa.
It is also necessary to pay attention to the size of the tile, its surface, color and installation method.
It is advisable to decide on all this when designing the interior, because you need to know how much material to purchase.
Tile coverings are divided into classes based on wear resistance and porosity. A is the highest, it can be used in swimming pools, B and C are lower class, suitable for finishing residential premises.
Floor covering
Preparing the foundation
Although tiles are characterized by increased moisture resistance, the cladding cannot 100% protect the base from water, which will inevitably fall on the bathroom floor. This must be taken into account when preparing it for laying the flooring:
- We dismantle the old finish, knocking down the tiles with a hammer drill and removing the remnants of the screed.
- We apply a waterproofing compound to the base - it can be either mastic or a polymer film.
It is advisable to add at least 10-15 cm of waterproofing to the walls, forming an improvised “trough”. To do this, waterproofing work must be completed before wall cladding begins.
- Fill the screed over the waterproofing. To speed up the work, we choose a self-leveling composition with a hardener: it is easier to fill and dries much faster, and the fairly high price is compensated by the small volume of pouring. The bathroom floor area is quite small, so the expense will be reasonable.
- After the screed has dried, we check its horizontalness, and before starting the cladding itself, we apply two layers of primer with an antiseptic.
Laying tiles
The first question that needs to be clarified before starting work is whether it is possible to glue ceiling or wall tiles to the floor.
The answer is clear: you can, if you want to redo everything in a maximum of six months, wasting time and money again. If re-cladding is not your goal, choose floor tiles that are made taking into account the loads that they will experience.
I will tell you how to glue tiles on the floor with your own hands in this section:
- First, we apply markings to the base. There are many marking methods, but it is best to draw several center lines and connect the corners of the room with diagonals - then it will be much easier to navigate when tiling.
The center of the entire composition, especially when using patterned tiles, is not the geometric center of the room, but the center of the free space. Those. We do not orient the drawing across the entire room, but along that section of the floor that will not be occupied by the bathtub and other plumbing fixtures.
- We start work either from a corner, or (as I do) from a section of the wall opposite the center line. Apply a layer of glue up to 5 mm thick and an area of about 1 m2 to the floor.
- Take a notched grater and form grooves in the glue.
- We lay the tiles on the floor, level them and press them tightly to the glue. Use a level to control the position of the tiles, and use a spatula to remove any protruding adhesive.
Thick and heavy tiles are difficult to press with enough force by hand, so it's best to have a rubber mallet handy for these types of items.
- We install spacers and continue covering the floor, gradually adding mortar to the base sections along the edges. We lay the tiles in rows, controlling their position relative to the marking axes and relative to each other.
- First we lay all the whole tiles, and then I add “halves” and “quarters” along the edges. Lastly, I glue on the parts with cutouts for pipes and other communications, adjusting them to their configuration immediately before installation.
After this, the floor must be left until the glue dries. As a rule, this takes at least 12 hours, so it is better to start grouting the next day.
But I carefully wipe off the drops of adhesive solution from the front surface immediately after installation: if you let them polymerize, then you need to clean them off with force, and it’s not a fact that only the glue will be cleaned off, and not the glue and pieces of glaze.
How to properly prepare the surface
Preparation is an important stage in the installation of tiles.
The installation of tiles can take place on different surfaces and the preparation of each of them takes place in its own way. When considering a concrete surface, you need to take into account that it must be absolutely smooth. For these purposes:
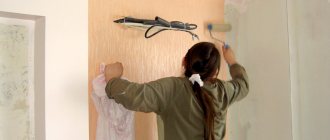
- Use a cement-sand mixture in a 1:3 ratio, preferably with the addition of PVA glue.
- After drying, the wall is primed. This will prevent the appearance of fungus and will promote better bonding of the adhesive to the wall.
- If there are large flaws, they are puttied and then the base is primed. If this is not done, the tile will simply fall off.
- It is very important before laying tiles on the wall to repair all protruding communications on it, so as not to damage the tiles later.
- The prepared surface must be marked horizontally and vertically, because then there will be no access to it.
What to glue it to?
The use of special paste does not require skills or extensive experience.
One of the important aspects of laying ceramic tiles is the choice of adhesive composition. For this purpose, there are 2 types of glue on the building materials market:
- Paste mastic. Has an easier way to use. The principle of operation is that the glue hardens after the water evaporates from its composition.
- Dry mixture based on cement. It is used more often because it has a lower price, reliability and a wide range of uses. They are even used for outdoor work. Depending on the purpose, dry adhesive compositions are classified into the following types: Universal. Has the largest area of use.
- Basic. Used for gluing small ceramic tiles onto a flat base.
- Reinforced. Used to secure dimensional slabs.
- White. Designed for laying ceramic products of the enlightening type.
- Highly specialized. Able to withstand high temperatures or high humidity.
Step-by-step instructions for laying tiles on a wall
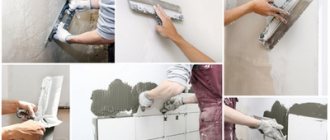
Stages of laying tiles
To hold the drying masonry, a wooden strip is mounted to the lower border of the tile.
The process of decorating walls with tiles is not at all difficult, you just need to properly prepare the surface and purchase all the necessary tools and materials. This work can be done independently.
- It is recommended to start installation from the corner that is visible in the foreground, from bottom to top;
- The tiles should be placed clearly in rows to prevent them from slipping. It is imperative to maintain a horizontal level;
- You can lay tiles on perfectly leveled floors. If this is not the case, then you need to fill in an even profile from below and start from there;
- at the end of the work, the profile is removed and the remainder is reported;
- At the very beginning, the required piece of tile is cut off with a tile cutter or grinder.
For better adhesion of the tiles to the concrete surface, it is recommended to place a metal plaster mesh on the wall. This will also prevent the tiles from sliding on the surface.
Preparing a plasterboard wall.
Drywall makes facing work as easy as possible.
It forms an almost perfectly flat surface. However, preparing a wall for tiles has several features.
Joint seams between sheets of drywall must be puttied. The mixtures used for this can be of three types: gypsum, cement and polymer.
- Gypsum is not suitable for rooms with high humidity.
- Cement is prone to cracking.
- Polymer ones are universal, but have a high price.
Before sealing, the joining seams are covered with reinforcing synthetic tape, otherwise called a construction bandage. For easy attachment, one side has a sticky surface.
sealing drywall seams
After puttying the seams, the entire surface of the drywall is primed.
For concrete, plaster and plasterboard walls, a deep penetration primer is used for absorbent surfaces.
deep penetration soil
In addition to ensuring high adhesion, the primer strengthens the base. Its average consumption is 150-200 ml/m2.
Some nuances
The color of the grout should be in harmony with the color of the tile.
Apply the adhesive to the tiles using a notched spatula, which allows you to adjust the layers. Plastic crosses are used to control seams.
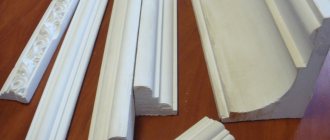
To ensure neat corners, special plastic corners with grooves are used. They contribute to the formation of a right angle when laying tiles.
Finish the job by grouting the tile joints with a special mixture of a color that matches the tile. This is done using a rubber spatula. Residues are removed with a damp sponge and, after drying, completely cleaned.
Repair of tile cladding
If we do everything correctly, the tiles in the bathroom will hold very firmly. However, even experienced craftsmen are not immune from mistakes, so it will be useful for both them and beginners to know how to glue tiles in the bathroom - if they have come off.
We proceed according to this scheme:
- If the tile has cracked and only partially fallen off (this happens with mechanical damage), then we first need to remove the remaining tiles. To do this, use a chisel and hammer to carefully knock out the glued pieces, trying not to touch the entire cladding.
- If the entire tile falls out, then our task is simplified: just clean off the remaining mortar. It is better to moisten a thin layer of material with water and carefully rub it in several steps, and cut off a thick layer with a chisel or narrow spatula.
- In the same way, we remove the remaining glue and grout mixture from the ends of the tiles glued next to each other.
- The cleaned area is dusted and primed. To improve adhesion, before priming, I make diagonal scratches on the base in increments of about a centimeter.
- We moisten the tile that we will glue in place of the damaged one with water.
- We apply glue to the reverse side: it can be either a tile solution (it can be prepared from the remains that we have preserved) or a composition with high adhesion (“liquid nails” and analogues). The main thing is that after polymerization the material retains its elasticity.
- Glue the tiles into place, press them tightly and tap them with a rubber hammer. We check that the tiles are in the same plane as the cladding.
- We wait about 12 hours and re-grout the joints, trying to guess the color.
Of course, we are unlikely to achieve an ideal result, but, as practice shows, after a few days the shades of the tiles and joints become almost identical, so only the person who did the repair can find the place where the repair was done.
Tools
Tools and materials that will be needed for work:
- Tile.
- Cement, sand, special glue, special colored grout.
- Plastic crosses and squares.
- Sieve, trowel or spatula.
- Metal square, building level, plumb line.
- Glass cutter, pencil with a pobedit tip, pliers.
- Typically a tool for cutting tiles.
- Metal construction mesh. For more information about simple tile laying, watch this video:
Knowing all these details, you can independently lay tiles on the concrete base of the walls.
Tiles on concrete?
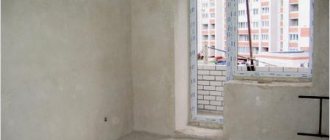
What is the best way to lay tiles on a smooth, unplastered reinforced concrete wall in a bathroom?
The tile will hold, there is no doubt about it! Dust the wall well and prime it with betokontakt. I would do it in two times. And be sure to let it dry thoroughly. At least a day. For tiling, use a good tile adhesive with high adhesion to the base. For example, Glims RealFix, Litoflex K80, Ceresit SM 117. Among other things, after concrete contact, I would putty the walls to scratch with the same glue on which it is planned to lay the tiles. After complete drying, you can begin the cladding itself. There will be no problems! Good luck!
If you get a negative result, you need to level the walls. You underestimate the scale of the work
The wall is almost flat, maximum 1-1.5mm, so there is practically nothing to level. The question is, will the tiles stick to such a surface, and if not, what to do with it!?
..Before installing the tiles, prime the walls with a universal primer, and after a couple of hours treat them with concrete contact. Everything will hold up perfectly? Only you will never lay tiles evenly on your walls in your life. If you are told to level the walls, you need to take this into account
Where should we level next?
Flag in hand, since you know everything
The tile will hold, there is no doubt about it! Dust the wall well and prime it with betokontakt. I would do it in two times. And be sure to let it dry thoroughly. At least a day. For tiling, use a good tile adhesive with high adhesion to the base. For example, Glims RealFix, Litoflex K80, Ceresit SM 117. Among other things, after concrete contact, I would putty the walls to scratch with the same glue on which it is planned to lay the tiles. After complete drying, you can begin the cladding itself. There will be no problems! Good luck!
I support Dmitry’s answer. I’ll add one more option: take 1 liter of deep penetration primer 0.5 liters of Betokontakt 250-300 grams of 400 grade cement, stir and apply with a brush, of course, having previously cleared the surface of dust. It turns out two in one [primer plus putty, scratched]
Very simple. For such purposes, the Betonkontakt primer was developed. Buy a good primer (don’t skimp), then you need to clean the surface from dust, dirt and flaking elements, prime the walls thoroughly and after the primer has dried, you can safely lay the tiles without any doubt that they will fall off. The only point is that the walls must be level (deviations from the vertical level over the entire height should not exceed 2 cm.) Good luck to you!
Thanks everyone. Got it. Happy New Year everyone!
Only a master can evaluate the evenness of the walls. I do not undertake such work without leveling the walls. There are doubts about the wonderful properties of concrete contact. It flies off like a film when it is lightly picked up. And no amount of primers or dust removal will help. My advice is notches with a puncher, metal mesh 50* 50 thickness 3mm, dust removal, concrete contact primer, plaster, acrylic primer, tiles. With this technology, nothing will ever fall off. Verified.
It would be a good idea to scald everything with a steel channel and install anti-tank hedgehogs. Then for sure - for centuries!
That notch is a good idea. But about the grid - this is overkill in my opinion. Why build such a vegetable garden on a flat wall? IMHO.
First, “shoot” the corners and walls with a laser, or better yet, contact a specialist t.s.498379
So the people went - they don’t know how to read questions at all. The question was: What is the best way to lay tiles on a smooth, unplastered reinforced concrete wall in a bathroom? This means that everything has already been measured, shot, and this particular wall suits everyone. I'm interested in the technology of laying tiles on such a surface. Why did the question arise? Apartment in a new building with social finishing. The kitchen had a tile backsplash on two walls, one of them concrete. So: from a plastered wall, the tiles along with the glue bounced off, but from a concrete wall it’s hard. Moreover, I didn’t see any notches there and I think there are no primers, much less concrete contact. And he holds on to the death.
Prime with concrete contact primer.
Installation of tiles on a smooth, unplastered reinforced concrete wall is carried out on a pre-prepared surface treated with concrete contact. Installation begins from the second row, first taking into account exactly up to mm the ceiling level. From the ceiling level line, the natural distance is laid off, pre-measured laid out tiles on the floor with crosses using a tape measure. The ceiling should have a whole tile cut to the floor. Along the walls, we find the middle axis and install the tiles from the center to the corner of the wall. For the floors, we shoot 2 diagonals from the corners, we get the center and from the center we draw an axis on the floor, and from this axis we install whole tiles to the walls trimming. This is the classic method. You will also need a comb spatula, the size of the teeth depends on the thickness of the tile, choose the width of the crosses 1.5 -2 mm. I think you have enough information as an amateur tiler
How we all fell in love with innovative methods (concrete contact, primer) in my parents’ house, my father laid tiles 40 years ago, we were tired of hollowing them out, it’s cool, no, because he responded to many of my objections as needed. has his own opinions! That’s it, dear.
In my old apartment (the house was built in 1961), the tiles in the kitchen are still holding together and are not going to fall off. If current specialists are given those materials, I think that not everyone will cope. Everyone is trying to work with what is simpler, easier, faster, more beautiful. How long it will last is the second question.
Tile and smooth, dense concrete
I primed it once with Ceresit-ST 17 primer, the wall shines after drying. Is it possible to lay tiles and will they stick, or will the soil be washed away with water?
While you wait for advice, stick one tile. Apply glue, press it against the wall and hold for about twenty seconds. you can let go... When you run out of advice, try to tear off this tile.)))
As I already wrote in a personal message, try to sand the wall a little, just so that the shine disappears and the film collapses.
she won’t try)))))))) as I already wrote in a personal message - it’s okay, you can glue the tiles.
violleta wrote: smooth, dense concrete
violleta wrote: Ceresit -ST 17, the wall shines after drying.
= not correct. (but maybe it will work
)
High-grade, non-absorbent concrete requires adhesive primers, not deep penetration ones (which can be sanded off). Checking absorption (before priming) simply splash water - if it is absorbed, it means it absorbs.
If not - Concrete contacts.
The concrete is smooth, but it absorbed water before priming and after, only less. I walked the sandpaper along the wall and it became even smoother. Where the sandpaper missed it, it shines. What to do with a smooth concrete wall, primed and sanded, which has become even smoother - shiny in places? Glue UNIS+ (red), for walls and floors.
Do as Gray said, try laying one tile.
I can’t lay one tile, it will have to be knocked down later. Other people will lay the tiles, there are no markings on the wall, where will I lay it? And then, I had the experience of tearing off the tiles after laying, after two weeks it did NOT come off, and after 6 months they pulled a corner and the entire “apron”, 5 square meters long, came off. meters..((
I think that if you primed the concrete surface, laid the tiles on a not very thick layer, and then didn’t tear them off with your hands after a day, then it won’t come off in the future. It usually flies off like a “husk” after a couple of months, if the base does not absorb at all, for example, on oil paint when, for example. For example, if you need to make it fall off in a couple of months, you need to coat it with drying oil, it will seem to stick, and then fall off in a month.
violleta wrote: Other people will lay the tiles, there are no markings on the wall, where will I lay them?
Any other tile similar in base and size anywhere on the wall using the same glue.
No, it’s not worth making contact.
concrete contact is a normal topic, at least it has been tested more than one hundred times
violleta wrote: smooth, dense concrete
violleta wrote: the wall shines after drying
violleta wrote: a smooth concrete wall, primed and sanded, which became even smoother - shiny in places?
but it absorbs water! This means there must be adhesion. Betokontakt is used only on non-absorbent, durable substrates, such as, for example, DSP.
What kind of fears are there, I don’t understand!
“The base must be clean, level and solid.” Where does it say that the base should not shine? Or should it be the other way around? Where does it say that the surface MUST be treated with concrete contact? – or vice versa, that concrete contact cannot be processed? Or about deep penetration primer - what documents prohibit (oblige) its use?
- The author's base is clean and even, and remains absorbent after all the procedures. It remains to test for strength. He was asked to do this more than once - he finds excuses. He doesn't want to. He just wants to talk about it. Let's pound the water in the mortar again and again.
soon these blondes will fucking ask if it is possible to glue pink tiles to the wall.
serg12 wrote: Betokontakt is used only on non-absorbent durable substrates, such as DSP.
Yeah? But the men didn’t even know!
FEIDAL BETOCONTACT Product purpose:
- Plastering adhesive primer for pre-treatment of dense, non-moisture-absorbing substrates: monolithic concrete, massive concrete ceilings, concrete blocks.
The product is relevant for renovation work in old houses where oil and alkyd paints were used to impregnate and paint walls.
BIRSS Concrete-contact Application area of the BIRSS Concrete-contact primer mixture: Designed for preliminary preparation of dense, poorly absorbent bases (monolithic concrete, concrete blocks, concrete ceilings) before applying gypsum, gypsum-lime, lime-cement and other plasters and putties .
======================================== In our case, low-absorbent monolithic concrete.
What's wrong? Do we want to improve adhesion or not?
How to lay large tiles yourself
When using large-sized tiles, it is necessary to make the base surface as even as possible, otherwise the work will require a lot of time and more material consumption.
When fastening large tiles, glue with increased adhesion values of 1 MPa is used. The room temperature should be between 20 - 25°.
When working with such material, it is extremely important to distribute the adhesive mixture as thoroughly as possible with a spatula “comb” in order to prevent the formation of air layers under the coating, which reduce adhesion to the base. It is recommended to “comb” the grout on large tiles in one direction, as this makes it easier to remove air from under the material. Laying is carried out immediately after applying the adhesive mixture, when the adhesion force is maximum.