Visitors to our site have probably noticed that when complex work is done, there are fewer errors and defects. The reason is increased care and responsibility. But when it comes to seemingly simple work, problems arise. This statement fully applies to the final stage of repair work - gluing the ceiling plinth, especially from foam plastic. Either the corner is not cut properly, then part of the fillet is sagging, then the glue begins to dissolve the baguette material, etc. Theoretical preparation does not help either - a lot of nuances arise in the process of work.
So that a home craftsman can quickly and efficiently do the work with his own hands, let’s look at how to properly glue a foam plastic ceiling plinth.
Advantages and disadvantages of polystyrene foam
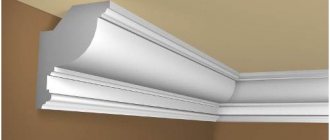
The industry offers ceiling moldings from a variety of materials: gypsum, polyurethane, plastic, MDF, wood, polystyrene, etc. However, foam fillets are the most popular among consumers. There are several reasons:
For information: foam plastic refers to a whole class of white plastics with a foamed structure. In the production of fillets, extruded polystyrene and polymerized styrofoam granules, also called expanded polystyrene, are used. The resulting materials differ significantly from each other in terms of consumer and technical-technological indicators, and therefore must be considered separately. Many construction specialists do not see the difference and confuse the advantages and disadvantages of materials, as well as methods of attaching them to the wall. In this work we will talk about styrofoam baguettes, i.e. about the material that gave the name to polystyrene foam.
- affordable price for all segments of the population;
- durability - service life is determined by several tens of years;
- simple installation, accessible to any beginner: just be careful and patient;
- light weight, which allows you to easily glue the fillet onto wallpaper, including liquid wallpaper;
- sufficient choice in surface shape and size, which allows you to use foam plinth in any interior design style;
- beautiful appearance - they look strict and elegant, adding a certain chic to the decoration;
- lack of response to changes in temperature and humidity - no linear expansion;
- possibility of painting with acrylic water-based emulsion in a different color and installation under a suspended ceiling;
- the material does not have any special maintenance requirements;
- you can stick it to any wall surface: wallpaper, paint, whitewash, concrete, brick, drywall, etc.;
- environmentally friendly - there are no harmful emissions into the air, therefore, there are no allergic reactions to the material;
- polystyrene foam is not a breeding ground for mold and fungi - they do not reproduce even at high humidity and temperature. Therefore, it can be installed in the bathroom and kitchen.
There are also disadvantages, but practically no attention is paid to them. Among the disadvantages:
- The granularity of the material does not make it possible to beautifully design the joint: it is not possible to cut perfectly smoothly - some grains are not cut, but fall out. Additional treatment of the seam with sealant or putty is required;
- the ability to melt in glue solvents, therefore, before starting work, it is necessary to apply a little glue to the tip of the panel and see the reaction of the material;
- fragility - easy to damage with slight deformation, therefore it is necessary to work very carefully;
- turn yellow over time, which can be eliminated by painting;
- dismantling is only destructive (the plinth strips can only be saved when removed together with the wallpaper).
Masking joints and painting
Painting skirting boards is carried out both for decorative purposes and to mask the sealant. It is especially recommended to paint when there are quite a lot of joining seams; they need to be hidden. You should also be sure to paint white baguettes, because without coating they will turn yellow over time.
Professionals advise that after the glue has completely dried, go over the cornices with finishing putty (dilute as thick as water-based paint), paint them well, and let them dry. Remove excess composition and drips with a plaster sanding sponge (sold in hardware stores). The baseboards will look beautiful, and any traces of sealant will be completely hidden.
If you didn’t have to use sealant or there weren’t enough seams, you can simply paint the baguettes with water-based paint, latex paint, or acrylic paint. It is possible to use nitro paint, but with preliminary priming. The work is carried out with a small brush; it is better to do it before gluing the wallpaper. This will avoid problems and get the perfect ceiling plinth.
Options for attaching foam baseboards
Experts, when considering options for attaching a foam baguette, highlight the method and location of attachment.
According to the method of fastening, the following are distinguished:
- all types of adhesives using water as a solvent;
- acrylic putty;
- acrylic or silicone sealant;
- liquid Nails.
In addition, sometimes a mechanical method of fastening is used - staples that are driven in with a tacker or, as people say, a “construction stapler.”
The mounting location can be:
- wallpaper, including liquid wallpaper;
Attention: for heavier baguettes, liquid wallpaper is removed so that it can be attached directly to the wall (it does not support the weight). You don’t have to perform such an operation with foam plastic - it’s lightweight.
- paint, whitewash or putty. With this option, there is an excellent opportunity to level out the curvature of the walls with paste putty (close the gap between the wall surface and the fillet);
- ceiling or wall and ceiling - used when there is poor adhesion of the adhesive to the wall surface. For example, applied liquid trellises, which with a suspended ceiling must be removed under the plane of the baguette.
In practice, installing a ceiling plinth on a wall without finishing is very rare - the difficulty of wallpapering or painting the walls increases.
How to glue baguettes to different surfaces
The gluing differs depending on the material of the ceiling and walls.
On a suspended ceiling
- It is better to choose light, narrow baguettes made of polystyrene foam or polystyrene foam; plastic and polyurethane materials are in second place in terms of lightness.
- It is necessary to take skirting boards in which the upper part, attached to the ceiling, was already lower. Then the adhesive mixture will be applied only to the side that is fixed along the wall; no glue will be applied to the ceiling part.
- The adhesive must have maximum hold, durability and dry quickly.
- If wooden borders or large-sized decor will be attached, it must be additionally secured with glue, dowels, and anchors.
PVC plinth looks impressive on a suspended ceiling, which is attached with clips mounted on self-tapping screws. In this case, you can create a corner with one strip that bends.
You need to be very careful, as glue stains on the ceiling can damage it.
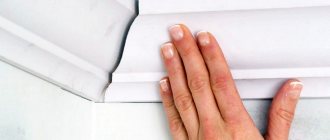
For wallpaper
Wallpaper must be securely glued to the wall, especially if it was glued a long time ago. If the wallpaper has peeled off in places, you need to glue it with wallpaper glue or PVA and wait for 1-2 days to dry completely. The plinth is glued into place with very reliable glue so that it does not fall off along with the wallpaper. To prevent the wallpaper from getting dirty, you must first mark the width of the border with a pencil. Below the drawn line, stick masking tape, which can be easily removed after work.
On drywall
The surface of the drywall is flat, so gluing borders onto it is quick and easy. Difficulties arise only at the joints, where the putty can drip. To avoid them, the joints are cleaned with sandpaper. Any type of skirting boards can be glued to drywall.
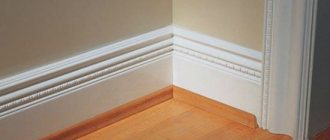
Since plasterboard walls reduce the space of a room, it can be visually increased by gluing the planks with the wide side to the ceiling.
For plaster
It is very important to check the evenness of the wall. Small flaws must be sanded or sealed with putty when gluing. It will eliminate imperfections and level the wall. The use of a special soft plinth visually hides unevenness. If the defects are significant, then the wall must be leveled, primed and sanded before gluing.
Materials and tools
Before starting work, you need to purchase materials:
- foam baseboard;
- glue (liquid nails or acrylic putty);
- sandpaper P100 (P120).
In addition, you will need:
- ladder;
- a construction knife with a replaceable blade - only it gives an acceptable quality cut;
- miter box;
- roulette;
- construction pencil;
- narrow spatula;
- ruler;
- a rag or sponge to remove excess glue protruding from under the baguette.
What is liquid nail
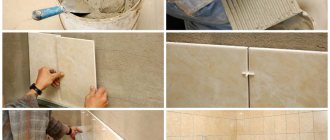
This product is very often used for ceiling cladding. With it you can stick tiles, as well as cover seams and joints.
To use liquid nails, you need to have a special glue gun in your arsenal that dispenses the product in the right quantity.
Liquid nails are applied pointwise to the foam baseboard in the center and edges. To level the ceiling you need to apply a little more product.
It is recommended to leave a little space from the edge so that after pressing the foam plinth to the surface, the glue does not leak out.
Which glue to choose
When preparing for work, a logical question arises - what kind of glue to use on ceiling plinths made of polystyrene foam. After all, polystyrene foam, firstly, is corroded by solvents, secondly, it does not have adhesion with some types of adhesive - it simply rolls off the surface of the baguette, and thirdly, it is very light.
The following conditions are fully met:
- polyurethane foam;
- polymer glue;
- acrylic putty;
- acrylic or silicone based sealant;
- "liquid Nails".
The following list shows how you can attach a plinth to a wall or ceiling. But this does not mean that every type of adhesive is technologically advanced and financially effective. For example, the use of sealants due to their high cost is pointless, and acrylic putty and polyurethane foam can only be used to glue ceiling plinths to a bare, unfinished wall.
Glue
Glue is best used in situations where it is necessary to connect the fillet to the wallpaper. But it should be remembered that for foam plastic the choice of adhesive composition is limited due to the chemical reaction of the styrofoam from which the baguette is made with paint solvents. Therefore, it is very easy to give advice here: “Titan”, “Eko-Hacet” or “Moment of installation”. Detailed characteristics of each type of glue can be found in the work “How to choose glue for baseboards.” We will pay attention to several nuances:
- using “Titan” (0.5 l costs 150 rubles and more) and “Moment installation” (price of 0.25 l starts from 200 rubles) is very financially expensive. Here, in relation to polystyrene foam, the quality indicators of the glue are many times overestimated, which affects the price;
- “Eko-Hacet” is affordable (from 65 rubles for 0.25 l), but it is a contact type, which is not taken into account by most consumers. The glue has a completely different application technology: a layer of “snake” is applied to the fillet, after which the plinth is pressed tightly against the wall and ceiling for a few seconds to leave a mirror trace of the adhesive. After which the baguette is set aside for the time indicated on the packaging (usually 5-10 minutes) to allow adhesion properties to develop.
Attention: in some cases, Moment glue can also be contact glue. This feature needs to be clarified with the seller or carefully read the instructions on the package.
Editorial advice: it is better to refuse glue for attaching foam baguettes for financial and technological reasons.
Polyurethane foam
The most budget option for attaching a baguette is polyurethane foam. But to use it, two conditions are required:
- wall without finishing;
- a baseboard with free space on the back side (a groove or be concave) into which the foam can expand without tearing the fillet away from the wall.
Acrylic putty
If the wall is not covered with wallpaper, there is no need to choose glue for a long time - it is acrylic putty. The option is the most optimal for the following reasons:
- affordable;
- easy to apply;
- instant grip, sufficient for long-term fixation of the baguette without using your hands;
- using putty, wall unevenness is repaired;
- completely harmless to humans.
When applying paint, it is necessary to prime the wall at the place where the fillet is attached with penetrating solutions in two layers.
"Liquid Nails"
Liquid nails may contain different chemical components. For polystyrene foam, you need to buy glue made from synthetic resins on a water-acrylic basis. It sets quickly (from 15 seconds to 30 minutes, and Tytan professional writes generally 5 seconds), has excessive tear strength for foam plastic (40-60 kg/m2), can be used in a wide temperature range: from – 40 to +35oС.
The rather high cost, although with a careful search you can find affordable prices, is compensated by low consumption (can be applied spotwise) and convenient packaging.
Conclusion: “liquid nails” are a good alternative to all methods of attaching ceiling plinths. Fillets fixed with their help receive reliable, long-term adhesion to the base (wall or ceiling).
Types of adhesives
First of all, it should be noted that narrow-purpose adhesive intended only for finishing plinths on the ceiling is not commercially available. However, the modern market offers three groups of such compositions for the installation of friezes, which cope with the task perfectly, but have their own characteristics:
- Polymer mixtures.
- Liquid Nails.
- Putties based on water dispersions.
Polymer mixtures
This is the most common option, the popularity of which is due to its excellent viscosity and rapid hardening. But that's not all the benefits. In fact, there are many more:
- Resistance to temperature changes. Therefore, this mixture can not only glue fillets in living rooms, but also in cold rooms.
- Moisture resistance. High humidity in some rooms can destroy the adhesive that holds the ceiling fillet in place, but this type is not afraid of moisture.
- Cost-effective and accessible.
Important! Pay attention to the expiration date of the glue. Often, sellers deliberately lower the cost of goods in order to quickly sell stale products.
Among the most famous types of polymer mixtures are “Moment” and “Titan”. Their composition is almost the same, but the advantage of the first option is faster hardening, so it costs more. Polymers can be used to attach polyurethane skirting boards, foam fillets or polyvinyl chloride.
Liquid Nails
They are also used as fasteners for ceiling fillets, are not harmful to any type of baseboard and securely fix the product to the ceiling and walls. They are divided into two types:
- Acrylic - non-toxic, but susceptible to water. Therefore, the use of this composition is not recommended in rooms with high humidity.
- Nails based on neopropylene emit an unpleasant and too pungent odor due to the organic solvent included in their structure. It disappears some time after the work is completed. But this type of glue can be used in any room, regardless of humidity or temperature.
It is better to use liquid nails to attach skirting boards to flat surfaces. With their help, any type of fillet can be installed - polyurethane, PVC, wood or plaster.
Acrylic putty
It is used in professional construction more often than other options, since it is easiest to install individual elements with its help.
The main advantages include:
- Easy to install.
- Versatility. You can not only glue fillets onto the putty, but also seal seams and cracks between walls and baseboards, or use it to putty the ceiling.
- Safety. The absence of solvents and organic compounds makes the material completely safe for health. This glue can be used indoors.
Self-made composition
The question often arises of what to use to attach friezes if you can’t buy glue at a hardware store. There is a way out - do it yourself. Prepare the following components:
- PVA construction adhesive.
- Dry putty based on gypsum.
- Water.
Procedure:
- Prepare a thick paste from water and putty.
- In a ratio of 1:100, add PVA glue to the resulting composition.
- Mix well so that there are no lumps left and wait 5-7 minutes. The glue is ready.
On a note! Store-bought products dry faster, and if you still want to glue the baseboards with homemade glue, you will have to spend more time on repairs.
Criteria for choosing a plinth
When buying a plinth, you need to successfully fit it into the dimensions and interior of your apartment or house. For example, not only the strength of the connection with the wall, but also the visual perception of the volume of the room depends on the width of the fillet. So, in small rooms, narrow baguettes look better, unlike wide ones: they reduce the volume. Table 1 will help you make your choice, where designers give the optimal ratios of the fillet and the size of the room.
Table 1.
| Ceiling height, m / Room area | 2.5 | 2.7 | 3 |
| Up to 15 m2 | 3-5 cm | Up to 9 cm | Up to 10 cm |
| 15-23 m2 | 5-7 cm | 9-14 cm | 10-15 cm |
| More than 23 m2 | 7-9 cm | 14-18 cm | 15-21 cm |
It is useless to give specific recommendations regarding the design of the plinth, since “there is no friend for taste and color.” However, it is still worth citing expert recommendations.
- If there are a large number of internal and external corners, it is best to purchase a fillet with a relief surface - the junction of the wall with the ceiling and the corners themselves look more harmonious.
- When finishing a ceiling with two or more levels, preference should be given to a baguette with a smooth surface.
- For classical trends in design, it is better to buy decor with a stucco surface; for modern trends (high-tech, eco-decor, etc.) - smooth and narrow.
- A narrow, smooth plinth looks good in any design, from simple to sophisticated.
- The white color of the fillets, together with the light ceiling, visually expands the room.
- For suspended ceilings, it is advisable to paint the baseboard to match the color of the canvas.
- It is better to abandon the complex shape of the surface - difficulties arise with corner connections.
Miter box
Using a special tool – a miter box – will help solve this problem, but you can try without it.
This is a tray-like tool that can be used to cut any profile part. The angle of the material will be 45 or 90 (depending on what type of miter box is used).
This method is very convenient; all professionals use it. The tool can be metal, plastic or wood. Expensive types also contain a rotating mechanism.
Working with a miter box is to place a foam plinth in the recess, press it and cut with a side slot, this way you will get a piece with the desired angle.
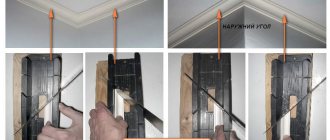
The production of tools for different angles (internal or external) is different. Here's how to make an internal corner:
- Measurements are taken;
- The top side of the stick is placed in the miter box;
- The left hand presses the foam baguette;
- The hacksaw is placed at the desired angle and a cut is made;
- The second part is cut in the same way, only it is placed in a mirror image of the first.
A hacksaw for foam baseboards is used for metal. Sometimes a construction knife will do. This makes the cuts very even.
The outer corner is done a little differently:
- Measure the bar from corner to end, put a mark on the inside;
- The material is placed in the tools and cut;
- The second plank is cut in the same way, only it is placed mirror-like and a spare length is left;
- Next, they measure everything on the wall, see if the joints are sufficiently even, and if necessary, trim with a knife. Before cutting foam plastic on a miter box, it is better to practice on unnecessary pieces. Some people make such a tool themselves from unnecessary boards or plywood. They connect it so that the letter P is formed, then they make a place for the hacksaw and mark the corner.
Sticker instructions
The instructions on how to glue foam ceiling plinths have two sections:
- preparatory work;
- baguette installation technology.
Preparatory work
Before starting work on gluing the ceiling plinth, you need to perform several simple operations:
- move all furniture away from the walls, if this was not done at previous stages of finishing;
- clean the area around the baguette from dust and dirt;
- prime the plastered (painted) wall, as well as the ceiling;
- determine the start and end location of the work. This is especially important when the surface of the fillet is embossed. After all, the planks can be joined according to the pattern only in 3 corners. In the latter it is almost impossible to do this. Therefore, it is advisable to hide the last connection, for example, in a darkened area or behind curtains.
Important: experts advise that if the surface of the plank is smooth, first glue the plinth in the corners, and then complete the work on the wall - this makes it easier to adjust the corner joints. When imitating stucco or pattern, work starts from any angle and proceeds in opposite directions.
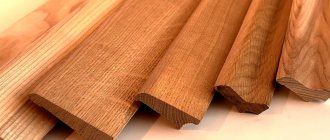
Plaster and wooden skirting boards
Wooden skirting boards are the least commonly purchased for ceilings; they should only be installed by a specialist using special glue. They cannot be used in rooms where there is a high level of humidity; they are installed in rooms with a classic design.
If the foam is not very heavy, then you can simply glue it with liquid nails, and if it is heavy, then the baguettes must also be secured with self-tapping screws.
A plaster cornice lasts a very long time and is quite durable. You can even purchase a set of molds and dry composition and make such a cornice yourself.
To glue such a baguette well, buy a composition made of alabaster, PVA or other similar glue. Heavier structures are coated with liquid nails.
Fillet installation technology
Begin gluing the baseboard from the most visible corner. The step-by-step work algorithm is as follows:
- The ends of the baguettes are cut for a beautiful connection in the corner, after which the convergence of the ceiling plinths is checked below in the same corner. If everything is fine, the next step is taken;
- An adhesive is applied to the reverse side. “Moment” and “Titan” - with a snake. “Liquid nails” - dotted, putty paste with a narrow spatula in a continuous mass on the back side of the baguette or on the wall and ceiling;
- immediately after applying the glue, the fillet is pressed against the wall and ceiling. The main thing here is to prevent the decorative element from moving down or up;
- The laid baguette is held by hand or with the help of tailor's pins on the wall in a fixed position until the glue sets. The time is always indicated on the packaging. If it says: instantly, you shouldn’t believe it. In this case, it is better to ask the seller how long it is necessary to hold the parts to be glued, since no glue, except contact glue, is capable of immediately holding the parts to be glued;
Attention: we remind you once again that contact types of glue require time to gain adhesive strength.
- remove any excess glue with a rag, carefully so as not to smear the wallpaper;
- in the same sequence, fillets are attached around the perimeter of the room;
- the gaps between the wall and the molding, as well as the joints, are sealed with sealant.
You can watch a lesson on attaching foam baseboards in the video below.
How to make corners
The most difficult moment in the entire technology of finishing the junction of a wall and a ceiling is to obtain the correct cut of the end of the fillet for the connection in the corners. If the walls are plastered before applying the finishing, there should be no problems, since the angle in this case is set to almost 90o. In this case, cutting a 45o end at the baseboard is not difficult. But for this you need a special device - a miter box. How to work with this tool is described in detail in the work “How to use a miter box for a baseboard.”
Difficulties begin if the angle is obtuse or acute. The miter box won't help here. You need calculations, marks with a pencil or marker, and cutting without tools. How to do all this, as well as cut the baguette for the internal and external corners, can be found in the work “How to make a corner on a ceiling plinth.”
Homemade glue
What other adhesive options are there? Some people prepare the adhesive at home to save money. To do this, use regular PVA, a putty mixture, a container and water. The work algorithm looks like this:
- 4 parts of finishing putty are poured into the container;
- Add 1 part of glue there;
- Next, pour in enough water to make the product as thick as sour cream, mix carefully so that there are no lumps;
- Leave the solution for 15 minutes;
- Now you can start working with the product for 2 hours.
This glue, as usual, is applied to the inside of the baseboard, attached to the surface and kept there for several minutes. Excess glue must be wiped off immediately before it hardens.
The nuances of installing foam plinth under a suspended ceiling
Attaching the ceiling molding is the logical conclusion of the repairs being carried out. It hides the junction of the wall and the ceiling, where the border of different finishing materials is located. However, due to two types of ceilings - tension and rigidly fixed (plasterboard or concrete floors), there are nuances in installing fillets.
- The rules for choosing a baguette are changing. So, for a stretch ceiling, the width of the lower part should be sufficient to be held with glue on the wall surface. After all, unlike a hard surface, glue can only be applied to the side plane.
- The upper part of the ceiling plinth should not touch the fabric of the suspended structure. The optimal distance is 2-3 mm.
- With a suspended ceiling, the shapes and sizes of fillets, etc. are visually perceived differently.
You can read more about fixing a baguette under a suspended ceiling in the material “Plinth for a suspended ceiling.”
Possible errors and ways to eliminate them
If the baseboard has fallen off or sagged, errors were made in the work. Let us list the most typical of them.
- Mounting is done on a dusty or dirty surface. Therefore, before starting work, grease stains and soot are removed from paint or putty. The surface is primed, as a result of which the dust binds, and the adhesive properties of the walls increase. The wallpaper is cleaned of dust, and greasy stains are removed along with the wallpaper.
- An error was made when choosing glue. It either contains solvents that corrode the baseboard, or is not intended for gluing foam to wallpaper or paint. The problem is solved by carefully studying the recommendations printed on the packaging.
- No attention was paid to the contact nature of the glue, as a result of which it does not hold due to a violation of the gluing technology.
- There are drafts in the room. Foam ceiling plinth, like wallpaper, categorically does not tolerate drafts: the glue dries quickly, as a result of which, firstly, it is difficult to adjust the position of the molding on the wall, and secondly, if the glue dries unevenly, there is a risk of deformation of the fillet. As a result, the baguette will be fixed to the wall (ceiling), but the quality of work in this case is not the best.
- The time for fixing the fillet with hands or auxiliary materials to set the adhesive mass was incorrectly selected.
Little tricks or expert advice
An analysis of various forums showed that home craftsmen mostly have typical questions:
- Is it possible to paint a baguette;
- how to make a corner;
- how to glue foam skirting boards to the ceiling, etc.
The editors have summarized them and provide recommendations from professionals.
- It is both possible and necessary to change the white color of the fillet to one of the colors in the palette. For these purposes, acrylic water-based paint with added color is suitable. It is advisable to paint before attaching the molding to the wall - the quality of painting is better. You can repaint the baseboard on the wall as well. But then you need to be especially careful so that the colored spots do not end up on the wallpaper. After filling the joints with sealant, they are corrected with a small soft brush, which is usually used when working with watercolor paints.
- The required amount of plinth is determined simply: one fillet is added to the perimeter of the room for unexpected losses.
- The stretch ceiling is protected from glue by cling film.
- Cutting the corners of the plinth for joints in the corners is best done in a device that builders call a wort.
- If the walls in a room are decorated with two types of materials, for example, on one part of the surface there is a trellis, and on the other there is tile, then how to glue the fillet onto the tile in this case? You'll have to buy "Titan" or "Moment Montage". Other adhesives do not hold well.
- It is easier to adjust the corner plinth to size using the following scheme: cut a 45o corner at the right and left baguette; the quality of the joint in the corner is checked; if necessary, the ends are adjusted; the length of the corner fillet is determined (you can measure it with a tape measure or attach the baguette to the wall and mark the cutting line with a knife or pencil); in a miter box at an angle of 90o with a knife, the plinth is cut to size.
How to properly glue ceiling plinths
If you don’t level the walls before gluing the plinth and don’t make careful calculations, you can end up with a crooked molding, poor joining and peeling of elements. To prevent this from happening, you need to thoroughly study the installation instructions.
Required Tools
- To cut wide baguettes, you need to prepare a hacksaw; narrow structures up to 2 cm wide can be cut with a stationery knife.
- Miter box, if there is a need to form corners.
- A narrow spatula.
- Fine-grained sandpaper for sanding rough surfaces.
Surface preparation
- Inspect the walls around the perimeter, in those places where you plan to secure the curb. Eliminate defects, straighten crooked walls. It is especially important to do this perfectly if a thin baseboard will be used. Sand the walls with a block to which fine sandpaper is nailed.
- Prime the walls and wait until the surface dries completely.
- You make markings. To do this, place individual parts of the plinth on the places where they will be fixed. Mark the joints with a pencil. Even before purchasing a baguette, you can draw an approximate diagram of its location on paper and calculate the number of elements.
- Cut the parts. This is the most critical stage for beginners. It can be difficult if you are working with a foam border, which crumbles, crumbles and can be cut unevenly. In such skirting boards, the joints are cut straight and the corners are cut at 45°. It's better to practice on small pieces first.
Gluing onto putty mixture
Gluing the ceiling fillet with putty is done in rooms where there is no wallpaper yet. This ensures maximum adhesion to the surface.
Putty comes in finished form or in the form of a powder, which should be crumbly and without lumps. Professionals can replace the putty mixture with a gypsum compound, which is strong but sets much faster. To increase adhesive properties, you can additionally use a deep penetration primer and pre-treat the surface with it before gluing.
Usually the dry mixture is poured into a bucket, then water is poured into it and kneaded with a mixer or by hand. Dilute the mixture gradually, then adding putty, then adding water.
The principle of working with ready-made putty:
- take some solution;
- Apply a thin layer of it to the back of the baguette;
- if the front side is accidentally stained with putty, it must be cleaned with a sponge or rag;
- You can install the plinth from any angle;
- carefully press the element to the marked place and visually evaluate the installation;
- Do not put too much pressure on the plinth; it will adhere to the wall without effort;
- remove excess mixture immediately, but in case of uneven walls, it is better to distribute the putty under the edge of the curb;
- When attaching the next baguette, you must first lubricate its end with putty and only then attach it to the first;
- Glue all the elements in the same way, leave them to dry completely for a day;
- After 24 hours, sand down all the unevenness and you can paint the baguette.
Glue mounting
Pasting is done on top of wallpaper, although it is also possible on bare walls.
The wallpaper must be glued well, otherwise the baguette may fall off after installation along with the rolls.
- Apply the adhesive composition to the baguette in accordance with the weight, size, and material from which it is made.
- Distribute the glue evenly over the baseboard in its central part, which is the main focus.
- Apply the baguette to the wall, gently but firmly press on the structure, hold for the time indicated in the glue instructions.
- Repeat the same steps in relation to other parts of the structure, carefully aligning the cuts of the parts.
- Carefully coat the joints at the end, quickly remove excess glue on the sides and on the front side.
- Leave the baguettes until completely dry. Usually this takes no more than a day.
- After complete drying, seal the cracks with white sealant.
If there are many cracks or they are too large, paint the baseboard with white paint, after priming it. Paint will hide flaws or make them less noticeable.
Before or after wallpapering
Professionals often differ in opinion regarding the technology and order of gluing ceiling plinths. There are 2 possible installation options for this decor:
- After wallpapering, this is the best option, which helps to hide all defects in the adhesion of wall finishing materials to the painted ceiling. The only disadvantage of this solution is the difficulty of choosing the right adhesive composition for reliable adhesion to the wallpaper.
Also, when installing foam plinth on top of wallpaper, extreme caution should be taken, as there is a high risk of glue getting on the wallpaper. In such situations, removing the composition without damaging the material is almost impossible. The same applies to finishing the baseboard - if the element is installed after finishing the walls, you need to choose a ready-made coating that does not need to be puttied and painted. Before installation, you should protect the wallpaper from possible contact with glue.
Installation of ceiling plinth after wallpapering
- Before wallpapering. It is considered the most practical option - the ceiling plinth can be glued without the risk of damaging the wallpaper. The part can be finished and painted without restrictions. The disadvantage of this type of plinth arrangement is the need to be careful when gluing wallpaper - the ends of each new row must carefully approach the lower edge of the ceiling decor. If the work is performed poorly, all defects in the adaptation of the rolled materials will be visible along the lower edge of the plinth.
Installation of ceiling plinth before wallpapering
Thus, to preserve the final finishing elements, the best solution would be to install a ceiling plinth before wallpapering. In this case, the standard order of finishing is also followed - “from top to bottom”, when experts advise first working on the ceilings, and then moving on to the walls and floors.
What characteristics should you pay attention to when choosing
When choosing and purchasing foam ceiling plinths, you should pay attention to the following distinctive features and technical characteristics of the products:
- Foam density - as a rule, sellers offer materials with a volumetric weight from 25 to 40 kg/m3. As the density increases, the price increases, but at the same time, the element has increased compressive and bending strength.
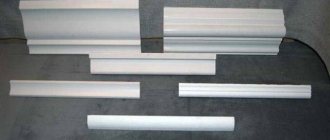
- Element profile shape - different manufacturers supply foam ceiling plinth to the market in 4 main types of profile shapes:
- Concave design is the classic type.
Concave part profile shape
- Convex shape - used mainly for modern interiors.
Convex part profile shape
- Figured dressing of complex configuration.
Figured finishing of the part profile
- Design of bas-relief in antique, Indian and other styles. The range of products is very large, and each owner of the premises can choose the decor to suit his taste.
Image of artistic bas-relief on the surface of the part
- Cross-sectional dimensions and length of parts. Products are supplied to the market from 2.5 to 3.5 - 4 meters in length, with profile dimensions from 15 - 25 mm to 200 - 400 mm, depending on the style.
- The plinth can be of symmetrical or arbitrary (asymmetrical) section.
Symmetrical profile section
- Composition and flammability class. The material should not contain formaldehyde or other toxic compounds, and the base should be self-extinguishing, which also guarantees its fire safety.
- Surface type – products are offered in both technical and finishing versions.
An element that does not require finishing
When choosing, it is also worth studying the main suppliers and the presence of positive reviews on forums on the Internet about their products, indicating the pros and cons.