Any stove, even one made according to all the rules and traditions, can crack over time. This is due to various circumstances, but most often due to uneven heating. People who laid it out themselves or used low-quality materials are often interested in how and what to cover the stove so that it does not crack. Regardless of the reasons for the appearance of cracks and cracks, their presence poses a serious threat to the life and health of the inhabitants, since carbon monoxide enters the room through them. In this article we will figure out how to cover or plaster the stove to prevent it from cracking, and what materials to use for this.
How to cover up cracks
It is important not just to “cover up” them, but to examine them in time and seal them correctly to prevent the ingress of carbon monoxide. If you use low-quality material again, instead of one crack, several will appear and quickly.
So, the entire process of removing defects can be divided into 3 stages:
- analysis of the crack and the nature of its origin;
- preparation of solution;
- plastering and grouting.
Crack Analysis
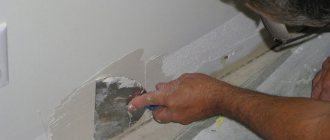
Even a beginner can handle this stage. The task is to determine the location and size. In case of minor damage, as a rule, not through and therefore not dangerous, you can simply clean the bricks from the previously applied finishing and part of the mortar in the area of the crack. Seal them with the prepared solution and clean them so that the restoration work is not noticeable.
If we are talking about deep cracks, especially those through which smoke and a characteristic odor noticeably leaks, you will have to dismantle the bricks in this area and re-lay new ones. This is a painstaking job that requires the correct selection of solution and careful work.
Preparation of the solution
Regardless of the location and size of the cracks, a certain solution will be needed to eliminate them. These can be traditional materials - fireclay clay or a mixture based on river sand and clay, modern - stove glue, personally prepared - stove grout. By the way, you can also purchase it at a hardware store and dilute it yourself.
The table below shows examples of components for plastering stoves and their proportions.
Each material can be used in the work, but in order to understand how to plaster the stove so as not to crack, you need to understand each of them.
The most popular material for laying stoves and fireplaces, restoration and plastering. Fireclay clay is the most reliable material that has passed centuries of testing and is still very popular. The stoves, built on fireclay clay more than 100 years ago, still stand and do not crack.
Today you can buy fireclay clay at any hardware store. Standard packaging is 20 kg, but there are also individual packages of 5-10 kg or large batches of 50 kg. Before work, according to the instructions, the clay is soaked in water in a ratio of 2:1 and left for a day, after which they proceed directly to the plaster.
Clay and sand
The cheapest option for plastering the stove not only during the restoration of cracks, but also during the initial laying. Despite the fact that such material costs a penny, it is very flexible, easy to work with, and after the first two starts of the furnace it becomes very strong and durable.
How to cook:
- Pour 1 part clay with 3 parts water and leave for 72 hours.
- After one and a half days, stir the solution thoroughly, adding a little water, and strain it through a medium sieve (mesh cross-section up to 3 mm).
- Drain off excess water, then mix well again. The result should be a creamy “product” that is ready for the addition of sand.
- At this stage it is very important not to overdo it with sand. Add it gradually, continuing to stir the clay solution. Periodically remove the stick and check how much is stuck to it. As a result, there should be small fragments on the stick. If large pieces stick, continue mixing the solution with river sand. As a rule, the ratio is 1:2.5, where 1 part is clay, the rest is sand.
In order to avoid mistakes, watch the video on how to properly prepare clay for grouting cracks
Procedure:
- thoroughly mix the composition obtained for restoration;
- To check how plastic and high-quality the mixture is, simply make a ball of clay, roll it out and squeeze it tightly with your fingers. The ideal composition will be like hard plasticine, wrinkled, but not cracked. If cracks appear, you will have to add a little more water;
- Moisten cracks and crevices generously with water;
- push the solution with your fingers, trying to get as deep as possible;
- sand the seams and proceed to general plastering.
Oven grout
Of course, it is best to purchase ready-made grout, which is simply diluted with water. It is expensive, but it is ideal for ovens. Very plastic, strong, durable, capable of maintaining integrity even at 10,000C.
Before sealing the cracks with a special grout, they are pre-moistened with water immediately before application.
For those who do not have the opportunity to purchase grout, we will tell you how to prepare a composition identical in characteristics to the grout.
You will need:
- clay - 1 part;
- water - 3 parts;
- sand - 4 parts;
- straw, cut into small pieces - 1 part;
- salt - pack.
Mix clay with water in a ratio of 1:3 and leave for 2-3 days. Next, add sand and gradually knead (see above for how to do this correctly). When finished, add straw and a pack of regular table salt.
Furnace glue
Very comfortable and practical material. which is also sold in all hardware stores. Its main advantage is ease of preparation and simple application.
There are 2 types of oven glue - plastic and hard. Plastic is used to fill cracks, while hard is a finishing coating that hardens very quickly.
The oven glue hardens within 15-20 minutes. To avoid wasting it, knead in small portions.
The procedure is as follows:
- preparing 1 liter of plastic solution;
- abundant wetting of bricks with water;
- applying (pushing) the mixture into all detected cracks and crevices;
- preparing 5 liters of solid solution;
- coating the entire oven.
Cracks appear on any stove. In the video you will see how to seal cracks and crevices on a Russian stove with a stove bench
How to plaster a stove so it doesn't crack
The first step is always to seal the cracks and, after they have dried, they begin to cover the entire surface of the stove.
With any restoration method, it is necessary to remove the layer of plaster on the bricks/bricks at the site of damage, the cladding or the decorative layer.
Always before filling cracks with mortar, moisten them generously with water - this will form an excellent bond between the brick and the mortar, so that it will not fall out as it dries.
Cracks and cracks are sealed only with your fingers so that the solution penetrates deeply. Buy waterproof gloves.
Once all damage has been repaired, leave the oven for at least a week to allow everything to dry completely. And after that you can melt it completely - no more cracks will appear in this place.
Today you can find anything on sale, because construction has long become a kind of art. To putty a heating building (stove), you can use many different modern materials, but there is one caveat. As a rule, such work is required for country houses, where there is simply no desire to spend a large amount of money. But you can always turn to age-old wisdom and use those materials that can be found in close proximity to the dacha building.
Important! Those materials that will be used for this type of solution must be cleaned of excess impurities.
So, what to decorate the stove with? To do this, you need to prepare a special clay solution, the recipe for which is quite simple:
- 4 buckets of soaked clay;
- 2 buckets of clean sand;
- a little water, the volume of which depends on the quality and condition of the clay and sand.
Conclusion
Do-it-yourself plastering of the oven walls is completed. It is important to follow all the necessary tips so that the stove lasts a long time and we can enjoy warm, cozy evenings in which it warms us with its warmth.
I would especially like to draw your attention to the fact that you cannot apply plaster if we have just completed the brickwork of the stove. The oven must dry and undergo a shrinkage process. And this requires enough time, 2-3 months of regular use.
Sources
- https://strbani.ru/kak-oshtukaturit-pech/
- https://kirpichguru.ru/pechi-i-kaminy/shtukaturka-pechi-iz-kirpicha.html
- https://stroyremont.info/otdelka/chistovaya-otdelka/kak-oshtukaturit-pech.html
- https://otoplenie-expert.com/kirpichnye-pechi/kak-oshtukaturit-pech-chtoby-ne-treskalas.html
- https://StrojDvor.ru/otoplenie/kakim-rastvorom-shtukaturit-pech-chtoby-ne-treskalas/
- https://kamin-expert.ru/otopitelnaya/shtukaturka-pechi-iz-kirpicha.html
- https://samstroy.com/%D0%BF%D0%BE%D1%87%D0%B5%D0%BC%D1%83-%D0%BF%D0%BE%D1%8F%D0%B2% D0%BB%D1%8F%D1%8E%D1%82%D1%81%D1%8F-%D1%82%D1%80%D0%B5%D1%89%D0%B8%D0%BD%D1 %8B-%D0%B2-%D0%BF%D0%B5%D1%87%D0%B0%D1%85-%D0%B8-%D0%BA%D0%B0/
- https://pechnoy.guru/pechi/izgotovlenie-pechi/materialy/shtukaturka/kak-oshtukaturit-pech.html
- https://strir.ru/vnutren-otdelka/shtukaturka/pechi
[collapse]
How to properly prepare a solution for putty?
Preparation of such a solution does not require special tools or skills. It is enough to find a suitable container, for example, a tub. The prepared container must have maximum integrity so that liquid does not leak out of the solution. Otherwise, the solution will turn out to be quite dry, which is simply unacceptable for puttying a stove building.
The clay must first be soaked in warm water for 12-24 hours. This will allow it to be mixed with sand more efficiently. Sift the sand before use to remove stones and other debris. Both components are poured into a container, after which they are thoroughly mixed.
It is best to mix clay with sand the old way - trample it with your feet. This will allow the components not only to mix, but also to get rid of lumps. While mixing, you can add warm water to the mixture. This will be noticeable by the state of the mixture itself, which should be homogeneous. The density of the solution should not be less than thick sour cream, which can be found on store shelves.
Process Features
So, when you have decided on the choice of plaster, and the necessary tools are already at the ready, all that remains is to start creating. However, in order to properly plaster the stove, you need to follow a certain technology and sequence of processing steps.
Surface preparation
Preparatory work is an important process that ensures the quality and durability of plastering. So that all your work does not turn out to be in vain, first of all, you need to perform the following actions:
- Remove old layers of cladding using a hammer and chisel, and then clean the surface of dirt and remaining substances with a brush.
- If the stove is new, you should also clean the masonry.
- Deepen all seams by 0.5–1 cm and remove dust from them.
- Prime the walls, including the seams.
It is very important not to start cladding a structure if it has just been built. You need to wait at least 3 months for the stove to “settle” and for the materials from which it consists to adapt to operating conditions
Preparing the mixture
The solution must be prepared after all the preparatory measures have been completed, otherwise the plaster may harden and become unusable.
Before mixing all the ingredients, the sand must be sifted and cleaned of foreign impurities. The same applies to clay - it is crushed and all debris in the form of particles of rocks and plants is removed. Next, the clay is soaked in water until the liquid covers it by 10–15 cm. On average, this process takes 2–3 days. When the base is ready, it is combined with the remaining components and stirred with a mixer. In some cases, it is permissible to add water, since the consistency of the finished solution should be similar to sour cream.
Warp finishing
Sometimes old age, damage or unscrupulous work of builders can cause distortions in the walls of the stove. You can fix this this way:
- focusing on the building level, set up beacons for alignment;
- heat the stove so that it is warm;
- moisten the slanting wall with a roller or brush;
- the surface is primed and left to dry;
- the first layer of plaster is applied using the “spray” method so that the mixture covers all the seams;
- after the first layer has dried, apply the second - it should protrude about 1 cm above the beacons. Start work from the bottom, leveling the rule every half meter of the layer;
- the wet solution is polished with grout;
- To level the corners, use a special corner spatula.
Application of mesh
The use of this mesh in cladding allows not only to level and hide surface defects, but also makes the plaster coating more uniform and durable. To plaster the stove, you need:
- install the mesh near the work surface at a distance of no more than 2.5 cm;
- “spray” apply the plaster and wait for it to harden;
- cover everything with the next leveling layer;
- rub out;
- decorate.
Light plaster
The need for such work usually arises if the stove has no obvious defects or distortions, but needs cosmetic repairs. Plaster it like this:
- guide elements are fixed on a previously prepared surface so that the coating is uniform;
- apply the solution from bottom to top with a wide spatula, which is immediately leveled using the rule;
- the corners of the structure are plastered with an angle spatula;
- the result is neatly erased.
Preparing the solution for use
So, we understand how to cover the stove, but it is worth noting that the prepared solution cannot be used immediately. In order for the final work to be of the highest quality, it is necessary to adhere to the following procedure:
- Mix all the components of the solution thoroughly in a whole container. This should be done in the evening to allow the mixture to brew.
- Cover the container with the solution with plastic film, which will not allow the water from the solution to evaporate. The solution must be left in this state until the next day.
- Stir the infused mixture in the morning so that the liquid that the clay pushed up is back in the solution.
- Start caulking the stove building.
Important! It must be remembered that the finished solution should not crack when drying.
You can check its quality by rolling a ball from the resulting mixture in your palm. If such a ball cracks, then there is little liquid in the solution. A well-prepared mixture will stay on the stove for a long time and reliably, which will eliminate the need to smear it every year.
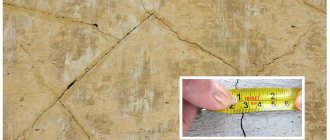
The condition of the furnace requires regular monitoring. The refractory brick, bonded with fireclay clay mortar, from which the stove is made, although capable of withstanding high temperatures, does not last forever. Over time, cracks may appear in the furnace masonry due to uneven heating of the material
.
Using a fireplace with through cracks poses a danger to human health, since harmful carbon monoxide enters the room
.
Consequently, the questions arise: how to cover the stove in order to prevent the appearance of cracks in a timely manner, how to eliminate the damage that has appeared, and what to do so that it does not crack again?
Advantages and disadvantages
When constructing a furnace, it is imperative to use refractory material for both internal and facing work. Among the advantages of chamotte mortar are:
- High level of environmental friendliness.
- Excellent steam permeability.
- Resistant to high temperatures and temperature changes.
- Long service life.
However, the masonry mixture is not famous for its advantages alone. It also has certain disadvantages. First of all, it is necessary to address the issue of price. Even if you prepare the solution yourself, its cost will be very high, when drawing an analogy with other materials in this group.
The mixture contains phenolic resin. This element has a high level of toxicity, and accordingly, environmental pollution occurs during production. And the work itself at the enterprise does not benefit anyone, since a lot of harmful dust is generated during the entire work process.
As for efficiency, it is not as high as we would like. For example, if you need to lay only 25 bricks, then you will need to purchase about 20 kg of clay mass, but to lay one cubic meter of structure you will need as much as 100 kg of material.
Crack sealing material
There are many sold in hardware stores for filling cracks. The heat-resistant mixture only needs to be diluted with water, and it is ready for use.
.
You can also resort to traditional methods, which are no worse. The most common remedy is a solution of clay and sand, which should be used to coat the damage. For better effect, you can add asbestos, lime or salt
.
If the solutions turn out to be ineffective, you can resort to more radical methods. These include a metal frame.
From aluminum sheets it will be necessary to make pieces of metal according to the size of the furnace
.
Pieces of metal should be secured to the sides of the stove with metal corners. Then it is recommended to apply heat-resistant radiator paint
.
Purchased heat-resistant mixtures
Ready-made stove plaster can also be used for finishing. There are many varieties of such mixtures. But the most popular are “Pechnik” and “Terracotta”. The advantage of such plasters in comparison with those prepared by hand is a high degree of heat resistance. “Pechnik” and “Terracotta” are able to withstand temperatures up to 200 degrees.
Whatever mixture is used for plastering the stove, purchased or homemade, there is no need to prepare a large amount of it at once. The volume of a single serving should not exceed 8-10 liters. In any case, the solution needs to be developed in a maximum of 2-2.5 hours.
Damage repair technique
If the stove is cracked, immediate action should be taken. If you follow all the rules that will help solve the problem efficiently, your stove will last a long time.
- Furnace diagnostics.
First, you need to carefully inspect the stove, both outside and inside, and determine the extent of the damage. If the stove has serious defects, then it will need to be completely disassembled and restored.
.
If there are small cracks, then it will be possible to coat and plaster them, having first removed the layers of finishing and plaster
.
- Selection of material.
Any stove is suitable for restoration, the main thing is that after soaking it takes on a homogeneous plastic consistency like butter.
- Preparation of the solution.
Making a solution for sealing cracks is easy. For the solution you will need 4 buckets of clay and 4 buckets of sea or river sand. The amount of water depends on the moisture content of the clay and sand. The clay is first soaked for 12 hours in warm water. After this, it should be mixed with a spatula to break up the formed lumps. The clay is then mixed with sand. The resulting solution is covered with polyethylene and infused for 12 hours.
to prevent moisture from evaporating.
The infused mixture is mixed again and checked for quality: you need to roll a small ball of putty in your palms and press lightly; if it cracks when pressed, then there is not enough liquid
.
- Applying putty to the damage.
Before applying the putty, you need to heat the fireplace a little. Then you should moisten the damage with water so that the finishing material becomes durable. Otherwise, dry masonry will suck all the liquid out of the fresh mortar.
.
Most summer residents and residents of country houses periodically face the problem of smoke and carbon monoxide entering the premises. As a rule, the cause of such troubles is cracks in the furnace. To avoid their formation, every owner of a private home needs to know how to cover the stove so that it does not crack from the heat.
How long does fireclay clay take to dry?
Experienced craftsmen say that a large oven can contain a whole barrel of liquid. It is contained in a composition that seals all the seams of the structure and firmly fastens the bricks together into a single reliable thermal system. In order to remove all moisture from a newly built stove and allow the fireclay composition to dry completely, it is necessary not just to wait, but to gradually and slowly heat the stove with a small amount of firewood, thereby helping the moisture to leave the pores of the clay. It is important to observe the ambient temperature - clay contains a large amount of moisture at temperatures below 10 Co, which looks light and dry from the outside.
To drive this moisture out of the composition, you need to maintain the temperature outside the oven in the region of 18-20 Co. You need to heat the stove 2 times a day with a very small amount of firewood - about 4 logs each time. The stove should operate in this mode for approximately 6-10 days (depending on the size of the stove and the depth of the masonry) in the summer and about 2-3 weeks in the winter. Until the structure is completely dry, the stove cannot be used!
In conclusion, it is worth saying that it is absolutely not necessary to resort to the services of experienced stove masons in order to put together a structure for which, in most cases, fireclay clay is used. However, if the homeowner is not sure that he will succeed, and it is a pity to waste material on experiments, then it is better to turn to professionals.
Causes of cracks
There can be several reasons for cracks in the furnace, for example:
- Poor quality putty.
- Failure to comply with the necessary standards when finishing the stove.
- Incorrect oven drying.
- Furnace subsidence.
The stove can sag due to an incorrectly installed, weak foundation or the use of low-quality material during installation. If it is better to re-lay a stove with an incorrectly made foundation, then in other cases putty for stoves will help get rid of the cracks.
However, smoke can enter the room from the furnace not only as a result of cracks, but also for a number of other reasons, for example:
- Clogging of the chimney with soot. Eliminating soot from the smoke duct will help here.
- Clogging of stove riser bricks with waste. The riser needs to be cleaned.
- Incorrect internal laying of the stove. Most likely, this cannot be done without a major overhaul of the chimney.
- Overcooling of the riser due to a long break in the operation of the furnace. Warming up the riser using lit paper will help.
Materials and tools
If, after all, cracks are the cause of smoke in the stove, then they must be coated. For this we need:
- sealed container;
- bucket;
- construction sieve;
- shovel;
- paint brush;
- putty knife;
- chisel;
- primer;
- clay;
- sand (cement, asbestos, lime, table salt);
- water.
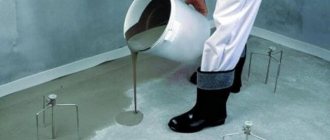
Preparation of the solution
When all the tools and materials are ready, you can proceed to preparing the solution. Let's look at some of the most effective recipes:
- The most common and at the same time simplest method of coating a stove is plastering with clay. To prepare it you will need clay and sand in a ratio of 2:1. These ingredients must be thoroughly mixed and table salt (30 g per 1 l) added. Before use, the solution is infused overnight, covered with polyethylene.
- A solution containing asbestos is more flexible and fire-resistant. To prepare it you need to mix 1 part asbestos with 10 parts clay and lime (or cement) and 2 parts sand.
- To fill cracks in iron and tile stoves, the following ingredients are used: wood ash, table salt, a small amount of clay and water. All components are mixed until dough-like.
Before preparing any solution, all ingredients must be sifted through a construction sieve. To make the clay easier to mix with sand, it is pre-soaked in warm water. Before adding lime to the solution, it must be quenched with water. The prepared solution should have a thick, uniform consistency.
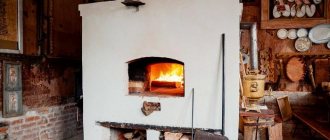
A stove, stove, Dutch oven, fireplace are devices well known to Russian people, thanks to which you can heat the house so much that no frost is scary! To this day, this is an indispensable way to keep warm in villages or holiday villages, so the problems that may arise with the stove are still relevant. One of them is how to cover the stove so it doesn’t crack?
Choosing the composition of the plaster
The question of how to plaster brick stove walls is the most important one when planning such an event. It should be said right away that the usual cement-sand mortar used for plastering the walls of a building is not suitable for stoves. It will simply crack in a very short time. For plaster, you can use a ready-made mixture intended specifically for this purpose, or prepare it yourself, but according to a special recipe.
To solve the question of what to plaster with, simple 2-3-component mixtures and complex compositions with the addition of various ingredients (fiberglass, asbestos, salts, plasticizers, etc.) can be used. The composition of the mortar also depends on the type of brick used for the construction of the stoves (fireclay, red brick, silicate varieties, etc.). Certain components added to the plaster increase its adhesion to the material.If you decide to use ready-made materials, then you need to purchase a stove or fireplace plaster mixture. All the necessary ingredients have already been added to it, and preparation for application consists of diluting it with water in the proportion specified in the instructions. When using them, one caveat should be taken into account: their long-term storage is undesirable, since atmospheric moisture can lead to premature hardening of the mixture in the form of poorly soluble lumps.
Most often, homemade solutions for plastering stoves are prepared of the following types:
- clay;
- lime-clay;
- calcareous-sandy-clayey,
- lime-gypsum;
- cement-sand-clay.
The practice of furnace construction shows that it is precisely such compositions that are least susceptible to cracking when heated. Other additives are also introduced to improve properties.
When preparing the solution, it is important to choose the correct proportions of ingredients. The precisely selected composition allows you to easily and evenly apply a thin layer to the stove wall. In particular, a certain consistency of the composition is used as grout
The viscosity of the solution is regulated by the proportions of water, plasticity largely depends on the amount of sand, and the more of it, the less elasticity of the mass
In particular, a certain consistency of the composition is used as grout. The viscosity of the solution is regulated by the proportions of water, the plasticity largely depends on the amount of sand, and the more sand there is, the less elasticity of the mass.
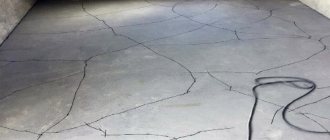
The stove is cracked - we determine the reasons!
Cracks and fissures stretch across the surface of the stove like a spider's web, especially if you heat it up on frosty days. The problem is not new, so there are plenty of solutions, you just need to wisely choose the right one depending on a particular situation. First you need to understand the causes of cracks. By and large, there can be three of them - poor-quality putty, hasty finishing of the furnace without complying with standards, and subsidence of the furnace itself.
The stove can sag due to an incorrectly laid foundation or poor-quality brick. The most radical way to solve the problem is to disassemble the stove, strengthen the foundation and put it back together. However, you should act in this spirit if the drawdown is really significant, smoke pours out of the cracks during the fire, the doors no longer close tightly, and the brick inside the stove itself is crumbling. With such “symptoms” it is necessary not only to disassemble it, but also to assemble it from completely different materials.
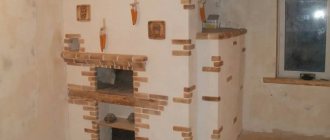
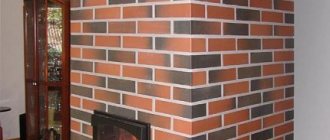
However, if we are talking about small cracks, you still shouldn’t rush - subsidence of a new furnace in the first few years is acceptable . What you should not do immediately after laying the stove is tiling it
. Of course, it’s beautiful and practical, but when it starts to fall off as a result of subsidence, you’re unlikely to enjoy sweeping up the fragments and gluing everything back together. Therefore, do not rush - let your stove warm up properly for a year or two, and if cracks do not appear, then lay the tiles.
Tiling is often recommended as a solution to crack problems. But at the same time, summer residents forget that the stove can crack even under the tiles. And everything may look fine, but smoke will penetrate into the room through these cracks, and this is already fraught with consequences. Therefore, tiles are good only in cases where the stove has been checked and certainly will not crack.
How to seal a stove to prevent cracks
You picked up the most expensive heat-resistant mortar in the store, your stove is on a solid foundation, but new cracks still appear. Don’t rush to immediately blame the putty manufacturer - the point is not what to cover the stove with, but how to cover it! Hasty completion of work without observing all the nuances is the second reason for the appearance of cracks.
Firstly, you need to putty the stove by heating it slightly. Secondly, the cracks that you want to cover up must be moistened generously with water; without this step, the dry masonry will suck all the liquid out of the fresh mortar, as a result of which it will not gain the required strength. And thirdly, do not rush to light the stove - you need to wait until the putty has completely dried! Only compliance with these nuances will allow you to forget about new cracks forever.
Advice from professionals
To ensure quality work when plastering a stove, professionals recommend:
- Proper mixing of the solution. To do this, you can take a small amount of the mixture and roll it into a ball in your palm. If cracks form on it, you need to add a little water.
- The mixture should be viscous so that it can be easily applied.
- Before starting work, all cracks must be repaired.
- To strengthen the plaster, use reinforcing mesh.
- After plastering, you cannot immediately heat the stove, otherwise the coating may crack. You need to wait until it dries completely.
For high-quality plastering of the stove, the main thing is to mix the solution correctly - it should not be too liquid or thick. Following the instructions will allow you to avoid common mistakes and get a durable and aesthetic lining for your home stove.
How to cover the stove - folk putty for the stove
In building materials stores you can find a lot of putties and mixtures, but their prices are quite high. And if we are talking about a dacha, then you need to cover up the stove, which is not used very often. In any case, folk methods are no worse than newfangled methods, and you can find materials for putty according to folk “recipes” right there, near the dacha.
The most famous putty for the stove is a solution of clay and sand. Sometimes asbestos is added there, sometimes a little lime is added, and some even recommend salting this solution! However, for starters, you can try the classic composition of stove putty, proven over centuries.
How to seal a stove - step by step diagram
Step 1: Selecting materials
There is an opinion that not every clay is suitable for making stove putty. However, practice shows that any clay is suitable for these purposes, as long as it is free of impurities. After soaking, good clay will be like butter, homogeneous and plastic. You will need 4 measures of clay (4 buckets or 4 handfuls - it depends on the volume of work) and 2 measures of clean, sifted sand. Both river and sea sand are suitable, the main thing is that it is free of impurities. The volume of water needed to prepare the putty varies depending on the moisture content of the sand and clay. Lime is necessary if you do not want to spend a long time with whitewashing in the future.
Step 2: Prepare the solution
It is very advisable to pre-soak the clay in warm water for at least 12 hours. After it is wet, mix it with a shovel or your hands (if the volume is small) to break up all the lumps. Prepared clay will be much easier to mix with sand. If we act according to tradition, then we will interfere in the old-fashioned way - trample on the mortar with our feet. Since cracks should be covered in the summer, you are unlikely to freeze your feet. The consistency of the solution should be like thick sour cream, which is sold in stores. The finished solution should be kept in a container for at least 12 hours, after covering it with polyethylene so that the moisture does not evaporate.
Step 3: Cover the cracks
Stir the mixture again. To check the quality of your putty, roll a ball in your palm - if it cracks when compressed, then there is not enough liquid in the solution. Previously, straw was added to this mixture to prevent the appearance of new cracks, but today you can use a special mesh that is used for plastering. By covering the surface with such a mesh and covering it with the prepared solution, you can definitely forget about the cracks. You can cover it with your hands - such a solution, unlike cement, will not harm your skin. Do not forget to heat the stove a little so that its surface is a little warm. Moisten the cracks with water, take small lumps of the solution and, as it were, push it into the cracks, spreading it over the surface on top. If everything was done correctly, and the stove is strong, then you can forget about cracks for a long time. Do not heat the stove until the putty has completely dried!
Covering
The last layer of plaster is necessary in order to completely level the surface of the stove. The primer needs to be moistened quite generously before applying it. The solution in this case should be used even less thick than for the first two layers. The mixture should fill absolutely all cracks and irregularities remaining on the surface. The thickness of the covering layer can be from 2 to 5 mm. It is impossible to level the stove in planes with plaster. Ultimately, the total thickness of the finishing layer should be no more than 1-1.5 cm. When laying out brick stoves for your home with your own hands, this should be kept in mind. When performing this work, you should initially try to make the walls as even as possible.
Other ways to get rid of cracks
If you don’t want to spend a long time fiddling with putty according to a folk recipe, you can buy a special heat-resistant mixture at a hardware store, which you just need to dilute with water, and it will be ready for use. However, follow the same rules: lightly heated stove, cracks moistened with water, do not heat until the solution is completely dry!
If the solution doesn’t help or you don’t want to bother with it, you can do a more radical and very practical way - make a frame for the slab from a sheet of aluminum or other suitable metal. To do this, you will need several sheets of metal, squares (if there are none in the corners of the slab), and metal scissors. Measure the height of the slab and its sides, cut out the corresponding pieces of metal. If the tile is adjacent to the wall, then try to use a grinder to make a small indentation in the wall so that the sheet seems to fit into the wall.
To ensure that the sheets adhere perfectly to the stove, it is best to secure them on top and on the sides with squares. The angles should be on top of the metal elements. If the slab is already reinforced with angles, it is better to remove them, install sheets of metal and then return them to their place. The metal can be painted with heat-resistant radiator paint or left as is - if it is stainless steel, then it will look quite decent.