Putty the stove or leave it as is
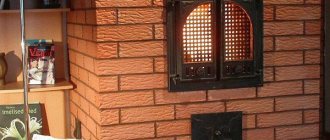
Of course, if your fireplace or stove is lined with high-quality facing bricks, then you should not finish such beauty with putty, but this is an exceptional case and this does not always happen.
But an old, but fully functional stove is in dire need of giving it the proper appearance, and there are several reasons for this:
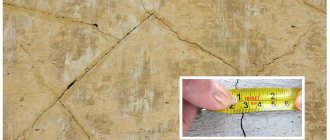
- The first and perhaps most important reason is to protect your home from carbon monoxide. Whatever masonry mortar is used, with active use, after 5–7 years a mass of microcracks will form between the bricks, through which carbon monoxide will leak, and this is already dangerous not only for health, but also for life;
- With such serious overheating, thermal deformations of the brick are inevitable and in order for the brickwork not to crumble, it needs to be protected with something. For such protection, heat-resistant putty for stoves is ideal; with it, even a country stove with periodic heating will last at least 10 years without repair;
- Another reason is savings; you can build a pretty good stove from inexpensive brick, for example, M150, and to cover up the unsightly appearance of such masonry, putty it, which will be an order of magnitude cheaper than building a stove from M500 brick;
- And finally, the most obvious reason - old rickety masonry with chipped corners and partially spilled mortar is not the best decoration for a home.
Choice of solution
I’ll immediately answer the most frequently asked question: is it possible to putty a stove with regular putty? So, forget about this idea right away; temperature deformations will destroy your efforts in a couple of months. The plaster layer will first crack and then begin to fall off in pieces.
Then how to putty a brick stove if conventional compounds are not suitable? There are 2 options here:
- Make a mixture for puttying stoves according to old grandfather’s recipes. The option is quite suitable and we will also talk about it, but homemade putty is well suited for an inexpensive country stove; an amateur cannot make a work of art from such a composition;
- Buy ready-made factory mixture. This thermal putty would be a good solution for a beginner: you will save a lot of time, you definitely won’t make a mistake in the proportions, and then there are instructions. Plus, factory-made compounds are an ideal option for decorative finishing, for example, under brickwork, although the price will be higher.
What does the market offer?
It is not necessary to look for a mixture that says that it is specifically a putty for stoves; the vast majority of modern heat-resistant masonry mortars are excellent for finishing. Please also note that the prices in the article are current in the spring of 2017.
| Illustrations | Recommendations |
| Terracotta. Heat-resistant putty for stoves from the Terracotta brand is considered one of the market leaders.
| |
| "Termo +999" from the "PRO" brand. High-quality universal repair and putty mixture:
| |
| "Pechnik" In terms of popularity rating, it is on the same level with mixtures of the “Terracotta” brand.
| |
| Clay-sand mixture. From my own experience, I can recommend a clay-sand mixture from the Makarov Stove House brand. In general, this manufacturer produces masonry stove mixtures; I haven’t seen any putties from them specifically, but these mixtures are also suitable for finishing and the quality is really good. |
Grandfather's recipes
In all folk recipes, the main component is clay. But there is a nuance: for laying and finishing stoves you need to take the fattest clay you can find.
The simplest fireproof putty for a stove is a mixture of clay and sand. There is no universal proportion in this case; it must be selected experimentally depending on the fat content of the clay.
If you dig clay yourself, then take it from a depth of at least 1 meter from the line of the beginning of the fertile layer of the earth.
| Illustrations | Recommendations |
| Soak the clay . The clay is soaked in water for at least a day, then it needs to be mixed well. It is better to mix with a construction mixer. | |
| We wipe the clay . The cleaner the putty, the better the result, so you need to take a fine sieve (up to 2 mm) and rub the clay milk through it. | |
| We wipe the sand . We wipe the sand in the same way. Only quarry sand should be taken, since river sand can cause severe shrinkage of the mixture. | |
| Mix the mixture. As a rule, 2 parts sand go to 1 part clay, but if the clay is oily, then you can put 2.5 parts sand. The video below in this article shows in detail the process of mixing and determining the quality of the clay-sand mortar. |
In addition to the simplest clay-sand mortar, there are also various variations; slaked lime, alabaster, horse or cow manure can be added to it. Fiber (loose fiberglass) is often added for reinforcement.
In proportions it looks something like this:
- Clay – 1 hour, sand – 2 hours, lime – 2 hours;
- Clay - 1 tsp, sand - 2 tsp, alabaster - 0.3 tsp (this composition hardens quickly, shelf life up to half an hour);
- Clay - 1 hour, sand - 2 hours, cement - 0.3 hours, fiber - 0.1 hours (take grade 500 cement);
There is another option to add asbestos powder instead of gypsum or cement, but I do not recommend it, the fact is that asbestos is quite harmful and cannot be used inside residential premises.
How to putty correctly
| Illustrations | Recommendations |
| We clean the surface . If the structure is old, then the plaster must be removed and the gaps between the bricks must be cleaned approximately 10–15 mm deep. Then we sweep away the dust. | |
| Let's heat it . The mixture will lie better if you lightly heat the oven beforehand, you shouldn’t be too zealous, 30–50 ºС on the surface is enough. | |
| Reinforcement. To reliably fix the putty on the masonry, the surface must be somehow reinforced. Option 1. We simply drive self-tapping screws about 75 mm long into masonry joints and other problem areas. You don’t need to screw it in completely; the cap should stick out 10–15 mm. | |
| Option 2. Using the same self-tapping screws, only with a washer, we attach a steel or fiberglass mesh to the masonry. The maximum cell size of such a grid is 10 mm. The second option is more suitable for relatively flat planes. If the masonry is very crooked, as in the photo above, then it is better to use only self-tapping screws. | |
| Applying primer. According to the technology, before filling, you need to prime the masonry, so if you are using a factory-made composition, then do not skimp, buy a normal heat-resistant primer for it. If you decide to putty with a homemade clay-sand mortar, then it will be enough to moisten the masonry well with water before application. | |
| Starting layer. Now take a spatula with a blade width of about 10 cm and apply the initial starting composition, it is needed to fill the cracks and pre-level the plane.
| |
| Leveling the plane. When the starting layer begins to set, spray it with water and apply the finishing layer of putty with a wide metal spatula.
| |
| Option with beacons . If the oven is large, then it will be more convenient for you to fix a couple of beacons with a solution, then throw the putty on the plane and level it with the beacons as a rule. Everything is shown in more detail in the video in this article. | |
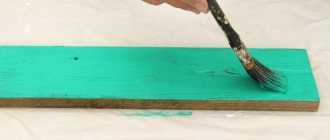
| Painting. After puttying, it is advisable to paint the stove; naturally, we also use heat-resistant paint:
|
Source: obustroeno.com
A stove so indispensable in a private home for its practicality of use, independence from gas and electricity, still has its drawbacks. We will not list them all, but according to the thematic feature of our article, one of them is the release of exhaust gases through fittings, cracks, etc., which as a result leads to the deposition of soot on its walls.
and this can get dirty on the stove; the stove also loses its attractive appearance by standing out from the interior of the house. The solution to this problem is to whitewash the stove.
In fact, whitewashing a stove is not such a complicated procedure; it is similar to whitewashing a ceiling. The difference is that it is usually even more convenient to whitewash the stove, but with the peculiarity of applying a thicker layer of whitewash to certain parts of the stove.
The first step is to remove part of the surface layer where most of the soot has settled. If we don’t remove the soot and start whitening, it will begin to show through, and we won’t be able to whitewash this area to its original whiteness. It is best to remove the top layer with a steel wool for washing dishes or a metal brush, but this must be done more carefully with a brush, since it is harsher and its use can lead to deep scratches on the stove.
Next, you need to wet the oven with water. Applying whitewash to a dry oven surface will be difficult, as the whitewash will roll into balls and be poorly absorbed. The oven can be soaked with water in parts, in accordance with the speed of whitewashing and the areas intended for whitewashing. At the same time, try to wash off any remaining soot if possible.
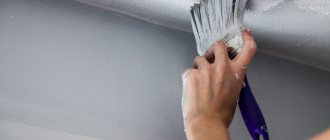
Now you need to inspect the stove and if there are cracks, or the plaster has crumbled somewhere, then it needs to be restored. You can use a brush to apply the putty. Its advantage in use is that it follows complex surface contours, filling in depressions and chips with hair putty. Or use a more traditional putty spatula. For whitewashing and puttying, you can use putty. More detailed information about putty can be found in the article “Shpakryl”.
We dilute the whitewash solution. You can use lime or putty which we mentioned earlier. Putty is diluted 1 part putty to 2 parts water. Stir the whitewash until smooth, so that there are no solid inclusions in the liquid.
Apply whitewash to the damp surface of the stove with a brush or foam sponge. If, after drying, the oven does not turn white (dark spots appear), we whiten these areas again.
We are waiting for the whitewash of the stove to dry. Now the stove has a completely different look.
Source: xn——7kcglddctzgerobebivoffrddel5x.xn--p1ai
Instructions for whitewashing the stove
Before whitewashing the stove, you should decide on the material used. After all, the preparation of the solution and the application process itself depend on this.
To whitewash with lime, you need to follow a few simple steps:
- Carefully remove the old layer of whitewash, especially where there is heavy dirt. To do this, use a wire brush or dishwasher. If whitewashing is carried out for the first time, then first seal all the chips, cracks and seams between the bricks.
- Wet the stove with water. It is better to do this in parts, as the whitewash is applied. If possible, wash off the remaining soot.
- Fill existing cracks and restore chipped plaster.
- Dilute the product with water until smooth and apply it to the oven surface using a brush or sponge. If necessary, apply a second coat. To avoid harmful effects of the material on your hands, you should use rubber gloves.
- Leave the material to dry.
Requirements for putty for the oven
With ordinary putty you can not only plaster the stove to make it smooth, but also serve as a starting point for laying tiles. When choosing a material, you must first look at the temperature regime and know the maximum heating temperature of your own furnace so that there are no cracks as a result of the work. The basis of heat-resistant mixtures are clay, cement, sand, lime and gypsum. In addition, a reinforcing component is also needed, which improves the performance properties of the structure. It can be small straws and fiberglass, sawdust. You should choose natural ingredients and environmentally friendly raw materials.
In a number of countries, asbestos (the reinforcing component) is prohibited, as it is the cause of many diseases, so you cannot buy a mixture that contains the substance.
Return to contents
How to choose?
The choice largely depends on the location of the stove. If it is located outside, then the finishing putty should not contain gypsum (it is susceptible to moisture). You can also make working mixtures yourself. The solution must withstand the following standards:
To prevent the release of toxins when the mixture is heated, you need to choose it without asbestos in the composition.
- Heat.
- The composition must be elastic so that it can be used to easily create a perfectly flat surface.
- Resistance to cracks (so that the oven does not crack due to temperature changes).
- Be environmentally friendly during operation. Do not release toxins when heated. No asbestos in the composition.
- Durability, service life exceeds 50 years.
- High ability for adhesion or adhesion to substrates made of various materials.
Return to contents
Master's secrets: how to properly prepare a stove for whitewashing
A new stove should be plastered or coated with clay before decorative finishing. If the old plaster does not hold up well, is cracked or is falling off, you will have to completely remove it and apply a new layer. For plastering, special heat-resistant mixtures or self-prepared solutions are used. The plastered stove is left to dry for at least two days. After this, the stove is heated three times, but in the first firebox the walls are only allowed to warm up slightly.
If there is no need for new plaster, you can limit yourself to cleaning the surface from soot and removing the old whitewash. It is convenient to remove a layer of lime and soot stains with a steel wool for cleaning dishes or a metal brush. You must work carefully, otherwise gouges and scratches will appear. It is possible not to remove the old whitewash only if it is clean and holds well, and the goal of the repair is to give the hearth a fresh look.
To clean the kitchen stove from greasy stains, use a two percent solution of soda ash. Rust can be removed with a solution of copper sulfate prepared from 100 grams of powder and a liter of boiled water.
Minor cracks formed during operation or after cleaning must be covered with putty. It is recommended to apply the putty not only with a spatula, but also with a brush, carefully eliminating unevenness.
Preparing for work
It is imperative to use a reinforcing component, including chopped straw, sawdust or crushed fiberglass. The primacy of natural ingredients, environmentally friendly. Before starting work, the craftsmen carry out preparatory activities:
- If there is previous plaster on the stove, then it needs to be rubbed off.
- Wash the brick wall (remove dust, dirt).
- Make the joints between the bricks up to 1 cm deep, which improves the adhesion of the mixture to the surface of the object.
- After working with the seams, clean the surface again.
- Covered with a heat-resistant primer mixture.
- The mesh is secured (as needed) with large nails. They are driven directly into the seams.
Return to contents
Professional products
In addition to the usual folk methods of whitewashing a stove, you can use industrial compounds. But first you need to decide on the types of materials and their main purpose. Let's consider several brands.
- "Master". This product is excellent as a whitewash for the stove, but the surface to be treated must first be prepared. Remove dust, clean dirt, seal cracks.
- “BRAVO” is a water-dispersed composition suitable for various types of coatings, including brick and stone walls. Does not rub off or fade with regular friction and exposure to high temperatures.
- "Flamingo". A good universal moisture-resistant composition that is suitable for covering stove structures, rough walls and nearby walls. It has a high degree of plasticity.
Professional whitewash hardens quickly and allows the use of decor on top of it Source haskidom.com
Before whitewashing the stove, all cracks on it must be sealed with putty Source kraski-net.ru
Experts recommend using an expensive, high-quality product once, rather than repainting and updating the surface every year.
Work methods
First approach
If the walls of the stove are uneven, beacons are installed on them.
It is used when there are significant distortions on the surface of the stove (above/below), and it requires strong leveling of the layer from 40 to 90 mm. Leveling beacons are attached. After which the stove is heated until hot. The entire surface is moistened with water using a pre-prepared roller. It will nail the dust particles to the surface. You need to plaster with accentuated movements so that the grout gets well into the seams between the rows of bricks. Leave for some time until the entire surface is completely dry. Then the master applies the next layer, which should end/begin behind the beacons, at 14-16 mm. The solution is applied evenly to all areas until the entire surface is covered. They pass along the damp wall with grout, sanding the working side of the stove. The last layer is smoothing.
Craftsmen often find it difficult to create clear angles. The best solution to this problem is to apply and level the mixture using an angle trowel.
Return to contents
Second method
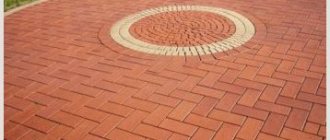
It assumes the presence of a metal mesh, which is also called chain-link, which prevents peeling and crumbling of the plaster and provides reliability. It is used to level the wall, moving it up to 30 mm at the necessary points. Putty the surface in 2-3 layers until the chain-link is completely covered. The first layer of the mixture should completely seep through the mesh and adhere securely to the wall. After drying, leveling layers of solution are applied. After leveling and drying, small cracks may appear, which are carefully rubbed down. The final stage is the application of a decorative coating, possibly made of brick.
Return to contents
Source: EtoKirpichi.ru
What to whiten?
In stores you can find modern compositions for whitewashing stoves; they are made by different manufacturers, but they go under one name - putty. Before use, such a purchased composition must be diluted with water in a ratio of 1 to 2.
After treating the stove with it, its walls will have a well-groomed appearance for a long time and will not fade. Among the popular manufacturers, it is worth highlighting those whose products come at an affordable price and with a high quality composition.
| Brand | Volume, kg | Description | Price, in rubles |
| Master | 1 | For this product, you need to prepare the surface of the oven so that it is dry and dust-free. They can be used to repair small cracks and whitewash walls, ceilings and stoves. | 30 |
| Nova | 0,8 | Can be used on plastered, wooden and concrete surfaces. | 21 |
| BRAVO | 16 | The water-dispersive composition of the product is used for painting rooms and preparing walls for wallpaper. | 960 |
| Diola-006 | 4 | In its pure form it is used for sealing cracks, places after removing nails and screws, and restoring chips. After dilution with water, it is used as paint. | 115 |
| Flamingo | 5 | Its moisture-resistant composition can be used for any premises; it is characterized by high plasticity. | 110 |
The best way to whitewash the stove in the house is up to everyone to decide for themselves; you can choose the appropriate one from the given means.
Why whitewash a stove: aesthetics or functionality?
For a long time, when stoves first appeared and continued to be used, it was customary to whitewash them. Why was this needed:
- the room acquired an attractive, cozy appearance;
- the structure was complete and reliable (no cracks appeared on it);
- it was easy to notice the leakage of combustion products and correct it;
- Whitewash played a disinfecting role (preventing the development of fungus and mold).
Nothing has changed now. Russian stoves are lined in a similar way, whether in a country house or in a private village house.
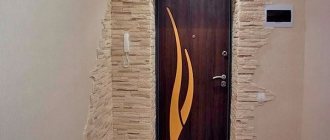
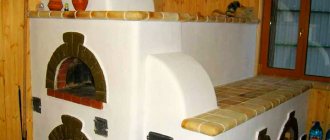
Beautiful Russian stove with a modern version of whitewash and stone finishing Source mrrestavrator.ru
Standard whitewashing of a Russian stove in a house Source www.kamin-best.ru
How to prepare whitewash yourself?
There are three common methods for preparing a solution for whitewashing a stove, each of which has been used for decades.
Mortar
Whitewashing a stove with lime has been known for a long time; if you dilute 1 liter of the mixture from it, it is enough for 2 m2. The preparation of such a composition is as follows: take 40 grams of salt and dissolve it in water, then add 1 kg of lime to it.
Salt acts as a fixative; after applying such whitewash, the oven must be heated so that a smooth transparent layer forms on its surface. It is better to dilute this product with low-fat milk instead of water.
Chalk based whitewash
The chalk should be prepared: finely crush and sift, you need to take about 1 kg of this component, then pour 2 liters of milk and 50 ml of blue into it.
Some people neglect such scrupulous preparation and end up with a solution with various inclusions; after application to the oven, under constant exposure to high temperatures it begins to change color from white to yellow.
It is the blue that prevents such a transformation of the color of the stove. The prepared milk-chalk mixture must be used immediately so that it does not harden.
Tooth powder solution
This unusual product will give the stove a pure white tint and keep it for a long time. To prepare the composition, you need to take 2 boxes of tooth powder, half a glass of milk, 2 eggs. Any dairy product can be used, boiled or unboiled.
Only the whites are taken from the eggs, which are mixed with milk and powder; after standing for 10 minutes, the mixture can be used. Its consistency should resemble paint. After staining, the oven can be used the same day, but you should note that the smell of tooth powder will disturb you during the day.
Formulation options
There are many ways to whitewash a stove without damaging your pocket. They are all very simple to prepare. Let's start with the most budget formulations that have been tested by time.
Mortar
This composition is inexpensive and can be found in hardware and construction stores. Plays the role of an antiseptic and a high-quality snow-white coating. To prepare it and use it for a long time, you need to dilute 1 kg of lime with 2 liters of water, in which 40 g of salt have previously been dissolved. The solution should be thoroughly mixed and then applied to the surface of the oven without delay.
Lime mixture for whitewashing with good durability qualities Source mrrestavrator.ru
How to whitewash a stove with your own hands?
First, you need to conduct a visual inspection of the stove; if there are deep cracks and chips on it, then they must first be covered in the old fashioned way with clay or specially purchased putty. It will not be possible to beautifully whitewash the stove without preparatory work; you need to carefully eliminate all defects so that your efforts do not go in vain.
Tools for work
Before whitewashing the stove, you should clean its surface with a broom or brush; for old exhibits, you can use a metal brush, but the main thing is not to damage the plastered surface with it. Then you need to determine the method of applying whitewash, for this you can use:
- A brush is chosen by those who have painted any surface more than once and are confident that they will do everything smoothly and without streaks. Before painting, it is advisable to soak the brush in water so that no hairs remain on the surface of the stove during whitewashing.
- A sponge is an alternative method; it does not give a clearly even color; it is used only for small stoves, since it will take a lot of time to obtain the desired painting density.
- Roller - suitable for both beginners and professionals; it covers a larger area with one stroke than with a regular brush. Applying the selected composition with a roller is very simple; the main thing is to move along the surface in the direction of the window to create uniform stripes.
- Spray gun - it is used for large stoves. It is easier to handle with two people: one person will maintain the required pressure in the device, and the second will monitor the uniform application of the composition filled into it. Before using it, you need to check the spray gun, and then constantly hold the spray gun at a right angle to the oven wall, while maintaining an optimal distance of 30 cm from it.
Whitening technology
- Initially, all seams, chips and cracks are sealed using a spatula and putty; the latter can be replaced with putty, using it in its original form, before diluting with water.
- After all the surfaces of the oven are smooth and without visible defects, you can proceed to preparing whitewash for them using putty, lime, chalk or tooth powder.
- The preparation of any of these compositions is carried out according to the recipe; the components are taken strictly in the specified quantities to obtain a mixture that is resistant to heating and cracking. It should be homogeneous and without lumps; its optimal consistency is liquid sour cream.
- The walls of the oven should be slightly moistened before whitewashing, but if a composition of tooth powder is used, they need to be warmed up. Then the selected whitewash option is applied to all surfaces.
- When using a spray gun, painting is carried out as conveniently as possible, but in the case of a brush or roller, a certain technology for applying strokes must be followed: first they are made vertically, and after the first layer has dried, they are duplicated by horizontal stripes. This method of applying whitewash can achieve its most uniform distribution and avoid gaps and yellow spots. If, however, they appear somewhere, then the whitewashing should be repeated, but after the oven has completely dried.
DIY artistic painting
Stove with artistic painting
If desired, the stove can be decorated with a design. Folk motifs will add individuality to your home. Artistic painting is easy to do. Coloring composition:
- Dilute multi-colored gouache with water.
- Add 1-2 raw egg yolks to the mixture.
- Stir well until smooth.
- Use as directed within 12 hours.
The design can be applied with a painting brush or with a sponge. The use of stencils is permitted. Painting depends on personal imagination. For beginners, it is better to use simple patterns.
In addition to the egg coloring mixture, the remaining whitewash is used - gouache is added to the solution. High temperature oil paint can be used.
It is best to carry out all furnace work before the onset of autumn. Cast iron parts (oven, doors) are best treated with fire-retardant or silicon-organic enamels. This will protect them from corrosion.